Java基础:【第四章】IO流 + 反射机制 + 注解
一、IO流
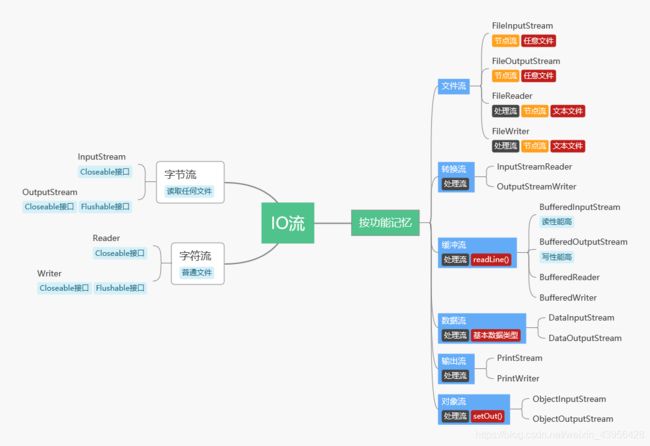
1. IO流的分类
重点掌握:
-
文件流:FileInputStream、FileOutputStream【文件拷贝】
-
输出流:PrintStream 【日志】
-
对象流:ObjectInputStream、ObjectOutputStream
读取 和 写入
- InputStream、Reader:从硬盘到内存,读取。
- OutputStream、Writer:从内存到硬盘,写出。
- 将自己当作内存,从外读取,从内写出。
节点流 和 处理流(包装流)
- 节点流 直接与数据源相连,用于输入或者输出
- 处理流:在节点流的基础上对之进行加工,进行一些功能的扩展
- 处理流的构造器必须要 传入节点流的子类
2. 文件流
FileInputStream:
int available() : 返回总剩余字节数
long skip(long n) : 跳过并丢弃n个字节数据
int read() : 返回读取到字节的int类型值,(范围0-255)若读取不到数据,返回-1。
int read(byte[] b) : 返回读取到字节的数量,若读取不到数据,返回-1。一次最多读取 b.length 字节。
String(byte[] bytes) : 将byte类型的数组bytes转换成字符串输出
String(byte[] bytes, int offset, int length) : 将byte类型的数组bytes按照指定起始位置转换成字符串输出。
 public class FileInputStreamTest{
    public static void main(String[] args){
        FileInputStream fis = null;
        try{
            //打开字节输入流
            fis = new FileInputStream("文件的绝对路径");

            //文件的总字节数量
            System.out.println("文件的总字节数量:" + fis.available());

            //创建一个临时byte数组,容量为4,一次读取4个字节
            byte bytes = new byte[4];
            //读取数据
            int readCount = 0;
            while((readCount = fis.read(bytes)) != -1){
                String str = new String(bytes,0,readCount);
                System.out.print(str);
            }

         //捕获异常
        }catch(FileNotFoundException e){
            e.printStackTrack();
        }catch(IOException e){
            e.printStackTrack();
        }finally{

            //关闭流
            if(fis != null){
                try{
                    fis.close();
                }catch(IOException e){
                    e.printStackTrace();
                }
            }
        }

    }
}
FileOutputStream:
public class FileOutputStream{
    public static void main(String[] args){
        FileOutputStream fos = null;
        try{
            //开启写入,在文件后追加写入append:true
            fos = new FileOutputStream("保存文件的绝对路径",true);

            //写入的内容
            byte[] bytes = {97,98,99,100};

            //将指定字节传入数据源
            fos.write(bytes);

            //写入完要刷新
            fos.flush();
        }catch(FileNotFoundException e){
            e.printStackTrace();
        }catch(IOException e){
            e.printStackTrace();
        }finally{
            //写完之后要关闭流
           if(fos != null){
               try{
                    fos.close();
                }catch(IOException e){
                    e.printStackTrace();
             	}
           }

        }

    }
}
文件的拷贝
public class CopyFile{
    public static void main(String[] args){
        FileInputStream fis = null;
        FileOutputStream fos = null;
        try{
            //开启文件输入流
            fis = new FileInputStream("读取文件的绝对路径");
            //开启文件输出流
            fos = new FileOutputStream("文件保存的绝对路径");

            //一边读取,一边写入
            byte[] bytes = new byte[1024 * 1024];//设置每次读取的容量:1MB

            //读取数据
            int readCount = 0;
            while(( readCount = fis.read(bytes)) != -1){
                //写入数据:读到哪,写到哪
                fos.write(bytes,0,readCount);
            }

            //文件输出流刷新
            fos.flush();
        }catch(FileNotFoundException e){
            e.printStrackTrack();
        }catch(IOException e){
            e.printStrackTrack();
        }finally{
            //关闭输入流
            if(fis != null){
                try{
                    fis.close();
                }catch(IOException e){
                    e.printStackTrack();
                }
            }
            //关闭输出流
            if( fos != null){
                try{
                    fos.close();
                }catch(IOException e){
                    e.printStackTrack();
                }
            }
        }

    }
}
字符流:Reader 和 Writer
-
节点流
-
只要将byte[] 换成 char[],框架一样
转换流:InputStreamReader 和 OutputStreamWriter
- 处理流
- InputStreamReader: InputStream --> Reader
- OutputStreamWriter: OutputStream --> Writer
- 能指定字符编码
缓冲流:
-
处理流
-
自带缓冲,不需要写自定义byte[]数组,或者char[]数组,适用于大量数据读写操作
-
传入Reader或者Writer
-
可以使用readLine()方法
数据流: DataInputStream 、 DataOutputStream
-
处理流
-
把数据和数据类型一起按顺序写入文件当中
输出流:PrintStream 和 PrintWriter
-
PrintWriter 可以打印各种数据类型
-
可以改变输出方向,setOut( printWriter,printStream ) : 重定向
3. 输出流
可以控制输出方向,默认向控制台输出。
System.setOut(out);//向自定义路径文件输出
日志工具类
import java.util.Date;

public class Logger{
  public static void log(String msg){
      PrintStream out = null;
      try{
       //输出流
       out = new PrintStream(new FileOutputStream("保存文件的绝对路径",true));

        //设置输出方向,默认向控制台输出,改为向日志的绝对路径输出
      	System.setOut(out);

      	//日期时间
        Data nowTime = new Data();
        SimpleDataFormat sdf = new SimpleDataFormat("yyyy-MM-dd HH:mm:ss SSS");
        String strTime = sdf.format(nowTime);

        //输出当前时间
        System.out.println(strTime + msg);

      }catch(FileNotFoundException e){
          e.printStackTrace();
      }catch(IOException e){
          e.printStackTrace();
      	}finally{
          //关闭输出流
          if( out != null){
          	try{
                out.close();
            }catch(IOException e){
                e.printStackTrace();
            }
         }
      }

  }
}
4. 对象流
-
序列化 和 反序列化
序列化: 将对象以二进制的形式保存在硬盘上 ,叫序列化。
反序列化: 将二进制的文件转化为对象读取 ,叫做反序列化。
-
序列化步骤:ObjectOutputStream
- 创建序列化对象s,并且对象implements Serializable接口
- 创建序列化oos,传入节点流FileOutputStream,设置文件的保存路径
- 序列化调用oos.writeObject(s)
- 因为是输出流,需要刷新,oos.flush()
- 因为是流,需要关闭,oos.close()
注:Serializable接口,作用起到标识的作用,表明该类支持序列化。JVM会默认为该类生成序列化版本号 serialVersionUID 。
序列化版本号的作用:区分类
区分类:一看类名,二看序列化版本号,两者相同,表明是同一个类
【新】流里的序列化版本号与【旧】本地序列化版本号相同,表明是同一个类,才能序列化。
【新】流里的序列化版本号与【旧】本地序列化版本号不同,表明不是同一个类,不能序列化,会出现运行时异常InvalidClassException。
自动生成的序列化版本号的缺点:
一旦代码确定,不能进行修改。如果修改,后续编译,会生成新的类,这样就不是同一个类了。所以如果一个类实现了Serializable接口,提供一个不变的序列化版本号。
private static final long serialVersionUID = -12315456465123L; -
反序列化步骤:ObjectInputStream
- 创建反序列化ois,传入节点流FileInputStream,设置文件的读取路径
- 反序列化ois.readObject(),返回一个对象
- 关闭反序列化流ois.close()
5. 文件夹
File类的常用方法:
| new File(“路径名”) | 构造方法 |
|---|---|
| f.exists() | 判断文件是否存在 |
| f.createNewFile() | 创建文本文件 |
| f.mkdir() | 创建文件夹 |
| f.mkdirs() | 创建多重文件夹 |
| f.getParent() | 获取文件父路径,返回String类型 |
| f.getAbsolutePath() | 获取文件绝对路径 |
| … | … |
如何使用IO流读取文件
    File file = new File("d:/spring.txt");
    try {
        Reader reader = new FileReader(file);
        BufferedReader buffered = new BufferedReader(reader);
        String data = null;

        while((data = buffered.readLine())!=null){
        System.out.println(data);
        }
    } catch (FileNotFoundException e) {
        e.printStackTrace();
    } catch (IOException e) {
        e.printStackTrace();
    }
递归读取文件夹文件
package test;
import java.io.File;

/**
 *
 * 递归读取文件夹的文件
 */
public class ListFileDemo {
    public static void listFile(String path) {
        if (path == null) {
            return;// 因为下面的new File如果path为空,回报异常
        }
        File[] files = new File(path).listFiles();
        if (files == null) {
            return;
        }
        for(File file : files) {
            if (file.isFile()) {
                System.out.println(file.getName());
            } else if (file.isDirectory()) {
                System.out.println("Directory:"+file.getName());
                listFile(file.getPath());
            } else {
                System.out.println("Error");
            }
        }
    }

    public static void main(String[] args) {
        ListFileDemo.listFile("D:\\data");

    }
}
6. IO流的面试总结
https://blog.csdn.net/baidu_37107022/article/details/76890019
二、反射机制
1. 反射机制的定义和原理
- 一种间接操作目标对象的机制
- 原理是JVM运行期在加载.class文件时,除了会在堆内存中生成该类的对象,还会动态创建Class对象,每个类只有一个Class对象,并通过Class对象反向编译其属性和方法
2. 反射机制的优缺点
-
优点:
可以让程序更加灵活,符合OCP原则。
通过反射机制,创建的对象,可以通过修改配置文件,创建不同的实例对象。 -
缺点:
反射会消耗一定的系统资源。
反射调用方法时可以忽略权限检查,因此可能会破坏封装性而导致安全问题
3. 反射机制的应用
- 反编译:.class --> .java
- 通过反射机制访问java对象的属性,方法,构造方法等
- 开发各种通用框架,比如很多框架(Spring)都是配置化的(比如通过XML文件配置Bean)。为了保证框架的通用性 ,他们可能需要根据配置文件加载不同的类或者对象,调用不同的方法,这个时候就必须使用到反射了,运行时动态加载需要的加载的对象。
4. 反射机制常用的类
java.lang.Class: 代表整个字节码,代表一个类型,代表整个类
java.lang.reflect.Field: 代表字节码中的属性字节码。代表类中的成员变量(静态变量)
java.lang.reflect.Constructor:代表字节码中的构造方法字节码。代表类中的构造方法
java.lang.reflect.Method: 代表字节码中的方法字节码。代表类中的方法
java.lang.reflect.Modifier :返回int类型的修饰关键字标号
5. 反射机制的应用
-
获取Class的三个主要方法
-
引用对象.getClass() : 缺点:先要创建对象
-
类名.class : 每个类都有class属性。缺点:需要导入包,否则抛编译错误。
-
Class.forName() 【推荐】:可以在配置文件修改参数
注:在JVM运行阶段,对一个类,只会动态生成一个Class对象。
以下stu1、stu2、stu3是同一个Class对象
public class ReflectTest{ public static void main(String[] args){ //引用对象.getClass() Student s = new Student(); Class stu1 = s.getClass(); //类名.class Class stu2 = Student.class; //Class.forName() try{ Class stu3 = Class.forName("reflect.Student");//包名.类名 }catch(FileNotFound e){ e.printStackTrace(); } } } -
-
反射应用:
- 通过反射创建对象
- 获取对象所有/单个属性,修改其中的一个属性值
- 获取对象的所有/单个方法,并调用
- 反射main方法
具体实现:【IO流 + Properties + 反射机制】
-
加载配置文件,并获取value值:
- 通过线程获取配置文件,传入输入流,再加载进Properties集合中,并通过getProperties()获取value值
-
创建对象:获取对象,并实例化对象
- 通过Class.forName()获取对象,通过有无参数构造方法实例化对象。
-
获取对象的所有声明属性 : getDeclaredFields()
- getFields() : 获取public修饰的字段,无法获取私有、受保护、默认的属性
-
获取某个属性,并修改属性值
- getDeclaredField(): 获取单个属性
- setAccessible(true):暴力访问
- set(对象,值) :修改
-
获取对象的单个方法,并调用
- 通过method.invoke(),传入反射的对象,和参数列表。调用对象的方法
- 反射main方法:invoke(null,(Object)new String[]{“a”,“b”,“c”})
- null: 因为main是static修饰的方法,null符合
- (Object)new String[]{“a”,“b”,“c”}: 因为JDK1.5之后String[]从数组变成了可变数组,所以要将String对象拆分成3个对象,所以要强制转换。
public class ReflectObject{ public static void main(String[] args){ try{ //*--------------------------------------------- //1.加载配置文件,并获取value值 //先打开文件输入流,将配置文件传入流 //InputStream path = new InputStream("D:\\src\\test.properties"); //改进,使用线程获取配置文件,不用再new对象。注意点:读取的是src包下的文件 InputStream path = Thread.currentThread().getcontextClassLoader().getResourceAsStream("test.properties"); //创建Properties类,存放配置文件。注意:Properties传入的流是Reader、InputStream Properties pt = new Properties(); //再将配置文件加载到Properties类中 pt.load(path); //通过key读取value值 String className = pt.getProperties("className"); //*--------------------------------------------- //2.创建对象:获取对象,并实例化对象 //获取class对象 Class c = Class.forName(className); //方法一: 通过无参数构造方法创建对象 //1.通过newInstance()方法,创建对象 Objcet o1 = c.newInstance();//调用指定类的无参数构造方法,若该类中没有无参数构造方法抛出异常 //2.通过构造器,创建对象,再修改字段的值 Object o2 = c.getConstructor().newInstance(); //方法二: 通过有参数构造方法创建对象//对象中的属性.class Object o3 = c.getConstructor(String.class).newInstance("xxx"); //*--------------------------------------------- //3.获取对象的所有声明属性 Field[] fields = o1.getDeclaredFields(); for(Field f : fields){ int i = f.getModifer(); System.out.print("修饰符列表:" + Modifer.toString(i) + "返回类型:" + f.getType() + "属性名:" + f.getName() ); } //*--------------------------------------------- //4.获取某个属性,并修改属性值 Field f = c.getDeclaredField("money"); //money是private修饰的属性,暴力访问 f.setAccessible(true); //传入要修改的对象,修改值 f.set(o1,555); //*--------------------------------------------- //5.获取某个方法,指定方法名+参数列表的类型.class(只能放在类名后) Method method = c.getDeclaredMethod("login",String.class,String.class); //通过invoke(),传入反射的对象,和参数列表。调用对象的方法 Object res = method.invoke(o1,"admin","123456"); System.out.println(res); }catch(FileNotFoundException e){ e.printStackTrace(); }finally{ //关闭流 if(path != null){ try{ path.close(); }catch(IOException e){ e.printStackTrace(); } } } } }Class.forName("带包名的完整的类名");//写配置文件className=包名.类名 重点: 如果只想要静态方法执行,可以使用 Class.forName("带包名的完整的类名"); 执行该方法:再类加载时,静态方法块执行。
参考链接:
https://blog.csdn.net/a745233700/article/details/82893076?utm_medium=distribute.pc_relevant.none-task-blog-BlogCommendFromMachineLearnPai2-3.nonecase&depth_1-utm_source=distribute.pc_relevant.none-task-blog-BlogCommendFromMachineLearnPai2-3.nonecase
https://blog.csdn.net/sinat_38259539/article/details/71799078
三、注解
-
介绍
Annotation注解,是java5.0引入的注解机制,与class和interface一样,注解也是一种类型。
-
注解的定义:比interface前多了一个 @
public @interface Test{ } -
注解作用
-
java的类、属性、方法等都可以使用注解,相当于标签
-
提供信息给编译器: 编译器可以利用注解来探测错误和警告信息
-
编译时的处理: 软件工具可以用来利用注解信息来生成代码、Html文档或者做其它相应处理。
-
运行时的处理: 可以在程序运行的时候通过反射机制提取注解
值得注意的是,注解不是代码本身的一部分, 注解对于代码的运行效果没有直接影响。
-
-
元注解 :作用在其他注解上的注解
元注解:@Target、@Retention、@Doumented、@Inherited、@Repeatable
-
@Target() : 目标注解,指定注解运用的场景
- ElementType.ANNOTATION_TYPE 可以给一个注解进行注解
- ElementType.CONSTRUCTOR 可以给构造方法进行注解
- ElementType.FIELD 可以给属性进行注解
- ElementType.LOCAL_VARIABLE 可以给局部变量进行注解
- ElementType.METHOD 可以给方法进行注解
- ElementType.PACKAGE 可以给一个包进行注解
- ElementType.PARAMETER 可以给一个方法内的参数进行注解
- ElementType.TYPE 可以给一个类型进行注解,比如类、接口、枚举
-
@Retention() : 保留注解,表明注解保留的时间
- RetentionPolicy.SOURCE 注解只保留在源码阶段,在编译器进行编译时它将被丢弃忽视。
- RetentionPolicy.CLASS 注解只被保留到编译阶段,它并不会被加载到 JVM 中。
- RetentionPolicy.RUNTIME 注解可以保留到运行阶段,它会被加载进入到 JVM 中,所以在程序运行时可以获取到它们。
-
@Documented : 文档注解,将注解的内容送到javadoc中
-
@Inherited :继承注解
-
@Repeatable:可重复注解
@interface Persons {
    Person[]  value();
}

@Repeatable(Persons.class)
@interface Person{
    String role default "";
}

@Person(role="artist")
@Person(role="coder")
@Person(role="PM")
public class SuperMan{
}
其他常用注解:
@Override - 子类要重写父类@Override修饰的方法@Deprecated - 标记过时方法。如果使用该方法,会报编译警告。
@SuppressWarnings - 告诉编译器禁止特定警告。在与泛型出现之前编写的遗留代码接口时最常用的
@FunctionalInterface - 在Java 8中引入,表明类型声明是一个功能接口,可以使用Lambda Expression提供其实现 -
-
注解的属性
-
注解的属性叫做成员变量。注解中只有属性,没有方法。
@Target(ElementType.TYPE) @Retention(RetentionPolicy.RUNTIME) public @interface TestAnnotation { int id(); String msg(); } -
赋值的方式是在注解的括号内以 value=” ” 形式,多个属性之前用 ,隔开。
@TestAnnotation(id=3,msg="hello annotation")
public class Test {}
需要注意的是,在注解中定义属性时它的类型必须是 8 种基本数据类型外加 类、接口、注解及它们的数组。
注解中属性可以有默认值,默认值需要用 default 关键值指定。比如:
@Target(ElementType.TYPE)
@Retention(RetentionPolicy.RUNTIME)
public @interface TestAnnotation {
    public int id() default -1;
    public String msg() default "Hi";
}
TestAnnotation 中 id 属性默认值为 -1,msg 属性默认值为 Hi。
它可以这样应用。@TestAnnotation()public class Test {}因为有默认值,所以无需要再在 @TestAnnotation 后面的括号里面进行赋值了,这一步可以省略。
另外,还有一种情况。如果一个注解内仅仅只有一个名字为 value 的属性时,应用这个注解时可以直接接属性值填写到括号内。
public @interface Check {
    String value();
}
上面代码中,Check 这个注解只有 value 这个属性。所以可以这样应用。
@Check("hi")
int a;
这和下面的效果是一样的
@Check(value="hi")
int a;
最后,还需要注意的一种情况是一个注解没有任何属性。比如
public @interface Perform {}那么在应用这个注解的时候,括号都可以省略。
@Performpublic void testMethod(){}
-
-
注解通过反射提取
-
通过Class对象的isAnnotationPresent()判断它是否使用了注解
-
通过getAnnotation()或者getAnnotations()方法,获取单个注解或者所有注解对象
-
如果获取到的 Annotation 如果不为 null,则可以通过注解对象调用它们的属性方法了。
@TestAnnotation() public class Test { public static void main(String[] args) { boolean hasAnnotation = Test.class.isAnnotationPresent(TestAnnotation.class); if ( hasAnnotation ) { TestAnnotation testAnnotation = Test.class.getAnnotation(TestAnnotation.class); System.out.println("id:"+testAnnotation.id()); System.out.println("msg:"+testAnnotation.msg()); } } }@TestAnnotation(msg="hello") public class Test { @Check(value="hi") int a; @Perform public void testMethod(){} @SuppressWarnings("deprecation") public void test1(){ Hero hero = new Hero(); hero.say(); hero.speak(); } public static void main(String[] args) { boolean hasAnnotation = Test.class.isAnnotationPresent(TestAnnotation.class); if ( hasAnnotation ) { TestAnnotation testAnnotation = Test.class.getAnnotation(TestAnnotation.class); //获取类的注解 System.out.println("id:"+testAnnotation.id()); System.out.println("msg:"+testAnnotation.msg()); } try { Field a = Test.class.getDeclaredField("a"); a.setAccessible(true); //获取一个成员变量上的注解 Check check = a.getAnnotation(Check.class); if ( check != null ) { System.out.println("check value:"+check.value()); } Method testMethod = Test.class.getDeclaredMethod("testMethod"); if ( testMethod != null ) { // 获取方法中的注解 Annotation[] ans = testMethod.getAnnotations(); for( int i = 0;i < ans.length;i++) { System.out.println("method testMethod annotation:" + ans[i].annotationType().getSimpleName()); } } } catch (NoSuchFieldException e) { // TODO Auto-generated catch block e.printStackTrace(); System.out.println(e.getMessage()); } catch (SecurityException e) { // TODO Auto-generated catch block e.printStackTrace(); System.out.println(e.getMessage()); } catch (NoSuchMethodException e) { // TODO Auto-generated catch block e.printStackTrace(); System.out.println(e.getMessage()); } } } -
-
总结
- 如果注解相当于标签,注解为了解释代码。
- 注解的基本语法,创建如同接口,但是多了个 @ 符号。
- 注解的元注解。
- 注解的属性。
- 注解主要给编译器及工具软件用的。
- 注解的提取需要借助于 Java 的反射机制,反射比较慢,所以注解使用时也需要谨慎计较时间成本。
参考链接: https://blog.csdn.net/qq1404510094/article/details/80577555