【vuejs】用vue写一个自己的博客管理系统(二):基础布局
安装并使用element-ui,
vue add element  //vue-cli3.x安装方式

npm install element-ui --save   //vue-cli2.x的安装方式
在根目录新建一个layouts文件夹,这里是放所有基础layout文件的地方。先新建 BasicLayout.vue。
这个文件,相当于最基础的布局文件
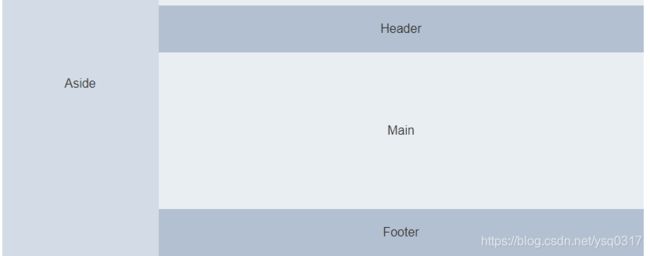
比如要做一个类似这样的页面。
然后再分别新建side.vue(左边导航栏) header.vue(顶部导航) footer.vue(底部导航栏)
左边导航菜单 Side.vue
element-ui里面,有导航菜单的组件。有顶部和侧边两种选择,我个人喜欢用侧边导航。所以,在之前新建的side.vue里,找到文档里面的代码,先直接复制进去。
找到自己的router.js路由文件。写好自己的路由。
import Vue from 'vue'
import Router from 'vue-router'
import NProgress from 'nprogress';
import 'nprogress/nprogress.css'
Vue.use(Router)

const router = new Router({
	mode: "history",
	routes: [
		{
			path: '/user',
			name: '/user',
			meta: {
				title: "用户"
			},
			hideMenu: true,
			component: () => import('./layouts/UserLayout.vue'),
			children: [{
				path: '/admin/login',
				name: 'login',
				component: () => import( './views/User/Login.vue')
			}, {
				path: '/admin/reg',
				name: 'reg',
				component: () => import('./views/User/Login.vue')
			}]
		}, {
			path: '/',
			name: '/dashboard',
			hideMenu: false,
			component: () => import('./layouts/BasicLayout.vue'),
			children: [
				{
					path: "/",
					redirect: "/dashboard/analysis"
				},
				{
					path: "/dashboard/analysis",
					name: "analysis",
					meta: { title: "仪表盘", icon: 'el-icon-s-home' },
					component: () =>
						import("./views/Admin/Dashboard/Analysis.vue")
				},
				{
					path: "/dashboard/articles",
					name: "articles",
					meta: { title: "文章管理", icon: 'el-icon-menu' },
					component: { render: h => h("router-view") },
					children: [{
						path: "/dashboard/articles/edit",
						name: "edit",
						meta: { title: "新建文章", },
						component: () =>
							import("./views/Admin/Dashboard/articles/edit.vue")
					}, {
						path: "/dashboard/articles/list",
						name: "list",
						meta: { title: "文章列表", },
						component: () =>
							import( "./views/Admin/Dashboard/articles/list.vue")
					}, {
						path: "/dashboard/articles/catalogs",
						name: "catalogs",
						meta: { title: "分类管理", },
						component: () =>
							import("./views/Admin/Dashboard/articles/catalogs.vue")
					}]
				}, {
					path: "/dashboard/system",
					name: "system",
					meta: { title: "系统管理", icon: 'el-icon-setting' },
					component: { render: h => h("router-view") },
					children: [{
						path: "/dashboard/system/center",
						name: "center",
						meta: { title: "个人中心", },
						component: () =>
							import("./views/Admin/Dashboard/system/center.vue")
					},{
						path: "/dashboard/system/setting",
						name: "setting",
						meta: { title: "系统设置", },
						component: () =>
							import( "./views/Admin/Dashboard/system/setting.vue")
					}]
				}
			]
		}
	]
})
router.beforeEach((to, from, next) => {
	NProgress.start();
	next();
})
router.afterEach(() => {
	NProgress.done()
})
export default router;
我们侧边栏里面的导航,就是根据router.js来的。
有好几种实现的方式,我是参考了一下大神的实现,然后改了一下代码。
<el-menu :default-active="defaultActive" unique-opened v-for="(item,index) in menuData"  background-color="#545c64" text-color="#fff" active-text-color="#ffd04b" >
  <template v-for="(item,index) in item.children">
    <el-submenu :index="index+1+''" v-if="item.children">
        <template slot="title">
          <i :class="item.meta.icon">i>
          <span slot="title">{{item.meta.title}}span>
        template>
        <el-menu-item-group v-for="(item,itemIndex) in item.children" :key="itemIndex">
          <el-menu-item @click="() => $router.push({ path: item.path, query: $route.query })" :index="index+'-'+(itemIndex+1)">{{item.meta.title}}el-menu-item>
        el-menu-item-group>
    el-submenu>
    <el-menu-item v-else @click="() => $router.push({ path: item.path, query: $route.query })">
        <i :class="item.meta.icon">i>
        <span slot="title" >{{item.meta.title}}span>
    el-menu-item>
  template>
el-menu>
这里面,循环menudata里面的数据就可以了。menuData里面的数据,就是递归router里面的元数据得到的。
const menuData = this.getMenuData(this.$router.options.routes);

getMenuData(routes = []) {
      const menuData = [];
      for (let item of routes) {//循环所有路由
        if (item.name && !item.hideMenu) {//如果路由有name,且hideMenu为false,就进行下一步
          const newItem = { ...item };
          delete newItem.children;
          if (item.children) {
            newItem.children = this.getMenuData(item.children);
          } else {
            this.getMenuData(
              item.children
            );
          }
          menuData.push(newItem);
        } else if (
          !item.hideMenu &&
          item.children
        ) {
          menuData.push(
            ...this.getMenuData(item.children)
          );
        }
      }
      return menuData;
    }
this.$router.options.routes 就是得到当前的所有路由数据
顶部菜单 Header.vue 和底部菜单 Footer.vue
顶部菜单其实没有什么可写的。比如我就写了一个下拉菜单,下栏菜单跳转两个页面
底部菜单同样。
BasicLayout.vue 最后的基础vue
<template>
  <el-container class="container">
    <my-side>my-side>
    <el-container>
      <my-header>my-header>
      <el-main class="mainContainer">
        <div class="headBread">

          <el-breadcrumb class="app-breadcrumb" separator-class="el-icon-arrow-right">
            <el-breadcrumb-item v-for="(item)  in levelList" :key="item.path" v-if="item.meta.title">
              <router-link :to="item.redirect||item.path">{{item.meta.title}}router-link>
            el-breadcrumb-item>
          el-breadcrumb>
        div>
        <router-view class="mainBox">
        router-view>
      el-main>
      <el-footer>Footerel-footer>
    el-container>
  el-container>
template>
<script>
import myHeader from "@/layouts/Head.vue";
import mySide from "@/layouts/Side.vue";
export default {
  components: {
    myHeader,
    mySide
  },
  data() {
    return {
      levelList: null
    };
  },
  watch: {
    $route(to, from) {
      this.loadBread();
    }
  },
  created() {
    this.loadBread();
  },
  methods: {
  //得到面包屑
    loadBread() {
      let matched = this.$route.matched.filter(item => item.name);
      const first = matched[0]; //第一个路由
      // console.log(first);
      if (first && first.name !== "首页") {
        matched = [{ path: "/home", meta: { title: "首页" } }].concat(matched);
      }

      this.levelList = matched;
    }
  }
};
script>
<style>
.aside {
  background: #545c64;
}
.dashboard {
  height: 100%;
}
.container {
  height: 100%;
}

.el-menu-vertical-demo:not(.el-menu--collapse) {
  width: 250px;
}
::-webkit-scrollbar {
  width: 0;
  height: 0;
  background: transparent;
}
.mainContainer {
  width: 100%;
  height: 100%;
  background: #f8f8f8;
}
.bc {
  width: 100%;
  height: 50px;
  line-height: 50px;
}
.mainBox {
  width: 100%;
  height: calc(100% - 50px);
}
.headBread {
  height: 40px;
}
.el-breadcrumb{
  position: relative;
  top: 50%;
  transform: translateY(-50%)
}
style>