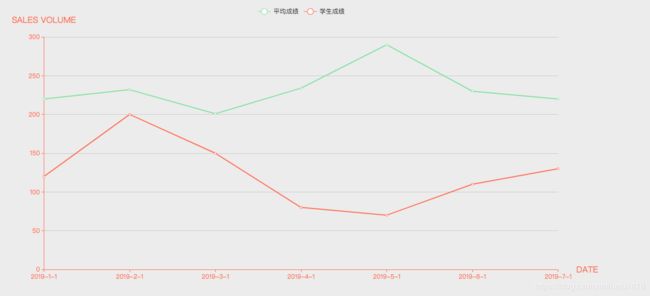
vue中使用echarts绘制折线图
1. 安装:npm install echarts --save
==>> 其他方式请参考:https://www.echartsjs.com/tutorial.html#5%20%E5%88%86%E9%92%9F%E4%B8%8A%E6%89%8B%20ECharts
2. 页面中使用
2.1 引入: import echarts from 'echarts'
2.2 定义具备高宽的 DOM 容器。
2.3 echarts.init 方法初始化一个 echarts 实例并通过 setOption 方法生成一个简单的折线图
注意:这里只是在mounted中生成,实际项目中会在通过接口获取数据后生成图表
mounted(){
        this.chartLine = echarts.init(document.getElementById('chartLineBox'));

        // 指定图表的配置项和数据
        var option = {
            tooltip: {              //设置tip提示
                trigger: 'axis'
            },

            legend: {               //设置区分(哪条线属于什么)
                data:['平均成绩','学生成绩']
            },
            color: ['#8AE09F', '#FA6F53'],       //设置区分(每条线是什么颜色,和 legend 一一对应)
            xAxis: {                //设置x轴
                type: 'category',
                boundaryGap: false,     //坐标轴两边不留白
                data: ['2019-1-1', '2019-2-1', '2019-3-1', '2019-4-1', '2019-5-1', '2019-6-1', '2019-7-1',],
                name: 'DATE',           //X轴 name
                nameTextStyle: {        //坐标轴名称的文字样式
                    color: '#FA6F53',
                    fontSize: 16,
                    padding: [0, 0, 0, 20]
                },
                axisLine: {             //坐标轴轴线相关设置。
                    lineStyle: {
                        color: '#FA6F53',
                    }
                }
            },
            yAxis: {
                name: 'SALES VOLUME',
                nameTextStyle: {
                    color: '#FA6F53',
                    fontSize: 16,
                    padding: [0, 0, 10, 0]
                },
                axisLine: {
                    lineStyle: {
                        color: '#FA6F53',
                    }
                },
                type: 'value'
            },
            series: [
              {
                name: '平均成绩',
                data:  [220, 232, 201, 234, 290, 230, 220],
                type: 'line',               // 类型为折线图
                lineStyle: {                // 线条样式 => 必须使用normal属性
                    normal: {
                        color: '#8AE09F',
                    }
                },
              },
              {
                name: '学生成绩',
                data: [120, 200, 150, 80, 70, 110, 130],
                type: 'line',
                lineStyle: {
                    normal: {
                        color: '#FA6F53',
                    }
                },
              }
          ]
        };

        // 使用刚指定的配置项和数据显示图表。
        this.chartLine.setOption(option);
    },
效果:
Echarts 教程:https://www.echartsjs.com/tutorial.html#5%20%E5%88%86%E9%92%9F%E4%B8%8A%E6%89%8B%20ECharts
Echarts 配置项:https://www.echartsjs.com/option.html#title
文章仅为本人学习过程的一个记录,仅供参考,如有问题,欢迎指出!
