推荐一款替换swagger的无侵入文档生成工具-SmartDoc
在前后端分离的今天,为了保证进度,前后端一般同步进行开发,所以后端需要先给出接口文档,再写实现。
经过笔者不断地寻找写文档的优化方案,至少尝试过以下方式:
- 手写,如果是代码还没开始写,这种方式可以当作思考的过程,但是后面改起来也不方便;如果代码写完了再来写文档,就会很自然感觉有点重复性工作了;
- 基于Swagger的注解,虽然能够自动生成文档,但是侵入性太强,曾经用过;
- 基于Spring Doc,spring自带的文档功能,感觉有点难用,没试过
但是,今天这款插件也是笔者一直想做的,还是那句话:程序员应该是懒惰的,绝不重复造轮子!
smart-doc 简介
其Github地址和文档
smart-doc是一个java restful api文档生成工具,smart-doc颠覆了传统类似swagger这种大量采用注解侵入来生成文档的实现方法。 smart-doc完全基于接口源码分析来生成接口文档,完全做到零注解侵入,你只需要按照java标准注释的写,smart-doc就能帮你生成一个简易明了的markdown 或是一个像GitBook样式的静态html文档。如果你已经厌倦了swagger等文档工具的无数注解和强侵入污染,那请拥抱smart-doc吧!
下面就来尝试一下,个人感觉还是很好用的。
smart-doc使用方式
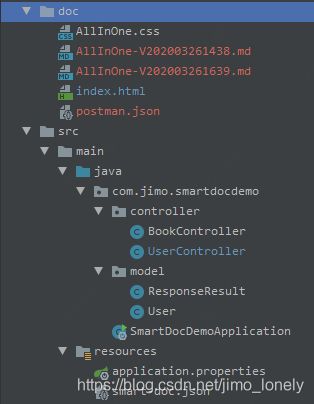
项目结构很简单,甚至项目都不用跑起来就可以测试,如下:
插件安装
查看其插件最新版:https://mvnrepository.com/artifact/com.github.shalousun/smart-doc-maven-plugin
然后加入maven插件里:
	<plugin>
		<groupId>com.github.shalousungroupId>
		<artifactId>smart-doc-maven-pluginartifactId>
		<version>1.0.4version>
		<configuration>

			<configFile>./src/main/resources/smart-doc.jsonconfigFile>

			<projectName>测试DEMOprojectName>


		configuration>
		<executions>
			<execution>

				<phase>compilephase>
				<goals>
					<goal>markdowngoal>
				goals>
			execution>
		executions>
	plugin>
填写配置
也就是smart-doc.json内容
{
  "outPath": "D:\\workspace\\demo\\smart-doc-demo\\doc",
  "allInOne": true,
  "customResponseFields": [
    {
      "name": "resultCode",
      "desc": "Response code",
      "value": "200"
    },
    {
      "name": "resultMsg",
      "desc": "错误信息",
      "value": null
    }
  ],
  "requestHeaders": [
    {
      "name": "token",
      "type": "string",
      "desc": "存放于cookie的校验信息",
      "required": true,
      "since": "-"
    }
  ]
}
这里的customResponseFields对应controller的返回值实体:
@Data
@AllArgsConstructor
@NoArgsConstructor
@ToString
public class ResponseResult<T> {

    /**
     * 状态码
     */
    private int resultCode;

    /**
     * 信息
     */
    private String resultMsg;

    /**
     * 时间戳
     */
    private Long tid;

    /**
     * 数据
     */
    private T data;
}
如果要在header里传参,那就需要requestHeaders.
完整的配置可以参考文档
声明接口并写注释
首先要了解Javadoc有哪些注释?
可以参考:Java 文档注释
我们常用来写接口的也就几个:
- @author
- @param
- @return
- @since
然后再探讨如何写优美的文档,这里官方给了建议:https://www.oracle.com/technetwork/java/javase/documentation/index-137868.html
下面是一个简单的示例:
import com.jimo.smartdocdemo.model.ResponseResult;
import com.jimo.smartdocdemo.model.User;
import org.springframework.web.bind.annotation.*;

/**
 * 用户API
 *
 * @author jimo
 * @version 1.0.0
 */
@RestController
@RequestMapping("/api/user")
public class UserController {

    /**
     * 根据id获取用户
     *
     * @param id ID
     */
    @GetMapping("/{id}")
    public ResponseResult<User> getUser(@PathVariable Integer id) {
        return ResponseResult.create(new User(id, "U" + id, "pwd" + id));
    }
}
这里的User对象要说明下:
首先字段要有注释,就当作解释参数含义了,同时支持[JSR303]规定的校验注解.
比如,不能为空的字段用@NotNull标注
import javax.validation.constraints.NotNull;

/**
 * 用户实体
 *
 * @author jimo
 * @version 1.0.0
 * @date 2020/3/25 20:22
 */
@Data
@AllArgsConstructor
@NoArgsConstructor
public class User {
    /**
     * 主键id
     */
    private Integer id;
    /**
     * 用户名
     */
    @NotNull
    private String username;
    /**
     * 密码
     */
    @NotNull
    private String password;
}
执行插件生成文档
可以通过命令行执行maven命令:
//生成html
mvn -Dfile.encoding=UTF-8 smart-doc:html
//生成markdown
mvn -Dfile.encoding=UTF-8 smart-doc:markdown
//生成adoc
mvn -Dfile.encoding=UTF-8 smart-doc:adoc
//生成postman json数据
mvn -Dfile.encoding=UTF-8 smart-doc:postman
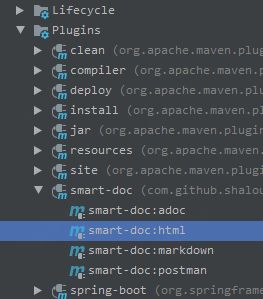
也可以在IDEA里执行插件:
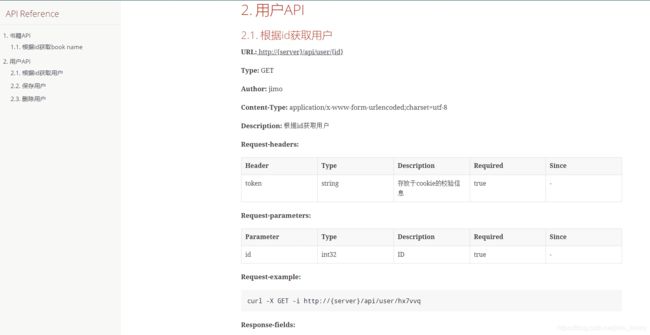
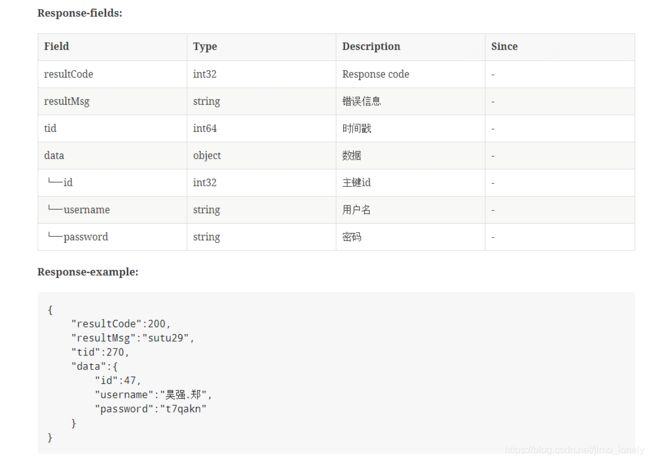
效果
需要强调的使用
在实践中,会遇到2个比较常见的问题
- 需要忽略实体中的某些字段,smart-doc给出的做法是加
@ignore: 见文档
    /**
     * 忽略,非參數
     *
     * @ignore
     */
    private String name;
- 对方法加注释时,要使用新的注解
@apiNode,代表详细内容,这样在生成html时锚的内容才不会很多:
    /**
     * 获取特征(只是个简单的标题)
     *
     * @param param 参数
     * @apiNote 这是一段非常详细的描述
     */
	 @PostMapping("/feature")
    public ResponseResult<List<NameValue>> getFeature(){}
- 忽略整个controller,目前还没支持,已经提了issue
总结
- smart-doc是完全基于源码分析推导出接口结构,所以是零侵入性的;
- 这种先写接口声明,再生成文档,也完全满足进度要求,毕竟写文档也需要花时间,同时还减少了修改,真正的所见即所得;
- 可以让程序员养成写注释的习惯,这是必须写的,注释即文档
- 这个过程可以自动化的
自动化发布文档流程
- 生成文档
- 把文档传到服务器
- 如何传到服务器:手动,代码上传(写个脚本)
- 渲染文档
- 通过nginx直接渲染:需要手动修改nginx配置,通过目录区分项目
- 通过后端应用渲染
可以开发自定义功能
将项目创建、上传、渲染一起实现了
nginx配置
这里说下nginx的一个location配置代理多个静态资源:
- 我们用一个目录来存项目文档,如果有多个项目,用文件夹名区分:
# pwd
/deploy/doc
# ls
app1 app2
- nginx配置用alias:
	location /deploy {
		alias /deploy/doc;
		index index.html;
		proxy_set_header X-Forwarded-Proto $scheme;
		error_page 404 /index.html;
	}
- 然后访问app1的文档就访问:http://host/deploy/app1


