vue-app项目知识点总结(一)
本项目GitHub地址:https://github.com/Yue-Shang/shop-app
学做的一个商城项目,后台地址需要另行购买(添加微信coderwhy002购买即可),项目功能正在一步步完善中,商品选择功能和购物车商品删除正在进一步完善会过几天在(三)中写出来并完成git上传,有一些小bug也正在改进中,商城基本功能都有,有做相关项目的小伙伴可以看一下有没有能用到的组件你的项目可以用到,
vue-app项目知识点总结(二)
vue-app项目知识点总结(三)
一. 创建项目
查看这篇https://blog.csdn.net/ShangMY97/article/details/105617930
安装cli手脚架:https://blog.csdn.net/ShangMY97/article/details/105177943
新建项目:
vue init webpack my-project
二.目录结构
base.css
normalize.css
normalize.css在HTML元素样式上提供了跨浏览器的高度一致性
下载地址https://github.com/necolas/normalize.css
public文件夹
network
- 请求拦截器的作用是在请求发送前进行一些操作,统一做了处理如果以后要改也非常容易。
- 响应拦截器的作用是在接收到响应后进行一些操作,例如在服务器返回登录状态失效,需要重新登录的时候,跳转到登录页。
request.js
import axios from 'axios'

export function request(config) {
  //1.创建axios的实例
  //这个根路径我们定义在instance中,如果有其他的根路径我们就可以在定义一个instance2
  //我们定义的这个instance本身的返回值就是promise
  const instance = axios.create({
    //请求的根路径,因为前面都是一样的所以我们拿到这里
    baseURL:'http://152.136.185.210:8000/api/n3',
    //超时时间设置
    timeout:5000
  })
  //2.axios拦截器
  //拦截去用于我们在发送每一次请求或者得到相应的结果后,进行相应的处理
  instance.interceptors.request.use(config =>{
    // 请求拦截
    return config//拦截掉之后还要原封不动的返回出去
  },err =>{} );
  instance.interceptors.response.use(res => {
    // 响应拦截
    //拦截成功
    return res.data
  },err =>{
    // 拦截失败
    if (err && err.response) {
      switch (err.response.status) {
        case 400:
          err.message = '请求错误'
          break
        case 401:
          err.message = '未授权的防问'
          break
      }
    }
    return err
  });
  //3.发送真正的网络请求
  return instance(config)
}
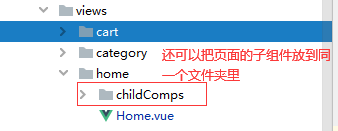
views
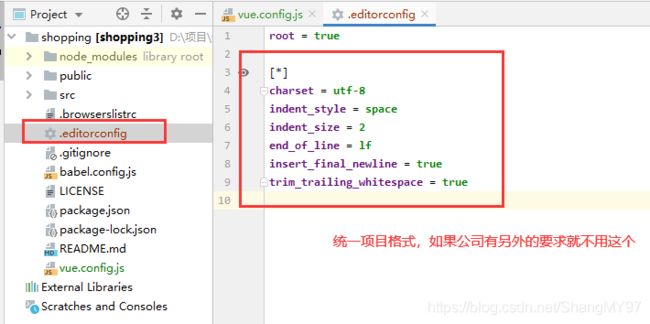
.editorcongif
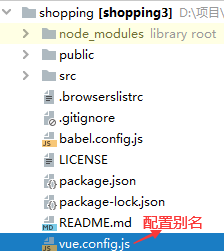
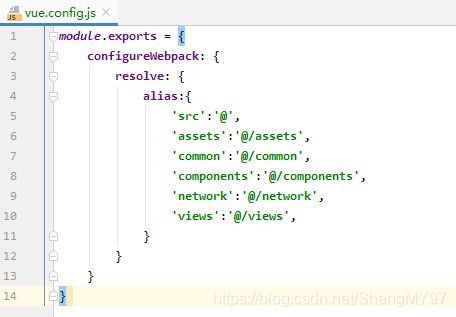
vue.config.js
三.写一个头部导航
底部导航写法链接:https://blog.csdn.net/ShangMY97/article/details/105338693
因为这个导航其他的项目也可能会用到,所以我们把组件放到component文件夹中

我们首先了解到这个头部是一般app都会出现的,比如搜索框等等,一般分为三部分
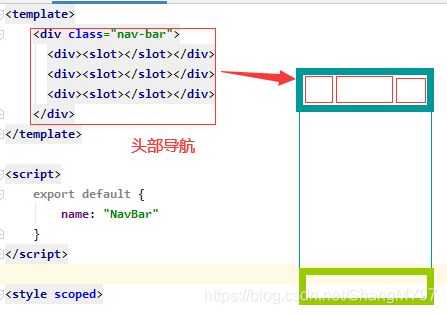
因为这三部分的内容也不确定,所以我们用插槽,并具命名每个插槽
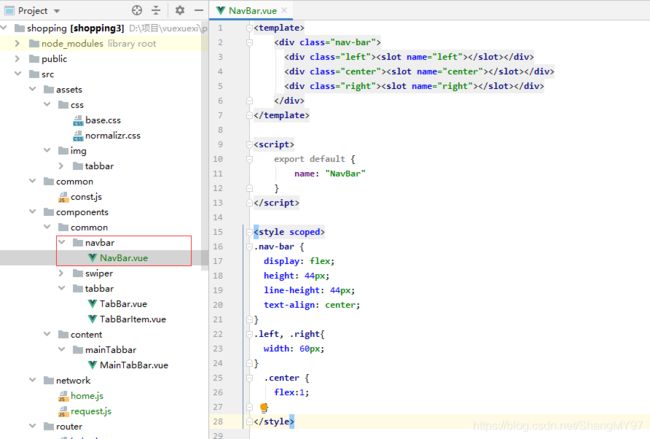
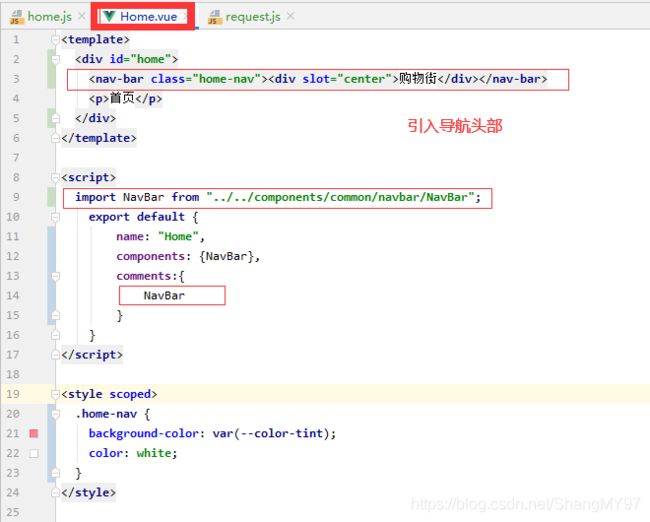
这里我们先试验在首页插槽的应用,先引入,再在替换掉具命名为canter的插槽
效果图
![]()
四.给页面添加内容
获取后台数据,发送网络请求
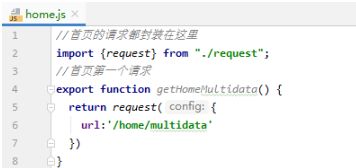
我们先导入这个方法再进行在created组件创建完成后发送请求进行‘’一‘’中的操作,在data函数中进行‘’二‘’的操作,将发送请求函数执行出的结果进行保存,不让结果被回收

一,二步原理如下
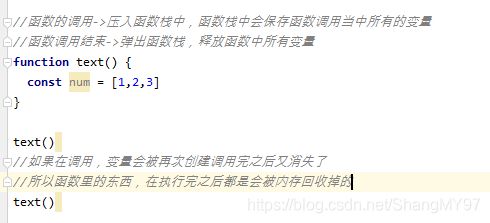
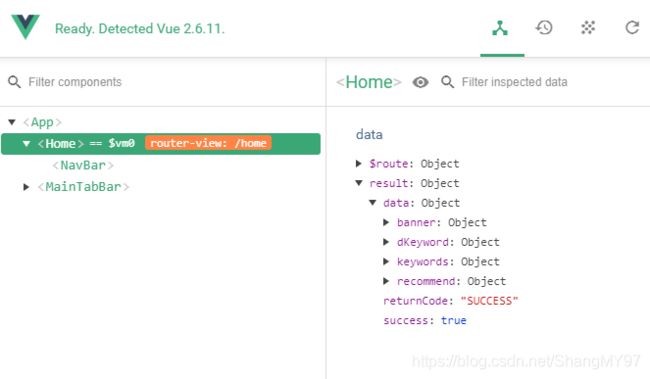
还可以根据后台数据详情结果对请求到的数据,进行更详细的分割


五. 首页商品数据的请求
5.1. 轮播图实现
我们在components\common中放入一个封装好的swiper组件
views\home\childComps\HomeSwiper.vue
<template>
  <swiper ref="swiper" v-if="banners.length">
    <swiper-item v-for="(item,index) in banners" :key="index">
        <img :src="item.image" alt="" @load="imageLoad">
        //@load="imageLoad"在下面分页标签的吸顶操作有用到,坚挺高度判断什么时候能够显示吸顶
    </swiper-item>
  </swiper>
</template>

<script>
    import {Swiper,SwiperItem} from 'components/common/swiper'
    export default {
        name: "HomeSwiper",
        props:{
            banners:{
                type:Array,
                default(){
                    return []
                }
            }
        },
        components:{
            Swiper,
            SwiperItem
        },
        data(){
           return {
                isLoad: false
            }
        },
        methods:{
            imageLoad() {
                if (!this.isLoad) {
                    this.$emit('swiperImageLoad')
                    this.isLoad = true
                }
            },
            stopTimer() {
                this.$refs.swiper.stopTimer()
            },
            startTimer() {
                if (this.$refs.swiper) {
                    this.$refs.swiper.startTimer()
                }
            }
        }
    }
</script>
home.vue
<home-swiper :banners="banners" @swiperImageLoad="swiperImageLoad"/>
...
import HomeSwiper from "./childComps/HomeSwiper";
...
components: {HomeSwiper, },
data(){
    return{
        banners:[],
    }
},
created() {
   //1.请求多个数据
   this.getHomeMultidata();
},

/*
* 网络请求相关,获取后台数据
* */
methods:{
   getHomeMultidata(){
       getHomeMultidata().then(res =>{
             // this.result = res
             this.banners = res.data.banner.list;
             this.recommends = res.data.recommend.list;
       })
   },
}
下面这四个小圆图很简单就略过了
5.2. 标签页数据显示
5.2.1 设计数据结构, 用于保存数据
src\components\common\tabControl.vue
<!--这是一个子组件中会用到的标签,点击标签切换不同页面-->
<template>
    <div class="tab-control">
<!--      只是文字不一样的时候没有必要搞插槽了-->
      <div v-for="(item,index) in titles"
           class="tab-control-item"
           :class="{active: index === isActive}"
            @click="itemClick(index)">
        <span>{{item}}</span >
      </div>
    </div>
</template>

<script>
    export default {
        name: "TabControl",
        props:{
            titles:{
                type:Array,
                default(){
                    return[]
                }
            }
        },
        data() {
            return {
                //注意这里的默认值要是0,也就是索引值,默认选中第一个
                isActive: 0
            }
        },
        methods:{
            itemClick(index) {
                this.isActive = index
                // 切换标签页面内容修改
                this.$emit('tabClick',index)
            }
        }
    }
</script>
在home.vue中引入
<tab-control :titles="titles" @tabClick="tabClick" ref="tabControl2"/>
...
import TabControl from "components/common/tabControl/TabControl";
...
components: {TabControl,},
        data(){
            return{
                goods:{
                  'pop':{page:0,list:[]},
                  'new':{page:0,list:[]},
                  'sell':{page:0,list:[]},
                },
                titles: ['流行','新款','精选'],
            }
        },
        ...
        methods:{
            /*
            * 事件监听相关
            * */
            tabClick(index) {
                switch (index) {
                    case 0:
                        this.currentType = 'pop';
                        break;
                    case 1:
                        this.currentType = 'new';
                        break;
                    case 2:
                        this.currentType = 'sell';
                        break;
                }
            },
         }
我们看一下这一部分整体代码
发送数据请求
- 在home.js中封装getHomeGoods(type, page)
- 在Home.vue中, 又在methods中getHomeGoods(type)
- 调用getHomeGoods(‘pop’)/getHomeGoods(‘new’)/getHomeGoods(‘sell’)
- page: 动态的获取对应的page
- 获取到数据: res
- this.goods[type].list.push(…res.data.list)
- this.goods[type].page += 1
<template>
  <div id="home">
    //购物街头标签组件略
    <tab-control :titles="titles" @tabClick="tabClick" ref="tabControl1" class="tab-control" v-show="isTabFixed"/>
      //轮播图组件略
      //四个圆形图组件略
      <tab-control :titles="titles" @tabClick="tabClick" ref="tabControl2"/>
      <goods-list :goods="showGoods" />
  </div>
</template>

<script>
    // 子组件
    ...组件引入省略

    // 公共组件
    ...组件引入省略

    // 请求方法
    //不是default导出的要用大括号导入
    import {getHomeMultidata,getHomeGoods} from "network/home";

    export default {
        name: "Home",
        components: {....此处省略},
        data(){
            return{
                goods:{
                  'pop':{page:0,list:[]},
                  'new':{page:0,list:[]},
                  'sell':{page:0,list:[]},
                },
                titles: ['流行','新款','精选'],
                //设置默认值
                currentType:'pop',
                isTabFixed: false,
                saveY: 0,
            }
        },
        computed: {
            showGoods() {
              return this.goods[this.currentType].list
            }
        },
        created() {
            ...
            //2.请求商品数据
            this.getHomeGoods('pop');
            this.getHomeGoods('new');
            this.getHomeGoods('sell');
        },
        methods:{
            /*
            * 事件监听相关
            * */
            tabClick(index) {
                switch (index) {
                    case 0:
                        this.currentType = 'pop';
                        break;
                    case 1:
                        this.currentType = 'new';
                        break;
                    case 2:
                        this.currentType = 'sell';
                        break;
                }
            },
            getHomeGoods(type){
                //在原来配置的基础上加1
                const page = this.goods[type].page + 1
                getHomeGoods(type,page).then(res =>{
                    // console.log(res)
                    // res=>pop的前三十条数据,第一页的
                    //现在我们要保存res数据
                    this.goods[type].list.push(...res.data.list)
                    this.goods[type].list.page += 1
                })
            }
        }
    }

</script>
六. 对商品数据进行展示
goodslist我们在后续的分页和详情页面都还会用到,所以我们把他放到src\components\content\goods文件夹中

6.1. 封装GoodsList.vue组件
- props: goods -> list[30]
- v-for goods -> GoodsListItem[30]
- GoodListItem(组件) -> GoodsItem(数据)
<template>
    <div class="goods">
     <goods-list-item v-for="(item,index) in goods" :key="index" :goods="item"/>
    </div>
</template>

<script>
  import GoodsListItem from "./GoodsListItem";
    export default {
        name: "GoodsList",
        components: {GoodsListItem},
        props:{
            goods:{
                type:Array,
                default() {
                    return []
                }
            }
        }
    }
</script>
6.2. 封装GoodsListItem.vue组件
- props: goodsItem
- goodsItem 取出数据, 并且使用正确的div/span/img基本标签进行展示
- 注意这里的showImage我刚才说了会有不同的地方用到这个goodslist,他们的后台地址自然也不同,所以
return this.goods.img || this.goods.image || this.goods.show.img
<template>
  <div class="goods-item" @click="itemClick">
    <img v-lazy="showImage" alt="" :key="showImage" @load="imageLoad" ><!--监听是否加载完-->
    <div class="goods-info">
      <p>{{goods.title}}</p>
      <span class="price">{{goods.price}}</span>
      <span class="collect">{{goods.cfav}}</span>
    </div>
  </div>
</template>

<script>
    export default {
        name: "GoodsListItem",
        props:{
            goods:{
                type:Object,
                default() {
                    return {}
                }
            }
        },
        computed: {
            showImage() {
                //解决image地址来自不同地方,还要用一个插件的问题
                return this.goods.img || this.goods.image || this.goods.show.img
            }
        },
        methods:{
            imageLoad(){
                this.$bus.$emit('itemImageLoad')
            },
            itemClick(){
                // console.log('跳转到详情页');
                this.$router.push('/detail/' + this.goods.iid)
            }
        }
    }
</script>
七. 对滚动进行重构: Better-Scroll
完成goodslist列表显示后我们发现,咦?为什么页面只能鼠标滚动呢?我们怎么实现手滑的那种移动端效果呢?
这里我们用到Better-Scroll:https://better-scroll.github.io/docs/en-US/
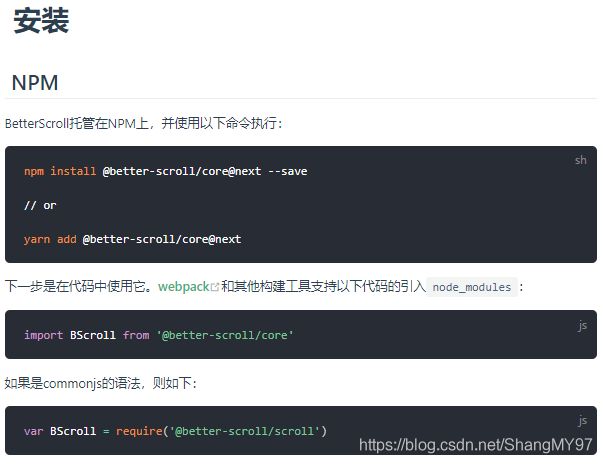
7.1. 在index.html中使用Better-Scroll
- const bscroll = new BScroll(el, { })
- 注意: wrapper -> content -> 很多内容
- 1.监听滚动
- probeType: 0/1/2(手指滚动)/3(只要是滚动)
- bscroll .on(‘scroll’, (position) => {})
- 2.上拉加载
- pullUpLoad: true
- bscroll .on(‘pullingUp’, () => {})
- 3.click: false
- button可以监听点击
- div不可以
7.2. 在Vue项目中使用Better-Scroll
- 对Better-Scroll进行封装: Scroll.vue
- Scroll.vue需要通过$emit, 实时将事件发送到Home.vue
src\components\common\scroll
<!--这里是滚动插件-->
<template>
  <div class="wrapper" ref="wrapper">
    <div class="content">
      <slot></slot>
    </div>
  </div>
</template>

<script>
    import BScroll from '@better-scroll/core'
    import Pullup from '@better-scroll/pull-up'

    BScroll.use(Pullup)

    export default {
        name: "Scroll",
        props:{
            probeType: {
                type: Number,
                default: 0
            },
            pullUpLoad: {
                type: Boolean,
                default: false
            },
            data: {
                type: Array,
                default: () => {
                    return []
                }
            },
        },
        data(){
            return {
                scroll: null
            }
        },
        methods:{
            scrollTo(x, y, time =300) {
                //逻辑与,前面不执行,后面都不执行
                this.scroll && this.scroll.scrollTo && this.scroll.scrollTo(x, y, time)
            },
            finishPullUp() {
                this.scroll.finishPullUp()
            },
            refresh() {
                this.scroll && this.scroll.refresh()
            },
            getScrollY() {
                //这里不能写 return this.scroll ? this.scroll.y : 0否则点详情再返回会回到顶部,有bug
                return this.scroll.y
            }
        },
        mounted() {
            this.scroll = new BScroll(this.$refs.wrapper, {
                click: true,//控制div是否可以点击
                probeType: this.probeType,
                pullUpLoad: this.pullUpLoad
            })
          // 监听滚动的位置
            if(this.probeType === 2 || this.probeType === 3) {
              this.scroll.on('scroll',(position) =>{
                  this.$emit('scroll', position)
                  // console.log(position);
              })
            }
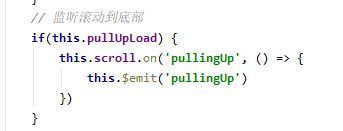
            // 监听滚动到底部
            if(this.pullUpLoad) {
                this.scroll.on('pullingUp', () => {
                    this.$emit('pullingUp')
                })
            }
            // console.log(this.scroll)
            //打印BScroll {…}
            // 里面有一个属性scrollerHeight,我们看看这个值是多少,值太小了不对(应该在1000以上,最好是4000上下)
        },
        watch: {
            data() {
                setTimeout(this.refresh, 20)
            }
        }
    }
</script>
- Home.vue和Scroll.vue之间进行通信
<template>
  <div id="home">
  ,,,
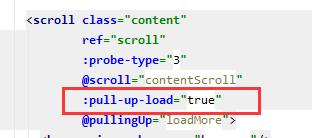
    <scroll class="content"
            ref="scroll"
            :probe-type="3"
            :data="showGoods"
            @scroll="contentScroll"
            :pull-up-load="true"
            @pullingUp="loadMore">
      //需要滚动的内容组件
    </scroll>
  </div>
</template>
<script>
    ...组件引入省略
    // 请求方法
    //不是default导出的要用大括号导入
    import {getHomeMultidata,getHomeGoods} from "network/home";

    export default {
        name: "Home",
        components: {...},
        data(){
            return{
                banners:[],
                recommends:[],
                goods:{
                  'pop':{page:0,list:[]},
                  'new':{page:0,list:[]},
                  'sell':{page:0,list:[]},
                },
                titles: ['流行','新款','精选'],
                //设置默认值
                currentType:'pop',
                tabOffsetTop: 0,
                isTabFixed: false,
                saveY: 0,
            }
        },
        computed: {
            showGoods() {
              return this.goods[this.currentType].list
            }
        },
        created() {
            ...
            //2.请求商品数据
            this.getHomeGoods('pop');
            this.getHomeGoods('new');
            this.getHomeGoods('sell');
        },
        methods:{
            loadMore() {
                this.getHomeGoods(this.currentType)
            },
            swiperImageLoad () {
                this.tabOffsetTop = this.$refs.tabControl2.$el.offsetTop;
                console.log('这个高度是' + this.$refs.tabControl2.$el.offsetTop);
            },
            ...
            getHomeGoods(type){
                //在原来配置的基础上加1
                const page = this.goods[type].page + 1
                getHomeGoods(type,page).then(res =>{
                    // console.log(res)
                    // res=>pop的前三十条数据,第一页的
                    //现在我们要保存res数据
                    this.goods[type].list.push(...res.data.list)
                    this.goods[type].list.page += 1

                    this.$refs.scroll.finishPullUp()
                })
            }
        }
    }

</script>
八. 回到顶部BackTop
8.1. 对BackTop.vue组件的封装
<!--这里是返回顶部按钮-->
<template>
    <div class="back-top">
      <img src="~assets/img/common/top.png" alt="">
    </div>
</template>

<script>
    export default {
        name: "BackTop",
        methods: {
        }
    }
</script>
8.2. 如何监听组件的点击
- 直接监听back-top的点击, 但是可以直接监听?
- 不可以, 必须添加修饰.native
<!--组件怎样进行点击?监听原生组件,.native-->
    <back-top @click.native="backClick" v-show="isShowBackTop"></back-top>
- 回到顶部
- scroll对象, scroll.scrollTo(x, y, time)
- this.$refs.scroll.scrollTo(0, 0, 500)
8.3. BackTop组件的显示和隐藏
- isShowBackTop: false
- 监听滚动, 拿到滚动的位置:
- -position.y > 1000 -> isShowBackTop: true
- isShowBackTop = -position.y > 1000
这个后期封装到了mixin.js中
参考 vue-app项目知识点总结(二) 中的第十六条
九. 解决首页中可滚动区域的问题
-
Better-Scroll在决定有多少区域可以滚动时, 是根据scrollerHeight属性决定
- scrollerHeight属性是根据放Better-Scroll的content中的子组件的高度
- 但是我们的首页中, 刚开始在计算scrollerHeight属性时, 是没有将图片计算在内的
- 所以, 计算出来的告诉是错误的(1300+)
- 后来图片加载进来之后有了新的高度, 但是scrollerHeight属性并没有进行更新.
- 所以滚动出现了问题
-
如何解决这个问题了?
- 监听每一张图片是否加载完成, 只要有一张图片加载完成了, 执行一次refresh()
- 如何监听图片加载完成了?
- 原生的js监听图片: img.onload = function() {}
- Vue中监听: @load=‘方法’
- 调用scroll的refresh()
-
如何将GoodsListItem.vue中的事件传入到Home.vue中
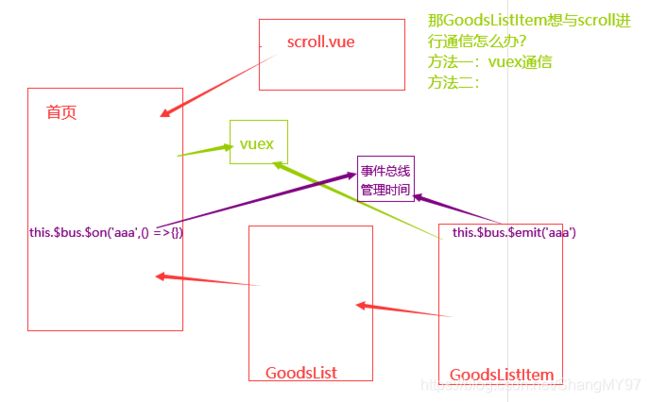
- 因为涉及到非父子组件的通信, 所以这里我们选择了事件总线
- bus ->总线
- Vue.prototype.$bus = new Vue()
- this.bus.emit(‘事件名称’, 参数)
- this.bus.on(‘事件名称’, 回调函数(参数))
- 因为涉及到非父子组件的通信, 所以这里我们选择了事件总线
-
问题一: refresh找不到的问题
- 第一: 在Scroll.vue中, 调用this.scroll的方法之前, 判断this.scroll对象是否有值
- 第二: 在mounted生命周期函数中使用
this.$refs.scroll而不是created中
ref如果是绑定在组件中的,那么通过this. r e f s . r e f n a m e 获 取 到 的 是 一 个 组 件 对 象 r e f 如 果 是 绑 定 在 普 通 元 素 中 , 那 么 通 过 t h i s . refs.refname获取到的是一个组件对象 ref如果是绑定在普通元素中,那么通过this. refs.refname获取到的是一个组件对象ref如果是绑定在普通元素中,那么通过this.refs.refname获取到的是一个元素对象
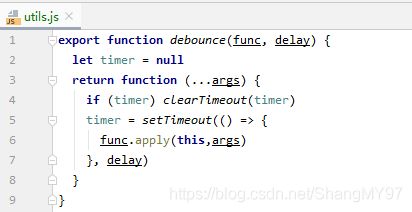
- 问题二: 对于refresh非常频繁的问题, 进行防抖操作
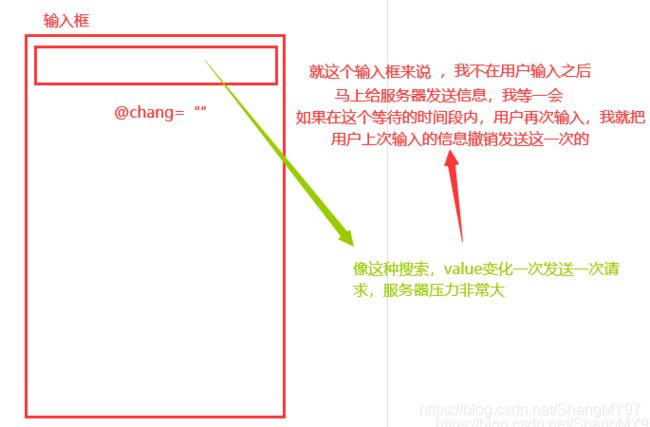
- 防抖debounce/节流throttle(课下研究一下)
- 防抖函数起作用的过程:
- 如果我们直接执行refresh, 那么refresh函数会被执行30次.

- 可以将refresh函数传入到debounce函数中, 生成一个新的函数.
- 之后在调用非常频繁的时候, 就使用新生成的函数.
- 而新生成的函数, 并不会非常频繁的调用, 如果下一次执行来的非常快, 那么会将上一次取消掉
- 如果我们直接执行refresh, 那么refresh函数会被执行30次.
 mounted() {
            //接受函数debounce的返回值
            const refresh = this.debounce(this.$refs.scroll.refresh,200)
            //注意这里的this.$refs.scroll.refresh不要有括号,有括号拿到的是返回值,没有传的就是这个函数
            //监听item中图片加载完成
            this.$bus.$on('itemImageLoad',() =>{
     		    refresh()
            })

        },
methods:{
      debounce(func, delay) {
        let timer = null
        return function (...args) {
          if (timer) clearTimeout(timer)
          timer = setTimeout(() => {
            func.apply(this, args)
          }, delay)
        }
      },
}
- timer一直没有销毁,他在函数中是一个局部变量
因为函数是一个闭包,这个闭包对外层的东西进行了一个引用,有引用指向的时候,他就不销毁了 - 1.第一次进来走else,延迟500ms,直接进到走第二张图片了
2.第二次进来,timer不为空,走if,把之前的timer清空,复制一个新timer,接着走else
3.第三次进来,timer不为空,走if,把之前的timer清空,复制一个新timer,接着走else
…
30.第三十次进来,第29次已经赋值timer了,我们走else把这个timer清空,走else,因为是最后一次,我们等到延迟时间,拿到func
调用
import {debounce} from "common/utils";
 mounted() {
            const refresh = debounce(this.$refs.scroll.refresh,500)
            this.$bus.$on('itemImageLoad',() =>{
                refresh()
            })

        },
setTimeout
- setTimeout(()=>{})异步函数,函数中的代码永远放到最后一步执行
console.log('aaa')

setTimeout(()=>{
	console.log('bbb')
})

console.log('ccc')
执行结果:aaa->ccc->bbb
十. 上拉加载更多的功能
- 监听滚动到底部
十一. tabControl的吸顶效果
11.1. 获取到tabControl的offsetTop
- 必须知道滚动到多少时, 开始有吸顶效果, 这个时候就需要获取tabControl的offsetTop
- 但是, 如果直接在mounted中获取tabControl的offsetTop, 那么值是不正确.
- 如何获取正确的值了?
- (1)监听HomeSwiper中img的加载完成.
- (1)监听HomeSwiper中img的加载完成.
		data(){
           return {
                isLoad: false
            }
        },
        methods:{
            imageLoad() {
                if (!this.isLoad) {
                    this.$emit('swiperImageLoad')
                    this.isLoad = true
                }
            }
        }
- 补充:
- 为了不让HomeSwiper多次发出事件,
- 可以使用isLoad的变量进行状态的记录.
- 注意: 这里不进行多次调用和debounce的区别
- (2)加载完成后, 发出事件, 在Home.vue中, 获取正确的值.
<home-swiper :banners="banners" @swiperImageLoad="swiperImageLoad"/>
<tab-control :titles="titles" @tabClick="tabClick" ref="tabControl"/>
		data(){
            return{
                tabOffsetTop: 0
            }
        },
this.$refs.tabControl拿到的是一个组件对象- 所有的组件都有一个属性$el:,用于获取组件中的元素
methods:{
	swiperImageLoad () {
         this.tabOffsetTop = this.$refs.tabControl.$el.offsetTop
    },
}
11.2. 监听滚动, 动态的改变tabControl的样式
- 问题:动态的改变tabControl的样式时, 会出现两个问题:
- 问题一: 下面的商品内容, 会突然上移
- 问题二: tabControl虽然设置了fixed, 但是也随着Better-Scroll一起滚出去了.
- 其他方案来解决停留问题.
- 在最上面, 多复制了一份TabControl组件对象, 利用它来实现停留效果.
<tab-control :titles="titles" @tabClick="tabClick" ref="tabControl1" class="tab-control" v-show="isTabFixed"/>
添加css样式,因为这个TabControl,是在列表滚动到一定程度才出现的,所以我们用v-show先让其隐藏
.tab-control{ position: relative;z-index: 9;}
data(){return{}}中添加,先隐藏
isTabFixed: false
为了作为区分,我们把ref一个设为tabControl1,一个设为tabControl2
把这里也改成tabControl2
methods:{
	swiperImageLoad () {
         this.tabOffsetTop = this.$refs.tabControl2.$el.offsetTop
    },
}
- 当用户滚动到一定位置时, TabControl显示出来.打印this.isTabFixed是true
- 当用户滚动没有达到一定位置时, TabControl隐藏起来.
methods:{
	contentScroll(position) {
           // 2.决定tabControl是否吸顶(position: fixed)
           this.isTabFixed = (-position.y) > this.tabOffsetTop
           console.log('这个值现在是' + this.isTabFixed);
    },
}
bug:tabControl2选中新款,滚动到显示tabControl1的时候还是流行

<tab-control :titles="titles" @tabClick="tabClick" ref="tabControl2"/>
我们在这个tabControl点击事件下面写一个
tabClick(index) {
         ...
         this.$refs.tabControl1.isActive = index;//获取对应标签的索引
         this.$refs.tabControl2.isActive = index;
},
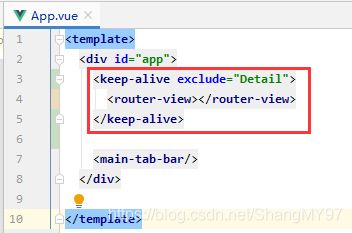
十二. 点别的回来想让Home保持原来的状态
12.1. 让Home不要随意销毁掉
12.2. 让Home中的内容保持原来的位置
- 离开时, 保存一个位置信息saveY.
saveY: 0
- 进来时, 将位置设置为原来保存的位置saveY信息即可.
- 注意: 最好回来时, 进行一次refresh()
//将底部导航设置为活跃和不活跃
        activated() {
            console.log('activated设置位置');
            this.$refs.scroll.scrollTo(0, this.saveY, 0)
            this.$refs.scroll.refresh()
        },
        deactivated() {
            this.saveY = this.$refs.scroll.getScrollY()
            console.log('deactivated记录位置' + this.saveY);
        },
scroll.vue
 getScrollY() {
       return this.scroll ? this.scroll.y : 0
}


