Kubernetes helm burrow 集成
环境
[root@k8s-master-a ~]# cat /etc/redhat-release
CentOS Linux release 7.8.2003 (Core)

[root@k8s-node-1 ~]# kubectl version
Client Version: version.Info{Major:"1", Minor:"18", GitVersion:"v1.18.3", GitCommit:"2e7996e3e2712684bc73f0dec0200d64eec7fe40", GitTreeState:"clean", BuildDate:"2020-05-20T12:52:00Z", GoVersion:"go1.13.9", Compiler:"gc", Platform:"linux/amd64"}
Server Version: version.Info{Major:"1", Minor:"18", GitVersion:"v1.18.3", GitCommit:"2e7996e3e2712684bc73f0dec0200d64eec7fe40", GitTreeState:"clean", BuildDate:"2020-05-20T12:43:34Z", GoVersion:"go1.13.9", Compiler:"gc", Platform:"linux/amd64"}

[root@k8s-node-1 ~]# helm version
Client: &version.Version{SemVer:"v2.16.0", GitCommit:"e13bc94621d4ef666270cfbe734aaabf342a49bb", GitTreeState:"clean"}
Server: &version.Version{SemVer:"v2.16.0", GitCommit:"e13bc94621d4ef666270cfbe734aaabf342a49bb", GitTreeState:"clean"}

[root@k8s-node-1 ~]# docker --version
Docker version 19.03.4, build 9013bf583a
1、安装 Kubernetes
关闭防火墙 && selinux
systemctl stop firewalld && systemctl disable firewalld && setenforce 0
禁用swap,直接注释swap,永久关闭
vim /etc/fstab
#
# /etc/fstab
# Created by anaconda on Thu Jul 16 19:55:12 2020
#
# Accessible filesystems, by reference, are maintained under '/dev/disk'
# See man pages fstab(5), findfs(8), mount(8) and/or blkid(8) for more info
#
/dev/mapper/centos-root /                       xfs     defaults        0 0
UUID=a8289a38-1720-4523-8027-939afead57e6 /boot                   xfs     defaults        0 0
/dev/mapper/centos-home /home                   xfs     defaults        0 0
#/dev/mapper/centos-swap swap                    swap    defaults        0 0
修改主机名称
vim /etc/hosts
192.168.11.11 k8s-master
192.168.11.12 k8s-node-1
192.168.11.13 k8s-node-2

或
hostnamectl set-hostname k8s-master
hostnamectl set-hostname k8s-node-1
hostnamectl set-hostname k8s-node-2
hostname主机名称
校准时间&同步时间
date
ntpdate cn.pool.ntp.org
将桥接的IPv4流量传递到iptables的链
cat > /etc/sysctl.d/k8s.conf << EOF
    net.bridge.bridge-nf-call-ip6tables = 1
    net.bridge.bridge-nf-call-iptables = 1
    net.ipv4.ip_forward = 1
EOF

sysctl --system
安装docker
卸载本机docker
[root@k8s-node1 /]# sudo yum remove docker \
>                   docker-client \
>                   docker-client-latest \
>                   docker-common \
>                   docker-latest \
>                   docker-latest-logrotate \
>                   docker-logrotate \
>                   docker-engine
Loaded plugins: fastestmirror
No Match for argument: docker
No Match for argument: docker-client
No Match for argument: docker-client-latest
No Match for argument: docker-common
No Match for argument: docker-latest
No Match for argument: docker-latest-logrotate
No Match for argument: docker-logrotate
No Match for argument: docker-engine
No Packages marked for removal
安装指定版本docker,并设置docker源
yum install yum-utils device-mapper-persistent-data lvm2 -y
yum-config-manager --add-repo http://mirrors.aliyun.com/docker-ce/linux/centos/docker-ce.repo
yum install containerd.io-1.2.10 docker-ce-19.03.4 docker-ce-cli-19.03.4 -y
systemctl start docker
cat > /etc/docker/daemon.json <
查看docker版本
docker --version
设置开机启动
systemctl restart docker & systemctl enable docker
安装 kubelet kubeadm kubectl (master、node 都需安装)
配置阿里源(需要注意源是否有k8s的镜像)
cat >> /etc/yum.repos.d/kubernetes.repo << EOF
[kubernetes]
name=Kubernetes
baseurl=https://mirrors.aliyun.com/kubernetes/yum/repos/kubernetes-el7-x86_64/
enabled=1
gpgcheck=0
EOF
查看可用版本
yum list kubelet --showduplicates
安装
需要注意版本和其他软件兼容性,如helm、docker、edct
1、指定版本号
yum install -y kubelet-1.18.3 kubectl-1.18.3 kubeadm-1.18.3
2、下载源最新版本
yum install -y kubelet kubeadm kubectl --disableexcludes=kubernetes
设置开机启动
systemctl start kubelet
systemctl enable kubelet
验证kubelet
kubelet -h
初始化 master
kubeadm init 之后会有提示信息,包括生成的信息,节点加入信息
定义POD的网段为:10.10.0.0/16,api server地址就是master本机IP地址,不填会自动生成。
[root@k8s-node-1 ~]# kubeadm init --kubernetes-version=1.18.3  \
>  --image-repository registry.aliyuncs.com/google_containers  \
>  --service-cidr=10.10.0.0/16 --pod-network-cidr=10.122.0.0/16
W0716 23:03:52.812423    8639 configset.go:202] WARNING: kubeadm cannot validate component configs for API groups [kubelet.config.k8s.io kubeproxy.config.k8s.io]
[init] Using Kubernetes version: v1.18.3
[preflight] Running pre-flight checks
[preflight] Pulling images required for setting up a Kubernetes cluster
[preflight] This might take a minute or two, depending on the speed of your internet connection
[preflight] You can also perform this action in beforehand using 'kubeadm config images pull'
[kubelet-start] Writing kubelet environment file with flags to file "/var/lib/kubelet/kubeadm-flags.env"
[kubelet-start] Writing kubelet configuration to file "/var/lib/kubelet/config.yaml"
[kubelet-start] Starting the kubelet
[certs] Using certificateDir folder "/etc/kubernetes/pki"
[certs] Generating "ca" certificate and key
[certs] Generating "apiserver" certificate and key
[certs] apiserver serving cert is signed for DNS names [k8s-node-1 kubernetes kubernetes.default kubernetes.default.svc kubernetes.default.svc.cluster.local] and IPs [10.10.0.1 192.168.11.12]
[certs] Generating "apiserver-kubelet-client" certificate and key
[certs] Generating "front-proxy-ca" certificate and key
[certs] Generating "front-proxy-client" certificate and key
[certs] Generating "etcd/ca" certificate and key
[certs] Generating "etcd/server" certificate and key
[certs] etcd/server serving cert is signed for DNS names [k8s-node-1 localhost] and IPs [192.168.11.12 127.0.0.1 ::1]
[certs] Generating "etcd/peer" certificate and key
[certs] etcd/peer serving cert is signed for DNS names [k8s-node-1 localhost] and IPs [192.168.11.12 127.0.0.1 ::1]
[certs] Generating "etcd/healthcheck-client" certificate and key
[certs] Generating "apiserver-etcd-client" certificate and key
[certs] Generating "sa" key and public key
[kubeconfig] Using kubeconfig folder "/etc/kubernetes"
[kubeconfig] Writing "admin.conf" kubeconfig file
[kubeconfig] Writing "kubelet.conf" kubeconfig file
[kubeconfig] Writing "controller-manager.conf" kubeconfig file
[kubeconfig] Writing "scheduler.conf" kubeconfig file
[control-plane] Using manifest folder "/etc/kubernetes/manifests"
[control-plane] Creating static Pod manifest for "kube-apiserver"
[control-plane] Creating static Pod manifest for "kube-controller-manager"
W0716 23:05:39.327123    8639 manifests.go:225] the default kube-apiserver authorization-mode is "Node,RBAC"; using "Node,RBAC"
[control-plane] Creating static Pod manifest for "kube-scheduler"
W0716 23:05:39.333170    8639 manifests.go:225] the default kube-apiserver authorization-mode is "Node,RBAC"; using "Node,RBAC"
[etcd] Creating static Pod manifest for local etcd in "/etc/kubernetes/manifests"
[wait-control-plane] Waiting for the kubelet to boot up the control plane as static Pods from directory "/etc/kubernetes/manifests". This can take up to 4m0s
[apiclient] All control plane components are healthy after 30.011699 seconds
[upload-config] Storing the configuration used in ConfigMap "kubeadm-config" in the "kube-system" Namespace
[kubelet] Creating a ConfigMap "kubelet-config-1.18" in namespace kube-system with the configuration for the kubelets in the cluster
[upload-certs] Skipping phase. Please see --upload-certs
[mark-control-plane] Marking the node k8s-node-1 as control-plane by adding the label "node-role.kubernetes.io/master=''"
[mark-control-plane] Marking the node k8s-node-1 as control-plane by adding the taints [node-role.kubernetes.io/master:NoSchedule]
[bootstrap-token] Using token: x87wn4.det2i23tfipboh2w
[bootstrap-token] Configuring bootstrap tokens, cluster-info ConfigMap, RBAC Roles
[bootstrap-token] configured RBAC rules to allow Node Bootstrap tokens to get nodes
[bootstrap-token] configured RBAC rules to allow Node Bootstrap tokens to post CSRs in order for nodes to get long term certificate credentials
[bootstrap-token] configured RBAC rules to allow the csrapprover controller automatically approve CSRs from a Node Bootstrap Token
[bootstrap-token] configured RBAC rules to allow certificate rotation for all node client certificates in the cluster
[bootstrap-token] Creating the "cluster-info" ConfigMap in the "kube-public" namespace
[kubelet-finalize] Updating "/etc/kubernetes/kubelet.conf" to point to a rotatable kubelet client certificate and key
[addons] Applied essential addon: CoreDNS
[addons] Applied essential addon: kube-proxy

Your Kubernetes control-plane has initialized successfully!

To start using your cluster, you need to run the following as a regular user:

  mkdir -p $HOME/.kube
  sudo cp -i /etc/kubernetes/admin.conf $HOME/.kube/config
  sudo chown $(id -u):$(id -g) $HOME/.kube/config

You should now deploy a pod network to the cluster.
Run "kubectl apply -f [podnetwork].yaml" with one of the options listed at:
  https://kubernetes.io/docs/concepts/cluster-administration/addons/

Then you can join any number of worker nodes by running the following on each as root:

kubeadm join 192.168.11.12:6443 --token x87wn4.det2i23tfipboh2w \
    --discovery-token-ca-cert-hash sha256:8a08cf6726dfb3ffe9d782d5aabc0a2aa11ada6838013a93d68cbd616bca21c8
后续用于节点加入
kubeadm join 192.168.11.12:6443 --token x87wn4.det2i23tfipboh2w \
    --discovery-token-ca-cert-hash sha256:8a08cf6726dfb3ffe9d782d5aabc0a2aa11ada6838013a93d68cbd616bca21c8
记录输出的kubeadm join命令kubeadm init,也可以都使用第二种
root用户请执行
export KUBECONFIG=/etc/kubernetes/admin.conf
非root用户
mkdir -p $HOME/.kube
sudo cp -i /etc/kubernetes/admin.conf $HOME/.kube/config
sudo chown $(id -u):$(id -g) $HOME/.kube/config
初始化完成之后的images
可以先下载镜像,再执行init,init执行失败大部分原因都是因为镜像没有下载失败
[root@k8s-master ~]# docker images
REPOSITORY                                                        TAG                 IMAGE ID            CREATED             SIZE
registry.aliyuncs.com/google_containers/kube-proxy                v1.18.3             3439b7546f29        8 weeks ago         117MB
registry.aliyuncs.com/google_containers/kube-apiserver            v1.18.3             7e28efa976bd        8 weeks ago         173MB
registry.aliyuncs.com/google_containers/kube-controller-manager   v1.18.3             da26705ccb4b        8 weeks ago         162MB
registry.aliyuncs.com/google_containers/kube-scheduler            v1.18.3             76216c34ed0c        8 weeks ago         95.3MB
registry.aliyuncs.com/google_containers/pause                     3.2                 80d28bedfe5d        5 months ago        683kB
registry.aliyuncs.com/google_containers/coredns                   1.6.7               67da37a9a360        5 months ago        43.8MB
registry.aliyuncs.com/google_containers/etcd                      3.4.3-0             303ce5db0e90        8 months ago        288MB
安装calico,用于节点通信(官方支持多种网络部署), 最新的3.15还没有镜像(镜像下载失败就手动下载)
[root@k8s-master-a ~]# kubectl apply -f https://docs.projectcalico.org/v3.12/manifests/calico.yaml
configmap/calico-config created
customresourcedefinition.apiextensions.k8s.io/bgpconfigurations.crd.projectcalico.org created
customresourcedefinition.apiextensions.k8s.io/bgppeers.crd.projectcalico.org created
customresourcedefinition.apiextensions.k8s.io/blockaffinities.crd.projectcalico.org created
customresourcedefinition.apiextensions.k8s.io/clusterinformations.crd.projectcalico.org created
customresourcedefinition.apiextensions.k8s.io/felixconfigurations.crd.projectcalico.org created
customresourcedefinition.apiextensions.k8s.io/globalnetworkpolicies.crd.projectcalico.org created
customresourcedefinition.apiextensions.k8s.io/globalnetworksets.crd.projectcalico.org created
customresourcedefinition.apiextensions.k8s.io/hostendpoints.crd.projectcalico.org created
customresourcedefinition.apiextensions.k8s.io/ipamblocks.crd.projectcalico.org created
customresourcedefinition.apiextensions.k8s.io/ipamconfigs.crd.projectcalico.org created
customresourcedefinition.apiextensions.k8s.io/ipamhandles.crd.projectcalico.org created
customresourcedefinition.apiextensions.k8s.io/ippools.crd.projectcalico.org created
customresourcedefinition.apiextensions.k8s.io/kubecontrollersconfigurations.crd.projectcalico.org created
customresourcedefinition.apiextensions.k8s.io/networkpolicies.crd.projectcalico.org created
customresourcedefinition.apiextensions.k8s.io/networksets.crd.projectcalico.org created
clusterrole.rbac.authorization.k8s.io/calico-kube-controllers created
clusterrolebinding.rbac.authorization.k8s.io/calico-kube-controllers created
clusterrole.rbac.authorization.k8s.io/calico-node created
clusterrolebinding.rbac.authorization.k8s.io/calico-node created
daemonset.apps/calico-node created
serviceaccount/calico-node created
deployment.apps/calico-kube-controllers created
serviceaccount/calico-kube-controllers created
执行如下命令查看pod信息,等待 一会(需要下载镜像和启动pod),直到所有的容器组处于 Running 状态
root@k8s-node-1 ~]# kubectl get pod -n kube-system -o wide
NAME                                       READY   STATUS    RESTARTS   AGE     IP               NODE         NOMINATED NODE   READINESS GATES
calico-kube-controllers-587bcbb54d-gkhgr   1/1     Running   0          5m36s   192.168.109.65   k8s-node-1
calico-node-l7qsn                          1/1     Running   0          5m36s   192.168.11.12    k8s-node-1
coredns-7ff77c879f-twfbc                   1/1     Running   0          17m     192.168.109.66   k8s-node-1
coredns-7ff77c879f-z6npv                   1/1     Running   0          17m     192.168.109.67   k8s-node-1
etcd-k8s-node-1                            1/1     Running   2          12m     192.168.11.12    k8s-node-1
kube-apiserver-k8s-node-1                  1/1     Running   2          12m     192.168.11.12    k8s-node-1
kube-controller-manager-k8s-node-1         1/1     Running   2          12m     192.168.11.12    k8s-node-1
kube-proxy-998lp                           1/1     Running   1          17m     192.168.11.12    k8s-node-1
kube-scheduler-k8s-node-1                  1/1     Running   2          12m     192.168.11.12    k8s-node-1              ```
# 查看 master 节点初始化结果
查看pod详细信息
[root@k8s-node-1 ~]# kubectl describe pods -n burrow-dev pld-blockchain-dev-burrow-004-5d98df4d47-ktgwx
Name:         pld-blockchain-dev-burrow-004-5d98df4d47-ktgwx
Namespace:    burrow-dev
Priority:     0
Node:         k8s-node-1/192.168.11.12
Start Time:   Fri, 24 Jul 2020 12:04:53 +0800
Labels:       app=burrow
              nodeNumber=004
              pod-template-hash=5d98df4d47
              release=pld-blockchain-dev
Annotations:  cni.projectcalico.org/podIP: 192.168.109.73/32
              cni.projectcalico.org/podIPs: 192.168.109.73/32
              prometheus.io/path: /metrics
              prometheus.io/port: 9102
              prometheus.io/scrape: true
Status:       Running
IP:           192.168.109.73
IPs:
  IP:           192.168.109.73
Controlled By:  ReplicaSet/pld-blockchain-dev-burrow-004-5d98df4d47
Init Containers:
  init-keys:
    Container ID:  docker://4eab3f0e460e6f6fb973b1b081966f34ae46ffb9252542874f4e11e8f744b798
    Image:         busybox
    Image ID:      docker-pullable://busybox@sha256:9ddee63a712cea977267342e8750ecbc60d3aab25f04ceacfa795e6fce341793
    Port:
    Host Port:
    Command:
      sh
      -xc
      mkdir -p /work/.burrow/config && \
      cp node_key.json /work/.burrow/config/node_key.json && \
      chmod 600 /work/.burrow/config/node_key.json
    State:          Terminated
      Reason:       Completed
      Exit Code:    0
      Started:      Fri, 24 Jul 2020 12:07:25 +0800
      Finished:     Fri, 24 Jul 2020 12:07:25 +0800
    Ready:          True
    Restart Count:  0
    Environment:
    Mounts:
      /keys from keys-dir (rw)
      /var/run/secrets/kubernetes.io/serviceaccount from default-token-54q2f (ro)
      /work from work-dir (rw)
Containers:
  node:
    Container ID:  docker://adfbea4b8da7f1794967b17accb62926e261e9aced5106ca4fe58d6b5ad33917
    Image:         hyperledger/burrow:0.30.3
    Image ID:      docker://sha256:e0fe4cfd6c80bf611480dcab47e9b77c34dd3e094e559fb9d7f69623c9e660b6
    Ports:         26656/TCP, 10997/TCP, 26658/TCP, 9102/TCP
    Host Ports:    0/TCP, 0/TCP, 0/TCP, 0/TCP
    Command:
      burrow
    Args:
      start
      --config
      /ref/burrow.json
      --genesis
      /ref/genesis.json
      --address
      F373BB01254E95BFC157BA7C6C302BFA45A7ABDA
      --moniker
      user-validator-004
    State:          Running
      Started:      Fri, 24 Jul 2020 12:07:26 +0800
    Ready:          True
    Restart Count:  0
    Liveness:       http-get http://:info/status%3Fblock_seen_time_within=10m delay=240s timeout=1s period=30s #success=1 #failure=3
    Readiness:      http-get http://:info/status delay=5s timeout=1s period=10s #success=1 #failure=3
    Environment:
    Mounts:
      /keys/data from keys-dir (rw)
      /keys/names from keys-dir-names (rw)
      /ref from ref-dir (rw)
      /var/run/secrets/kubernetes.io/serviceaccount from default-token-54q2f (ro)
      /work from work-dir (rw)
Conditions:
  Type              Status
  Initialized       True
  Ready             True
  ContainersReady   True
  PodScheduled      True
Volumes:
  ref-dir:
    Type:               Projected (a volume that contains injected data from multiple sources)
    ConfigMapName:      pld-blockchain-dev-burrow-config
    ConfigMapOptional:
    ConfigMapName:      pld-blockchain-dev-burrow-genesis
    ConfigMapOptional:
  keys-dir:
    Type:                Projected (a volume that contains injected data from multiple sources)
    SecretName:          pld-blockchain-dev-burrow-keys-004
    SecretOptionalName:
  keys-dir-names:
    Type:       EmptyDir (a temporary directory that shares a pod's lifetime)
    Medium:
    SizeLimit:
  work-dir:
    Type:       EmptyDir (a temporary directory that shares a pod's lifetime)
    Medium:
    SizeLimit:
  default-token-54q2f:
    Type:        Secret (a volume populated by a Secret)
    SecretName:  default-token-54q2f
    Optional:    false
QoS Class:       BestEffort
Node-Selectors:
Tolerations:     node.kubernetes.io/not-ready:NoExecute for 300s
                 node.kubernetes.io/unreachable:NoExecute for 300s
Events:
进入pod内
kubectl get pods -n burrow-dev
kubectl exec -ti pld-blockchain-dev-burrow-004-5d98df4d47-ktgwx  -n burrow-dev  -- /bin/sh

发送交易
burrow tx -g /ref/genesis.json -v 0 formulate send -s F373BB01254E95BFC157BA7C6C302BFA45A7ABDA -t 5ED6AAE9256A3F1C76E987855DC74B2E21A061EB -a 10 | burrow tx -g /ref/genesis.json -v 0 commit

helm已经将 keys/data做了分离,所以不能直接使用node下面账户,每一个pod只有一个账号,
私钥:/keys/data
创始文件:/ref/genesis.json
重启k8s(至此k8s集群搭建完毕)
systemctl restart kubelet
查看 kubelet 状态
[root@k8s-node-1 ~]# systemctl status kubelet
● kubelet.service - kubelet: The Kubernetes Node Agent
   Loaded: loaded (/usr/lib/systemd/system/kubelet.service; enabled; vendor preset: disabled)
  Drop-In: /usr/lib/systemd/system/kubelet.service.d
           └─10-kubeadm.conf
   Active: active (running) since Thu 2020-07-16 23:15:35 CST; 29min ago
     Docs: https://kubernetes.io/docs/
 Main PID: 657 (kubelet)
   Memory: 83.3M
   CGroup: /system.slice/kubelet.service
           ‣ 657 /usr/bin/kubelet --bootstrap-kubeconfig=/etc/kubernetes/bootstrap-kubelet.conf --kubeconfig=/etc/kubernetes/kubelet.conf --config=/var/lib/kubelet/config.yaml --cgroup-driver=systemd --netw...

Jul 16 23:26:14 k8s-node-1 kubelet[657]: 2020-07-16 23:26:14.107 [INFO][6906] ipam.go 413: Block '192.168.109.64/26' provided addresses: [192.168.109.69/26] handle="k8s-pod-network.ed10c35df54...t="k8s-node-1"
Jul 16 23:26:14 k8s-node-1 kubelet[657]: 2020-07-16 23:26:14.121 [INFO][6906] ipam.go 569: Auto-assigned 1 out of 1 IPv4s: [192.168.109.69/26] handle="k8s-pod-network.ed10c35df547d1704c2d376a3...t="k8s-node-1"
Jul 16 23:26:14 k8s-node-1 kubelet[657]: 2020-07-16 23:26:14.121 [INFO][6906] ipam_plugin.go 235: Calico CNI IPAM assigned addresses IPv4=[192.168.109.69/26] IPv6=[] ContainerID="ed10c35df547d1704c2d376a301...
Jul 16 23:26:14 k8s-node-1 kubelet[657]: 2020-07-16 23:26:14.121 [INFO][6906] ipam_plugin.go 261: IPAM Result ContainerID="ed10c35df547d1704c2d376a301128f2a64c9fd935a9a50154c7f89b5f945dfd" HandleID="k8s-pod...
Jul 16 23:26:14 k8s-node-1 kubelet[657]: 2020-07-16 23:26:14.125 [INFO][6898] k8s.go 358: Populated endpoint ContainerID="ed10c35df547d1704c2d376a301128f2a64c9fd935a9a50154c7f89b5f945dfd" Name...d--857bb4c778-
Jul 16 23:26:14 k8s-node-1 kubelet[657]: 2020-07-16 23:26:14.126 [INFO][6898] k8s.go 359: Calico CNI using IPs: [192.168.109.69/32] ContainerID="ed10c35df547d1704c2d376a301128f2a64c9fd935a9a50154c7f89b5f945...
Jul 16 23:26:14 k8s-node-1 kubelet[657]: 2020-07-16 23:26:14.126 [INFO][6898] network_linux.go 76: Setting the host side veth name to cali3bbcf7d8cc9 ContainerID="ed10c35df547d1704c2d376a301128f2a64c9fd935a...
Jul 16 23:26:14 k8s-node-1 kubelet[657]: 2020-07-16 23:26:14.130 [INFO][6898] network_linux.go 400: Disabling IPv4 forwarding ContainerID="ed10c35df547d1704c2d376a301128f2a64c9fd935a9a50154c7f89b5f945dfd" N...
Jul 16 23:26:14 k8s-node-1 kubelet[657]: 2020-07-16 23:26:14.182 [INFO][6898] k8s.go 385: Added Mac, interface name, and active container ID to endpoint ContainerID="ed10c35df547d1704c2d376a30...point="k8s--no
Jul 16 23:26:14 k8s-node-1 kubelet[657]: 2020-07-16 23:26:14.233 [INFO][6898] k8s.go 417: Wrote updated endpoint to datastore ContainerID="ed10c35df547d1704c2d376a301128f2a64c9fd935a9a50154c7f89b5f945dfd" N...
Hint: Some lines were ellipsized, use -l to show in full.
安装kubernetes/dashboard
[root@k8s-node-1 ~]# kubectl apply -f https://raw.githubusercontent.com/kubernetes/dashboard/v2.0.0-rc5/aio/deploy/recommended.yaml
namespace/kubernetes-dashboard created
serviceaccount/kubernetes-dashboard created
service/kubernetes-dashboard created
secret/kubernetes-dashboard-certs created
secret/kubernetes-dashboard-csrf created
secret/kubernetes-dashboard-key-holder created
configmap/kubernetes-dashboard-settings created
role.rbac.authorization.k8s.io/kubernetes-dashboard created
clusterrole.rbac.authorization.k8s.io/kubernetes-dashboard created
rolebinding.rbac.authorization.k8s.io/kubernetes-dashboard created
clusterrolebinding.rbac.authorization.k8s.io/kubernetes-dashboard created
deployment.apps/kubernetes-dashboard created
service/dashboard-metrics-scraper created
deployment.apps/dashboard-metrics-scraper created
查看 kubernetes-dashboard pod 状态
[root@k8s-node-1 ~]# kubectl get pod -n kubernetes-dashboard -o wide
NAME                                         READY   STATUS    RESTARTS   AGE     IP               NODE         NOMINATED NODE   READINESS GATES
dashboard-metrics-scraper-779f5454cb-rnkmb   1/1     Running   0          5m14s   192.168.109.68   k8s-node-1
kubernetes-dashboard-857bb4c778-mm779        1/1     Running   0          5m14s   192.168.109.69   k8s-node-1
创建RBAC
[root@k8s-master-a ~]# kubectl create serviceaccount admin-user -n kubernetes-dashboard
serviceaccount/admin-user created
[root@k8s-master-a ~]# kubectl create clusterrolebinding admin-user --clusterrole=cluster-admin --serviceaccount=kubernetes-dashboard:admin-user
clusterrolebinding.rbac.authorization.k8s.io/admin-user created
[root@k8s-master-a ~]#
访问
编辑kubernetes-dashboard服务
401 403 都是证书问题, 要么自己生成证书导入浏览器,要么把ClusterIP改成NodePort,如下
编辑kubernetes-dashboard
kubectl -n kubernetes-dashboard edit service kubernetes-dashboard
更改type: ClusterIP为type: NodePort并保存文件,改完之后查看一下TYPE已经是NodePort,32663是外网端口(随机产生)
[root@k8s-node-1 ~]# kubectl -n kubernetes-dashboard get service kubernetes-dashboard
NAME                   TYPE       CLUSTER-IP     EXTERNAL-IP   PORT(S)         AGE
kubernetes-dashboard   NodePort   10.10.205.79           443:32663/TCP   8m54s
生成证书
[root@k8s-master-a ~]# grep 'client-certificate-data' ~/.kube/config | head -n 1 | awk '{print $2}' | base64 -d >> kubecfg.crt
[root@k8s-master-a ~]# grep 'client-key-data' ~/.kube/config | head -n 1 | awk '{print $2}' | base64 -d >> kubecfg.key
[root@k8s-master-a ~]# openssl pkcs12 -export -clcerts -inkey kubecfg.key -in kubecfg.crt -out kubecfg.p12 -name "kubernetes-client"
Enter Export Password:
Verifying - Enter Export Password:
[root@k8s-master-a ~]# ls
anaconda-ks.cfg                              apiVersion:       get-k8s-images.sh   kubecfg.crt  kubecfg.p12                           kubernetes-dashboard.yaml  reset-k8s
--apiserver-advertise-address=192.168.11.11  calico-etcd.yaml  --image-repository  kubecfg.key  kubernetes-dashboard-admin.rbac.yaml  recommended.yaml
[root@k8s-master-a ~]# sz
sz: need at least one file to send
Try `sz --help' for more information.
[root@k8s-master-a ~]# sz kubecfg.p12
下载到本地,再倒入浏览器即可,注意密码
生成kubernetes-dashboard token
[root@k8s-master ~]# kubectl -n kubernetes-dashboard describe secret $(kubectl -n kubernetes-dashboard get secret | grep admin-user | awk '{print $1}')
Name:         admin-user-token-pxbvc
Namespace:    kubernetes-dashboard
Labels:
Annotations:  kubernetes.io/service-account.name: admin-user
              kubernetes.io/service-account.uid: 81f0d9db-3702-4439-8068-9306a901f835

Type:  kubernetes.io/service-account-token

Data
====
ca.crt:     1025 bytes
namespace:  20 bytes
token:      eyJhbGciOiJSUzI1NiIsImtpZCI6Inp0dHZQTUp6R1RwRkNPbzZ0b2l3S1NxUFRFa2xKc2VGdlRXTERocHE3YzgifQ.eyJpc3MiOiJrdWJlcm5ldGVzL3NlcnZpY2VhY2NvdW50Iiwia3ViZXJuZXRlcy5pby9zZXJ2aWNlYWNjb3VudC9uYW1lc3BhY2UiOiJrdWJlcm5ldGVzLWRhc2hib2FyZCIsImt1YmVybmV0ZXMuaW8vc2VydmljZWFjY291bnQvc2VjcmV0Lm5hbWUiOiJhZG1pbi11c2VyLXRva2VuLXB4YnZjIiwia3ViZXJuZXRlcy5pby9zZXJ2aWNlYWNjb3VudC9zZXJ2aWNlLWFjY291bnQubmFtZSI6ImFkbWluLXVzZXIiLCJrdWJlcm5ldGVzLmlvL3NlcnZpY2VhY2NvdW50L3NlcnZpY2UtYWNjb3VudC51aWQiOiI4MWYwZDlkYi0zNzAyLTQ0MzktODA2OC05MzA2YTkwMWY4MzUiLCJzdWIiOiJzeXN0ZW06c2VydmljZWFjY291bnQ6a3ViZXJuZXRlcy1kYXNoYm9hcmQ6YWRtaW4tdXNlciJ9.lBj5VriSNm9AKIs0zwyJcKtL89lF7Pb0SuxEuy0Hi3d9KNTp_-NVZFW4wUHZ97vdAYG9JVO-93xk3SHuK2hkN4aoe21nySdGnVU_Nm-1XKiQR2hifVHYbPrtShf2khs2gbPRG0REFEK-B3Jtwi4VKQBFybb6jsUnijTbHnQtBmAnHMvm0OXynpcOF5ZnwG7Sq-lzghBy-mZYWOhdMvYTTHDuhzErh2glzXr5J3QvFem5aMl_5ZaX2zE553sevqYlHDT01NhTm2F_mtxxy6JIYrIsaQloYR5Hlj85X23aoXVN75zdgOJ8oWABfg4rzXnWuJEoTZUW7hSpehBWEITQ_g

works 加入集群
kubeadm join 192.168.11.12:6443 --token x87wn4.det2i23tfipboh2w \
>     --discovery-token-ca-cert-hash sha256:8a08cf6726dfb3ffe9d782d5aabc0a2aa11ada6838013a93d68cbd616bca21c8
W0716 23:48:26.631373   11898 join.go:346] [preflight] WARNING: JoinControlPane.controlPlane settings will be ignored when control-plane flag is not set.
[preflight] Running pre-flight checks
[preflight] Reading configuration from the cluster...
[preflight] FYI: You can look at this config file with 'kubectl -n kube-system get cm kubeadm-config -oyaml'
[kubelet-start] Downloading configuration for the kubelet from the "kubelet-config-1.18" ConfigMap in the kube-system namespace
[kubelet-start] Writing kubelet configuration to file "/var/lib/kubelet/config.yaml"
[kubelet-start] Writing kubelet environment file with flags to file "/var/lib/kubelet/kubeadm-flags.env"
[kubelet-start] Starting the kubelet
[kubelet-start] Waiting for the kubelet to perform the TLS Bootstrap...

This node has joined the cluster:
* Certificate signing request was sent to apiserver and a response was received.
* The Kubelet was informed of the new secure connection details.

Run 'kubectl get nodes' on the control-plane to see this node join the cluster.
相关命令
#查看集群结点状态
kubectl get nodes
#查看详细结点信息
kubectl describe nodes
#查看集群服务状态
kubectl get pods --all-namespaces
#查看集群运行在那些ip上
kubectl cluster-info
#查看master的各种token
kubectl get secret -n kube-system
#查看某一个特定的token
kubectl describe secret/[token name] -n kube-system
在marter上查看node状态
[root@k8s-node-1 ~]# kubectl get nodes
NAME         STATUS   ROLES    AGE     VERSION
k8s-node-1   Ready    master   46m     v1.18.3
k8s-node-2   Ready       4m24s   v1.18.3
安装helm
同步github,github的太大下载太慢,利用gitee自动同步
git clone https://gitee.com/ii77/charts.git
下载
wget https://get.helm.sh/helm-v2.16.0-linux-amd64.tar.gz
解压
tar -zxvf helm-v2.16.0-linux-amd64.tar.gz
安装
mv linux-amd64/helm /usr/local/bin/
验证 ,必须客户端和服务端都启动成功,3.0以后没有服务端和客户端了,只有一个端,如果想兼容helm2需要手动构建仓库
[root@k8s-node-1 ~]# helm version
Client: &version.Version{SemVer:"v2.16.0", GitCommit:"e13bc94621d4ef666270cfbe734aaabf342a49bb", GitTreeState:"clean"}
Server: &version.Version{SemVer:"v2.16.0", GitCommit:"e13bc94621d4ef666270cfbe734aaabf342a49bb", GitTreeState:"clean"}
helm init --service-account=tiller --tiller-namespace=kube-system --tiller-image=registry.cn-hangzhou.aliyuncs.com/google_containers/tiller:v2.16.0 --stable-repo-url=https://kubernetes.oss-cn-hangzhou.aliyuncs.com/charts
如果是单节点,需要设置master允许部署pod
允许master节点部署pod
kubectl taint nodes --all node-role.kubernetes.io/master-
如果不允许调度
kubectl taint nodes master1 node-role.kubernetes.io/master=:NoSchedule
污点可选参数
	  NoSchedule: 一定不能被调度
      PreferNoSchedule: 尽量不要调度
      NoExecute: 不仅不会调度, 还会驱逐Node上已有的Pod
安装EPEL源:
yum install epel-release
安装完EPEL源后,可以查看下jq包是否存在:
yum list jq
安装jq:
yum install jq
One of the configured repositories failed (Unknown),
and yum doesn’t have enough cached data to continue. At this point the only
safe thing yum can do is fail. There are a few ways to work “fix” this:
 1. Contact the upstream for the repository and get them to fix the problem.

 2. Reconfigure the baseurl/etc. for the repository, to point to a working
    upstream. This is most often useful if you are using a newer
    distribution release than is supported by the repository (and the
    packages for the previous distribution release still work).

 3. Run the command with the repository temporarily disabled
        yum --disablerepo= ...

 4. Disable the repository permanently, so yum won't use it by default. Yum
    will then just ignore the repository until you permanently enable it
    again or use --enablerepo for temporary usage:

        yum-config-manager --disable
    or
        subscription-manager repos --disable=

 5. Configure the failing repository to be skipped, if it is unavailable.
    Note that yum will try to contact the repo. when it runs most commands,
    so will have to try and fail each time (and thus. yum will be be much
    slower). If it is a very temporary problem though, this is often a nice
    compromise:

        yum-config-manager --save --setopt=.skip_if_unavailable=true
Cannot retrieve metalink for repository: epel/x86_64. Please verify its path and try again
[epel]
name=Extra Packages for Enterprise Linux 7 - $basearch
baseurl=http://download.fedoraproject.org/pub/epel/7/$basearch
#mirrorlist=https://mirrors.fedoraproject.org/metalink?repo=epel-7&arch=$basearch

yum clean all

yum makecache
使用helm 部署 burrow
下载burrow源码,并build成镜像,
如果是自己改了burrow源码,最好自己生成镜像。没有就直接使用官方的makefile。
修改官方的dockefile
设置
ENV GOPROXY https://goproxy.cn,direct
ENV GO111MODULE on
如下:
# For solc binary
FROM ethereum/solc:0.5.12 as solc-builder
# We use a multistage build to avoid bloating our deployment image with build dependencies
FROM golang:1.13-alpine3.11 as builder

ENV GOPROXY https://goproxy.cn,direct
ENV GO111MODULE on

RUN apk add --no-cache --update git bash make

ARG REPO=/src/burrow
COPY . $REPO
WORKDIR $REPO
helm 已经对burrow做了封装处理,可以直接使用
[root@k8s-node-1 ~]# ls charts/stable/burrow/
addresses.yaml  Chart.yaml  ci  initialize.sh  OWNERS  README.md  setup.yaml  templates  values.yaml

$ CHAIN_NODES=5 CHAIN_NAME="pld-blockchain-dev-burrow" ./initialize.sh
Initializing 5 Validator Nodes
------------------------------

Writing kubernetes template files for validators secrets, and configmaps.
Building the genesis spec with burrow (0.30.3+commit.ffccfb69eb9465b3a5b5a747139e081b9f095fdd+2020-04-05T21:34:13Z).
Creating keys and necessary deploy files...
Saved keys and genesis as /root/helm/charts/stable/burrow/setup.yaml
Saved example 'values.yaml' as /root/helm/charts/stable/burrow/addresses.yaml
Done

kubectl create namespace burrow-dev
kubectl apply -f setup.yaml -n burrow-dev


修改value.yaml配置文件
burrow --version版本应该和image.tag保持一致
image:
  repository: hyperledger/burrow
  tag: 0.30.3
  pullPolicy: IfNotPresent

持久化(可选)
persistence:
  enabled: false
  size: 10Gi
  storageClass:
  accessMode: ReadWriteOnce
  persistentVolumeReclaimPolicy: "Delete"

pod资源设置
resources:
  limits:
    cpu: 500m
    memory: 1Gi
  requests:
    cpu: 100m
    memory: 256Mi


将生成的地址配置文件合并进values.yaml

cat addresses.yaml >> values.yaml

安装
helm install .   \
--set chain.nodes=5 \
--namespace burrow-dev \
--name pld-blockchain-dev \
--values values.yaml
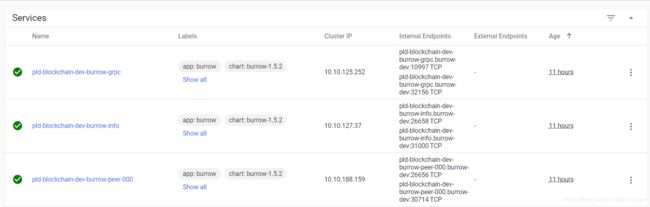
默认helm创建的grpc和info service是 type: ClusterIP,只允许集群内部访问,直接改成NodePort,外部就可以访问了
burrow 节点
这里每一个节点都是都只有一个用户,和本地直接使用burrow spec -f2是不一样的。交易之前先确认账户

安装完成以后就可以查看节点信息了,192.168.11.12是k8s本机IP,31000是NodePort自动生成的,如下
http://192.168.11.12:31000/

私钥
私钥对应的目录
进入pod内
kubectl exec -ti pld-blockchain-dev-burrow-004-5d98df4d47-ktgwx  -n burrow-dev  -- /bin/sh

cd /keys/data 可以看到私钥信息
创世快信息在 /ref/genesis.json
发起交易
如果方便在容器内操作,可以把私钥cp出来。在本地替换即可。
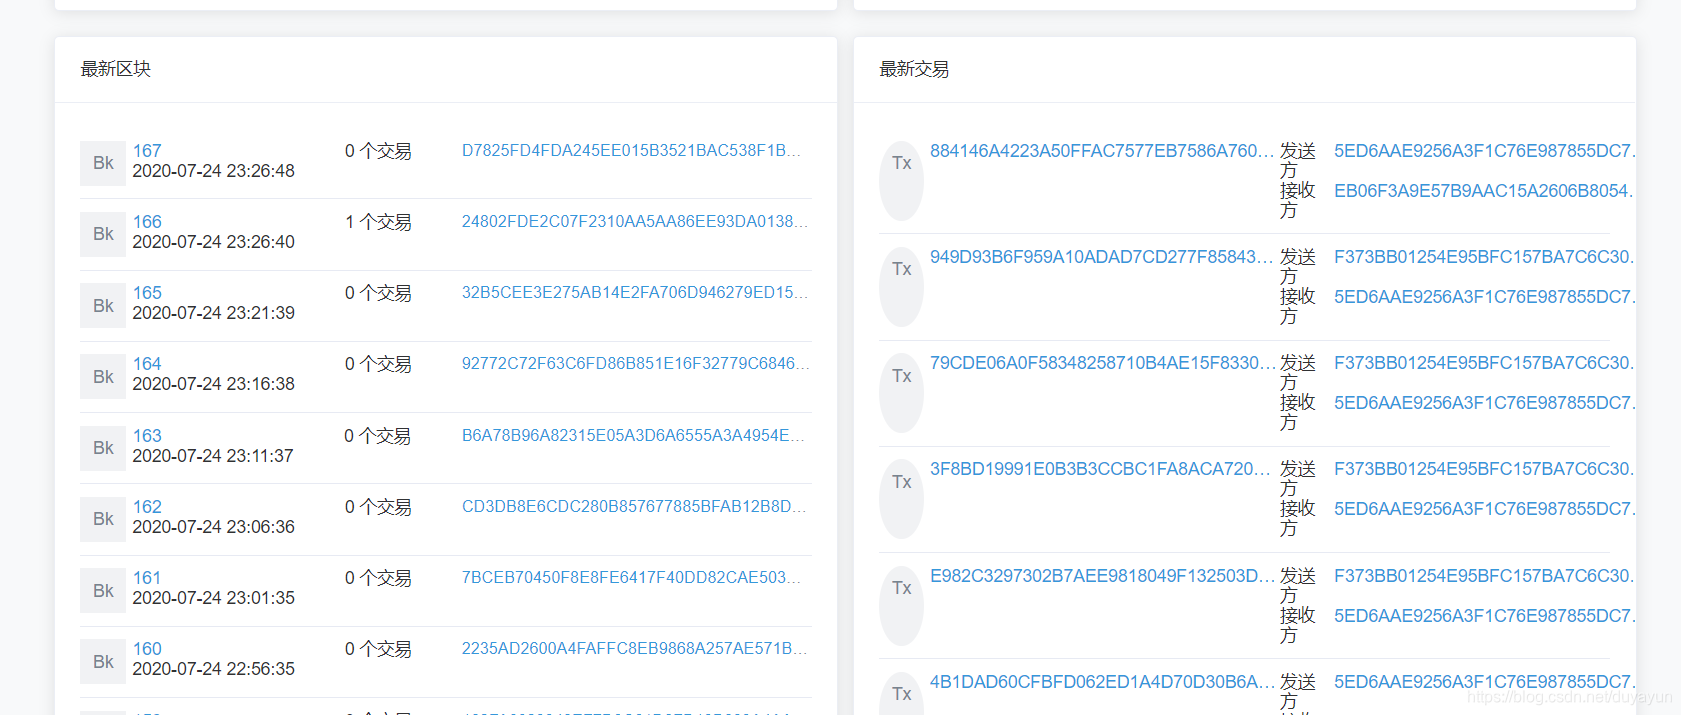
/keys/data $ burrow tx -g /ref/genesis.json -v 0 formulate send -s 5ED6AAE9256A3F1C76E987855DC74B2E21A061EB -t EB06F3A9E57B9AAC15A2606B8054F68841757E43 -a 10 | burrow tx -g /ref/genesis.json -v 0 commit
884146A4223A50FFAC7577EB7586A760B9AA13D8410C52FFAB8F0EDFC3F84DC5
``
### 交易信息(区块链浏览器需要自己继承,如下)
需要注意burrow的grpc服务,