Spring菜鸟小白学习笔记---此节图片特多,逐步讲解Spring jdbcTemplate&&&&idea环境下配置项目数据库
上一次我们说到了Spring的AOP
总体目录在此
本节来说下:
Spring JDBC Template
代码–》JDBC API–》JDBC驱动–》数据库
代码–》JDBC Template—》JDBC API–》JDBC驱动–》数据库
JDBC Template提供统一的模板方法,在保留代码灵活性的基础上,尽量减少持久化代码
JDBC Template基本使用
execute方法执行DDL(数据定义语言:定义表名,标题,列名,及其结构)语句
update与batchUpdate方法更新方法
update 对数据进行增删改操作
batchUpdate批量增删改
query和queryXXX方法查询方法
查询简单数据项
获取一个数据
获取多个数据
获取复杂对象(封装为Map)
查询复杂对象RowMapper接口
call方法调用存储过程
优点:
   简单
   灵活
缺点:
    Java代码和SQL代码掺杂
    功能不丰富
对于如何在idea环境下配置数据源的详细步骤,idea的内置功能很方便我们查看和配置我们的数据库,此部分在文章末尾,请直接下滑
为了逐个实现JDBCTemplate我们首先创建测试用数据库
代码如下
drop database if exists selection_course;
create database selection_course;
use selection_course;
create table course
(
id int not null auto_increment,
name char(20),
score int,
primary key (id)
);
create table selection
(
student int not null,
course int not null,
selection_time datetime,
score int,
primary key (student, course)
);
create table student
(
id int not null auto_increment,
name varchar(20),
sex char(2),
born date,
primary key (id)
);
alter table selection add constraint FK_Reference_1 foreign key (course)
references course (id) on delete restrict on update restrict;
alter table selection add constraint FK_Reference_2 foreign key (student)
references student (id) on delete restrict on update restrict;
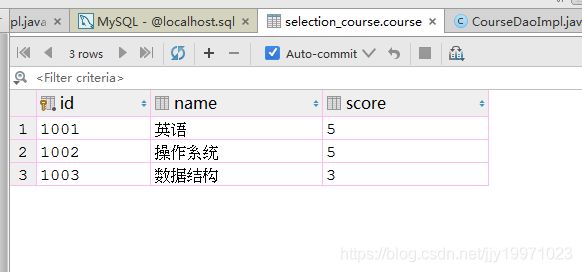
insert into course(id,name,score) values(1001,'英语',5);
insert into course(id,name,score) values(1002,'操作系统',5);
insert into course(id,name,score) values(1003,'数据结构',3);
commit;
接着我们建立新的maven工程
具体步骤详见
链接
创建好之后我们的项目结构如下

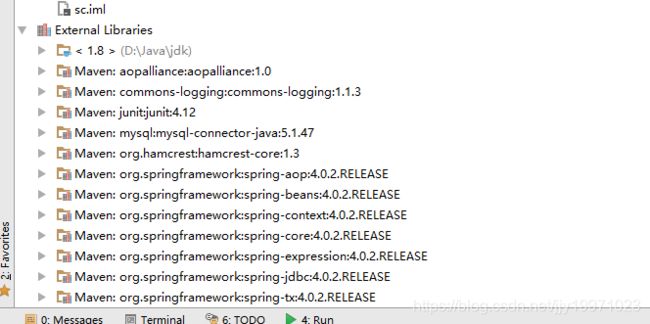
创建好对应的包,然后我们修改下pom文件来引入我们项目所需要的依赖
<?xml version="1.0" encoding="UTF-8"?>
<project xmlns="http://maven.apache.org/POM/4.0.0"
         xmlns:xsi="http://www.w3.org/2001/XMLSchema-instance"
         xsi:schemaLocation="http://maven.apache.org/POM/4.0.0 http://maven.apache.org/xsd/maven-4.0.0.xsd">
    <modelVersion>4.0.0</modelVersion>

    <groupId>com.jjyu</groupId>
    <artifactId>sc</artifactId>
    <version>1.0-SNAPSHOT</version>
    <properties><spring.version>4.0.2.RELEASE</spring.version>
            </properties>
    <dependencies>
        <dependency>
            <groupId>mysql</groupId>
            <artifactId>mysql-connector-java</artifactId>
            <version>5.1.47</version>
        </dependency>
        <dependency>
            <groupId>org.springframework</groupId>
            <artifactId>spring-core</artifactId>
            <version>${spring.version}</version>
        </dependency>
        <dependency>
            <groupId>org.springframework</groupId>
            <artifactId>spring-beans</artifactId>
            <version>${spring.version}</version>
        </dependency>
        <dependency>
            <groupId>org.springframework</groupId>
            <artifactId>spring-context</artifactId>
            <version>${spring.version}</version>
        </dependency>
        <dependency>
            <groupId>org.springframework</groupId>
            <artifactId>spring-aop</artifactId>
            <version>${spring.version}</version>
        </dependency>
        <dependency>
            <groupId>org.springframework</groupId>
            <artifactId>spring-jdbc</artifactId>
            <version>${spring.version}</version>
        </dependency>
        <dependency>
            <groupId>org.springframework</groupId>
            <artifactId>spring-tx</artifactId>
            <version>${spring.version}</version>
        </dependency>
        <dependency>
            <groupId>junit</groupId>
            <artifactId>junit</artifactId>
            <version>4.12</version>
        </dependency>
    </dependencies>


</project>
一共这些,你引入对了吗?
接下来为了操作数据库我们要在entity包中创建与数据库对应的实体类
三个实体类如下所示

public class Course {
    private int id;
    private String name;
    private int score;
    public int getId() {
        return id;
    }
    public void setId(int id) {
        this.id = id;
    }
    public String getName() {
        return name;
    }
    public void setName(String name) {
        this.name = name;
    }
    public int getScore() {
        return score;
    }
    public void setScore(int score) {
        this.score = score;
    }
}

public class Selection {
    private int sid;
    private int cid;
    private Date selTime;
    private int score;
    public int getSid() {
        return sid;
    }
    public void setSid(int sid) {
        this.sid = sid;
    }
    public int getCid() {
        return cid;
    }
    public void setCid(int cid) {
        this.cid = cid;
    }
    public Date getSelTime() {
        return selTime;
    }
    public void setSelTime(Date selTime) {
        this.selTime = selTime;
    }
    public int getScore() {
        return score;
    }
    public void setScore(int score) {
        this.score = score;
    }
}

public class Student {
    private int id;
    private String name;
    private String sex;
    private Date born;
    public int getId() {
        return id;
    }
    public void setId(int id) {
        this.id = id;
    }
    public String getName() {
        return name;
    }
    public void setName(String name) {
        this.name = name;
    }
    public String getSex() {
        return sex;
    }
    public void setSex(String sex) {
        this.sex = sex;
    }
    public Date getBorn() {
        return born;
    }
    public void setBorn(Date born) {
        this.born = born;
    }
    @Override
    public String toString() {
        return "Student: " +
                "id=" + id +
                ", name='" + name + '\'' +
                ", sex='" + sex + '\'' +
                ", born=" + born ;
    }
}
接下来我们配置Spring的核心配置文件spring.xml,建立起数据库和我们项目的连接
<?xml version="1.0" encoding="UTF-8" ?>
<beans xmlns="http://www.springframework.org/schema/beans"
       xmlns:xsi="http://www.w3.org/2001/XMLSchema-instance"
       xmlns:context="http://www.springframework.org/schema/context"
       xmlns:aop="http://www.springframework.org/schema/aop"
       xmlns:tx="http://www.springframework.org/schema/tx"
       xsi:schemaLocation="http://www.springframework.org/schema/beans
    http://www.springframework.org/schema/beans/spring-beans.xsd
    http://www.springframework.org/schema/context
    http://www.springframework.org/schema/context/spring-context.xsd
    http://www.springframework.org/schema/aop
    http://www.springframework.org/schema/aop/spring-aop.xsd
    http://www.springframework.org/schema/tx
    http://www.springframework.org/schema/tx/spring-tx.xsd">


<bean id="dataSource" class="org.springframework.jdbc.datasource.DriverManagerDataSource">
        <property name="driverClassName" value="com.mysql.jdbc.Driver"/>
        <property name="url" value="jdbc:mysql://localhost:3306/selection_course?useUnicode=true&characterEncoding=utf-8"/>
        <property name="username" value="root"/>
        <property name="password" value="root"/>
    </bean>

    <bean id="jdbcTemplate" class="org.springframework.jdbc.core.JdbcTemplate">
        <property name="dataSource" ref="dataSource"/>
<!--自动扫描-->
    </bean>
    <context:component-scan base-package="com.jjyu.src"/>
    </beans>
上面的准备工作终于结束啦。
再做这些项目的时候,测试永远不是麻烦的,麻烦的永远是配置和准备工作。

接下来便一块看看测试我们JDBCTemplate的各种方法吧。ok!let’s go!!!
public class Test {
    //获取到数据库操作对象
   private JdbcTemplate jdbcTemplate;
    {
        ApplicationContext context=new ClassPathXmlApplicationContext("spring.xml");
         jdbcTemplate=(JdbcTemplate) context.getBean("jdbcTemplate");
    }
    //接下来的方法就是单个单个的了,如果你真的在coding的话,
    //就把下面的代码插入到这行注释之后即可,即可测试,如下图

 }

JDBC Template基本使用测试代码
execute方法执行DDL(数据定义语言:定义表名,标题,列名,及其结构)语句
@org.junit.Test
public void testExecute(){
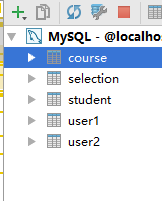
jdbcTemplate.execute("create table user2(id int,name VARCHAR (20))");
}
你看多了个user2
update与batchUpdate方法更新方法
update 对数据进行增删改操作
batchUpdate批量增删改
 @org.junit.Test
    public void testUpdate(){
        String sql="insert into student(name,sex) values(?,?)";
        jdbcTemplate.update(sql,new Object[]{"apple","男"});
    }
    @org.junit.Test
    public void testUpdate2(){
        String sql="UPDATE  student set sex=? where id=?";
        jdbcTemplate.update(sql,"b",1);
    }
   @org.junit.Test
    public void testBatchUpdate(){
        String[] sql={
                "insert into student(name,sex) values('b','n')",
                "insert into student(name,sex) values('c','b')",
                "update  student set sex='n' where id=1"
        };
        jdbcTemplate.batchUpdate(sql);
    }
    @org.junit.Test
    public void testBatchUpdate2(){
        String sql="insert into selection(student,course) values(?,?)";
        List<Object[]> list=new ArrayList<Object[]>();
        list.add(new Object[]{1,1001});
        list.add(new Object[]{1,1003});

        jdbcTemplate.batchUpdate(sql,list);
    }


query和queryXXX方法查询方法
查询简单数据项
获取一个数据
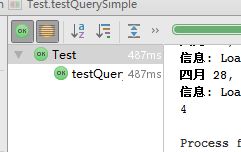
@org.junit.Test
public void testQuerySimple(){
String sql="select count(*) from student";
int count=jdbcTemplate.queryForObject(sql,Integer.class);
System.out.println(count);
}
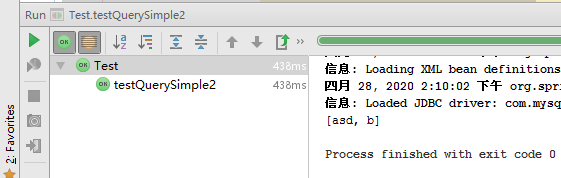
@org.junit.Test
public void testQuerySimple2(){
String sql="select name from student where sex=?";
List<String> count=jdbcTemplate.queryForList(sql,String.class,"n");
System.out.println(count);
}
获取多个数据
获取复杂对象(封装为Map)
@org.junit.Test
public void testQueryMap(){
String sql="select * from student where id=?";
Map<String,Object> count=jdbcTemplate.queryForMap(sql,1);
System.out.println(count);
}
@org.junit.Test
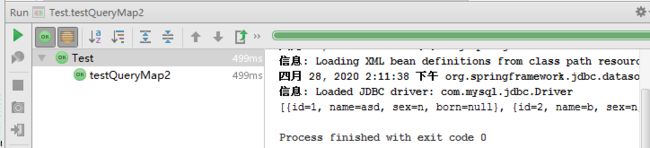
public void testQueryMap2(){
String sql="select * from student ";
List< Map<String,Object>> count=jdbcTemplate.queryForList(sql);
System.out.println(count);
}

查询复杂对象RowMapper接口
call方法调用存储过程
  @org.junit.Test
    public void testQueryEnetity1(){
        String sql="select * from student where id=? ";
        Student student=jdbcTemplate.queryForObject(sql, new StudentRowMapper(), 1);

        System.out.println(student);
    }
    @org.junit.Test
    public void testQueryEnetity2(){
        String sql="select * from student  ";
       List<Student>  students=jdbcTemplate.query(sql, new StudentRowMapper());

        System.out.println(students);
    }
    private  class StudentRowMapper implements RowMapper<Student>{
        public Student mapRow(ResultSet resultSet, int i) throws SQLException {
            Student stu=new Student();
            stu.setId(resultSet.getInt("id"));
            stu.setName(resultSet.getString("name" ));
            stu.setSex(resultSet.getString("sex"));
            stu.setBorn(resultSet.getDate("born"));
            return stu;
        }
    }


接下来为了方便加深理解,我们实现下模拟业务逻辑中的增删改查
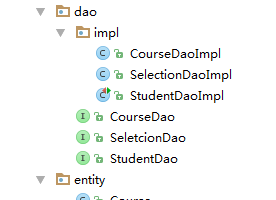
对应代码
public interface CourseDao {
    void insert(Course stu);
    void update(Course stu);
    void delete(int id);
    Course select(int id);
    List<Course> selectAll();
}


@Repository
public class CourseDaoImpl implements CourseDao {
    @Autowired
    private JdbcTemplate jdbcTemplate;


    public void insert(Course course) {
        String sql ="insert into student(name,score) values(?,?)";
        jdbcTemplate.update(sql,course.getName(),course.getScore());
    }
    public void update(Course course) {
        String sql="update course set name=?,score where id=?";    jdbcTemplate.update(sql,course.getName(),course.getScore(),course.getId());

    }

    public void delete(int id) {
        String sql="delete from course where id=?";
        jdbcTemplate.update(sql,id);
    }

    public Course select(int id) {
        String sql ="select * from course where id=?";
        return jdbcTemplate.queryForObject(sql,new CourseRowMapper(),id);

    }

    public List<Course> selectAll() {
        String sql ="select * from course ";
        return jdbcTemplate.query(sql,new CourseRowMapper());
    }
    private  class CourseRowMapper implements RowMapper<Course> {
        public Course mapRow(ResultSet resultSet, int i) throws SQLException {
            Course course=new Course();
            course.setId(resultSet.getInt("id"));
            course.setName(resultSet.getString("name" ));
            course.setScore(resultSet.getInt("score"));

            return course;
        }
    }
}


public interface SeletcionDao {
    void insert(List<Selection> seles);
    void delete(int sid,int cid);
    List<Map<String,Object>> selectByStudent(int sid);
    List<Map<String,Object>> selectByCourse(int cid);
}


@Repository
public class SelectionDaoImpl implements SeletcionDao {
    @Autowired
    private JdbcTemplate jdbcTemplate;

    public void insert(List<Selection> seles) {
        String sql="insert into selection values(?,?,?,?)";
        List<Object[]> list=new ArrayList<Object[]>();
        for(Selection selection:seles){
            Object[] args=new Object[4];
            args[0]=selection.getSid();
            args[1]=selection.getCid();
            args[2]=selection.getSelTime();
            args[3]=selection.getScore();
            list.add(args);
        }
        jdbcTemplate.batchUpdate(sql,list);

    }


    public void delete(int sid,int cid) {
        String sql="delete from selection where student=? and course=?";
        jdbcTemplate.update(sql,sid,cid);

    }

    public List<Map<String, Object>> selectByStudent(int sid) {
        String sql="select se.* , stu.name sname ,cou.name cname" +
                "from selection se left join student stu on se.student=stu.id " +
                "left join course cou onse.course=cou.id"+
                "where student=?";
        return jdbcTemplate.queryForList(sql,sid);
    }

    public List<Map<String, Object>> selectByCourse(int cid) {
        String sql="select se.* , stu.name sname ,cou.name cname" +
                "from selection se left join student stu on se.student=stu.id " +
                "left join course cou onse.course=cou.id"+
                "where course=?";
        return jdbcTemplate.queryForList(sql,cid);
    }
}


public interface StudentDao {
    void insert(Student stu);
    void update(Student stu);
    void delete(int id);
    Student select(int id);
    List<Student> selectAll();
}


@Repository("studentDaoImpl")
public class StudentDaoImpl implements StudentDao {
    @Autowired
    private JdbcTemplate jdbcTemplate;

    public void insert(Student stu) {
       String sql ="insert into student(name,sex,born) values(?,?,?)";
        jdbcTemplate.update(sql,stu.getName(),stu.getSex(),stu.getBorn());
    }

    public void update(Student stu) {
        String sql="update student set name=?,sex=?, born=? where id=?";
        jdbcTemplate.update(sql,stu.getName(),stu.getSex(),stu.getBorn(),stu.getId());

    }

    public void delete(int id) {
       String sql="delete from student where id=?";
        jdbcTemplate.update(sql,id);
    }

    public Student select(int id) {
        String sql ="select * from student where id=?";
        return jdbcTemplate.queryForObject(sql,new StudentRowMapper(),id);
    }

    public List<Student> selectAll() {
        String sql ="select * from student ";
        return jdbcTemplate.query(sql,new StudentRowMapper());
    }
    private  class StudentRowMapper implements RowMapper<Student> {
        public Student mapRow(ResultSet resultSet, int i) throws SQLException {
            Student stu=new Student();
            stu.setId(resultSet.getInt("id"));
            stu.setName(resultSet.getString("name" ));
            stu.setSex(resultSet.getString("sex"));
            stu.setBorn(resultSet.getDate("born"));
            return stu;
        }
    }

}
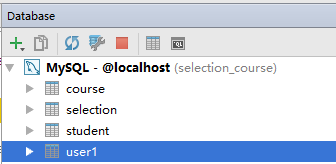
此为idea环境下配置项目数据库
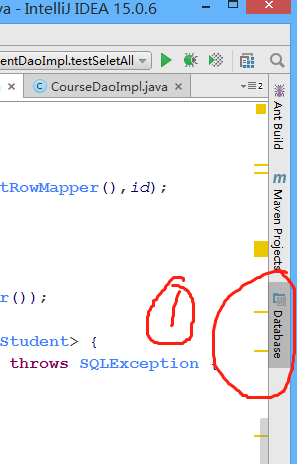

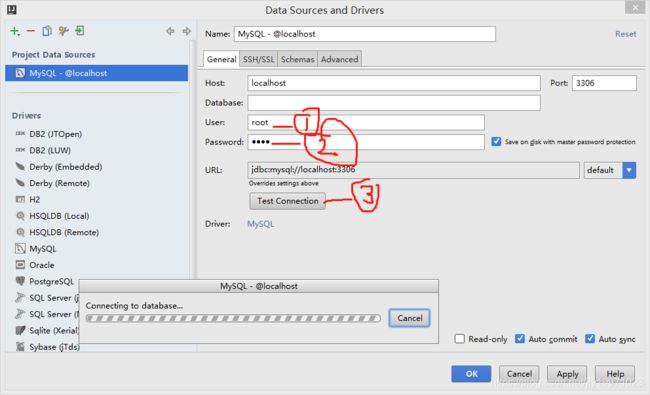
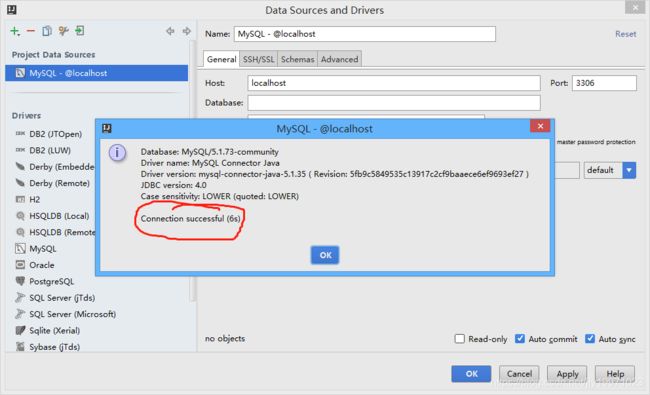
在此处选择数据库。

