Spring菜鸟小白学习笔记------Spring事务管理
上一节我们说了SpringJDBCTemplate
详细Spring系列目录
点击链接查看
Spring事务管理
事务的相关概念
事务一般特指数据库事务,是指作为一个程序执行单元执行的一系列操作,要么完全执行,要么完全不执行。
事务的特性(ACID)
1、原子性atomicity:事务是一个不可分割的工作单位
2、一致性consistency:在业务规则上,事务必须是使数据库从一个一致性状态变到另一个一致性状态
3、隔离性isolation:一个事务的执行不能被其他事务干扰
4、持久性durability:一个事务一旦提交,它对数据库中数据的改变就应该是永久性的
MySQL事务处理
基本语句
MySQL中只有使用InnoDB数据库引擎的数据库或表才支持事务
show engines–查看服务器支持的引擎
default-storage-engine=Innodb ----my.ini修改默认引擎
MySQL默认以自动提交autocommit模式运行
显示的事务语句
begin/start transaction 显示的开启一个事务。
commit 提交事务并使已对数据库进行的所有修改变为永久性的。
rollback 回滚事务,并撤销正在进行的所有未提交的修改。
事务并发问题
  脏读,读取了脏数据(不合理的数据,不正确的数据),只允许读取永久性数据,会话独立
  不可重复读,事务B修改对事务A的影响,锁行
  幻读,事务A插入对事务B的影响,锁表
MySQL事务隔离级别                  脏读  不可重复读    幻读
	  读未提交(read-uncommitted)  是     是        是
	  读已提交(read-committed)    否     是        是
	  可重复读(repeatable-read)   否     否        是
	  串行化(serializable)        否     否        否
  #会用到的表和操作
drop database if exists os;
create database os;
create table orders(
     id char(6) not null,
     products_id char(6) not null,
     number int,
     price double,
     create_time datetime,
     send_time datetime,
     confirm_time datetime,
     consignee varchar(20),
     consignee_phone char(11),
     consignee_address varchar(100),
     status varchar(10),
     primary key(id)
     );

create table products(
     id char(6) not null,
     title varchar(20),
     price double,
     stock int,
     status varchar(10),
     primary key(id));
	insert into products values('100001','小米8',2699,80,'正常'),('100002','小米8SE',1799,100,'正常'),('100003','小米MIX2S',3299,100,'正常'),('100004','小米手环3',199,100,'正常');
----设置事务隔离级别
set session transaction isolation level read uncommitted;
  `select @@tx_isolation` 查询默认隔离级别
set session transaction isolation level 。。。设置当前会话隔离级别

我们首先为我们的接下来的测试项目创建表
以及对该表进行测试也就是测试MySQL中的事务问题
这里我是用的Navicat进行操作的,你也可以使用idea自带的数据库插件来整
详细如何配置idea的数据库插件链接
---脏读
---事务A
begin;
select stock from products where id='100001';
rollback;
--事务B
begin;
update  products set stock=0 where id='100001';
rollback;
--不可重复读
--事务A
begin;
select stock from products where id='100001';
select stock from products where id='100001';
rollback;
--事务B
begin;
update  products set stock=0 where id='100001';
commit;
--幻读
--事务A
begin;
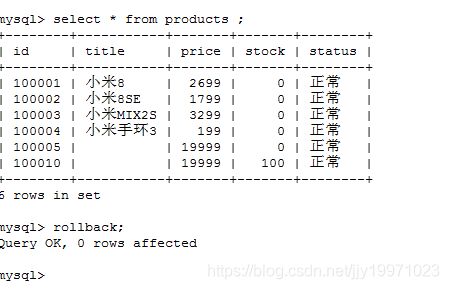
update  products set stock=0 ;
select * from products ;
rollback;
--事务B
begin;
insert into products values('100010','',19999,100,'正常');
commit;
事务A,是想将所有的都改了的,但是由于事务B的不合时机的插入,导致A产生幻读。

事务B

事务A

JDBC事务处理
JDBC的事务处理是基于Connection的,JDBC是通过Connection对象进行事务管理
JDBC默认事务处理行为是自动提交
事务相关方法
setAutoCommit 设置自动提交
commit 提交事务
rollback 回滚事务
JDBC事务隔离级别
   transaction_None不支持事务
   transaction_READ_UNCOMMITIED
   transaction_READ_COMMITTED
   transaction_REPEATABLE_READ默认级别
   transaction_SERIALIZABLE
事务隔离级别设置
–getTransactionIsolation获取当前隔离级别
–setTransactionIsolation设置隔离级别
Spring事务
Spring事务处理API
 PlatformTransactionManager是核心接口
 TransactionDefinition实现的隔离级别
 Isolation_Default使用数据库默认
 Isolation_READ_UNCOMMITIED
 Isolation_READ_COMMITTED
 Isolation_REPEATABLE_READ默认级别
 Isolation_SERIALIZABLE
默认超时30s
Spring事务传播行为
Propagation_Required支持当前事务,如果当前没有事务,就创建一个事务
Propagation_supports支持当前事务,如果当前没有事务,就以非事务方式执行
Propagation_mandatory支持当前事务,如果没有当前事务,就抛出异常
Propagation_requires_new新建事务,如果当前存在事务,就把当前事务挂起
Propagation_not_supported以非事务方式执行操作,如果当前存在事务,就把当前事务挂起
Propagation_never以非事务方式执行,如果当前存在事务,则抛出异常
Propagation_nested如果当前存在事务,则在嵌套事务内运行,如果当前没有事务,就新建一个事务
Spring事务处理方式
1、 Spring编程式事务处理
基于底层API的编程式事务管理
	    PLatformTransactionManager
		TransactionDefinition
		TransactionStatus
	  基于TransactionTemplate的编程式事务管理
	     TransactionTemplate
2、Spring声明式事务处理
Spring的声明式事务处理是建立在AOP的基础之上的,其本质是对方法前后进行拦截,然后在目标方法开始之前创建或者加入一个事务,在执行完目标方法之后根据执行情况提交或者回滚事务
建议在开发中使用声明式事务,是因为这样可以使业务代码纯粹干净,方便后期的代码维护
基于TransactionInterceptor的声明式事务处理
基于TransactionProxyFactoryBean的声明式事务处理
基于
在业务层中间不需要任何注解
基于@Transactional的声明式事务管理
在业务层需要注解,但是精简,更加流行的方式
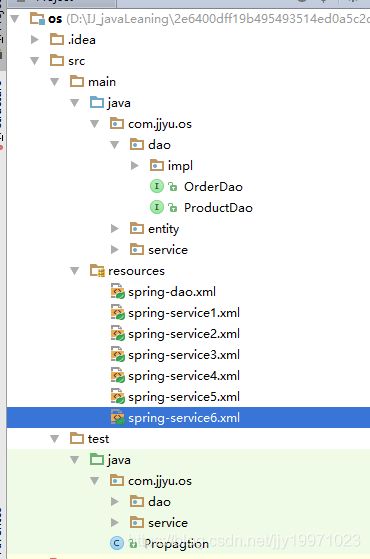
为了实现上述理论我们新建一个项目
如何新建项目,请点链接
       <dependency>
            <groupId>mysql</groupId>
            <artifactId>mysql-connector-java</artifactId>
            <version>5.1.48</version>
        </dependency>
public class Order {
    private String id;
    private String productsId;
    private int number;
    private double price;
    private Date createTime;
    private Date sendTime;
    private Date confirmTime;
    private String consignee;
    private String consigneePhone;
    private String consigneeAddress;
    private String status;

    public Order() {
    }

    public Order(String id, String productsId, int number, double price, Date createTime, Date sendTime, Date confirmTime, String consignee, String consigneePhone, String consigneeAddress, String status) {
        this.id = id;
        this.productsId = productsId;
        this.number = number;
        this.price = price;
        this.createTime = createTime;
        this.sendTime = sendTime;
        this.confirmTime = confirmTime;
        this.consignee = consignee;
        this.consigneePhone = consigneePhone;
        this.consigneeAddress = consigneeAddress;
        this.status = status;
    }
    //get set 方法
}
public class Product {
    private String id;
    private String title;
    private double price;
    private int stock;
    private String status;
    //get set 方法
}
接下来用SpringJDBCTemplate实现对应的操作Dao和其实现

public interface ProductDao {
    void insert(Product product);
    void update(Product product);
    void delete(String id);
    Product select(String id);
    List<Product> select();
}
public class ProductDaoImpl implements ProductDao {
    public void insert(Product product) {
    }
    public void update(Product product) {
    }

    public void delete(String id) {
    }
    public Product select(String id) {
        return null;
    }

    public List<Product> select() {
        return null;
    }
}
public interface OrderDao {
    void insert(Order order);
    void update(Order order);
    void delete(String id);
    Order select(String id);
    List<Order> select();
}
@Repository
public class OrderDaoImpl implements OrderDao {
    @Autowired
    private JdbcTemplate jdbcTemplate;
    public void insert(Order order) {
    }

    public void update(Order order) {
    }

    public void delete(String id) {
    }

    public Order select(String id) {
        return null;
    }

    public List<Order> select() {
        return null;
    }
}
public class OrderTest {
    private String driver="com.mysql.jdbc.Driver";
    private String url="jdbc:mysql://localhost:3306/os?useUnicode=true&characterEncoding=utf8";
    private String username="root";
    private String password="root";

    @Test
    public void addOrder() throws SQLException {
        try {
            Class.forName(driver);
        } catch (ClassNotFoundException e) {
            e.printStackTrace();
        }
        Connection connection=null;
        try {
            connection= DriverManager.getConnection(url,username,password);
       connection.setAutoCommit(false);

            Statement statement=connection.createStatement();
            statement.execute("insert into orders values('100001','100001',2,2499,now(),null,null,'hhh','13625614444','beijing','daifahuo')");
            statement.execute("update products set  stock=stock-2  where id='100001' ;");

            statement.close();
            connection.commit();
        } catch (SQLException e) {
            e.printStackTrace();
            connection.rollback();
        }
        finally {
            try {
                connection.close();
            } catch (SQLException e) {
                e.printStackTrace();
            }
        }
    }
}
首先接口的代码为
public interface OrderService {
    void addOrder(Order order);
}
各个实现类
impl
@Service
public class OrderServiceImpl implements OrderService {
    @Autowired
    private OrderDao orderDao;
    @Autowired
    private ProductDao productDao;

    public void addOrder(Order order) {
        order.setCreateTime(new Date());
        order.setStatus("代付款");
        orderDao.insert(order);
        Product product = productDao.select(order.getProductsId());
        product.setStock(product.getStock() - order.getNumber());
        productDao.update(product);
    }
}
impl 1
@Service
public class OrderServiceImpl implements OrderService {
    @Autowired
    private OrderDao orderDao;
    @Autowired
    private ProductDao productDao;
    @Autowired
    private PlatformTransactionManager transactionManager;
    @Autowired
    private TransactionDefinition transactionDefinition;

    public void addOrder(Order order) {
        order.setCreateTime(new Date());
        order.setStatus("代付款");

        TransactionStatus transactionStatus=transactionManager.getTransaction(transactionDefinition);
      try {
          orderDao.insert(order);
          Product product = productDao.select(order.getProductsId());
          product.setStock(product.getStock() - order.getNumber());
          productDao.update(product);
          transactionManager.commit(transactionStatus);
      }catch (Exception e){
          transactionManager.rollback(transactionStatus);
      }

    }
}
impl2
@Service
public class OrderServiceImpl implements OrderService {
    @Autowired
    private OrderDao orderDao;
    @Autowired
    private ProductDao productDao;
    @Autowired
    private TransactionTemplate transactionTemplate;

    public void addOrder(final Order order) {
        order.setCreateTime(new Date());
        order.setStatus("代付款");

     transactionTemplate.execute(new TransactionCallback() {
         public Object doInTransaction(TransactionStatus transactionStatus) {
             try {
                 orderDao.insert(order);
                 Product product = productDao.select(order.getProductsId());
                 product.setStock(product.getStock() - order.getNumber());
                 productDao.update(product);

             }catch (Exception e){
                 transactionStatus.setRollbackOnly();
             }
             return null;
         }
     });


    }
}
impl6
@Service
public class OrderServiceImpl implements OrderService {
    @Autowired
    private OrderDao orderDao;
    @Autowired
    private ProductDao productDao;

    @Transactional(propagation = Propagation.REQUIRED)
    public void addOrder(Order order) {
        order.setCreateTime(new Date());
        order.setStatus("代付款");
        orderDao.insert(order);
        Product product = productDao.select(order.getProductsId());
        product.setStock(product.getStock() - order.getNumber());
        productDao.update(product);
    }
}
<?xml version="1.0" encoding="UTF-8" ?>
<beans xmlns="http://www.springframework.org/schema/beans"
       xmlns:xsi="http://www.w3.org/2001/XMLSchema-instance"
       xmlns:context="http://www.springframework.org/schema/context"
       xmlns:aop="http://www.springframework.org/schema/aop"
       xmlns:tx="http://www.springframework.org/schema/tx"
       xsi:schemaLocation="http://www.springframework.org/schema/beans
    http://www.springframework.org/schema/beans/spring-beans.xsd
    http://www.springframework.org/schema/context
    http://www.springframework.org/schema/context/spring-context.xsd
    http://www.springframework.org/schema/aop
    http://www.springframework.org/schema/aop/spring-aop.xsd
    http://www.springframework.org/schema/tx
    http://www.springframework.org/schema/tx/spring-tx.xsd">
    <bean id="dataSource" class="org.springframework.jdbc.datasource.DriverManagerDataSource">
        <property name="driverClassName" value="com.mysql.jdbc.Driver"/>
        <property name="url" value="jdbc:mysql://localhost:3306/os?userUnicode=true&characterEncoding=utf-8"/>
        <property name="username" value="root"/>
        <property name="password" value="root"/>

    </bean>
    <bean id="jdbcTemplate" class="org.springframework.jdbc.core.JdbcTemplate">
        <property name="dataSource" ref="dataSource"/>
    </bean>
    <context:component-scan base-package="com.jjyu.os.dao"/>
</beans>
spring-service1.xml
Spring编程式事务处理
<!--前面的头部都是一样的-->
 <import resource="spring-dao.xml"/>
    <context:component-scan base-package="com.jjyu.os.service.impl1"/>
    <bean id="transactionManager" class="org.springframework.jdbc.datasource.DataSourceTransactionManager">
        <property name="dataSource" ref="dataSource"/>
    </bean>
    <bean id="transactionDefinition" class="org.springframework.transaction.support.DefaultTransactionDefinition">
        <property name="propagationBehaviorName" value="PROPAGATION_REQUIRED"/>
    </bean>
spring-service2.xml
  <import resource="spring-dao.xml"/>
    <context:component-scan base-package="com.jjyu.os.service.impl2"/>
    <bean id="transactionManager" class="org.springframework.jdbc.datasource.DataSourceTransactionManager">
        <property name="dataSource" ref="dataSource"/>
    </bean>
    <bean id="transactionTemplate" class="org.springframework.transaction.support.TransactionTemplate">
        <property name="transactionManager" ref="transactionManager"/>
    </bean>
spring-service3.xml
基于TransactionInterceptor的声明式事务处理
<import resource="spring-dao.xml"/>
    <bean id="transactionManager" class="org.springframework.jdbc.datasource.DataSourceTransactionManager">
        <property name="dataSource" ref="dataSource"/>
    </bean>
    <bean id="orderServiceTarget" class="com.jjyu.os.service.impl.OrderServiceImpl"/>
    <bean id="transactionInterceptor" class="org.springframework.transaction.interceptor.TransactionInterceptor">
        <property name="transactionManager" ref="transactionManager"/>
       <property name="transactionAttributes">
           <props>
               <prop key="get*">PROPAGATION_REQLIRED,readOnly</prop>
               <prop key="find*">PROPAGATION_REQLIRED,readOnly</prop>
               <prop key="search*">PROPAGATION_REQLIRED,readOnly</prop>
               <prop key="*">PROPAGATION_REQLIRED</prop>
           </props>
       </property>
    </bean>
    <bean id="orderService" class="org.springframework.aop.framework.ProxyFactoryBean">
        <property name="target" ref="orderServiceTarget"/>
        <property name="interceptorNames">
            <list>
                <idref bean="transactionInterceptor"/>
            </list>
        </property>
    </bean>
spring-service4.xml
基于TransactionProxyFactoryBean的声明式事务处理
  <import resource="spring-dao.xml"/>
    <bean id="transactionManager" class="org.springframework.jdbc.datasource.DataSourceTransactionManager">
        <property name="dataSource" ref="dataSource"/>
    </bean>
    <bean id="orderServiceTarget" class="com.jjyu.os.service.impl.OrderServiceImpl"/>
    <bean id="orderService" class="org.springframework.transaction.interceptor.TransactionProxyFactoryBean">
        <property name="transactionManager" ref="transactionManager"/>
        <property name="transactionAttributes">
            <props>
                <prop key="get*">PROPAGATION_REQLIRED,readOnly</prop>
                <prop key="find*">PROPAGATION_REQLIRED,readOnly</prop>
                <prop key="search*">PROPAGATION_REQLIRED,readOnly</prop>
                <prop key="*">PROPAGATION_REQLIRED</prop>
            </props>
        </property>
        <property name="target" ref="orderServiceTarget"/>
    </bean>
spring-service5.xml
基于
在业务层中间不需要任何注解
 <import resource="spring-dao.xml"/>
    <context:component-scan base-package="com.jjyu.os.service.impl"></context:component-scan>
    <bean id="transactionManager" class="org.springframework.jdbc.datasource.DataSourceTransactionManager">
        <property name="dataSource" ref="dataSource"/>
    </bean>
   <tx:advice id="txAdvice" transaction-manager="transactionManager">
       <tx:attributes>
           <tx:method name="get*" propagation="REQUIRED" read-only="true"/>
           <tx:method name="find*" propagation="REQUIRED" read-only="true"/>
           <tx:method name="search*" propagation="REQUIRED" read-only="true"/>
           <tx:method name="*" propagation="REQUIRED"/>
       </tx:attributes>
   </tx:advice>
    <aop:config>
        <aop:pointcut id="pointcut" expression="execution(* com.jjyu.os.service.impl.*.*(..))"/>
        <aop:advisor advice-ref="txAdvice" pointcut-ref="pointcut"/>
    </aop:config>
spring-service6.xml
基于@Transactional的声明式事务管理
在业务层需要注解,但是精简,更加流行的方式
  <import resource="spring-dao.xml"/>
    <context:component-scan base-package="com.jjyu.os.service.impl6"></context:component-scan>
    <bean id="transactionManager" class="org.springframework.jdbc.datasource.DataSourceTransactionManager">
        <property name="dataSource" ref="dataSource"/>
    </bean>
   <tx:annotation-driven transaction-manager="transactionManager"/>
@RunWith(SpringJUnit4ClassRunner.class)
@ContextConfiguration("classpath:spring-service6.xml")
public class OrderTest {
    @Autowired
private OrderService orderService;
    @Test
    public void testAddOrder(){
        Order order=new Order();
        orderService.addOrder(order);
    }
}


