目标识别:SSD pytorch代码学习笔记(1)-模型篇
网络模型
整个网络是由三大部分组成:
VGG Backbone
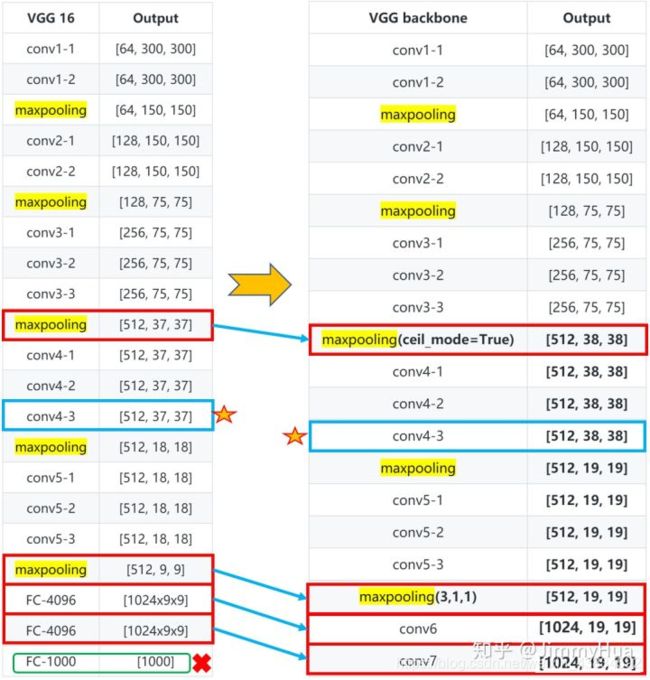
✔️ 根据SSD的论文描述,作者采用了vgg16的部分网络作为基础网络,在5层网络后,丢弃全连接,改为空洞卷积网络
✏️ 值得注意:
- conv4-1前面一层的maxpooling的ceil_mode=True,使得输出为 38x38;
- Conv4-3网络是需要输出多尺度的网络层;
- Conv5-3后面的一层maxpooling参数为(kernel_size=3, stride=1, padding=1),不进行下采样。这是为空洞卷积做准备。
- Conv6为空洞卷积。
空洞卷积参考链接
网络层次图:
网络代码:
def vgg(cfg, i, batch_norm=False):
'''
该代码参考vgg官网的代码
'''
    layers = []
    in_channels = i
    for v in cfg:
        # 正常的 max_pooling
        if v == 'M':
            layers += [nn.MaxPool2d(kernel_size=2, stride=2)]

        # ceil_mode = True, 上采样使得 channel 75-->38
        # ceil_mode 为True,则采用天花板模式,否则采用地板模式,默认为False
        elif v == 'C':
            layers += [nn.MaxPool2d(kernel_size=2, stride=2, ceil_mode=True)]
        else:
            conv2d = nn.Conv2d(in_channels, v, kernel_size=3, padding=1)
            if batch_norm:
                layers += [conv2d, nn.BatchNorm2d(v), nn.ReLU(inplace=True)]
            else:
                layers += [conv2d, nn.ReLU(inplace=True)]
            # update in_channels
            in_channels = v

    # max_pooling (3,3,1,1)
    pool5 = nn.MaxPool2d(kernel_size=3, stride=1, padding=1)
    # 新添加的空洞卷积
    conv6 = nn.Conv2d(512, 1024, kernel_size=3, padding=6, dilation=6)
    #dalation:用于控制内核点之间的距离

    # 新添加的网络层 1024x1x1
    conv7 = nn.Conv2d(1024, 1024, kernel_size=1)

    # 结合到整体网络中
    layers += [pool5, conv6,
               nn.ReLU(inplace=True), conv7, nn.ReLU(inplace=True)]
    return layers

# 代码测试
if __name__ == "__main__":
    base = {
    '300': [64, 64, 'M', 128, 128, 'M', 256, 256, 256, 'C', 512, 512, 512, 'M',
            512, 512, 512],
    '512': [],
    }
    vgg = nn.Sequential(*vgg(base['300'], 3))
    x = torch.randn(1,3,300,300)
    print(vgg(x).shape)  #(1, 1024, 19, 19)
不同的写法
def vggs():
    '''
    调用torchvision.models里面的vgg,
    修改对应的网络层,同样可以得到目标的backbone。
    '''
    vgg16 = models.vgg16()
    vggs = vgg16.features
    vggs[16] = nn.MaxPool2d(2, 2, 0, 1, ceil_mode=True)
    vggs[-1] = nn.MaxPool2d(3, 1, 1, 1, ceil_mode=False)
    conv6 = nn.Conv2d(512, 1024, kernel_size=3, padding=6, dilation=6)
    conv7 = nn.Conv2d(1024, 1024, kernel_size=1)
    '''
    方法一:
    '''
    #vggs= nn.Sequential(feature, conv6, nn.ReLU(inplace=True), conv7, nn.ReLU(inplace=True))

    '''
    方法二:
    '''
    vggs.add_module('31',conv6)
    vggs.add_module('32',nn.ReLU(inplace=True))
    vggs.add_module('33',conv7)
    vggs.add_module('34',nn.ReLU(inplace=True))
    #print(vggs)
    x = torch.randn(1,3,300,300)
    print(vggs(x).shape)

    return vgg
输出网络结构:
Sequential(
  (0): Conv2d(3, 64, kernel_size=(3, 3), stride=(1, 1), padding=(1, 1))
  (1): ReLU(inplace)
  (2): Conv2d(64, 64, kernel_size=(3, 3), stride=(1, 1), padding=(1, 1))
  (3): ReLU(inplace)
  (4): MaxPool2d(kernel_size=2, stride=2, padding=0, dilation=1, ceil_mode=False)
  (5): Conv2d(64, 128, kernel_size=(3, 3), stride=(1, 1), padding=(1, 1))
  (6): ReLU(inplace)
  (7): Conv2d(128, 128, kernel_size=(3, 3), stride=(1, 1), padding=(1, 1))
  (8): ReLU(inplace)
  (9): MaxPool2d(kernel_size=2, stride=2, padding=0, dilation=1, ceil_mode=False)
  (10): Conv2d(128, 256, kernel_size=(3, 3), stride=(1, 1), padding=(1, 1))
  (11): ReLU(inplace)
  (12): Conv2d(256, 256, kernel_size=(3, 3), stride=(1, 1), padding=(1, 1))
  (13): ReLU(inplace)
  (14): Conv2d(256, 256, kernel_size=(3, 3), stride=(1, 1), padding=(1, 1))
  (15): ReLU(inplace)
  (16): MaxPool2d(kernel_size=2, stride=2, padding=0, dilation=1, ceil_mode=True)
  (17): Conv2d(256, 512, kernel_size=(3, 3), stride=(1, 1), padding=(1, 1))
  (18): ReLU(inplace)
  (19): Conv2d(512, 512, kernel_size=(3, 3), stride=(1, 1), padding=(1, 1))
  (20): ReLU(inplace)
  (21): Conv2d(512, 512, kernel_size=(3, 3), stride=(1, 1), padding=(1, 1))
  (22): ReLU(inplace)
  (23): MaxPool2d(kernel_size=2, stride=2, padding=0, dilation=1, ceil_mode=False)
  (24): Conv2d(512, 512, kernel_size=(3, 3), stride=(1, 1), padding=(1, 1))
  (25): ReLU(inplace)
  (26): Conv2d(512, 512, kernel_size=(3, 3), stride=(1, 1), padding=(1, 1))
  (27): ReLU(inplace)
  (28): Conv2d(512, 512, kernel_size=(3, 3), stride=(1, 1), padding=(1, 1))
  (29): ReLU(inplace)
  (30): MaxPool2d(kernel_size=3, stride=1, padding=1, dilation=1, ceil_mode=False)
  (31): Conv2d(512, 1024, kernel_size=(3, 3), stride=(1, 1), padding=(6, 6), dilation=(6, 6))
  (32): ReLU(inplace)
  (33): Conv2d(1024, 1024, kernel_size=(1, 1), stride=(1, 1))
  (34): ReLU(inplace)
)
Extra Layers
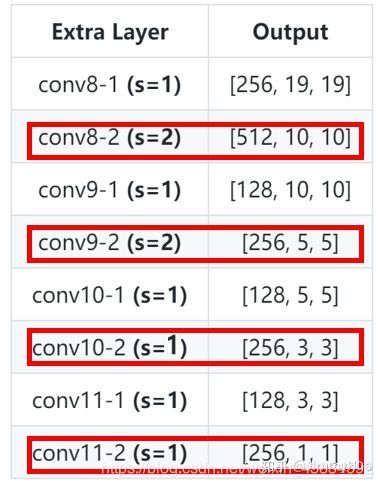
作者为了后续的多尺度提取,在VGG Backbone后面添加了卷积网络。

网络层次:

PS: 红框的网络需要进行多尺度分析,输入到multi-box网络。
网络代码:
def add_extras(cfg, i, batch_norm=False):
    '''
    为后续多尺度提取,增加网络层
    '''
    layers = []
    # 初始输入通道为 1024
    in_channels = i
    # flag 用来选择 kernel_size= 1 or 3
    flag = False
    for k,v in enumerate(cfg):
        if in_channels != 'S':
            if v == 'S':
                layers += [nn.Conv2d(in_channels, cfg[k+1],
                                    kernel_size=(1,3)[flag], stride=2, padding=1)]
            else:
                layers += [nn.Conv2d(in_channels, v, kernel_size=(1, 3)[flag])]

            flag = not flag # 反转flag

        in_channels = v # 更新 in_channels

    return layers
# 代码测试
if __name__ == "__main__":
    extras = {
    '300': [256, 'S', 512, 128, 'S', 256, 128, 256, 128, 256],
    '512': [],
    }
    layers = add_extras(extras['300'], 1024)
    print(nn.Sequential(*layers))
同论文中的网络结构比对,可以知道后面的extra部分已被正确定义了。其实很多代码都是串行地定义网络结构,不过这里用的是循环,每次读入cfg不同的值,这样的定义方式一定程度上减少了代码量,对于大型深度网络值得借鉴。同样地,函数的输出layers也为一个list,用于后续提取特征图之用。
输出:
Sequential(
  (0): Conv2d(1024, 256, kernel_size=(1, 1), stride=(1, 1))
  (1): Conv2d(256, 512, kernel_size=(3, 3), stride=(2, 2), padding=(1, 1))
  (2): Conv2d(512, 128, kernel_size=(1, 1), stride=(1, 1))
  (3): Conv2d(128, 256, kernel_size=(3, 3), stride=(2, 2), padding=(1, 1))
  (4): Conv2d(256, 128, kernel_size=(1, 1), stride=(1, 1))
  (5): Conv2d(128, 256, kernel_size=(3, 3), stride=(1, 1))
  (6): Conv2d(256, 128, kernel_size=(1, 1), stride=(1, 1))
  (7): Conv2d(128, 256, kernel_size=(3, 3), stride=(1, 1))
)
Multi-box Layers
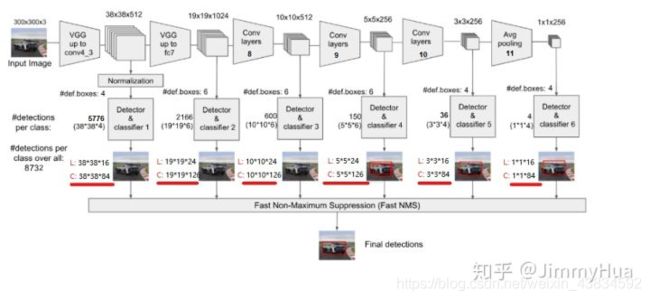
SSD一共有6层多尺度提取的网络,每层分别对 loc 和 conf 进行卷积,得到相应的输出。
网络层次:
网络代码
def multibox(vgg, extra_layers, cfg, num_classes):
    '''
    Args:
        vgg: 修改fc后的vgg网络
        extra_layers: 加在vgg后面的4层网络
        cfg: 网络参数,eg:[4, 6, 6, 6, 4, 4]
        num_classes: 类别,VOC为 20+背景=21
    Return:
        vgg, extra_layers
        loc_layers: 多尺度分支的回归网络
        conf_layers: 多尺度分支的分类网络
    '''
    loc_layers = []
    conf_layers = []
    vgg_layer = [21, -2]
    # 第一部分,vgg 网络的 Conv2d-4_3(21层), Conv2d-7_1(-2层)
    for k, v in enumerate(vgg_layer):
        # 回归 box*4(坐标)
        loc_layers += [nn.Conv2d(vgg[v].out_channels, cfg[k]*4, kernel_size=3, padding=1)]
        # 置信度 box*(num_classes)
        conf_layers += [nn.Conv2d(vgg[v].out_channels, cfg[k]*num_classes, kernel_size=3, padding=1)]

    # 第二部分,cfg从第三个开始作为box的个数,而且用于多尺度提取的网络分别为1,3,5,7层
    for k, v in enumerate(extra_layers[1::2],2):
        # 回归 box*4(坐标)
        loc_layers += [nn.Conv2d(v.out_channels, cfg[k]*4, kernel_size=3, padding=1)]
        # 置信度 box*(num_classes)
        conf_layers += [nn.Conv2d(v.out_channels, cfg[k]*(num_classes), kernel_size=3, padding=1)]

    return vgg, extra_layers, (loc_layers, conf_layers)
if __name__  == "__main__":
    vgg, extra_layers, (l, c) = multibox(vgg(base['300'], 3),
                                         add_extras(extras['300'], 1024),
                                         [4, 6, 6, 6, 4, 4], 21)
    print(nn.Sequential(*l))
    print('---------------------------')
    print(nn.Sequential(*c))
输出
'''
loc layers:
'''
Sequential(
  (0): Conv2d(512, 16, kernel_size=(3, 3), stride=(1, 1), padding=(1, 1))
  (1): Conv2d(1024, 24, kernel_size=(3, 3), stride=(1, 1), padding=(1, 1))
  (2): Conv2d(512, 24, kernel_size=(3, 3), stride=(1, 1), padding=(1, 1))
  (3): Conv2d(256, 24, kernel_size=(3, 3), stride=(1, 1), padding=(1, 1))
  (4): Conv2d(256, 16, kernel_size=(3, 3), stride=(1, 1), padding=(1, 1))
  (5): Conv2d(256, 16, kernel_size=(3, 3), stride=(1, 1), padding=(1, 1))
)
---------------------------
'''
conf layers:
'''
Sequential(
  (0): Conv2d(512, 84, kernel_size=(3, 3), stride=(1, 1), padding=(1, 1))
  (1): Conv2d(1024, 126, kernel_size=(3, 3), stride=(1, 1), padding=(1, 1))
  (2): Conv2d(512, 126, kernel_size=(3, 3), stride=(1, 1), padding=(1, 1))
  (3): Conv2d(256, 126, kernel_size=(3, 3), stride=(1, 1), padding=(1, 1))
  (4): Conv2d(256, 84, kernel_size=(3, 3), stride=(1, 1), padding=(1, 1))
  (5): Conv2d(256, 84, kernel_size=(3, 3), stride=(1, 1), padding=(1, 1))
)
SSD
模型类根据上述的三个网络层结合,结合后面提到的 prior_box和detection方法可以,完整的写出SSD的类。
class SSD(nn.Module):
    '''
    Args:
        phase: string, 可选"train" 和 "test"
        size: 输入网络的图片大小
        base: VGG16的网络层(修改fc后的)
        extras: 用于多尺度增加的网络
        head: 包含了各个分支的loc和conf
        num_classes: 类别数

    return:
        output: List, 返回loc, conf 和 候选框
    '''
    def __init__(self, phase, size, base, extras, head, num_classes):
        super(SSD, self).__init__()
        self.phase = phase
        self.size = size
        self.num_classes = num_classes
        # 配置config
        self.cfg = (coco, voc)[num_classes == 21]
        # 初始化先验框
        self.priorbox = PriorBox(self.cfg)#将在其他博客中介绍
        self.priors = self.priorbox.forward()
        # basebone 网络
        self.vgg = nn.ModuleList(base)
        # conv4_3后面的网络,L2 正则化
        self.L2Norm = L2Norm(512, 20)
        self.extras = nn.ModuleList(extras)
        # 回归和分类网络
        self.loc = nn.ModuleList(head[0])
        self.conf = nn.ModuleList(head[1])

        if phase == 'test':
        '''
            # 预测使用
            self.softmax = nn.Softmax(dim=-1)
            self.detect = Detect(num_classes, 200, 0.01, 0.045)
        '''
            pass

    def forward(self, x):
        sources = [] # 6张特征图
        loc = [] #所有默认框的位置预测结果, 列表中一个元素对应一张特征图
	conf = [] #所有默认框的分类预测结果, 列表中一个元素对应一张特征图

        # vgg网络到conv4_3
        for i in range(23):
            x = self.vgg[i](x)
        # l2 正则化并得到第一个特征图
        s = self.L2Norm(x)
        sources.append(s)

        # conv4_3 到 fc 并得到第二个特征图
        for i in range(23, len(self.vgg)):
            x = self.vgg[i](x)
        sources.append(x)

        # extras 网络 得到另外四个特征图
        for k,v in enumerate(self.extras):
            x = F.relu(v(x), inplace=True)
            # 把需要进行多尺度的网络输出存入 sources
            if k%2 == 1:
                sources.append(x)

        # 多尺度回归和分类网络
        #将各个特征图的定位和分类预测结果append进列表中
        for (x, l, c) in zip(sources, self.loc, self.conf):
            loc.append(l(x).permute(0, 2, 3, 1).contiguous())  #6*(N,C,H,W)->6*(N,H,W,C)
            conf.append(c(x).permute(0, 2, 3, 1).contiguous())  #6*(N,C,H,W)->6*(N,H,W,C)

        loc = torch.cat([o.view(o.size(0), -1) for o in loc], 1)
        conf = torch.cat([o.view(o.size(0), -1) for o in conf], 1)

        if self.phase == 'test':
        #如果是测试阶段需要对定位和分类的预测结果进行分析得到最终的预测框
            output = self.detect(
                    # loc 预测
                    loc.view(loc.size(0), -1, 4),
                    # conf 预测
                    self.softmax(conf.view(conf.size(0), -1, self.num_classes)),
                    # default box
                    self.priors.type(type(x.data)),
                    )
        else:
        #如果是训练阶段则直接输出定位和分类预测结果以计算损失函数
            output = (
                # loc的输出,size:(batch, 8732, 4)
                loc.view(loc.size(0), -1 ,4),
                 # conf的输出,size:(batch, 8732, 21)
                conf.view(conf.size(0), -1, self.num_classes),
                # 生成所有的候选框 size([8732, 4])
                self.priors,
                )
#            print(type(x.data))
#            print((self.priors.type(type(x.data))).shape)
        return output

    # 加载模型参数
    def load_weights(self, base_file):
        print('Loading weights into state dict...')
        self.load_state_dict(torch.load(base_file))
        print('Finished!')
使用build_ssd()封装函数,增加可读性:
def build_ssd(phase, size=300, num_classes=21):
    # 判断phase是否为满足的条件
    if phase != "test" and phase !="train":
        print("Error: Phase:" + phase +" not recognized!\n")
        return
    # 判断size是否为满足的条件
    if size != 300:
        print("Error: currently only size=300 is supported!")
        return

    # 调用multibox,生成vgg,extras,head
    base_, extras_, head_ = multibox(vgg(base[str(size)], 3),
                                     add_extras(extras[str(size)], 1024),
                                     mbox['300'], num_classes,
                                     )
    return SSD(phase, size, base_, extras_, head_, num_classes)

# 调试函数
if __name__ == '__main__':
    ssd = build_ssd('train')
    x = torch.randn(1, 3, 300, 300)
    y = ssd(x)
    print("Loc    shape: ", y[0].shape)
    print("Conf   shape: ", y[1].shape)
    print("Priors shape: ", y[2].shape)
输出
Loc    shape:  torch.Size([1, 8732, 4])
Conf   shape:  torch.Size([1, 8732, 21])
Priors shape:  torch.Size([8732, 4])

