系列简介
记得小时候读过一本关于计算机图形学(computer graphics, CG)的入门书,从此就爱上了CG。本系列希望,采用很多人认识的JavaScript语言去分享CG,令更多人有机会接触,并爱上CG。
本系列的特点之一,是读者能在浏览器里直接执行代码,也可重覆修改代码测试。透过这种互动,也许能更深刻体会内容。读者只要懂得JavaScript(因为JavaScript很简单,学过Java/C/C++/C#之类的语言也应没问题)和一点点线性代数(linear algebra)就可以了。
笔者在大学期间并没有修读CG课程,虽然看过相关书籍,始终未亲手做过全域光照的渲染器,本文也作为个人的学习分享。此外,笔者也差不多十年没接触JavaScript,希望各位不吝赐教。
本文简介
多数程序员听到3D CG,就会联想到Direct3D、OpenGL等API。事实上,这些流行的API主要为实时渲染(real-time rendering)而设,一般采用光栅化(rasterization)方式,渲染大量的三角形(或其他几何图元种类(primitive types))。这种基于光栅化的渲染系统,只支持局部光照(local illumination)。换句话说,渲染几何图形的一个像素时,光照计算只能取得该像素的资讯,而不能访问其他几何图形资讯。理论上,阴影(shadow)、反射(reflection)、折射(refraction)等为全局光照(global illumination)效果,实际上,栅格化渲染系统可以使用预处理(如阴影贴图(shadow mapping)、环境贴图(environment mapping))去模拟这些效果。
全局光照计算量大,一般也没有特殊硬件加速(通常只使用CPU而非GPU),所以只适合离线渲染(offline rendering),例如3D Studio Max、Maya等工具。其中一个支持全局光照的方法,称为光线追踪(ray tracing)。光线追踪能简单直接地支持阴影、反射、折射,实现起来亦非常容易。本文的例子里,只用了数十行JavaScript代码(除canvas外不需要其他特殊插件和库),就能实现一个支持反射的光线追踪渲染器。光线追踪可以用来学习很多计算机图形学的课题,也许比学习Direct3D/OpenGL更容易。现在,先介绍点理论吧。
光线追踪
光栅化渲染,简单地说,就是把大量三角形画到屏幕上。当中会采用深度缓冲(depth buffer, z-buffer),来解决多个三角形重叠时的前后问题。三角形数目影响效能,但三角形在屏幕上的总面积才是主要瓶颈。
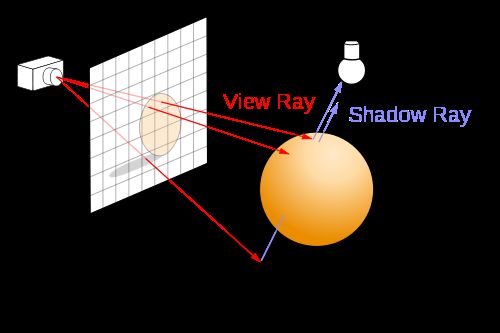
光线追踪,简单地说,就是从摄影机的位置,通过影像平面上的像素位置(比较正确的说法是取样(sampling)位置),发射一束光线到场景,求光线和几何图形间最近的交点,再求该交点的著色。如果该交点的材质是反射性的,可以在该交点向反射方向继续追踪。光线追踪除了容易支持一些全局光照效果外,亦不局限于三角形作为几何图形的单位。任何几何图形,能与一束光线计算交点(intersection point),就能支持。
上图(來源)显示了光线追踪的基本方式。要计算一点是否在阴影之内,也只须发射一束光线到光源,检测中间有没有障碍物而已。不过光源和阴影留待下回分解。
初试画板
光线追踪的输出只是一个影像(image),所谓影像,就是二维颜色数组。
要在浏览器内,用JavaScript生成一个影像,目前可以使用HTML 5的
以下是一个简单的实验,把每个象素填入颜色,左至右越来越红,上至下越来越绿。
Run
| 左邊的canvas定義如下:
修改代码试试看
|
这实验说明,从canvas取得的影像资料canvas.getImageData(...).data是个一维数组,该数组每四个元素代表一个象素(按红, 绿, 蓝, alpha排列),这些象素在影像中从上至下、左至右排列。
解决实验平台的技术问题后,可开始从基础类别开始实现。
基础类
笔者使用基于物件(object-based)的方式编写JavaScript。
三维向量
三维向量(3D vector)可谓CG里最常用型别了。这里三维向量用Vector3类实现,用(x, y, z)表示。 Vector3亦用来表示空间中的点(point),而不另建类。先看代码:
|
1
2
3
4
5
6
7
8
9
10
11
12
13
14
15
16
17
|
Vector3 =
function
(x, y, z) {
this
.x = x;
this
.y = y;
this
.z = z; };
Vector3.prototype = {
copy :
function
() {
return
new
Vector3(
this
.x,
this
.y,
this
.z); },
length :
function
() {
return
Math.sqrt(
this
.x *
this
.x +
this
.y *
this
.y +
this
.z *
this
.z); },
sqrLength :
function
() {
return
this
.x *
this
.x +
this
.y *
this
.y +
this
.z *
this
.z; },
normalize :
function
() {
var
inv = 1/
this
.length();
return
new
Vector3(
this
.x * inv,
this
.y * inv,
this
.z * inv); },
negate :
function
() {
return
new
Vector3(-
this
.x, -
this
.y, -
this
.z); },
add :
function
(v) {
return
new
Vector3(
this
.x + v.x,
this
.y + v.y,
this
.z + v.z); },
subtract :
function
(v) {
return
new
Vector3(
this
.x - v.x,
this
.y - v.y,
this
.z - v.z); },
multiply :
function
(f) {
return
new
Vector3(
this
.x * f,
this
.y * f,
this
.z * f); },
divide :
function
(f) {
var
invf = 1/f;
return
new
Vector3(
this
.x * invf,
this
.y * invf,
this
.z * invf); },
dot :
function
(v) {
return
this
.x * v.x +
this
.y * v.y +
this
.z * v.z; },
cross :
function
(v) {
return
new
Vector3(-
this
.z * v.y +
this
.y * v.z,
this
.z * v.x -
this
.x * v.z, -
this
.y * v.x +
this
.x * v.y); }
};
Vector3.zero =
new
Vector3(0, 0, 0);
|
这些类方法(如normalize、negate、add等),如果传回Vector3类对象,都会传回一个新建构的Vector3。这些三维向量的功能很简单,不在此详述。注意multiply和divide是与纯量(scalar)相乘和相除。
Vector3.zero用作常量,避免每次重新构建。值得一提,这些常量必需在prototype设定之后才能定义。
光线
所谓光线(ray),从一点向某方向发射也。数学上可用参数函数(parametric function)表示:
当中,o即发谢起点(origin),d为方向。在本文的例子里,都假设d为单位向量(unit vector),因此t为距离。实现如下:
|
1
2
3
4
5
|
Ray3 =
function
(origin, direction) {
this
.origin = origin;
this
.direction = direction; }
Ray3.prototype = {
getPoint :
function
(t) {
return
this
.origin.add(
this
.direction.multiply(t)); }
};
|
球体
球体(sphere)是其中一个最简单的立体几何图形。这里只考虑球体的表面(surface),中心点为c、半径为r的球体表面可用等式(equation)表示:
如前文所述,需要计算光线和球体的最近交点。只要把光线x = r(t)代入球体等式,把该等式求解就是交点。为简化方程,设v=o - c,则:
因为d为单位向量,所以二次方的系数可以消去。 t的二次方程式的解为
若根号内为负数,即相交不发生。另外,由于这里只需要取最近的交点,因此正负号只需取负号。代码实现如下:
|
1
2
3
4
5
6
7
8
9
10
11
12
13
14
15
16
17
18
19
20
21
22
23
24
25
26
27
28
29
|
Sphere =
function
(center, radius) {
this
.center = center;
this
.radius = radius; };
Sphere.prototype = {
copy :
function
() {
return
new
Sphere(
this
.center.copy(),
this
.radius.copy()); },
initialize :
function
() {
this
.sqrRadius =
this
.radius *
this
.radius;
},
intersect :
function
(ray) {
var
v = ray.origin.subtract(
this
.center);
var
a0 = v.sqrLength() -
this
.sqrRadius;
var
DdotV = ray.direction.dot(v);
if
(DdotV <= 0) {
var
discr = DdotV * DdotV - a0;
if
(discr >= 0) {
var
result =
new
IntersectResult();
result.geometry =
this
;
result.distance = -DdotV - Math.sqrt(discr);
result.position = ray.getPoint(result.distance);
result.normal = result.position.subtract(
this
.center).normalize();
return
result;
}
}
return
IntersectResult.noHit;
}
};
|
实现代码时,尽快用最少的运算剔除没相交的情况(Math.sqrt是比较慢的函数)。另外,预计算了球体半径r的平方,此为一个优化。
这里用到一个IntersectResult类,这个类只用来记录交点的几何物件(geometry)、距离(distance)、位置(position)和法向量(normal)。 IntersectResult.noHit的geometry为null,代表光线没有和任何几何物件相交。
|
1
2
3
4
5
6
7
8
|
IntersectResult =
function
() {
this
.geometry =
null
;
this
.distance = 0;
this
.position = Vector3.zero;
this
.normal = Vector3.zero;
};
IntersectResult.noHit =
new
IntersectResult();
|
摄影机
摄影机在光线追踪系统里,负责把影像的取样位置,生成一束光线。
由于影像的大小是可变的(多少像素宽x多少像素高),为方便计算,这里设定一个统一的取样座标(sx, sy),以左下角为(0,0),右上角为(1 ,1)。
从数学角度来说,摄影机透过投影(projection),把三维空间投射到二维空间上。常见的投影有正投影(orthographic projection)、透视投影(perspective projection)等等。这里首先实现透视投影。 ]]>
透视摄影机
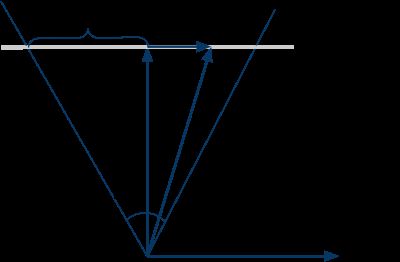
透视摄影机比较像肉眼和真实摄影机的原理,能表现远小近大的观察方式。透视投影从视点(view point/eye position),向某个方向观察场景,观察的角度范围称为视野(field of view, FOV)。除了定义观察的向前(forward)是那个方向,还需要定义在影像平面中,何谓上下和左右。为简单起见,暂时不考虑宽高不同的影像,FOV同时代表水平和垂直方向的视野角度。
上图显示,从摄影机上方显示的几个参数。 forward和right分别是向前和向右的单位向量。
因为视点是固定的,光线的起点不变。要生成光线,只须用取样座标(sx, sy)计算其方向d。留意FOV和s的关系为:
把sx从[0, 1]映射到[-1,1],就可以用right向量和s,来计算r向量,代码如下:
|
1
2
3
4
5
6
7
8
9
10
11
12
13
14
15
|
PerspectiveCamera =
function
(eye, front, up, fov) {
this
.eye = eye;
this
.front = front;
this
.refUp = up;
this
.fov = fov; };
PerspectiveCamera.prototype = {
initialize :
function
() {
this
.right =
this
.front.cross(
this
.refUp);
this
.up =
this
.right.cross(
this
.front);
this
.fovScale = Math.tan(
this
.fov * 0.5 * Math.PI / 180) * 2;
},
generateRay :
function
(x, y) {
var
r =
this
.right.multiply((x - 0.5) *
this
.fovScale);
var
u =
this
.up.multiply((y - 0.5) *
this
.fovScale);
return
new
Ray3(
this
.eye,
this
.front.add(r).add(u).normalize());
}
};
|
代码中fov为度数,转为弧度才能使用Math.tan()。另外,fovScale预先乘了2,因为sx映射到[-1,1]每次都要乘以2。 sy和sx的做法一样,把两个在影像平面的向量,加上forward向量,就成为光线方向d。因之后的计算需要,最后把d变成单位向量。
渲染测试
写了Vector3、Ray3、Sphere、IntersectResult、Camera五个类之后,终于可以开始渲染一点东西出来!
基本的做法是遍历影像的取样座标(sx, sy),用Camera把(sx, sy)转为Ray3,和场景(例如Sphere)计算最近交点,把该交点的属性转为颜色,写入影像的相对位置里。
把不同的属性渲染出来,是CG编程里经常用的测试和调试手法。笔者也是用此方法,修正了一些错误。
渲染深度
深度(depth)就是从IntersectResult取得最近相交点的距离,因深度的范围是从零至无限,为了把它显示出来,可以把它的一个区间映射到灰阶。这里用[0, maxDepth]映射至[255, 0],即深度0的像素为白色,深度达maxDepth的像素为黑色。
|
1
2
3
4
5
6
7
8
9
10
11
12
13
14
15
16
17
18
19
20
21
22
23
24
25
26
27
28
|
// renderDepth.htm
function
renderDepth(canvas, scene, camera, maxDepth) {
// 从canvas取得imgdata和pixels,跟之前的代码一样
// ...
scene.initialize();
camera.initialize();
var
i = 0;
for
(
var
y = 0; y < h; y++) {
var
sy = 1 - y / h;
for
(
var
x = 0; x < w; x++) {
var
sx = x / w;
var
ray = camera.generateRay(sx, sy);
var
result = scene.intersect(ray);
if
(result.geometry) {
var
depth = 255 - Math.min((result.distance / maxDepth) * 255, 255);
pixels[i ] = depth;
pixels[i + 1] = depth;
pixels[i + 2] = depth;
pixels[i + 3] = 255;
}
i += 4;
}
}
ctx.putImageData(imgdata, 0, 0);
}
|
Run
| 这里的观看方向是,正X轴向右,正Y轴向上,正Z轴向后。 修改代码试试看
|
渲染法向量
相交测试也计算了几何物件在相交位置的法向量,这里也可把它视觉化。法向量是一个单位向量,其每个元素的范围是[-1, 1]。把单位向量映射到颜色的常用方法为,把(x, y, z)映射至(r, g, b),范围从[-1, 1]映射至[0, 255]。
|
1
2
3
4
5
6
7
8
9
10
11
|
// renderNormal.htm
function
renderNormal(canvas, scene, camera) {
// ...
if
(result.geometry) {
pixels[i ] = (result.normal.x + 1) * 128;
pixels[i + 1] = (result.normal.y + 1) * 128;
pixels[i + 2] = (result.normal.z + 1) * 128;
pixels[i + 3] = 255;
}
// ...
}
|
Run
| 球体上方的法向量是接近(0, 1, 0),所以是浅绿色(0.5, 1, 0.5)。 修改代码试试看
|
材质
渲染深度和法向量只为测试和调试,要显示物件的"真实"颜色,需要定义该交点向某方向(如往视点的方向)发出的光的颜色,称之为几个图形的材质(material )。
材质的接口为function sample(ray, posiiton, normal) ,传回颜色Color的对象。这是个极简陋的接口,临时做一些效果出来,有机会再详谈。
颜色
颜色在CG里最简单是用红、绿、蓝三个通道(color channel)。为实现简单的Phong材质,还加入了对颜色的简单操作。
|
1
2
3
4
5
6
7
8
9
10
11
12
13
14
|
Color =
function
(r, g, b) {
this
.r = r;
this
.g = g;
this
.b = b };
Color.prototype = {
copy :
function
() {
return
new
Color(
this
.r,
this
.g,
this
.b); },
add :
function
(c) {
return
new
Color(
this
.r + c.r,
this
.g + c.g,
this
.b + c.b); },
multiply :
function
(s) {
return
new
Color(
this
.r * s,
this
.g * s,
this
.b * s); },
modulate :
function
(c) {
return
new
Color(
this
.r * c.r,
this
.g * c.g,
this
.b * c.b); }
};
Color.black =
new
Color(0, 0, 0);
Color.white =
new
Color(1, 1, 1);
Color.red =
new
Color(1, 0, 0);
Color.green =
new
Color(0, 1, 0);
Color.blue =
new
Color(0, 0, 1);
|
这Color类很像Vector3类,值得留意的是,颜色有调制(modulate)操作,其意义为两个颜色中每个颜色通道相乘。
格子材质
CG世界里,国际象棋棋盘是最常见的测试用纹理(texture)。这里不考虑纹理贴图(texture mapping)的问题,只凭(x, z)坐标计算某位置发出黑色或白色的光(黑色的光不叫光吧,哈哈)。
|
1
2
3
4
5
6
7
|
CheckerMaterial =
function
(scale, reflectiveness) {
this
.scale = scale;
this
.reflectiveness = reflectiveness; };
CheckerMaterial.prototype = {
sample :
function
(ray, position, normal) {
return
Math.abs((Math.floor(position.x * 0.1) + Math.floor(position.z *
this
.scale)) % 2) < 1 ? Color.black : Color.white;
}
};
|
代码中scale的意义为1坐标单位有多少个格子,例如scale=0.1即一个格子的大小为10x10。
Phong材质
这里实现简单的Phong材质,因为未有光源系统,只用全域变量设置一个临时的光源方向,并只计算漫射(diffuse)和镜射(specular)。
|
1
2
3
4
5
6
7
8
9
10
11
12
13
14
15
16
17
18
19
20
21
|
PhongMaterial =
function
(diffuse, specular, shininess, reflectiveness) {
this
.diffuse = diffuse;
this
.specular = specular;
this
.shininess = shininess;
this
.reflectiveness = reflectiveness;
};
// global temp
var
lightDir =
new
Vector3(1, 1, 1).normalize();
var
lightColor = Color.white;
PhongMaterial.prototype = {
sample:
function
(ray, position, normal) {
var
NdotL = normal.dot(lightDir);
var
H = (lightDir.subtract(ray.direction)).normalize();
var
NdotH = normal.dot(H);
var
diffuseTerm =
this
.diffuse.multiply(Math.max(NdotL, 0));
var
specularTerm =
this
.specular.multiply(Math.pow(Math.max(NdotH, 0),
this
.shininess));
return
lightColor.modulate(diffuseTerm.add(specularTerm));
}
};
|
Phong的内容不在此述。
渲染材质
修改之前的渲染代码,当碰到相交时,就向几何对象取得material属性,并调用sample方法函数取得颜色。
|
1
2
3
4
5
6
7
8
9
10
11
12
|
// rayTrace.htm
function
rayTrace(canvas, scene, camera) {
// ...
if
(result.geometry) {
var
color = result.geometry.material.sample(ray, result.position, result.normal);
pixels[i] = color.r * 255;
pixels[i + 1] = color.g * 255;
pixels[i + 2] = color.b * 255;
pixels[i + 3] = 255;
}
// ...
}
|
Run
修改代码试试看
|
多个几何物件
只渲染一个几何物件太乏味,这节再加入一个无限平面,和介绍如何组合多个几何物件。
平面
一个(无限)平面(Plane)在数学上可用等式定义:
n为平面的法向量,d为空间原点至平面的最短距离。光线和平面的相交计算很简单,这里不详述了。
|
1
2
3
4
5
6
7
8
9
10
11
12
13
14
15
16
17
18
19
20
21
22
23
|
Plane =
function
(normal, d) {
this
.normal = normal;
this
.d = d; };
Plane.prototype = {
copy :
function
() {
return
new
plane(
this
.normal.copy(),
this
.d); },
initialize :
function
() {
this
.position =
this
.normal.multiply(
this
.d);
},
intersect :
function
(ray) {
var
a = ray.direction.dot(
this
.normal);
if
(a >= 0)
return
IntersectResult.noHit;
var
b =
this
.normal.dot(ray.origin.subtract(
this
.position));
var
result =
new
IntersectResult();
result.geometry =
this
;
result.distance = -b / a;
result.position = ray.getPoint(result.distance);
result.normal =
this
.normal;
return
result;
}
};
|
并集
把多个几何物件结合起来,可以使用集(set)的概念。这里最容易实现的操作,就是并集(union),即光线要找到一组几个图形的最近交点。无需改其他代码,只加入一个Union类就可以:
|
1
2
3
4
5
6
7
8
9
10
11
12
13
14
15
16
17
18
19
20
21
|
Union =
function
(geometries) {
this
.geometries = geometries; };
Union.prototype = {
initialize:
function
() {
for
(
var
i
in
this
.geometries)
this
.geometries[i].initialize();
},
intersect:
function
(ray) {
var
minDistance = Infinity;
var
minResult = IntersectResult.noHit;
for
(
var
i
in
this
.geometries) {
var
result =
this
.geometries[i].intersect(ray);
if
(result.geometry && result.distance < minDistance) {
minDistance = result.distance;
minResult = result;
}
}
return
minResult;
}
};
|
可以看到,这里利用Javascript的多型(polymorphism)的特性,完全不用修改原来的代码,就可以扩展功能。
如前所述,这里只考虑几何几何图形的表面。如果考虑几何图形是实心的,就可以用构造实体几何(constructive solid geometry, CSG)方法,提供并集、交集、补集等操作。容后再谈。
反射
以上实现的,也只是局部照明。只要再加入一点点代码,就可以实现反射。
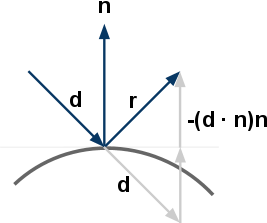
下图说明反射向量的计算方法:
把d投射到n上(因n是单位向量,只需要点乘即可),就可以计算d在n上的长度,把d减去这长度两倍的法向量,就是反射向量r。数学上可写成:
一般材质并非完全反射(镜子除外),因此这里为材质加上一个反射度(reflectiveness)的属性。反射的功能很简单,只要在碰到反射度非零的材质,就继续向反射方向追踪,并把结果按反射度来混合。例如一个材质的反射度为25%,则它传回的颜色是75%本身颜色,加上25%反射传回来的颜色。
另外,不断反射会做成大量的运算,甚至乎永远不能停止(考虑摄影机在两个镜子中间)。因此要限制反射的次数。含反射功能的光线追踪代码如下:
|
1
2
3
4
5
6
7
8
9
10
11
12
13
14
15
16
17
18
19
20
21
22
23
24
25
26
27
28
29
30
31
32
33
34
35
36
37
38
39
40
41
42
43
|
function
rayTraceRecursive(scene, ray, maxReflect) {
var
result = scene.intersect(ray);
if
(result.geometry) {
var
reflectiveness = result.geometry.material.reflectiveness;
var
color = result.geometry.material.sample(ray, result.position, result.normal);
color = color.multiply(1 - reflectiveness);
if
(reflectiveness > 0 && maxReflect > 0) {
var
r = result.normal.multiply(-2 * result.normal.dot(ray.direction)).add(ray.direction);
ray =
new
Ray3(result.position, r);
var
reflectedColor = rayTraceRecursive(scene, ray, maxReflect - 1);
color = color.add(reflectedColor.multiply(reflectiveness));
}
return
color;
}
else
return
Color.black;
}
function
rayTraceReflection(canvas, scene, camera, maxReflect) {
// 从canvas取得imgdata和pixels,跟之前的代码一样
// ...
scene.initialize();
camera.initialize();
var
i = 0;
for
(
var
y = 0; y < h; y++) {
var
sy = 1 - y / h;
for
(
var
x = 0; x < w; x++) {
var
sx = x / w;
var
ray = camera.generateRay(sx, sy);
var
color = rayTraceRecursive(scene, ray, maxReflect);
pixels[i++] = color.r * 255;
pixels[i++] = color.g * 255;
pixels[i++] = color.b * 255;
pixels[i++] = 255;
}
}
ctx.putImageData(imgdata, 0, 0);
}
|
Run
修改代码试试看
|
结语
能体会到计算机图形学的有趣之处么?百多行简单的JavaScript代码,就绘画出像真的影像,那种满足感实非笔墨所能形容。
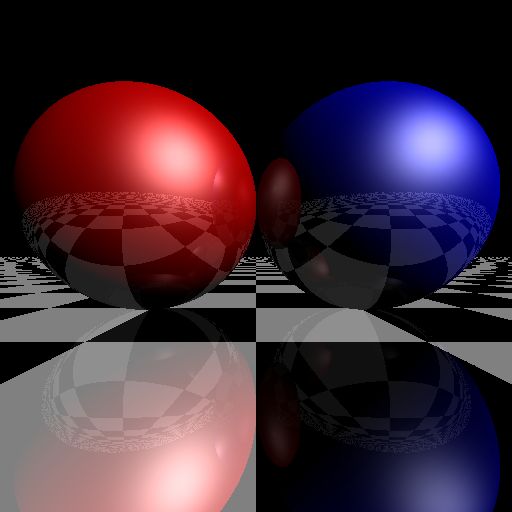
本文实现了一个简单的光线追踪渲染器,支持球体、平面、Phong材质、格子材质、多重反射等功能。读者可以下载这组代码,加入不同的扩展,也可以尝试翻译做熟悉的编程语言。很多光线追踪用到的计算机图形技术,也可以应用到实时图形编程里,例如光源和材质的计算,基本上可以简易翻译做实时图形的著色器(shader)编程。
游戏里采用光栅化渲染技术已有二十年以上,这几年的硬件发展,使其他渲染方法也能用于实时应用。光线追踪和其他类似的方法,有个当今重要优点,就是能高度平行化。采样之间并没有依赖性,例如256x256=65536个采样,理论上,可使用65536个机器/核心独立执行追踪,那么完成时间只是最慢的一个取样所需的时间。
笔者希望继续撰写这系列,例如包括以下内容:
- 其他几何图形(长方体、柱体、三角形、曲面、高度场、等值面、……)
- 光源(方向光源、点光源、聚光灯、阴影、ambient occlusion)
- 材质(Phong-Blinn、Oren-Nayar、Torrance-Sparrow、折射、 Fresnel、BRDF、BSDF……)
- 纹理(纹理座标、采样、Perlin noise)
- 摄影机模型(正投射、全景、景深)
- 成像流程(渐进渲染、反锯齿、后期处理)
- 优化方法(场景剖分、低阶优化)
- 其他全局光照渲染方法
祈望得到大家的意见反馈。
参考
- Matt Pharr, Greg Humphreys, Physically Based Rendering, Morgan Kaufmann, 2004
- Wikipedia, Ray Tracing
- Slime, The JavaScript Raytracer
- SIGGRAPH HyperGraph Education Project, Ray Tracing
更新
- 2010年3月31日,网友HouSisong把本文代码以C++实现,并完全保留了原设计,代码可於他的博文下载。


