pytest+Allure+jenkins
目录
1、Allure简介
2、Pytest框架集成Allure
2.1 环境配置
2.2 生成html报告
2.3 定制报告
2.3.1 Features、Story定制详解
2.3.2 用例标题和用例描述定制详解
2.3.3 Severity定制详解
2.3.4 Step定制详解
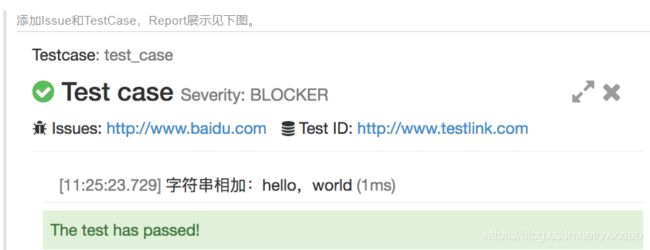
2.3.5 Issue和TestCase定制详解
2.3.6 Environment定制详解
2.3.7 attach定制详解
3、持续集成 Jenkins 构建 Allure Report
3.1 安装插件 allure-jenkins-plugin
3.2 构建配置
3.3 查看报告
4、问题总结
1 Jenkins 集成时打包本地python 环境
2 Jenkins中执行python命令,出现python不是内部命令的问题
3 allure-result 不存在,allure报告数据为空
1、Allure简介
Allure是一款非常轻量级并且非常灵活的开源测试报告生成框架。 它支持绝大多数测试框架, 例如TestNG、Pytest、JUint等。它简单易用,易于集成。下面就Pytest如何与Allure集成做详细介绍。
2、Pytest框架集成Allure
Pytest是Python的单元测试框架,非常方便和易用。强烈推荐对于用Python进行测试工作的小伙伴使用这个测试框架,相比与Python自带的UnitTest好用太多太多。今天我们主要是介绍如何将测试报告生成工具Allure集成到Pytest中。目前现在已经有allure2了,我们要使用的就是这个allure2。
2.1 环境配置
a、因为allure2需要在java的环境下,并且要求必须是jdk1.8级以上,所以要首先保证这一点。
b、安装allure-pytest,他用来在pytest执行测试结束后生成allure所需要的配置信息。安装使用pip命令即可:
安装Python依赖库:
pip3 install allure-pytest
注意:我看到许多教程是让安装 pytest-allure-adaptor 的,我刚开始也是安装的它,但是使用的时候出了错。查了解决方法就是卸掉pytest-allure-adaptor,安装allure-pytest。后来了解到官方已经放弃维护pytest-allure-adaptor~
c、下载allure2:https://github.com/allure-framework/allure2/releases,我们下载的是allure-2.8.0版本;下载后解压,放在某个位置(建议放在C:\python35\Lib\site-packages下);配置环境变量:环境变量path中加上解压好的文件夹下的bin目录下的allure.bat文件的路径(这里是:C:\python35\Lib\site-packages\allure-2.8.0\bin)
2.2 生成html报告
if __name__=="__main__":
    pytest.main(['-s','-q','--alluredir','report/result','test_Pytest.py'])
    os.system("C:/python35/Lib/site-packages/allure-2.8.0/bin/allure.bat "
              "generate "
              "F:/pycharm_workspace/FirstApplication/testPytest/report/result "
              "-o "
              "F:/pycharm_workspace/FirstApplication/testPytest/report/html")
2.2.1 pytest命令基础上加--alluredir,生成测试数据
pytest命令基础上加--alluredir,生成测试数据。(测试脚本中添加了Allure特性之后,在执行测试的时候需要先生成Allure报告所需要的测试结果数据。在py.test执行测试的时候,指定–alluredir选项及测试数据保存的目录即可)
pytest -s -q --alluredir [xml_report_path]
//[xml_report_path]根据自己需要定义文件夹,作者定义为:/report/result
例子:
#test_Pytest.py文件
#coding=utf-8

import pytest
import os

class Test_Pytest():

        def test_one(self):
                print("test_one方法执行" )
                assert 1==1

        def test_two(self):
                print("test_two方法执行" )
                assert "s" in "love"

        def test_three(self):
                print("test_three方法执行" )
                assert 3-2==1

if __name__=="__main__":
    pytest.main(['-s','-q','--alluredir','report/result','test_Pytest.py'])
运行结果:
![]()
2.2.2 命令行方式
第一步:用命令行或os模块运行allure命令,来生成html格式的报告(通过下面的命令将./result/目录下的测试数据生成测试报告)。
命令如下:(因为我们已经将allure.bat放在环境变量中,所以在哪里打开cmd窗口都可以找到allure/allure.bat)
allure generate 配置信息的路径 -o 生成报告的路径
allure generate ./result/ -o ./report/html --clean这样在./report/目录下就生成了Allure的测试报告了。–clean目的是先清空测试报告目录,再生成新的测试报告
第二步:打开/report/html,下面的index.html
![]()
第三步:通过下面的命令打开测试报告:
$ allure open -h 127.0.0.1 -p 8083 ./report/解释:127.0.0.1:是IP,可以替换成本机IP,这样就可以远程打开网页了,8083是端口号,用一个不常用的就行
本机的浏览器将打开http://127.0.0.1:8083/index.html网页,展示测试报告。
或者参考下面方式,打开HTML,但是一般用上面的方面简单:
第二种方式,打开HTML,参考https://blog.csdn.net/baozi_xiaoge/article/details/103380307
2.3 定制报告
@allure.feature # 用于定义被测试的功能,被测产品的需求点
@allure.story # 用于定义被测功能的用户场景,即子功能点
with allure.step # 用于将一个测试用例,分成几个步骤在报告中输出
allure.attach # 用于向测试报告中输入一些附加的信息,通常是一些测试数据信息
@pytest.allure.step # 用于将一些通用的函数作为测试步骤输出到报告,调用此函数的地方会向报告中输出步骤
2.3.1 Features、Story定制详解
# -*- coding: utf-8 -*-
# @Time    : 2018/8/17 上午10:10
# @Author  : WangJuan
# @File    : test_case.py
import allure
import pytest


@allure.feature('test_module_01')
@allure.story('test_story_01')
def test_case_01():
    """
    用例描述:Test case 01
    """
    assert 0

@allure.feature('test_module_01')
@allure.story('test_story_02')
def test_case_02():
    """
    用例描述:Test case 02
    """
    assert 0 == 0


if __name__ == '__main__':
    pytest.main(['-s', '-q', '--alluredir', './report/xml'])
$ py.test test/ --allure_features='test_module_01' --allure_stories='test_story_01'
2.3.2 用例标题和用例描述定制详解
# -*- coding: utf-8 -*-
# @Time    : 2018/8/17 上午10:10
# @Author  : WangJuan
# @File    : test_case.py
import allure
import pytest

@allure.feature('test_module_01')
@allure.story('test_story_01')
#test_case_01为用例title
def test_case_01():
    """
    用例描述:这是用例描述,Test case 01,描述本人
    """
    #注释为用例描述
    assert 0

if __name__ == '__main__':
    pytest.main(['-s', '-q', '--alluredir', './report/xml'])
2.3.3 Severity定制详解
Allure中对严重级别的定义:
1、 Blocker级别:中断缺陷(客户端程序无响应,无法执行下一步操作)
2、 Critical级别:临界缺陷( 功能点缺失)
3、 Normal级别:普通缺陷(数值计算错误)
4、 Minor级别:次要缺陷(界面错误与UI需求不符)
5、 Trivial级别:轻微缺陷(必输项无提示,或者提示不规范)
# -*- coding: utf-8 -*-
# @Time    : 2018/8/17 上午10:10
# @Author  : WangJuan
# @File    : test_case.py
import allure
import pytest


@allure.feature('test_module_01')
@allure.story('test_story_01')
@allure.severity('blocker')
def test_case_01():
    """
    用例描述:Test case 01
    """
    assert 0

@allure.feature('test_module_01')
@allure.story('test_story_01')
@allure.severity('critical')
def test_case_02():
    """
    用例描述:Test case 02
    """
    assert 0 == 0

@allure.feature('test_module_01')
@allure.story('test_story_02')
@allure.severity('normal')
def test_case_03():
    """
    用例描述:Test case 03
    """
    assert 0

@allure.feature('test_module_01')
@allure.story('test_story_02')
@allure.severity('minor')
def test_case_04():
    """
    用例描述:Test case 04
    """
    assert 0 == 0


if __name__ == '__main__':
    pytest.main(['-s', '-q', '--alluredir', './report/xml'])
2.3.4 Step定制详解
#!/usr/bin/env python
# coding=utf-8

import pytest
import allure


@allure.feature('购物车功能')  # feature定义功能
class TestShoppingTrolley(object):
    @allure.story('加入购物车')  # story定义用户场景
    def test_add_shopping_trolley(self):
        login('刘春明', '密码')  # 调用“步骤函数”
        with allure.step("浏览商品"):  # 将一个测试用例分成几个步骤,将步骤打印到测试报告中,步骤2
            allure.attach('商品1', '刘春明')  # attach可以打印一些附加信息
            allure.attach('商品2', 'liuchunming')
        with allure.step("点击商品"):  # 将一个测试用例分成几个步骤,将步骤打印到测试报告中,步骤3
            pass
        with allure.step("校验结果"):
            allure.attach('期望结果', '添加购物车成功')
            allure.attach('实际结果', '添加购物车失败')
            assert 'success' == 'failed'

    @allure.story('修改购物车')
    def test_edit_shopping_trolley(self):
        pass

    @pytest.mark.skipif(reason='本次不执行')
    @allure.story('删除购物车')
    def test_delete_shopping_trolley(self):
        pass


@allure.step('用户登录')  # 还可以将一个函数作为一个步骤,调用此函数时,报告中输出一个步骤,步骤名字通常是函数名,我把这样的函数叫“步骤函数”
def login(user, pwd):
    print(user, pwd)
2.3.5 Issue和TestCase定制详解
#-*- coding: utf-8 -*-
#@Time    : 2018/8/17 上午10:10
#@Author  : WangJuan
#@File    : test_case.py
import allure
import pytest

@allure.step("字符串相加:{0},{1}")
#测试步骤,可通过format机制自动获取函数参数
def str_add(str1, str2):
    print('hello')
    if not isinstance(str1, str):
        return "%s is not a string" % str1
    if not isinstance(str2, str):
        return "%s is not a string" % str2
    return str1 + str2

@allure.feature('test_module_01')
@allure.story('test_story_01')
@allure.severity('blocker')
@allure.issue("http://www.baidu.com")
@allure.testcase("http://www.testlink.com")
def test_case():
    str1 = 'hello'
    str2 = 'world'
    assert str_add(str1, str2) == 'helloworld'


if __name__ == '__main__':
    pytest.main(['-s', '-q', '--alluredir', './report/xml'])
2.3.6 Environment定制详解
# 具体Environment参数可自行设置
allure.environment(app_package='com.mobile.fm')
allure.environment(app_activity='com.mobile.fm.activity')
allure.environment(device_name='aad464')
allure.environment(platform_name='Android')
2.3.7 attach定制详解
file = open('../test.png', 'rb').read()
allure.attach('test_img', file, allure.attach_type.PNG)在报告中增加附件:allure.attach(’arg1’,’arg2’,’arg3’):arg1:是在报告中显示的附件名称 arg2:表示添加附件的内容 arg3:表示添加的类型(支持:HTML,JPG,PNG,JSON,OTHER,TEXTXML)
3、持续集成 Jenkins 构建 Allure Report
3.1 安装插件 allure-jenkins-plugin
- 进入系统管理 - 管理插件
- 搜索Allure,并进行安装,重启Jenkins
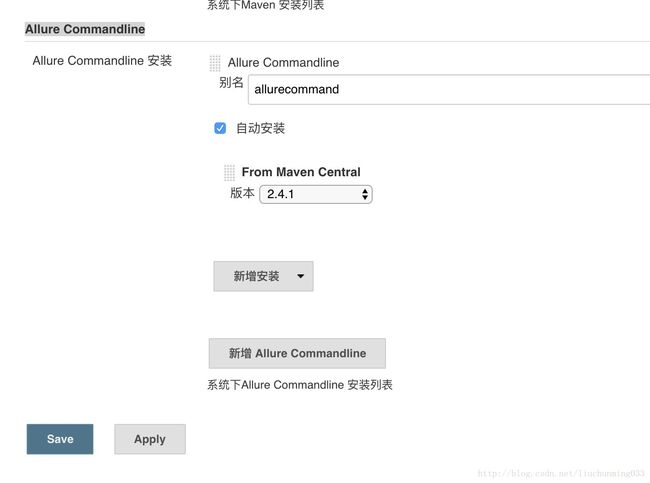
- 进入系统管理 - 全局工具配置 - Allure Commandline
- 点击 Allure Commandline安装,如下图:其中name可随便定义,作为标识用。
点击后,弹出下面的页面,输入Allure的命令别名和版本后,点击Apply 和Save。(或者不勾选自动安装,使用你已经下载好的包,把包的路径复制到这里就行,如下图:)
3.2 构建配置
- General - 参数化构建过程 处增加参数ALLURE_HOME,参数值填写存放allure results的默认路径。
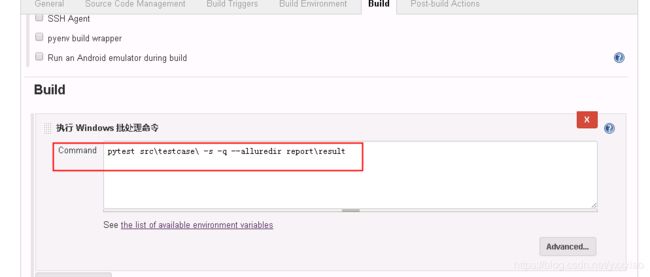
- 构建 - Execute shell 处增加命令:--alluredir ${ALLURE_HOME} 如:pytest src\testcase\ -s -q --alluredir report\result
- 构建后操作 - Allure Report ,Results Path处设置${ALLURE_HOME}
注意:一定要在jenkins添加shell命令生成result(生成报告的数据源),在脚本里面写的生成的数据源生不成HTML报告(血泪史)
3.3 查看报告
构建已配置好的工程,即可查看Allure Report,有多处入口,点击任意入口即可查看Report,见下图
4、问题总结
1 jenkins 集成时打包本地python 环境
在本地执行:pip freeze > requirements.txt
安装有jenkins的服务上面执行:pip install -r requirements.txt,,,,将上面打包的环境导入到新环境中,新环境的python 环境将于之前的环境一样,这样所使用的包就不用手动一个一个的导入了
2 Jenkins中执行python命令,出现python不是内部命令的问题
问题描述:已安装python安装包,但是还是提示python 不是内部命令
定位原因:python.exe 不在jenkins执行用户的PATH里面
解决:构建的时候Python命令加上python.exe的路径
3 allure-result 不存在,allure报告数据为空
就是生成allure htlm的数据源不存在
问题描述:
我出现的问题是,在脚本中已经执行命令: pytest src\testcase\ -s -q --alluredir report\result,生成了数据,但是Jenkins中构建成功,生成allure-HTML时,还是提示allure htlm的数据源不存在,生成的报告数据为空
解决:
a .一定要在jenkins添加shell命令生成result(生成报告的数据源),如下:
b. 下面2处地址一定要一致


