springboot入门2—jpa访问mysql数据库
还是参照官方的例子1,maven依赖
  4.0.0
  springBootTestMysql
  springBootTestMysql
  war
  0.0.1-SNAPSHOT
  springBootTestMysql Maven Webapp
  http://maven.apache.org


  	org.springframework.boot
  	spring-boot-starter-parent
  	1.4.2.RELEASE


        1.8


			releases
			Releases
			http://10.92.1.84:8081/nexus/content/repositories/releases


			snapshots
			Snapshots
			http://10.92.1.84:8081/nexus/content/repositories/snapshots


			public
			http://10.92.1.84:8081/nexus/content/groups/public

				true


				true


			libs-central
			libs-releases
			http://10.92.35.161/nexus/content/repositories/releases

				false


			libs-snapshots
			libs-snapshots
			http://10.92.35.161/nexus/content/repositories/snapshots


			15public
			i5public
			http://10.92.7.15:8081/nexus/content/repositories/public/


			public
			http://10.92.1.84:8081/nexus/content/groups/public

				true


				true


      junit
      junit
      3.8.1
      test


        org.springframework.boot
        spring-boot-starter-web


            org.springframework.boot
            spring-boot-starter-data-jpa


            mysql
            mysql-connector-java


            org.springframework.boot
            spring-boot-starter-test

            test


    springBootTestMysql
2,创建mysql数据库,由于我本机没安装mysql,这里使用docker,来创建一个mysql容器,随时可以删掉
a.直接使用mysql的官方镜像使用 docker pull mysql 命令,下载镜像
![]()
b.pull完成之后,直接run起来,run的时候可以使用-e参数制定mysql的root用户的密码 , docker run -d -p3306:3306 -e MYSQL_ROOT_PASSWORD=123456 --name mysql mysql:1.0
c.进入mysql容器,建数据库,建表, mysql -h ip -uusername -ppassword -P端口
3.In the sources folder, you create a resource file src/main/resources/application.properties
创建连接数据库所需要的properties文件,主要就是连接的地址啊,用户名,密码
spring.jpa.hibernate.ddl-auto=create
spring.datasource.url=jdbc:mysql://localhost:3306/test
spring.datasource.username=root
spring.datasource.password=123456
/**
 * Copyright EXPRESS PAY 2017, Inc. All rights reserved.
 */
/**
 *
 */

package hello.model;

import javax.persistence.Entity;
import javax.persistence.GeneratedValue;
import javax.persistence.GenerationType;
import javax.persistence.Id;

/**
 *
 * TODO。
 *
 *
 * @author lujia
 * @version 1.0
 * @date 2017年7月11日
 */
@Entity   //This tells Hibernate to make a table out of this class
public class User {

    @Id
    @GeneratedValue(strategy=GenerationType.AUTO)
    private int id;
    private String name;
    private String sex;
    /**
     * 获取 id
     * @return id
     */
    public int getId() {
        return id;
    }
    /**
     * 设置 id
     * @param id id
     */
    public void setId(int id) {
        this.id = id;
    }
    /**
     * 获取 name
     * @return name
     */
    public String getName() {
        return name;
    }
    /**
     * 设置 name
     * @param name name
     */
    public void setName(String name) {
        this.name = name;
    }
    /**
     * 获取 sex
     * @return sex
     */
    public String getSex() {
        return sex;
    }
    /**
     * 设置 sex
     * @param sex sex
     */
    public void setSex(String sex) {
        this.sex = sex;
    }


}
5.创建 reository
/**
 * Copyright EXPRESS PAY 2017, Inc. All rights reserved.
 */
/**
 *
 */

package hello.repository;

import org.springframework.data.repository.CrudRepository;

import hello.model.User;

/**
 *
 * TODO。
 *
 *
 * @author lujia
 * @version 1.0
 * @date 2017年7月11日
 */

//This will be AUTO IMPLEMENTED by Spring into a Bean called userRepository
//CRUD refers Create, Read, Update, Delete
public interface UserRepository extends CrudRepository{


}
6.创建controller
/**
* Copyright EXPRESS PAY 2017, Inc. All rights reserved.
*/
/**
*
*/
package lujia.springboot.hello;
import javax.servlet.http.HttpServletRequest;
import org.springframework.beans.factory.annotation.Autowired;
import org.springframework.stereotype.Controller;
import org.springframework.web.bind.annotation.RequestMapping;
import org.springframework.web.bind.annotation.RequestParam;
import org.springframework.web.bind.annotation.ResponseBody;
/**
*
* TODO。
*
*
* @author lujia
* @version 1.0
* @date 2017年7月12日
*/
@Controller
@RequestMapping("/user")
public class UserController {
@Autowired
private UserRepository userRepository;
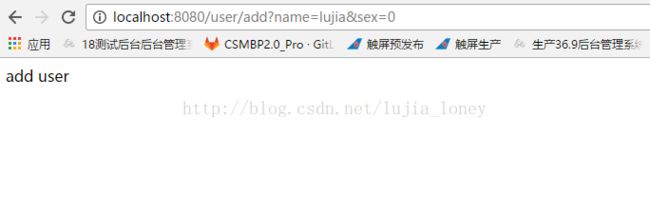
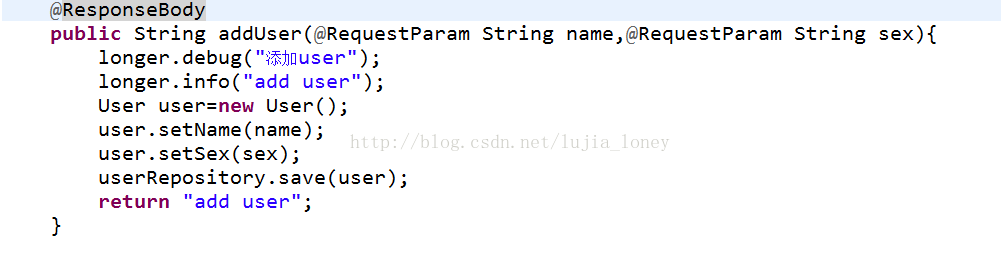
@RequestMapping("/add")
@ResponseBody
public String addUser(@RequestParam String name,@RequestParam String sex){
User user=new User();
user.setName(name);
user.setSex(sex);
userRepository.save(user);
return "add user";
}
@RequestMapping("/getAllUsers")
public @ResponseBody Iterable getAllUsers() {
return userRepository.findAll();
}
}
7.启动类
/**
 * Copyright EXPRESS PAY 2017, Inc. All rights reserved.
 */
/**
 *
 */

package lujia.springboot.hello;

import org.springframework.boot.SpringApplication;
import org.springframework.boot.autoconfigure.SpringBootApplication;

/**
 *
 * TODO。
 *
 *
 * @author lujia
 * @version 1.0
 * @date 2017年7月12日
 */
@SpringBootApplication
public class Application {

    public static void main(String[] args) {
        SpringApplication.run(Application.class, args);
    }
}
直接运行启动类,springboot内置的tomcat默认开启8080端口访问, 这里有个坑,来看下@SpringBootApplication 注解,
/*
 * Copyright 2012-2016 the original author or authors.
 *
 * Licensed under the Apache License, Version 2.0 (the "License");
 * you may not use this file except in compliance with the License.
 * You may obtain a copy of the License at
 *
 *      http://www.apache.org/licenses/LICENSE-2.0
 *
 * Unless required by applicable law or agreed to in writing, software
 * distributed under the License is distributed on an "AS IS" BASIS,
 * WITHOUT WARRANTIES OR CONDITIONS OF ANY KIND, either express or implied.
 * See the License for the specific language governing permissions and
 * limitations under the License.
 */

package org.springframework.boot.autoconfigure;

import java.lang.annotation.Documented;
import java.lang.annotation.ElementType;
import java.lang.annotation.Inherited;
import java.lang.annotation.Retention;
import java.lang.annotation.RetentionPolicy;
import java.lang.annotation.Target;

import org.springframework.boot.SpringBootConfiguration;
import org.springframework.boot.context.TypeExcludeFilter;
import org.springframework.context.annotation.Bean;
import org.springframework.context.annotation.ComponentScan;
import org.springframework.context.annotation.ComponentScan.Filter;
import org.springframework.context.annotation.Configuration;
import org.springframework.context.annotation.FilterType;
import org.springframework.core.annotation.AliasFor;

/**
 * Indicates a {@link Configuration configuration} class that declares one or more
 * {@link Bean @Bean} methods and also triggers {@link EnableAutoConfiguration
 * auto-configuration} and {@link ComponentScan component scanning}. This is a convenience
 * annotation that is equivalent to declaring {@code @Configuration},
 * {@code @EnableAutoConfiguration} and {@code @ComponentScan}.
 *
 * @author Phillip Webb
 * @author Stephane Nicoll
 * @since 1.2.0
 */
@Target(ElementType.TYPE)
@Retention(RetentionPolicy.RUNTIME)
@Documented
@Inherited
@SpringBootConfiguration
@EnableAutoConfiguration
@ComponentScan(excludeFilters = @Filter(type = FilterType.CUSTOM, classes = TypeExcludeFilter.class))
//@ComponentScan 默认扫描的是我们启动类同个包或者子包下的类,
public @interface SpringBootApplication {
/**
* Exclude specific auto-configuration classes such that they will never be applied.
* @return the classes to exclude
*/
Class[] exclude() default {};
}8.测试

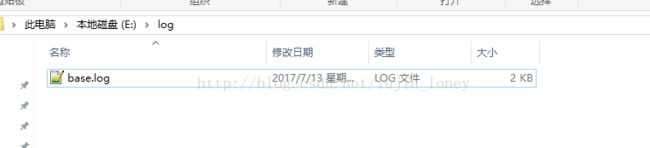
9 ,在项目基础上添加日志,使用logback
直接在 src/main/resources目录下,新建logback.xml
				%d %p (%file:%line\)- %m%n
				UTF-8


			E:\log\base.log

				base.log.%d.%i


					64 MB


					%d %p (%file:%line\)- %m%n

				UTF-8
10.修改userController添加日志打印
测试成功,

参考了一下别人写的jpa的发现springboot结合jpa操作数据库太方便了,分页,排序,查询都非常简单方便,可以快速启动一个工程,代码如下
/**
 * Copyright EXPRESS PAY 2017, Inc. All rights reserved.
 */
/**
 *
 */

package lujia.springboot.hello.repository;

import java.util.List;

import org.springframework.data.jpa.repository.JpaRepository;
import org.springframework.data.jpa.repository.Query;
import org.springframework.data.repository.query.Param;
import org.springframework.stereotype.Repository;

import lujia.springboot.hello.model.Language;

/**
 *
 *
 *
 * @author lujia
 * @version 1.0
 * @date 2017年7月13日
 */
@Repository
public interface LanguageRepository extends JpaRepository{


    List findByName(String name);
    List findByAge(String age);
    List findByNameAndAge(String name,String age);
    @Query("select l from Language l where l.name=:name and l.age=:age")
    List withNameAndAge(@Param("name")String name,@Param("age")String age);
    @Query("select l from Language l where l.id>:id")
    List withID(@Param("id")Long id);
}
/**
 * Copyright EXPRESS PAY 2017, Inc. All rights reserved.
 */
/**
 *
 */

package lujia.springboot.hello.web;

import java.util.List;

import org.slf4j.Logger;
import org.slf4j.LoggerFactory;
import org.springframework.beans.factory.annotation.Autowired;
import org.springframework.data.domain.Page;
import org.springframework.data.domain.PageRequest;
import org.springframework.data.domain.Sort;
import org.springframework.data.domain.Sort.Direction;
import org.springframework.web.bind.annotation.RequestMapping;
import org.springframework.web.bind.annotation.ResponseBody;
import org.springframework.web.bind.annotation.RestController;

import lujia.springboot.hello.model.Language;
import lujia.springboot.hello.repository.LanguageRepository;

/**
 *
 *
 *
 * @author lujia
 * @version 1.0
 * @date 2017年7月13日
 */
@RestController
@RequestMapping("/language")
public class LanguageController {

    private static Logger logger=LoggerFactory.getLogger(LanguageController.class);
    @Autowired
    private LanguageRepository languageRepository;

    @RequestMapping("/save")
    @ResponseBody
    public String save(String name,String age){
        logger.debug("save 开始");
        Language save = languageRepository.save(new Language(null,name,age));

        logger.debug("save 结束");
        return "save id="+save.getId();
    }
    @RequestMapping("/quesyByName")
    @ResponseBody
    public List quesyByName(String name){
        logger.debug("quesyByName 开始");
        List findByName = languageRepository.findByName(name);

        logger.debug("quesyByName 结束");
        return findByName;
    }
    @RequestMapping("/quesyByAge")
    @ResponseBody
    public List quesyByAge(String age){
        logger.debug("quesyByAge 开始");
        List quesyByAge = languageRepository.findByAge(age);

        logger.debug("quesyByAge 结束");
        return quesyByAge;
    }

    @RequestMapping("/quesyByNameAndAge")
    @ResponseBody
    public List quesyByNameAndAge(String name,String age){
        logger.debug("quesyByNameAndAge 开始");
        List lsit = languageRepository.findByNameAndAge(name, age);

        logger.debug("quesyByNameAndAge 结束");
        return lsit;
    }
    @RequestMapping("/withNameAndAge")
    @ResponseBody
    public List withNameAndAge(String name,String age){
        logger.debug("quesyByNameAndAge 开始");
        List lsit = languageRepository.withNameAndAge(name, age);

        logger.debug("quesyByNameAndAge 结束");
        return lsit;
    }
    @RequestMapping("/withID")
    @ResponseBody
    public List withID(Long id){
        logger.debug("withID 开始");
        List lsit = languageRepository.withID(id);

        logger.debug("withID 结束");
        return lsit;
    }

    @RequestMapping("/sort")
    @ResponseBody
    public List sort(){
        logger.debug("sort 开始");
        List lsit = languageRepository.findAll(new Sort(Direction.ASC, "age"));

        logger.debug("sort 结束");
        return lsit;
    }
    @RequestMapping("/page")
    @ResponseBody
    public Page page(int page,int size){
        logger.debug("page 开始");
       Page findAll = languageRepository.findAll(new PageRequest(page, size));

        logger.debug("page 结束");
        return findAll;
    }


}