Qt:各类控件修改(不断更新)
Qt:代码控件。
字体参考网站:https://www.cnblogs.com/findumars/p/4776398.html
目录
控件通用的部分
QPushBotton
QLabel
QTextEdit
QComboBox
右键
TableWidget右键
主界面右键
获取exe所在路径
QProgressDialog:
QMessageBox:修改摁键名称
规定整个程序的编码类型
-
控件通用的部分
控件定位:
//情况一
QLabel *label = new QLabel(this);
label->setGeometry(260,65,90,35);
//setGeometry是控件中常用的,设置控件在前界面中的位置,设置控件大小的对象。
//前两个代表的是坐标,后两个是长宽
//情况二
QRect new_type = QRect(new_x,new_y,new_width,new_height);
item->setGeometry(new_type);
控件样式要求(样式表的简化):
QTextEdit *begin= new QTextEdit(this);//创建
begin->setStyleSheet("border:none;");//无边框
begin->setStyleSheet("background:transparent;border-width:0;border-style:outset");
//无边框,边框透明,背景透明
-
QPushBotton
设置变量
//情况一
QPushButton *exit = new QPushButton("退出程序",this);
//情况二
QPushButton *exit = new QPushButton(this);
exit->setText("退出程序");
非常常见的Qt中new动态分配空间并指定父对象的操作。
exit->setGeometry(260,65,90,35);
//setGeometry是控件中常用的,设置控件在前界面中的位置,设置控件大小的对象。
其中四个参数分别表示为1x长度,2y长度,(x,y)形成了控件在界面上的具体位置,及控件左上角举例界面零点(0,0)的相对位置。3控件的长度4控件的高度
那么直接用信号和槽即可,即可完成摁键功能的设置
connect(connectp,&QPushButton::clicked,this,&Widget::on_connect_clicked);快捷键
exit->setShortcut(QKeySequence("F7"));
-
QLabel
QLabel *label1 = new QLabel("连接操作(多点采样模式)",this);
label1->setGeometry(40,25,260,30);
//情况二
QPushButton *label1 = new QLabel(this);
label1->setText("连接操作(多点采样模式)");
QFont定义字体,并将其赋给使用setFont
QFont的实际使用:
在QFont当中有两种方式设置字体大小,一种是setPixelSize,另一种是setPointSize
setPixelSize()函数使用像素作为单位来设置字体大小
setPointSize()函数规定了实际中我们肉眼看到的字体的大小,与像素无关
也就是说
使用setPixelSize函数设置大小,在像素大小不同的设备上显示的大小也不同
使用setPointSize函数设置大小,在不同设备上显示的大小是相同的
更多字体设置参考:https://blog.csdn.net/qq_40194498/article/details/79171149
默认字体Segoe UI
//情况一
QFont serifFont("Times", 10, QFont::Bold);

//情况二
QFont serifFont("005-CAI978",30,75);

//情况三(虽然复杂繁琐,但是使用PointSize设置字体可以适应分辨率)
QFont serifFont;
serifFont.setFamily("Microsoft YaHei");
serifFont.setPointSize(20);
serifFont.setBold(true);

//情况
label1->setFont(font);
Qlabel变色
QColor xcol;

xcol.setRgb(0,163,255);//定义xcol是什么颜色

QPalette xcolor;
//QPalette 属于ui控件专属的调色工具,它管理着控件或窗体的所有颜色信息,每个窗体或控件都包含一个QPalette对象

xcolor.setColor(QPalette::WindowText,xcol);
//喊两个参数,第一个是上色规则,第二个具体什么颜色

//Sets the color in the specified color group, used for the given color role, to the //specified solid color.

label1->setPalette(xcolor);//将颜色赋予label
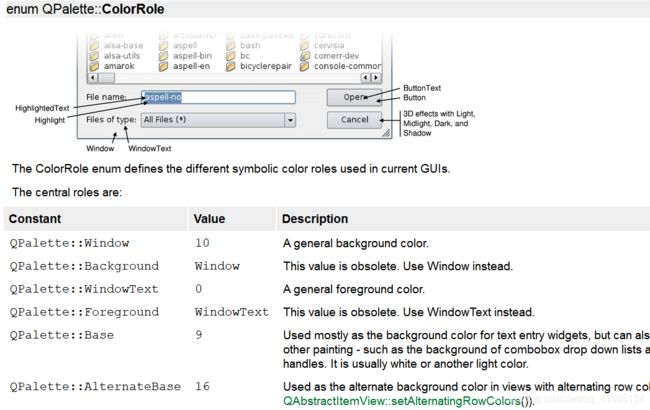
关于xcolor.setColor(QPalette::WindowText,xcol);
语句中的第一个参数,需要输入ColorRole变量
关于 ColorRole变量的具体解释如下:
QLabel 加载图片并打印
QLabel加载图片,使用setPixmap接口
关于Qimage,QPicture和QPixmap之间的格式转换,见https://blog.csdn.net/qq_41605114/article/details/88899042
//如果是实时更新的话,必须在绘图事件中进行这个步骤
QLabel Plabel;
Plabel.setPixmap(QPixmap::fromImage(ImageForSave));//ImageForSave为已经在线程中绘制好的图片
QGridLayout  mainLayout = new QGridLayout(this);//将Label放置于界面中的相应位置
mainLayout->addWidget(&Plabel,1,0,5,5,Qt::AlignCenter | Qt::AlignVCenter);
-
QTextEdit
QTextEdit *nambuerford = new QTextEdit(this);//创建
nambuerford->setGeometry(1120,22,100,35);//大小及定位
nambuerford->setFontPointSize(sizeforfont);//显示的字号设置
nambuerford->setAlignment(Qt::AlignRight);//对齐方式的设置但是以上QTextEdit改变字体大小的代码不够稳定
下面的写法最稳定
QFont fonttextsize("005-CAI978",20,75);//设置字体,字号,样式
nambuerford->setFont(fonttextsize);//这种情况是最稳定的,能够设置好所有的内容
设置QTextEdit背景透明且无框
setStyleSheet("background:transparent;border-width:0;border-style:outset");//无边框且 透明如何在Qt的QTextEdit中使输出内容的颜色变色
void Widget::textedit()
{
    textedit->setGeometry(300,500,300,30);//textedit为类成员
    QFont font("微软雅黑",12,50);
    textedit->setFont(font);
    textedit->setAlignment(Qt::AlignRight);
    textedit->setStyleSheet("background:transparent;border-width:0;border-style:outset");//无边框且 透明
    output("123,数据已经导入");//

}
void Widget::output(QString &str)
{
    QColor clrR(0,0,0);//字体要显示的颜色设置
    stringToHtml(str,clrR);
    textedit->setText(NULL);
    textedit->setText(str);
    textedit->setAlignment(Qt::AlignRight);
}
void Widget::stringToHtml(QString &str,QColor crl)//不需要返回值,取的str的地址,直接修改原值
{
     QByteArray array;
     array.append(crl.red());
     array.append(crl.green());
     array.append(crl.blue());//拼接一下颜色(RGB)
     QString strC(array.toHex());
     str = QString("%2").arg(strC).arg(str);//html写法
}
append的解释
QByteArray x("free");
QByteArray y("dom");
x.append(y);
// x == "freedom"调用以上函数,即可修改内容
完整版本修改颜色(来自本论坛,侵删)
void Widget::stringToHtmlFilter(QString &str)
{
   //注意这几行代码的顺序不能乱,否则会造成多次替换
   str.replace("&","&");
   str.replace(">",">");
   str.replace("<","<");
   str.replace("\"",""");
   str.replace("\'","'");
   str.replace(" "," ");
   str.replace("\n","
");
   str.replace("\r","
");
}
void Widget::stringToHtml(QString &str,QColor crl)
{
     QByteArray array;
     array.append(crl.red());
     array.append(crl.green());
     array.append(crl.blue());//拼接一下颜色(RGB)
     QString strC(array.toHex());
     qDebug()<%2").arg(strC).arg(str);
}
void Widget::output()
{
    QString str(" < Hello Qt!>\n");
    QColor clrR(37,121,236);
    stringToHtmlFilter(str);
    stringToHtml(str,clrR);
    ui->color->append(str);
} - QFrame 绘制分割线
 QFrame *lineo = new QFrame(this);//创建内容
 lineo->setGeometry(QRect(40,55,310,2));//起点(前两个参数),第三个参数表示长度,第四个是线高
 lineo->setFrameShape(QFrame::HLine);//线的形式,横线还是竖线
 lineo->setFrameShadow(QFrame::Sunken);//线的阴影
 lineo->raise();
 //将此小部件提升到父窗口小部件堆栈的顶部。
 //在此调用之后,窗口小部件将在视觉上位于任何重叠的同级窗口小部件之前。
-
QComboBox
QComboBox *radiohead = new QComboBox(this);
radiohead->addItem(tr("双读数头"));//先出现的默认在最顶端
radiohead->addItem(tr("单读数头"));
radiohead->setGeometry(150,65,90,35);- 获取分辨率
#include //获取当前界面分辨率的头文件 this->setWindowTitle("关节臂多点采样Beta1.5");
int currentScreenWid = QApplication::desktop()->width();
qDebug()<<"currentScreenWid"<height();
qDebug()<<"currentScreenHei"< 使用:QApplication::desktop()—>width();
- 转换到不同分辨率下,如何保持ui尽量稳定
void Widget::resetGrid(QWidget *widget,double factorx,double factory)
{
    int widgetX = widget->x();
    int widgetY = widget->y();
    int widgetWid = widget->width();
    int widgetHei = widget->height();

    int nWidgetX = (int)(widgetX*factorx);
    int nWidgetY = (int)(widgetY*factory);
    int nWidgetWid = (int)(widgetWid*factorx);
    int nWidgetHei = (int)(widgetHei*factory);

    widget->setGeometry(nWidgetX,nWidgetY,nWidgetWid,nWidgetHei);
}
获取当前ui(如pushbotton或者label)的起点坐标和长宽,同时乘以factorx和factory两个因子
最后一句,重新给予ui(setGeometry)起点和长宽-
右键
TableWidget右键
分两部分:1右键界面设置 2信号和槽3槽函数的编写
1:右键弹出窗口的设置
void Widget::menu_for_table()
{
    qDebug()<<"右键设置";
    table_widget_menu = new QMenu(table);
    actdelete = new QAction("删除", this);
    connect(actdelete,&QAction::triggered,this,&Widget::on_deletedata_clicked);//删除
    table_widget_menu->addAction(actdelete);
    actclear = new QAction("清空", this);
    connect(actclear,&QAction::triggered,this,&Widget::on_clear_clicked);//清空
    table_widget_menu->addAction(actclear);
}
在设置右键的时候,即可写入相关的信号和槽函数,以上只有删除和清空两项要求
2:信号和槽
connect(table,&QTableWidget::customContextMenuRequested,this,&Widget::showmenu);
在TableWidget上右键,会触发的signal:
[signal] void QWidget::customContextMenuRequested(const QPoint &pos)
信号会将鼠标相对于部件的原点(0,0)的坐标值传输给槽函数。正如信号函数中所描述的,会有参数const QPoint &pos。
注意需要TableWidget进行设置
table->setContextMenuPolicy(Qt::CustomContextMenu);
3:槽函数的编写(注意,这次是含有参数的)
void Widget::showmenu(const QPoint pt)
{
    qDebug()<<"showmenu";
    QPoint point = pt; //得到窗口坐标
    QTableWidgetItem *item =table->itemAt(point);//会根据坐标值判断,目前选中的是哪儿一行
    qDebug()<row(); //当前行
        table_widget_menu->clear(); //清除原有菜单
        table_widget_menu->addAction(actclear);
        table_widget_menu->addAction(actdelete);
        //菜单出现的位置为当前鼠标的位置
        table_widget_menu->exec(QCursor::pos());
    }
}
主界面右键
如果使用主界面右键的写法,是会有问题的,因为信号customContextMenuRequested(const QPoint &pos)
传递的是相对于部件的原点(0,0)的坐标值
而contextMenuEvent(QContextMenuEvent *event)传递的是相对于整个界面左上角的原点的坐标值。
void Widget::contextMenuEvent(QContextMenuEvent *event)
{
    QPoint point; //得到窗口坐标
    point.x() = event->x();
    point.y() = event->y();
    QTableWidgetItem *item =table->itemAt(point);
    qDebug()<row(); //当前行
        table_widget_menu->clear(); //清除原有菜单
        table_widget_menu->addAction(actclear);
        table_widget_menu->addAction(actdelete);
        //菜单出现的位置为当前鼠标的位置
        table_widget_menu->exec(QCursor::pos());
    }
}
以上方法不适合对部件,适合对整个界面,以上代码进行执行时在TableWidget没有反应。
右键时会触发以上信号
获取exe所在路径
    QString qexeFULLPath = QCoreApplication::applicationDirPath();
    qDebug()<
QProgressDialog:
.h
#include //进度条
.cpp
void Dialog::progress()//进度条
{
    prnumb=0;//进度条初始化
    qDebug()<<"进度条";
    progressindex = new QProgressDialog(this);//分配空间
    progressindex->setMinimum(0);//最小值
    progressindex->setMaximum(FileSize);//最大值
    progressindex->reset();//让进度条重新回到开始
    progressindex->setWindowModality(Qt::WindowModal);//设置进度条模式
    progressindex->setMinimumDuration(5);//设置整个进度条范围
    progressindex->setWindowTitle(tr("plese waiting"));//设置弹窗标题
    progressindex->setLabelText("Reading...");//设置弹窗内容
    progressindex->setCancelButtonText(tr("Cancel"));//设置摁键文本内容
    progressindex->setRange(0,FileSize);//设置整个进度条范围
    progressindex->autoReset();//自动关闭

}
void Dialog::progressValue()//进度条赋值
{
    prnumb++;
    progressindex->setValue(prnumb);//目前进度条显示的数值
}
关于弹窗式进度条如何使用:
progress()放置在循环外,progressValue放置于循环内即可。
QMessageBox:修改摁键名称
    QMessageBox box(QMessageBox::Warning, "选择","请选择模式:");
    box.setStandardButtons(QMessageBox::Yes | QMessageBox::No);
    box.setButtonText(QMessageBox::Yes, QString("单文件"));
    box.setButtonText(QMessageBox::No, QString("多文件"));
    int ret = box.exec();
    if(ret == QMessageBox::Yes)
    {
        CalFourier->show();

    }
    else if(ret == QMessageBox::No)
    {

    }
规定整个程序的编码类型
在main函数中添加如下的语句
QTextCodec::setCodecForLocale(QTextCodec::codecForName("UTF-8"));


