CSR8670学习笔记:OTA升级固件
为了方便大家学习,现与我爱蓝牙网联合推出【QCC300x/CSR867x/QCC30xx/QCC51xx开发板】。
技术交流QQ群号:743434463
开发板会员QQ群号:725398389(凭订单号入群,赠独家学习资料)
——————————正文分割线———————————–
1. 引言
当我们将产品交付给客户后,有时需要修复软件问题,或是增加新的特性,此时用OTA (on-the-air) 升级产品固件是一种方便实用的方式。
2. OTA升级流程
CSR8670平台的OTA升级流程可以简化成如下示意:
下面每个步骤单独讲解。
2.1. 准备出厂固件
2.1.1. 生成密钥
首选我们需要随机生成一对公钥和私钥,用于加密那些在升级过程中需要被替换的文件,使得出厂固件和OTA文件能够一一对应,避免设备被第三方通过OTA升级的方式恶意劫持。
执行下列命令后,会生成dfu.private.key和dfu.public.key。
echo.
echo. ******** generate keys ********
echo.

:: create key folder
rd /s /Q %keypath%
mkdir %keypath%

:: generate key
cd /D %keypath%
call %toolpath%\dfukeygenerate -o dfu
2.1.2. 签名loader和stack
接着需要签名loader和stack,并烧录到芯片中:
: sign_loader_and_stack

echo.
echo. ******** sign loader and stack ********
echo.

:: create signed loader and stack
rd /s /Q %loaderpath%
mkdir %loaderpath%

:: copy loader and stack here
cd /D %loaderpath%
copy %firmwarepath%\loader_unsigned.xdv loader_unsigned.xdv
copy %firmwarepath%\loader_unsigned.xpv loader_unsigned.xpv
copy %firmwarepath%\stack_unsigned.xdv stack_unsigned.xdv
copy %firmwarepath%\stack_unsigned.xpv stack_unsigned.xpv

:: sign loader and stack
cd /D %upgradepath%
call %toolpath%\dfukeyinsert -v -o %loaderpath%\loader_signed -l %loaderpath%\loader_unsigned.xdv -ks %keypath%\dfu.public.key
call %toolpath%\dfusign -v -o %loaderpath%\stack_signed -s %loaderpath%\stack_unsigned.xpv -ks %keypath%\dfu.private.key


: burn signed loader and stack to board

echo.
echo. ******** burn signed loader and stack to board ********
echo.

call %bluesuitepath%\blueflashcmd -usb 0 erase
call %bluesuitepath%\blueflashcmd -usb 0 %loaderpath%\loader_signed.xpv
call %bluesuitepath%\blueflashcmd -usb 0 %loaderpath%\stack_signed.xpv
2.1.3. 配置ADK工程属性
使能如下选项:
- Device Upgrade
- GAIA
如果需要支持BLE OTA,使能如下选项:
- Enable BLE/GATT
- Enable GATT GAIA Server
- 开机后需要触发BLE start bonding事件,否则手机只能搜索到传统蓝牙设备
别忘了修改ADK工程的firmware image配置,否则xIDE工具会将默认路径的loader和stack烧录进芯片,使得更新固件时出现加密校验失败。

2.1.4. 编写外部Flash分区表文件
首先需要知道ADK工程编译后的VM占用的size,可在.map文件中查看:

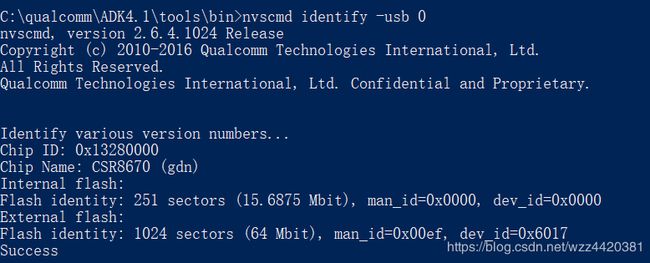
然后看一下芯片内部Flash和外部Flash的size大小:

可以看到内部Flash size是不到1M word(15.6875/8/2),VM用了约187K word,考察官方示例给出的分区表文件:
# Sample partition file for ADK
# Allows testing of all ADK forms of OTAU
0, 1024K, RS, (erase) # Logical 0: Partition for DFU
1, 32K, RO, (erase)# Logical 1: Audio Prompt partition #1,1
2, 32K, RO, (erase) # Logical 1: Audio Prompt partition #1,2
3, 16K, RO, (erase) # Logical 2: Audio Prompt partition #2,1
4, 16K, RO, (erase) # Logical 2: Audio Prompt partition #2,2
5, 64K, RS, (erase) # Logical 3: Test partition #1
6, 64K, RS, (erase) # Logical 3: Test partition #2
7, 8K, RS, (erase) # Logical 4: Single-banked test partition
官方给出的ptn的0号分区的size是1M word,在这个工程里使用是没有问题的。
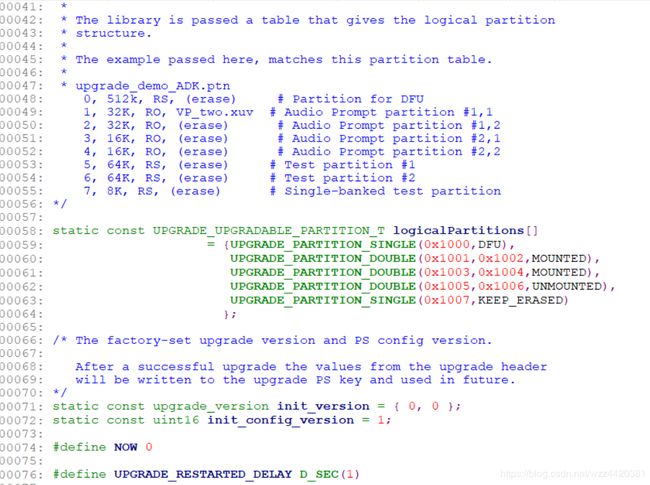
在sink例程代码中也给出了用代码表示的分区表,需要确保代码中的分区数量和类型与分区表文件中的一致。

2.1.5. 烧录分区表文件到外部Flash
将外部Flash的分区表烧录到外部Flash中:
echo.
echo. ******** partition external serial flash memory ********
echo.

call %toolpath%\nvscmd -usb 0 burn %ptnpath%\upgrade_partition_file.ptn all
2.2. 制作OTA升级文件
2.2.1. 生成DFU文件
我们可能需要将psr和VM的修改添加到OTA文件中。对于VM层的修改,我们需要在修改代码后运行run以更新image.fs;对于psr的修改,我们需要手动创建stack.psr,并将我们的修改添加到其中。以修改设备名称为例,需标明目标升级芯片的ID号和需要更新的PSKEY键值:
//chip ID
// 0000 0000 0000 0200 = BC5MM
// 0000 0000 0000 1000 = CSR8670
// 0000 0000 0000 2000 = CSR8675
&F002 = 0000 0000 0000 1000

// PSKEY_DEVICE_NAME
&0108 = 6c42 6575 6f4d 6f74 3272 6e20 326f
在我们准备好stack.psr和image.fs文件后,运行如下命令,生成DFU文件:
echo.
echo. ******** create application DFU file ********
echo.

:: sign stack psr
copy %psrpath%\stack.psr %buildpath%\stack.psr
call %toolpath%\dfukeyinsert -v -o %buildpath%\sps -ps %buildpath%\stack.psr -ka %keypath%\dfu.public.key
call %toolpath%\dfusign -v -o %buildpath%\sps -ps %buildpath%\sps.psr -ks %keypath%\dfu.private.key

:: sign image
copy %projectpath%\image.fs %buildpath%\image.fs
call %toolpath%\dfusign -v -o %buildpath%\image_signed -h %buildpath%\image.fs -ka %keypath%\dfu.private.key

:: create DFU file
call %toolpath%\dfubuild -v -pedantic -t 2 -f %buildpath%\upgrade_file.dfu -uv 0xffff -up 0xffff -ui "DFU OTA upgrade" -p3 . %buildpath%\sps.stack.psr . -h %buildpath%\image_signed.fs
2.2.2. 生成bin文件
我们有了DFU文件后,需要将版本控制信息(包括image和psr)和目标更新分区记录在upd格式的文件:
# ADK upgrade requires an empty signature appended to the end of the file.
add_empty_signature

# Set the upgrade version and previous version(s)
# that are compatible to upgrade from. The minor
# version can be '*' to act as a wildcard.
upgrade_version 1.0
compatible_upgrade 0.*

# Set the ps config version and previous version(s)
# that are compatible to upgrade from
ps_config_version 1
ps_prev_config_version 0

# list all partition starting from index 0 including partition type
#
# DFU file with file system
0 1 upgrade_partition_dfu.xuv
此处需要注意,upd文件可以阻止旧版本的bin文件更新设备,所以在制作新版本的bin文件时,需要升级upgrade_version和ps_config_version的版本号。
准备好upd文件后,执行指令生成bin文件:
: create upgrade file

echo.
echo. ******** create upgrade file ********
echo.

copy %updpath%\upgrade_partition.upd  %buildpath%\upgrade_partition.upd

cd %buildpath%

call %toolpath%\XUV2BIN -e upgrade_file.dfu upgrade_partition_dfu.xuv
call %toolpath%\UpgradeFileGen upgrade_partition.upd upgrade_file.xuv
call %toolpath%\XUV2BIN -d upgrade_file.xuv upgrade_file.bin
2.3. 下载OTA文件到外部Flash
步骤简述如下:
整个下载过程中有几个注意事项:
- 一定要在app界面内完成配对,否则BLE连接是会被8670主动reject的,这是很多人发现BLE连接会自动断开的原因。可以通过改代码的方式取消这个机制。
- 注意upd文件中的upgrade_version一定要大于代码中默认的version号,可以搜索init_version找到。否则会报0x0018错误,提示应用版本号不合适。
- 注意外部Flash一定要在8670开机过程中已经上电,否则会在进入upgrade时提示0x0014错误——找不到分区。
- 如果完成升级后,app提示有0x0018错误是正常现象,因为升级成功后,固件的应用版本号会和bin文件的一致,此时可以检查那些需要更新的PSKEY的值是否已改变,来确认OTA升级已生效。
- 传统蓝牙升级完大约需要7分钟,BLE需要约4小时。iOS平台不支持传统蓝牙升级,因为走的是spp通道,需要加MFi加密芯片并过苹果认证。
3. 总结
在ADK4.4版本中,得益于BT4.2对BLE的extend packet length的扩增,使得BLE连接的升级时间有显著缩短。
虽然BLE传输较慢,但其支持断电续传,对通话和音乐播放功能没有显著影响,可以在连接手机app后让8670在后台无感下载固件。