ucore lab1结合原理的实现
首先,从计算机硬件启动开始说起,开始启动的时候,CPU产生一个RESET,设定一些处理器,从ROM的0Xfffffff0开始执行,进行POST(上电自检),初始化硬件设备,紧接着搜索操作系统来启动,在这个过程中试图访问磁盘的第一个扇区也称为引导扇区(512个字节),只要能找到一个有效的磁盘,那就将这个扇区拷贝到内存0x00007c00开始的位置,跳转,加载这个扇区的代码,也就是bootloader。
在这个阶段,我们需要做的最主要的有3部,为载入内核的代码做好准备。首先bootloader开始的时候需要关闭中断,设置代码从地址递增的方向执行,对8042键盘进行读写操作,置位A20地址线(为了兼容8086遗留下来的原因),使得在保护模式的时候,21位地址不会一直为0.接着我们需要加载GDTR(GDT的大小和基地址),初始化全局描述符表。最后通过置位Cr0寄存器的PE位开启保护模式,然后通过段选择子跳转到内核代码开始的位置设置DS,ES,FS,GS,SS,以及BIOS的数据栈位0-0x7c00(ebp:0,esp:0x7c00).
关中断,初始化寄存器,然后使能了A20。
.globl start
start:
.code16                                             # Assemble for 16-bit mode
    cli                                             # Disable interrupts
    cld                                             # String operations increment

    xorw %ax, %ax                                   # Segment number zero
    movw %ax, %ds                                   # -> Data Segment
    movw %ax, %es                                   # -> Extra Segment
    movw %ax, %ss                                   # -> Stack Segment
seta20.1:
inb $0x64, %al # Wait for not busy(8042 input buffer empty).
testb $0x2, %al
jnz seta20.1
movb $0xd1, %al # 对0x64写入0xd1
outb %al, $0x64 # 0xd1 means: write data to 8042's P2 port
seta20.2:
inb $0x64, %al # Wait for not busy(8042 input buffer empty).
testb $0x2, %al
jnz seta20.2
movb $0xdf, %al # 对0x60写入0xdf使能了A20
outb %al, $0x60 # 0xdf = 11011111, means set P2's A20 bit(the 1 bit) to 1
.p2align 2                                          # force 4 byte alignment
gdt:    #标识符  表示地址
    SEG_NULLASM                                     # null seg    第一段永远为0  不用的
    SEG_ASM(STA_X|STA_R, 0x0, 0xffffffff)           # code seg for bootloader and kernel
    SEG_ASM(STA_W, 0x0, 0xffffffff)                 # data seg for bootloader and kernel

gdtdesc:					    # GDTR寄存器  用lgdt加载
    .word 0x17                                      # sizeof(gdt) - 1
    .long gdt                                       # address gdt
通过SEG_ASM设置全局描述符,这里只是简单的为内核的代码加载初始化GDT而已。
    lgdt gdtdesc   //通过LGDT指令把表的地址和大小装入GDTR寄存器
    movl %cr0, %eax
    orl $CR0_PE_ON, %eax
    movl %eax, %cr0    #  置位PE位  使能保护模式

    # Jump to next instruction, but in 32-bit code segment.
    # Switches processor into 32-bit mode.
    ljmp $PROT_MODE_CSEG, $protcseg
#由于上面的代码已经打开了保护模式了,所以这里要使用逻辑地址,而不是之前实模式的地址了。
#这里用到了PROT_MODE_CSEG, 他的值是0x8。根据段选择子的格式定义,0x8就翻译成:
#       INDEX         TI     CPL
#        0000 0000 0000 1      00      0
#INDEX代表GDT中的索引,TI代表使用GDTR中的GDT, CPL代表处于特权级。protcseg:
# Set up the protected-mode data segment registers
movw $PROT_MODE_DSEG, %ax # Our data segment selector
movw %ax, %ds # -> DS: Data Segment
movw %ax, %es # -> ES: Extra Segment
movw %ax, %fs # -> FS
movw %ax, %gs # -> GS
movw %ax, %ss # -> SS: Stack Segment
# Set up the stack pointer and call into C. The stack region is from 0--start(0x7c00) 为了让读内核的bootmain有数据可以放
movl $0x0, %ebp //基址指针寄存器(extended base pointer),其内存放着一个指针,该指针永远指向系统栈最上面一个栈帧的底部。
movl $start, %esp //栈指针寄存器(extended stack pointer),其内存放着一个指针,该指针永远指向系统栈最上面一个栈帧的栈顶 call bootmain
# If bootmain returns (it shouldn't), loop.
spin:
jmp spin#define SECTSIZE 512 #扇区大小
#define ELFHDR ((struct elfhdr *)0x10000) // scratch spacestruct elfhdr {
uint32_t e_magic; // must equal ELF_MAGIC
uint8_t e_elf[12];
uint16_t e_type; // 1=relocatable, 2=executable, 3=shared object, 4=core image
uint16_t e_machine; // 3=x86, 4=68K, etc.
uint32_t e_version; // file version, always 1
uint32_t e_entry; // entry point if executable
uint32_t e_phoff; // file position of program header or 0程序头
uint32_t e_shoff; // file position of section header or 0
uint32_t e_flags; // architecture-specific flags, usually 0
uint16_t e_ehsize; // size of this elf header
uint16_t e_phentsize; // size of an entry in program header
uint16_t e_phnum; // number of entries in program header or 0 多少个程序
uint16_t e_shentsize; // size of an entry in section header
uint16_t e_shnum; // number of entries in section header or 0
uint16_t e_shstrndx; // section number that contains section name strings
};struct proghdr {
uint32_t p_type; // loadable code or data, dynamic linking info,etc.
uint32_t p_offset; // file offset of segment 偏移量
uint32_t p_va; // virtual address to map segment 程序头的地址
uint32_t p_pa; // physical address, not used
uint32_t p_filesz; // size of segment in file
uint32_t p_memsz; // size of segment in memory (bigger if contains bss) 每个程序大小
uint32_t p_flags; // read/write/execute bits
uint32_t p_align; // required alignment, invariably hardware page size
}; readseg((uintptr_t)ELFHDR, SECTSIZE * 8, 0);static void
readseg(uintptr_t va, uint32_t count, uint32_t offset) {
uintptr_t end_va = va + count;
// round down to sector boundary
va -= offset % SECTSIZE;//当前所在块的首地址
// translate from bytes to sectors; kernel starts at sector 1
uint32_t secno = (offset / SECTSIZE) + 1;//读取磁盘开始的位置
// If this is too slow, we could read lots of sectors at a time.
// We'd write more to memory than asked, but it doesn't matter --
// we load in increasing order.
for (; va < end_va; va += SECTSIZE, secno ++) {
readsect((void *)va, secno);
}
}static void
readsect(void *dst, uint32_t secno) {
// wait for disk to be ready
waitdisk();
outb(0x1F2, 1); // count = 1读一个
outb(0x1F3, secno & 0xFF); //表示读取磁盘的扇区编号
outb(0x1F4, (secno >> 8) & 0xFF);
outb(0x1F5, (secno >> 16) & 0xFF);
outb(0x1F6, ((secno >> 24) & 0xF) | 0xE0);
outb(0x1F7, 0x20); // cmd 0x20 - read sectors
// wait for disk to be ready
waitdisk();
// read a sector
insl(0x1F0, dst, SECTSIZE / 4);
}接着进行bootmain的后续程序,对ELF进行验证,如果是ELF文件则利用e_phoff得到起始的头,通过e_phnum获得end_ph
通过proghdr中的偏移量,程序头的地址,以及每个程序头的大小进行磁盘读取。
    // is this a valid ELF?
    if (ELFHDR->e_magic != ELF_MAGIC) {
        goto bad;
    }

    struct proghdr *ph, *eph;

    // load each program segment (ignores ph flags)
    ph = (struct proghdr *)((uintptr_t)ELFHDR + ELFHDR->e_phoff);
    eph = ph + ELFHDR->e_phnum;
    for (; ph < eph; ph ++) {
        readseg(ph->p_va & 0xFFFFFF, ph->p_memsz, ph->p_offset);
    }

    // call the entry point from the ELF header
    // note: does not return
    ((void (*)(void))(ELFHDR->e_entry & 0xFFFFFF))();

bad:
    outw(0x8A00, 0x8A00);
    outw(0x8A00, 0x8E00);

    /* do nothing */
while (1);void
kern_init(void){
extern char edata[], end[];
memset(edata, 0, end - edata);
cons_init(); // init the console
const char *message = "(THU.CST) os is loading ...";
cprintf("%s\n\n", message);
print_kerninfo();
grade_backtrace();
pmm_init(); // init physical memory management
pic_init(); // init interrupt controller
idt_init(); // init interrupt descriptor table
clock_init(); // init clock interrupt
intr_enable(); // enable irq interrupt
/* do nothing */
while (1);
}对于idt表的初始化,我们需要加载内核态的中断描述符表以及一个用户态访问内核态的软中断。
    extern uintptr_t __vectors[];//中断的向量地址
    int i;
    for (i = 0; i < sizeof(idt) / sizeof(struct gatedesc); i ++) {
        SETGATE(idt[i], 0, GD_KTEXT, __vectors[i], DPL_KERNEL);//SEGGATE是设置中断描述符的下面会展示
    }
	// set for switch from user to kernel
    SETGATE(idt[T_SWITCH_TOK], 0, GD_KTEXT, __vectors[T_SWITCH_TOK], DPL_USER);
	// load the IDT
lidt(&idt_pd);/* Gate descriptors for interrupts and traps */
struct gatedesc {
unsigned gd_off_15_0 : 16; // low 16 bits of offset in segment
unsigned gd_ss : 16; // segment selector
unsigned gd_args : 5; // # args, 0 for interrupt/trap gates
unsigned gd_rsv1 : 3; // reserved(should be zero I guess)
unsigned gd_type : 4; // type(STS_{TG,IG32,TG32})
unsigned gd_s : 1; // must be 0 (system)
unsigned gd_dpl : 2; // descriptor(meaning new) privilege level
unsigned gd_p : 1; // Present
unsigned gd_off_31_16 : 16; // high bits of offset in segment
};#define SETGATE(gate, istrap, sel, off, dpl) { \
(gate).gd_off_15_0 = (uint32_t)(off) & 0xffff; \
(gate).gd_ss = (sel); \
(gate).gd_args = 0; \
(gate).gd_rsv1 = 0; \
(gate).gd_type = (istrap) ? STS_TG32 : STS_IG32; \
(gate).gd_s = 0; \
(gate).gd_dpl = (dpl); \
(gate).gd_p = 1; \
(gate).gd_off_31_16 = (uint32_t)(off) >> 16; \
}对于每100个TICK进行一次输出非常简单,在这里不再赘述了。
重点来讲讲扩展练习的用户态和内核态的转换,最主要的还是栈的转变。
首先对于vector.s,trap.c以及对应的trap的asm文件,我们可以得到call trap传入对应的tf参数,也就是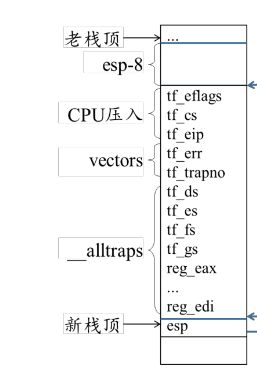 对应于
对应于
struct trapframe {
    struct pushregs tf_regs;
    uint16_t tf_gs;
    uint16_t tf_padding0;
    uint16_t tf_fs;
    uint16_t tf_padding1;
    uint16_t tf_es;
    uint16_t tf_padding2;
    uint16_t tf_ds;
    uint16_t tf_padding3;
    uint32_t tf_trapno;
    /* below here defined by x86 hardware */
    uint32_t tf_err;
    uintptr_t tf_eip;
    uint16_t tf_cs;
    uint16_t tf_padding4;
    uint32_t tf_eflags;
    /* below here only when crossing rings, such as from user to kernel */
    uintptr_t tf_esp;
    uint16_t tf_ss;
    uint16_t tf_padding5;
} __attribute__((packed));static void
lab1_switch_test(void) {
lab1_print_cur_status();
cprintf("+++ switch to user mode +++\n");
lab1_switch_to_user();
lab1_print_cur_status();
cprintf("+++ switch to kernel mode +++\n");
lab1_switch_to_kernel();
lab1_print_cur_status();
} asm volatile (
"sub $0x8, %%esp \n"
"int %0 \n"
"movl %%ebp, %%esp"
:
: "i"(T_SWITCH_TOU)
);同时将新建栈的地址放入压入得esp处,弹出esp时进入了新建栈,完成转换。
   case T_SWITCH_TOU:
        if (tf->tf_cs != USER_CS) {
            switchk2u = *tf;
            switchk2u.tf_cs = USER_CS;
            switchk2u.tf_ds = switchk2u.tf_es = switchk2u.tf_ss = USER_DS;
            switchk2u.tf_esp = (uint32_t)tf + sizeof(struct trapframe) - 8;

            // set eflags, make sure ucore can use io under user mode.
            // if CPL > IOPL, then cpu will generate a general protection.
            switchk2u.tf_eflags |= FL_IOPL_MASK;

            // set temporary stack
            // then iret will jump to the right stack
            *((uint32_t *)tf - 1) = (uint32_t)&switchk2u;
        }
        break;
同样的,从用户态返回内核态时一个相反的过程,通过获得tf_esp来寻找到前一次进入用户态的内核态的代码所在处,通过加减到上图新栈顶的位置,同事把该栈放入esp处,进行下一次的操作转换。
    case T_SWITCH_TOK:
        if (tf->tf_cs != KERNEL_CS) {
            tf->tf_cs = KERNEL_CS;
            tf->tf_ds = tf->tf_es = KERNEL_DS;
            tf->tf_eflags &= ~FL_IOPL_MASK;
            switchu2k = (struct trapframe *)(tf->tf_esp - (sizeof(struct trapframe) - 8));
            memmove(switchu2k, tf, sizeof(struct trapframe) - 8);
            *((uint32_t *)tf - 1) = (uint32_t)switchu2k;
        }
        break;