Nginx配置详情
Nginx1.16.0安装详见 CentOS7.3编译安装LNMP之(一)Nginx-1.16.0安装
本文以nginx1.16.0编译安装版为例,目录如下
/usr/local/nginx/ nginx的安装目录
/usr/local/nginx/conf/ nginx的配置目录
/usr/local/nginx/conf/nginx.conf 默认的主配置文件
/usr/local/nginx/html/ 默认站点
/usr/local/nginx/conf/vhost/ 我们自己创建的专门用来放置虚拟主机的配置文件的目录
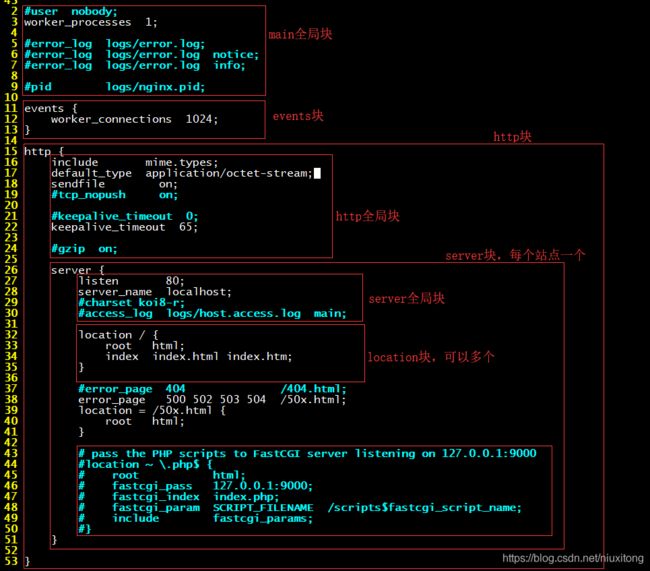
nginx配置文件一般包含以下模块:
1、main全局模块:配置Nginx用户(组)、worker process数、进程PID存放路径、日志的存放路径等配置
2、events模块:配置影响nginx服务器或与用户的网络连接,有每个进程的最大连接数,选取哪种事件驱动模型处理连接请求,是否允许同时接受多个网路连接,开启多个网络连接序列化等
3、http模块:可以嵌套多个server,配置代理,缓存,日志定义等绝大多数功能和第三方模块的配置。
3-1、http全局模块:如mime-type定义,日志自定义,是否使用sendfile传输文件,连接超时时间,单连接请求数等
3-2、server模块:配置虚拟主机的相关参数,一个http中可以有多个server
3-2-1、server全局模块:配置站点的端口号、域名、目录等
3-2-2、location模块:配置请求的路由,以及各种页面的处理情况
具体内容详如下:
### 每个指令必须有分号结束,用#号注释, 注释部分为可选项,未注释的为必须的 ###

# main全局块:配置影响nginx全局的指令。一般有运行nginx服务器的用户组,nginx进程pid存放路径,日志存放路径,配置文件引入,允许生成worker process数等。
#user nginx nginx; #配置用户或者组,默认为nobody nobody。
worker_processes  1;		#允许生成的进程数,默认为1, 最大为cpu核数或者cup核数的两倍

#制定日志路径,级别。这个设置可以放入全局块,http块,server块,级别以此为:debug|info|notice|warn|error|crit|alert|emerg
#error_log  logs/error.log;
#error_log  logs/error.log  notice;
#error_log  logs/error.log  info;

#pid        logs/nginx.pid;	#指定nginx进程运行文件存放地址

#最大文件打开数(连接),可设置为系统优化后的ulimit -HSn的结果
#worker_rlimit_nofile 51200;
#cpu亲和力配置,让不同的进程使用不同的cpu
#worker_cpu_affinity 0001 0010 0100 1000 0001 00100100 1000;


#2、events块:配置影响nginx服务器或与用户的网络连接。有每个进程的最大连接数,选取哪种事件驱动模型处理连接请求,是否允许同时接受多个网路连接,开启多个网络连接序列化等。
events {
	#use epoll;       #epoll是多路复用IO(I/O Multiplexing)中的一种方式,但是仅用于linux2.6以上内核,可以大大提高nginx的性能
	#accept_mutex on;   #设置网路连接序列化,防止惊群现象发生,默认为on
    #multi_accept on;  #设置一个进程是否同时接受多个网络连接,默认为off
    worker_connections  1024; #单个后台worker process进程的最大并发链接数
}

#3、http块:可以嵌套多个server(每个server为一个站点),配置代理,缓存,日志定义等绝大多数功能和第三方模块的配置。如文件引入,mime-type定义,日志自定义,是否使用sendfile传输文件,连接超时时间,单连接请求数等。
http {
    include       mime.types;		#文件扩展名与类型映射表。来查看mime.types文件内容,我们发现其就是一个types结构,里面包含了各种浏览器能够识别的MIME类型以及对应类型的文件后缀名字
    default_type  application/octet-stream;   #默认文件类型,默认为text/plain

    #log_format  main  '$remote_addr - $remote_user [$time_local] "$request" '
    #                  '$status $body_bytes_sent "$http_referer" '
    #                  '"$http_user_agent" "$http_x_forwarded_for"';

    #access_log  logs/access.log  main;   #自定义服务日志

    sendfile        on;				#允许sendfile方式传输文件,默认为on,表示高效文件传输模式,可以在http块,server块,location块。
	#sendfile_max_chunk 100k;  #每个进程每次调用传输数量不能大于设定的值,默认为0,即不设上限。
    #tcp_nopush     on;			#激活tcp_nopush参数可以允许把httpresponse header和文件的开始放在一个文件里发布,积极的作用是减少网络报文段的数量
	# tcp_nodelay on; 			#激活tcp_nodelay,内核会等待将更多的字节组成一个数据包,从而提高I/O性能
    #keepalive_timeout  0;			#设置长连接超时时间,默认为75s,可以在http,server,location块。
    keepalive_timeout  65;

    #gzip  on;
	#gzip_min_length  1k;   #gzip  on开启才有效,设置允许压缩的页面最小字节数,页面字节数从header头的Content-Length中获取。默认值是0,表示不管页面多大都进行压缩。建议设置成大于1K。如果小于1K可能会越压越大

	#upstream表示负载服务器池,定义名字为backend_server的服务器池
#	upstream myweb {
#		server 118.24.241.124 [weight=1 max_fails=2 fail_timeout=30s];
#		server 106.12.2.195:8081 [weight=1 max_fails=2 fail_timeout=30s];
#		server 106.12.2.195:8082 [weight=1 max_fails=2 fail_timeout=30s];
#		server 106.12.2.195:8083 [weight=1 max_fails=2 fail_timeout=30s];
#	}

#设置由 fail_timeout 定义的时间段内连接该主机的失败次数,以此来断定 fail_timeout 定义的时间段内该主机是否可用。默认情况下这个数值设置为 1。零值的话禁用这个数量的尝试。设置在指定时间内连接到主机的失败次数,超过该次数该主机被认为不可用。这里是在30s内尝试2次失败即认为主机不可用!

	#基于域名的虚拟主机
    server {
        listen       80;		#端口号,
        server_name  localhost;		#域名 多个用空格隔开,  也可以是IP地址如
		#root  /home/wwwroot/qinser   #站点根目录,可以是相对路径,也可以是绝对路径,此项目也可以放置的到 location /{ }里配置
		#index index.php index.html index.htm;  #设置默认页 此项目也可以放置的到 location /{ }里配置

        #charset koi8-r;

        #access_log  logs/host.access.log  main;

        location / {
		#	proxy_pass http://myweb;   proxy_pass  #请求转向myweb定义的服务器列表, 用于负载均衡,如果开启了,那么此处自己的站点就不能访问了
            root   /home/wwwroot/qinser;
            index index.php index.html index.htm;
        }

        #error_page  404              /404.html;

        # redirect server error pages to the static page /50x.html
        #
        error_page   500 502 503 504  /50x.html;
        location = /50x.html {
            root   html;
        }

        # proxy the PHP scripts to Apache listening on 127.0.0.1:80
        #
        #location ~ \.php$ {
        #    proxy_pass   http://127.0.0.1;
        #}

        # pass the PHP scripts to FastCGI server listening on 127.0.0.1:9000
        #  支持PHP配置模块 #符合php扩展名的请求调度到fcgi server
        location ~ \.php$ {
            #root           /home/wwwroot/qinser;     #上面已经配置过了,这里就不用配置了
            fastcgi_pass   127.0.0.1:9000;				#因为php-fpm启用的是9000端口,因此这里表示抛给本机的9000端口
            fastcgi_index  index.php;
            fastcgi_param  SCRIPT_FILENAME  /usr/local/nginx/html$fastcgi_script_name;
            include        fastcgi_params;
        }

        # deny access to .htaccess files, if Apache's document root
        # concurs with nginx's one
        #
        #location ~ /\.ht {
        #    deny  all;
        #}
    }


	#每个站点都需要配置一个server模块,为了方便管理,这里把每个站点的配置文件统一放入到./vhost/目录下,并统一使用 .conf为后缀。
	include /usr/local/nginx/conf/vhost/*.conf

}
二、配置虚拟站点:
创建一个虚拟站点,域名为my.niuxitong.com, 站点根目录为/home/wwwroot/niuxitong/。
1、创建站点目录及文件
# mkdir -p /home/wwwroot/niuxitong/
# vim index.html
输入内容如下


mytest


this is my test site!!!
2、创建配置文件
配置文件名为my.niuxitong.com.conf 位于/usr/local/nginx/conf/vhost/下。(确保在nginx主配置文件里include进来了)
# vim /usr/local/nginx/conf/vhost/my.niuxitong.com.conf

输入如下内容:(最基本的配置)

server {
    listen 80;
    server_name my.niuxitong.com;
    root /home/wwwroot/niuxitong;
    # 设置默认文件名
    index index.html index.htm default.html default.htm;
}


检查配置文件有没有语法错误
# nginx -t

重启nginx
# service nginx restart
3、在你本地C:\Windows\System32\drivers\etc\下的hosts文件里添加如下域名
106.12.2.195 my.niuxitong.com
访问:http://my.niuxitong.com/  OK 站点配置成功
三、配置负载均衡服务器
由于本人只有两台服务器:
106.12.2.195 为主服务器
118.24.241.124 :为从服务器
一主服务器的默认站点为负载, 并在主服务器上创建两个虚拟站点106.12.2.195:8081 和 106.12.2.195:8082: 。通过默认站点分发到 118.24.241.124、106.12.2.195:8081、106.12.2.195:8082 这三个站点上:
1、在主服务器上分别建立两个虚拟站点:分别位于/home/wwwroot/weba、/home/wwwroot/webb两个目录下,配置文件如下:
# vim 106.12.2.195:8081.conf
内容如下:
server {
    listen 8081;
    server_name 106.12.2.195:8081;
    root /home/wwwroot/weba;
    index index.html index.htm default.html defaut.htm;
}


# vim 106.12.2.195:8082.conf
内容如下:
server {
    listen 8082;
    server_name 106.12.2.195:8082;
    root /home/wwwroot/webb;
    index index.html index.htm default.html defaut.htm;
}
2、在主服务器的默认配置文件./nginx.conf设置如下内容
主站点的配置如下:

http {
    ...
    ...
    #配置负载均衡
    #upstream 表示负载均衡服务器池  定义名字为mywebs的服务器池
    upstream mywebs{
        server 118.24.241.124;
        server 106.12.2.195:8081;
        server 106.12.2.195:8082;
    }

    ...
    ...
    server {
        location / {
            proxy_pass http://mywebs;    //转发到名为mywebs的服务器池中
            ...
        }

    }

}
3、重启nginx
4、访问http://106.12.2.195/ 不停的刷新,在三个站点之间来回切换。
OK负载均衡搭建成功。
5、模拟测试其中一台服务器宕机的情形
把118.24.241.124 这台服务器nginx关闭 ,这时我们刷新http://106.12.2.195/ 只在weba、webb两个站点之间切换。
四、设置目录列表
默认情况下,如果没有对应的索引文件,如果我们直接访问,会报403 Forbidden错误的。可以通过autoindex on;属性来设置列目录
此属性可以在http全局块设置,对所有站点有效。也可以在server全局块设置,对当前站点有效
演示:在my.niuxitong.com站点模块设置
# vim /usr/local/nginx/conf/vhost/my.niuxitong.com.conf

在server全局块加入如下三行

 autoindex on;        #开启目录列表
 autoindex_exact_size on;     #默认值为off 以kB、mB、GB显示文件的大概大小, 如果设置为on则精准显示文件的大小
 autoindex_localtime on;     #默认值为on 表示显示文件最后一次被修改的服务器时间(格林尼治时间)
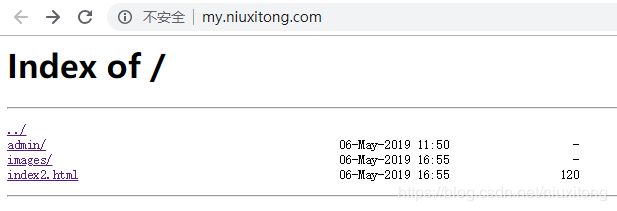
把默认索引文件名 index.html 修改为 index2.html;
访问 http://my.niuxitong.com/ 显示如图:
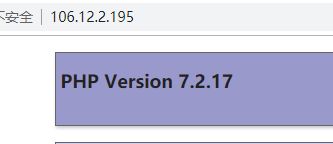
五、让nginx支持PHP
PHP-7.2.18安装 详见 CentOS7.3编译安装LNMP之(三)PHP-7.2.18安装
仍以上文提到的my.niuxitong.com站点为例,PHP安装部署好以后,在./vhost/my.niuxitong.com.conf配置文件内添加如下内容
server {
    listen 80;
    server_name my.niuxitong.com;
    root /home/wwwroot/niuxitong;

    index index.php index.html ....;   #默认文件增加一个index.php

    ....

    #设置使nginx支持PHP
    location ~ \.php$ {
        fastcgi_pass   127.0.0.1:9000;
        fastcgi_index  index.php;
        fastcgi_param  SCRIPT_FILENAME  /home/wwwroot/niuxitong$fastcgi_script_name;
        include        fastcgi_params;
    }

}
在此站点目录创建 index.php文件
phpinfo();
?>


