ansible改进版(2)--ansible playbook入门和编写规范
文章目录
- playbook语言介绍
- playbook框架与格式
- test playbooks
- playbooks编写规范
- 详细目录testenv
- 主任务文件main.yml
- 任务入口文件deploy.yml
- SSH免密码秘钥认证
- 执行playbooks
- 执行
- ansible playbook常用模块
- 部署nginx并启动
- 更新用户密码
playbook语言介绍
playbook作为ansible独有的术语,是ansible配置部署的编排语言框架,本身简单易读的语法结构以及丰富的内嵌模块非常易于我们编写远程系统部署策略,playbook基础的文件格式为yaml格式,可以将playbook称之为总的乐谱,每一个yaml文件可以称为playbook的乐章,在这个playbook下可以编写一个或多个task作为这个乐章的音符,通过ansible相关的命令去play演奏这个乐谱,就可以将我们预先写好的任务按照特定的编排部署到远程服务器当中,也就是演奏给我们的听众
playbook框架与格式
test playbooks
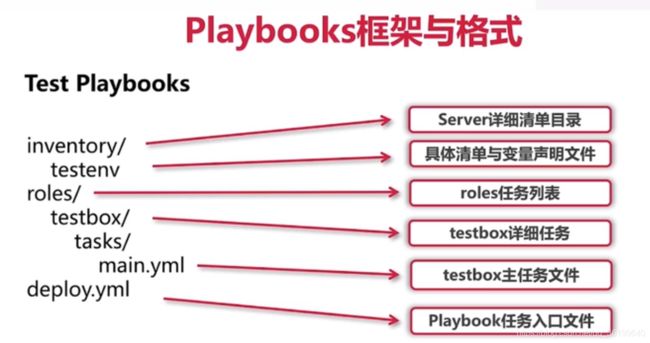
- 总文件结构
inventory/ #存放一个或多个server详细清单目录,用来保存目标部署主机的相关域名或者IP地址,以及该主机的变量参数,通常可以用具体的部署环境例如deploy开发环境,uat单元测试环境或者production最终产品环境用来给server清单命名,对应保存在清单的主机地址具体部署到那个环境中
testenv #具体清单与变量声明文件,这里是保存inventory/testenv文件,意在保存在testenv下的主机部署到testenv环境中
roles/ #roles任务列表,保存需要部署的详细任务列表,它的下边可以存放一个或者多个role通常命名为具体的add或者项目名称
testbox/ #testbox详细任务,这里命令testbox作为项目名称
task/ #保存testbox任务乐章
    main.yml#testbox主任务文件
deploy.yml #playbook任务入口文件,调动roles下需要部署的项目,以及该项目下的所有任务,最终将任务部署到environment下定义的目标主机中

路径:
inventory/testenv
roles/testbox/tasks/main.yml
deploy.yml
playbooks编写规范
详细目录testenv
[testservers] #server组列表,保存一个或多个目标主机域名或IP地址
test.example.com #目标部署服务器主机名,需要部署的目标主机的域名
[testservers:vars] #server主列表参数,用来定义改组下的远程主机用到的所有key value参数键值对,作为变量组的server声明
server_name=test.example.com
user=root     #目标主机key/value参数
output=/root/test.txt
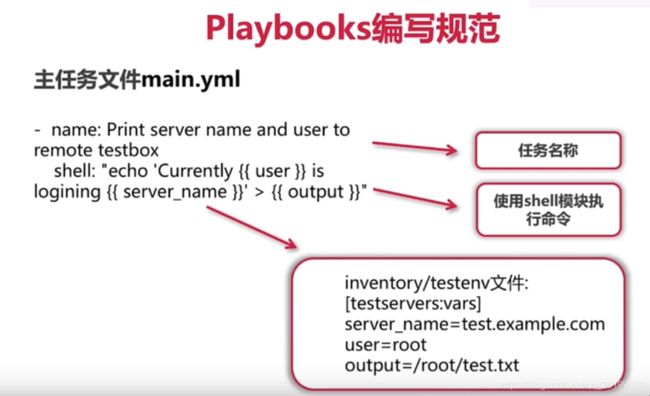
主任务文件main.yml
保存特定role下的具体任务乐章,乐章会保存一个或多个task作为我们的音符,task一般由两部分组成
- name: print server name and user to #任务名称,用来定义task名称方便我们编写好task后知道它是干什么用的
remote testbox(打印主机名和用户名到远程testbox主机)
  shell: "echo 'Currently {{user}} is logining {{server_name}}'>{{output}}" #使用shell模块执行命令,具体要执行的任务调用ansible内嵌模块编排任务逻辑(shell语句执行一句话并保存到目标目录文件下)
   {{user}} {{server_name}}含义#引用了ansible的变量调用,将inventory/testenv文件里给我们目标主机定义的参数引入到这个当前的文件当中,这里user的值为root,server_name为test.example.com,output值为/root/test.txt
任务入口文件deploy.yml
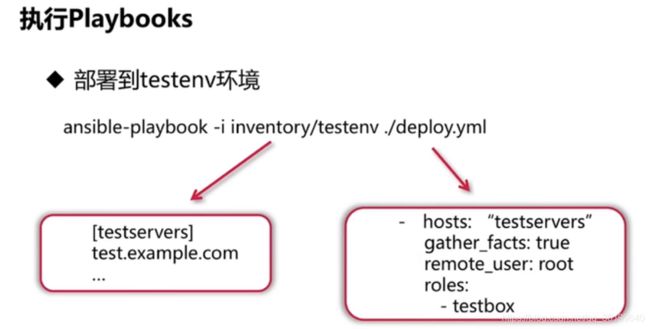
作为我们的核心文件用来与ansible-playbook命令直接对话,将playbook下的所有编排内容展示给我们的ansible命令进行最终的play演奏最后部署到对应的目标主机当中
- hosts:"testservers" #server列表,用来调用这个标签下的目标主机,需要部署的目标主机为tes.texample.com这台主机
  gather_facts:true #获取server基本信息,获取目标主机下的一些基本信息
  remote_user:root #目标服务器系统用户指定,告诉ansible我们在目标主机下使用的是root用户权限进行所有的系统文件操作
  roles:
    - testbox #告诉进入roles/testbox任务目录,进行接下来的任务执行
SSH免密码秘钥认证
因为使用的是ssh作为通信协议,为了保证正常的通信连接,我们需要配置的ansible主机与目标主机的秘钥认证,保证ansible无需密码即可访问目标主机并进行相应的部署操作
- ansible服务器端创建ssh本地秘钥
ssh-keygen -t rsa #创建秘钥
- ansible服务器端建立与目标部署机器的秘钥认证
ssh-copy-id -i /home/deploy/.ssh/id_rsa.pub [email protected] #远程推送公钥
执行playbooks
- 部署testenv环境
ansible-playbook -i inventory/testenv ./deploy.yml #testenv对应test.example.com主机,deploy.yml对应任务入口文件deploy.yml,就可以开启任务
执行
登录ansible
su - deploy #进入deploy虚拟环境
source /home/deploy/.py3-a2.5-env/bin/activate #加载虚拟环境
source /home/deploy/.py3-a2.5-env/ansible/hacking/env-setup -q ##在虚拟环境下加载ansible2.5版本
ansibel --version #验证ansible加载效果
mkdir test_playbooks #创建项目目录
cd test_playbooks/
mkdir inventory
mkdir roles
cd inventory/
vim testenv
[testservers]
test.example.com


[testservers:vars]
server_name=test.example.com
user=root
output=/root/test.txt

cd ../
ls
cd roles/
mkdir testbox
cd testbox/
mkdir tasks
cd tasks/
vim main.yml
- name: print server name and user to remote testbox #:后有个空格
  shell: "echo 'Currently {{user}} is logining {{server_name}}'>{{output}}"
pwd # 查看当前目录
cd ../../.. #返回test_playbooks/目录下
vim deploy.yml
- hosts: "testservers" #:后有个空格,定义目标主机
  gather_facts: true #两个空格,获取目标主机的信息
  remote_user: root #使用root账户权限
  roles:
    - testbox #四个空格 #进入roles目录下的testbox任务目录进行接下来的任务执行
tree . #查看目录
su - root
vim /etc/hosts #添加hosts记录方便测试
192.168.152.171 test.example.com
exit #返回deploy环境
ssh-keygen -t rsa  #一路回车
ssh-copy-id -i /home/deploy/.ssh/id_rsa.pub [email protected]
ssh [email protected] #测试免密登录
exit #返回
cd test_playbooks/
ansible-playbook -i inventory/testenv ./deploy.yml
#unreachable=0 无法达到的值为0,就是可以直接访问到目标主机 failed=0指代语法结构没有任何错误
ssh [email protected]
ls #查看结果
ansible playbook常用模块
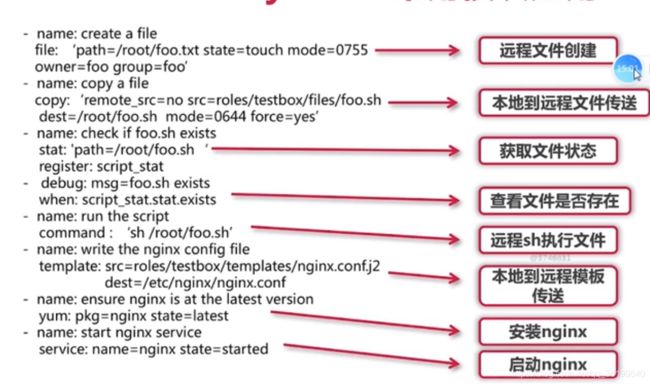
ansible模块是有ansible对特定部署脚本打包封装后的成品,可以利用该模块成品直接编写playbooks,这样就大大简化了日常工作中对部署脚本的编写逻辑,从而方便后期维护管理
- file模块
- 在目标主机创建文件或目录,并赋予其系统权限
- name: create a file #定义任务名称
  file: 'path=/root/foot.txt state=touch mode=0755 owner=foo group=foo'
  # 声明调用的是file模块
  # path=/root/foot.txt 在目标主机上创建/root/foot.txt文件
  # state=touch 定义需要创建一个文件
  # mode=0755 给文件赋予0755权限
  # owner=foo  文件属主为foo
  # group=foo 文件属组为foo
- copy模块
- 实现ansible服务端到目标主机的文件传送,同样可以对目的地传送文件进行系统配置
- name: copy a file
  copy: 'remote_src=no src=roles/testbox/files/foo.sh dest=/root/foo.sh mode=0644 force=yes'
  # remote_src=no 声明将源ansible主机中的文件传输到目标主机当中
  # src=roles/testbox/files/foo.sh 声明源文件为这个路径的文件
  # dest=/root/foo.sh 传送到目标/root/foo.sh
  # mode=0644 文件权限0644
  # force=yes 定义copy任务强制执行
- stat模块
- 获取远程文件状态信息,并将信息保存在一个环境变量下供随后使用
- name: check if foo.sh exists #检查这个文件是否存在在
  stat: 'path=/root/foo.sh' #获取远程主机/root/foo.sh文件状态信息
  register: script_stat

  # path=/root/foo.sh 定义当前需要获取的文件路径为/root/foo.sh
  # register: script_stat 将stat获取的文件信息传送给script_stat这个变量
  # 从而实现从获取文件信息到给该变量赋值的这样一个任务操作这样就构成了一个stat的ansible任务
- Debug模块
- 打印语句到ansible执行输出,通常与stat配置使用,确认文件状态,也可以调用参数进行语句输出
- debug: msg=foo.sh exits
  when: script_stat.exists
  # msg=foo.sh exits 定义输出内容
  # when: script_stat.exists 调用条件语句when去调用之前的script_stat变量从而判断foo.sh是否存在
  #合在一起用来判断如果foo.sh文件存在就在ansible执行信息里打印一条foo.sh exits存在的语句,不存在则不打印
  # 这样就构成了debug模块的ansible语句
- command/shell模块
- 用来执行Linux目标主机命令行,shell模块会调用Linux系统下的/bin/bash,可以使用系统环境变量重定向变量符以及管道符等,command就不能使用这些shell的特定符号用法
- name: run the script
  command: "sh /root/foo.sh"

- name: run the script
  shell: "echo 'test' >/root/test.txt" #可以使用重定向符(推荐)
- template模块
- 实现ansible服务端到目标主机的jinja2模板传送,利用jinja语法格式编写一个http的配置文件,例如nginx配置文件我们在里面添加一些变量参数然后通过定义ansible的参数将我们的模板传送到目标主机的http配置文件目录从而实现对不同环境的http配置文件的参数管理
- name: write the nginx config file #编写一个nginx配置文件
  template: src=roles/testbox/templates/nginx.conf.j2 dest=/etc/nginx/nginx.conf
  # template 声明任务语句调用的是template模块,源模板文件roles/testbox/templates/nginx.conf.j2 传送并重命名到目标/etc/nginx/nginx.conf,nginx.conf定义的变量参数会调用playbooks清单里的参数生成最终的nginx.conf文件
- packaging模块
- 调用目标主机系统包管理工具(yum,apt)进行安装,调用Linux发行版的包管理工具并根据定义的安装包名称进行配置安装,常用这个模块去安装不同Linux下的http安装包,常用在centos系统下安装nginx.rpm格式安装包、
- name: ensure nginx is at the latest version #保证我们的nginx为最新版本
  yum: pkg=nginx state=latest
 # yum声明调用的语句是yum模块
 # pkg=nginx表示要安装的为nginx安装包
 # state=latest设定安装的nginx为最新版本
 # 保证主机为centos/redhat系统
- name: ensure nginx is at the latest version
  apt: pkg=nginx state=latest
  # 调用apt模块
  # 保证主机系统为Debian/Ubuntu
- service模块
- 管理目标主机系统服务,调用主机的service systemctl管理系统服务的停止、启动和状态检查
- name: start nginx service
  service: name=nginx state=started
  # service声明任务语句调用 service模块
  # name=nginx定义调用的服务为
  # state=started定义将nginx服务做一个启动操作
su - deploy #进入deploy虚拟环境
source /home/deploy/.py3-a2.5-env/bin/activate #加载虚拟环境
source /home/deploy/.py3-a2.5-env/ansible/hacking/env-setup -q ##在虚拟环境下加载ansible2.5版本
ansibel --version #验证ansible加载效果
目标主机预配置
useradd foo
useradd deploy
mkdir /etc/nginx
rpm -Uvh http://nginx.org/packages/centos/7/noarch/RPMS/nginx-release-centos-7-0.el7.ngx.noarch.rpm #nginx yum源安装包安装
exit
cd test_playbooks/
vi roles/testbox/tasks/main.yml

- name: create a file
  file: 'path=/root/foot.txt state=touch mode=0755 owner=foo group=foo'
- name: copy a file
  copy: 'remote_src=no src=roles/testbox/files/foo.sh dest=/root/foo.sh mode=0644 force=yes'
- name: check if foo.sh exists
  stat: 'path=/root/foo.sh'
  register: script_stat
- debug: msg="foo.sh exits"
  when: script_stat.exists
- name: run the script
  command: "sh /root/foo.sh"
- name: run the script
  shell: "echo 'test' >/root/test.txt"
- name: write the nginx config file
  template: src=roles/testbox/templates/nginx.conf.j2 dest=/etc/nginx/nginx.conf
- name: ensure nginx is at the latest version
  yum: pkg=nginx state=latest
- name: ensure nginx is at the latest version
  apt: pkg=nginx state=latest
- name: start nginx service
  service: name=nginx state=started
ansible-playbook -i inventory/testenv ./deploy.yml #执行任务
ssh [email protected] ll /root/foot.txt #验证
mkdir roles/testbox/files #file模块操作
vim roles/testbox/files/foo.sh
echo "this is a script"
ansible-playbook -i inventory/testenv ./deploy.yml
部署nginx并启动
cd inventory/
vim testenv
[testservers]
test.example.com


[testservers:vars]
server_name=test.example.com
user=root
output=/root/test.txt
server_name=test.example.com
port=80
user=deploy
worker_processes=4
max_open_file=65505
root=/www


mkdir roles/testbox/templates
vim roles/testbox/templates/nginx.conf.j2

user  {{ user }};
worker_processes  {{ worker_processes }};

#error_log  logs/error.log;
#error_log  logs/error.log  notice;
#error_log  logs/error.log  info;

#pid        logs/nginx.pid;


events {
    worker_connections  {{ max_open_file }};
}


http {
    include       mime.types;
    default_type  application/octet-stream;

    #log_format  main  '$remote_addr - $remote_user [$time_local] "$request" '
    #                  '$status $body_bytes_sent "$http_referer" '
    #                  '"$http_user_agent" "$http_x_forwarded_for"';

    #access_log  logs/access.log  main;

    sendfile        on;
    #tcp_nopush     on;

    #keepalive_timeout  0;
    keepalive_timeout  65;

    #gzip  on;

    server {
        listen       {{ port }};
        server_name  {{ server_name }};

        #charset koi8-r;

        #access_log  logs/host.access.log  main;

        location / {
            root   {{ root }};
            index  index.html index.htm;
        }

        #error_page  404              /404.html;

        # redirect server error pages to the static page /50x.html
        #
        error_page   500 502 503 504  /50x.html;
        location = /50x.html {
            root   html;
        }

        # proxy the PHP scripts to Apache listening on 127.0.0.1:80
        #
        #location ~ \.php$ {
        #    proxy_pass   http://127.0.0.1;
        #}

        # pass the PHP scripts to FastCGI server listening on 127.0.0.1:9000
        #
        #location ~ \.php$ {
        #    root           html;
        #    fastcgi_pass   127.0.0.1:9000;
        #    fastcgi_index  index.php;
        #    fastcgi_param  SCRIPT_FILENAME  /scripts$fastcgi_script_name;
        #    include        fastcgi_params;
        #}

        # deny access to .htaccess files, if Apache's document root
        # concurs with nginx's one
        #
        #location ~ /\.ht {
        #    deny  all;
        #}
    }


    # another virtual host using mix of IP-, name-, and port-based configuration
    #
    #server {
    #    listen       8000;
    #    listen       somename:8080;
    #    server_name  somename  alias  another.alias;

    #    location / {
    #        root   html;
    #        index  index.html index.htm;
    #    }
    #}


    # HTTPS server
    #
    #server {
    #    listen       443 ssl;
    #    server_name  localhost;

    #    ssl_certificate      cert.pem;
    #    ssl_certificate_key  cert.key;

    #    ssl_session_cache    shared:SSL:1m;
    #    ssl_session_timeout  5m;

    #    ssl_ciphers  HIGH:!aNULL:!MD5;
    #    ssl_prefer_server_ciphers  on;

    #    location / {
    #        root   html;
    #        index  index.html index.htm;
    #    }
    #}

}
vim roles/testbox/tasks/main.yml #写template模块 yum模块 service模块
ssh [email protected] cat /etc/nginx/nginx.conf
ssh [email protected] ps -ef | grep nginx
更新用户密码
- testenv 添加本地地址
[local]
localhost ansible_connection=local
- 修改test用户本机密码
---
- hosts: local
  gather_facts: false
  tasks:
    - name: change user passwd
      user: name={{ item.name }} password={{ item.chpass | password_hash('sha512') }}  update_password=always
      with_items:
          - { name: 'test', chpass: 'admin#123' }
ansible-playbook -i /home/test/inventory/testenv ./roles/userupdate.yml -C
ansible-playbook -i /home/test/inventory/testenv ./roles/userupdate.yml -C


