Linux下安装Redis5.0.5
1、下载redis 地址 http://download.redis.io/releases/redis-5.0.5.tar.gz
2、解压tar -zxf redis-5.0.2.tar.gz
3、make编译
3.1 缺少gcc环境需要yum install gcc
3.2 报错:
[root@lang redis-5.0.2]# make
cd src && make all
make[1]: Entering directory `/usr/local/redis-4.0.10/src'
    CC adlist.o
In file included from adlist.c:34:
zmalloc.h:50:31: error: jemalloc/jemalloc.h: No such file or directory
zmalloc.h:55:2: error: #error "Newer version of jemalloc required"
make[1]: *** [adlist.o] Error 1
make[1]: Leaving directory `/usr/local/redis-4.0.10/src'
make: *** [all] Error 2
redis解压目录下有个README.md文件中有如下一段话:
Selecting a non-default memory allocator when building Redis is done by setting the `MALLOC` environment variable. Redis is compiled and linked against libc malloc by default, with the exception of jemalloc being the default on Linux systems. This default was picked because jemalloc has proven to have fewer fragmentation problems than libc malloc.

To force compiling against libc malloc, use:

    % make MALLOC=libc

To compile against jemalloc on Mac OS X systems, use:

    % make MALLOC=jemalloc
4、编译加上MALLOC=libc 即可
#make MALLOC=libc补充:或者直接make install安装也是可以的,默认会把它装在系统目录:usr/local/bin下
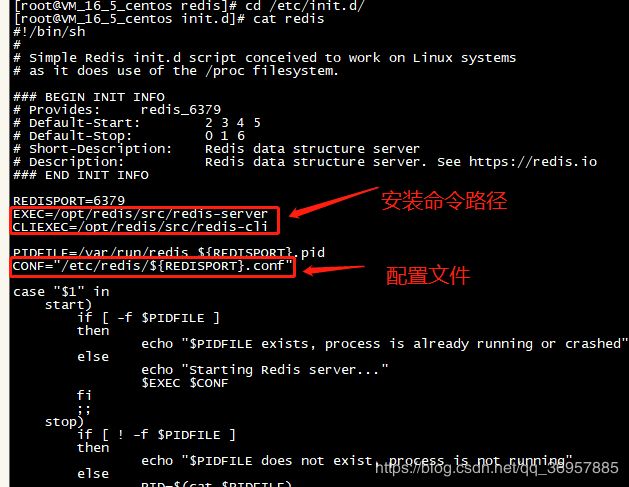
第七步修改开机启动的配置文件的时候用的就是这个目录:
/usr/local/bin/redis-cli
/usr/local/bin/redis-server
5、运行redis(主要是看是否安装成功,可忽略此步)
[root@host4 redis-5.0.5]# src/redis-server
10498:C 30 May 2019 11:42:14.708 # oO0OoO0OoO0Oo Redis is starting oO0OoO0OoO0Oo
10498:C 30 May 2019 11:42:14.708 # Redis version=5.0.5, bits=64, commit=00000000, modified=0, pid=10498, just started
10498:C 30 May 2019 11:42:14.708 # Warning: no config file specified, using the default config. In order to specify a config file use src/redis-server /path/to/redis.conf
10498:M 30 May 2019 11:42:14.709 * Increased maximum number of open files to 10032 (it was originally set to 1024).
                _._
           _.-``__ ''-._
      _.-``    `.  `_.  ''-._           Redis 5.0.5 (00000000/0) 64 bit
  .-`` .-```.  ```\/    _.,_ ''-._
 (    '      ,       .-`  | `,    )     Running in standalone mode
 |`-._`-...-` __...-.``-._|'` _.-'|     Port: 6379
 |    `-._   `._    /     _.-'    |     PID: 10498
  `-._    `-._  `-./  _.-'    _.-'
 |`-._`-._    `-.__.-'    _.-'_.-'|
 |    `-._`-._        _.-'_.-'    |           http://redis.io
  `-._    `-._`-.__.-'_.-'    _.-'
 |`-._`-._    `-.__.-'    _.-'_.-'|
 |    `-._`-._        _.-'_.-'    |
  `-._    `-._`-.__.-'_.-'    _.-'
      `-._    `-.__.-'    _.-'
          `-._        _.-'
              `-.__.-'
10498:M 30 May 2019 11:42:14.710 # WARNING: The TCP backlog setting of 511 cannot be enforced because /proc/sys/net/core/somaxconn is set to the lower value of 128.
10498:M 30 May 2019 11:42:14.710 # Server initialized
10498:M 30 May 2019 11:42:14.710 # WARNING overcommit_memory is set to 0! Background save may fail under low memory condition. To fix this issue add 'vm.overcommit_memory = 1' to /etc/sysctl.conf and then reboot or run the command 'sysctl vm.overcommit_memory=1' for this to take effect.
10498:M 30 May 2019 11:42:14.710 # WARNING you have Transparent Huge Pages (THP) support enabled in your kernel. This will create latency and memory usage issues with Redis. To fix this issue run the command 'echo never > /sys/kernel/mm/transparent_hugepage/enabled' as root, and add it to your /etc/rc.local in order to retain the setting after a reboot. Redis must be restarted after THP is disabled.
10498:M 30 May 2019 11:42:14.710 * Ready to accept connections
修改配置文件 redis.conf
#vi redis.conf为了方便:vi进这个文件之后,不要着急点 i ,直接 【/ + 下面的 】要修改的关键字,便可检索到对应位置,再进行i修改.
daemonize no 改为 yes 后台运行:
protected-mode yes 改为no 可以不用输入密码登陆
bind 127.0.0.1 表示只可以本机访问,要是远程访问需要注释掉(前面加#号)
6、带配置文件后台启动
[root@lang redis-5.0.2]# src/redis-server redis.conf
7897:C 06 Dec 2018 06:25:57.484 # oO0OoO0OoO0Oo Redis is starting oO0OoO0OoO0Oo
7897:C 06 Dec 2018 06:25:57.484 # Redis version=5.0.2, bits=64, commit=00000000, modified=0, pid=7897, just started
7897:C 06 Dec 2018 06:25:57.484 # Configuration loaded
[root@lang redis-5.0.2]# ps -ef | grep redis
root       7898      1  4 06:25 ?        00:00:00 src/redis-server *:6379
root       7903   2880  0 06:25 pts/1    00:00:00 grep redis
[root@lang redis-5.0.2]#
7.设置开机启动
-
复制redis配置文件(启动脚本需要用到配置文件内容,所以要复制)
mkdir /etc/redis cp /opt/redis/redis.conf /etc/redis/6379.conf -
查看redis_init_script的路径 find / -name redis_init_script - 继续复制
// 中间的目录是你find后的啊
cp /home/redis/utils/redis_init_script /etc/init.d/redis-
修改启动脚本参数 vi /etc/init.d/redis 
-
启动redis
# 进入usr/loacl/bin目录下找到`redis-server` ./redis-server ../redis.conf # 查看是否启动成功 netstat -nlpt -
打开redis命令:service redis start
关闭redis命令:service redis stop
设为开机启动:chkconfig redis on
设为开机关闭:chkconfig redis off
8.测试
由于我的配的是本机的,也即是bind:127.0.0.1并没有注销掉,所以测试命令如下:
# 进入redis客户端
./redis-cli
出现如下图就表示OK了
主要事项:
- 看到上面结果说明已成功安装redis。
- 如果是阿里服务器需要配置安全组开放6379端口才能连接使用。
- 注意以上没有配置环境变量,如果redis服务停止需要进到src目录下找到redis-server启动

