JVMTI加密jar包,防止反编译
简介
Java虚拟机工具接口(JVMTI)提供了一个编程接口,允许开发人员创建可以监视和控制Java编程语言应用程序的软件代理。关于JVMTI的官方说明:
通俗的说,就是用外部平台(例如C/C++)生成动态链接库(windows ⇒ dll,linux ⇒
so),给指定的二进制的class文件中插入一段数字,进行篡改,使其无法被JD-GUI用简单的AST抽象语法树进行反编译,在运行 jar
包时,再通过dll/so文件实现解密。
更多想要了解JVMTI的参考 https://developer.ibm.com/zh/articles/j-lo-jpda2/
反编译软件 JD-GUI :http://java-decompiler.github.io/http://java-decompiler.github.io/
动态链接库
分加密模块和解密模块,由c实现,windows下面是dll,linux下面是so
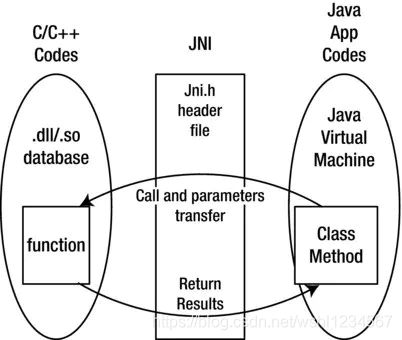
加密模块通过JNI native方式调用,解密通过JVMTI的Agent_OnLoad实现
代码已上传到github https://github.com/wangshulun/jvmti-encrypt
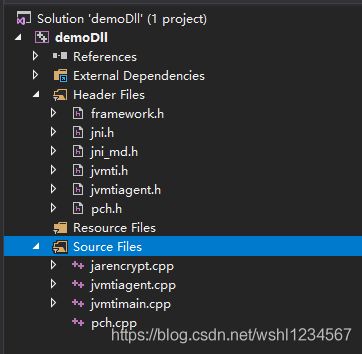
C功能的目录结构如下

需要额外引入java的头文件jni.h、jni_md.h、jvmti.h、jvmtiagent.h,文件位置在jdk根目录的include文件夹和include/windows(linux)下。
framework.h pch.h是vscode2017默认生成的,build时存在一些强校验,在CLion等其他ide里面不会有这种,不用在意。
SourceFiles下面的jarencrypt.cpp jvmtiagent.cpp jvmtimain.app是具体的实现
在windows下build会生成dll文件,加解密会用到
步骤
1、加密实现
定义加密的native code实现,需要注意的一点是定义JNICALL的方法时的命名规则:Java_package{.换成下划线}_类名_方法名,这个需要和java code 注册的位置保持一致,否则native方法注册失败
下面代码是通过c语言对Java class文件的一个简单加密方式,可替换成自定义的加密实现
#include 1、对jar包执行加密操作
动态链接库对于Java来说是native code,下面这段代码是对native code的注册和引用,修改为刚才生成的dll文件的路径
package com.allen.bytecode;
public class ByteCodeEncryptor {
  static{
    System.load("C:\\Users\\Administrator\\source\\repos\\demoDll\\x64\\Debug\\demoDll.dll");
  }
  public native static byte[] encrypt(byte[] text);
}
然后来看Java代码实现的对jar包进行加密的过程,修改if (name.startsWith(“com/allen”),改成自己解密的包路径
public class JarEncryptor {

    public static void encrypt(String fileName) {
        try {
            ByteArrayOutputStream baos = new ByteArrayOutputStream();
            byte[] buf = new byte[1024];
            File srcFile = new File(fileName);
            File dstFile = new File(fileName.substring(0, fileName.lastIndexOf(".")) + "_encrypted.jar");
            FileOutputStream dstFos = new FileOutputStream(dstFile);
            JarOutputStream dstJar = new JarOutputStream(dstFos);
            JarFile srcJar = new JarFile(srcFile);
            for (Enumeration<JarEntry> enumeration = srcJar.entries(); enumeration.hasMoreElements(); ) {
                JarEntry entry = enumeration.nextElement();
                InputStream is = srcJar.getInputStream(entry);
                int len;
                while ((len = is.read(buf, 0, buf.length)) != -1) {
                    baos.write(buf, 0, len);
                }
                byte[] bytes = baos.toByteArray();
                String name = entry.getName();
                if (name.startsWith("com/allen") && name.endsWith(".class")) {
                    System.out.println("加密的类:" + name);
                    try {
                        bytes = ByteCodeEncryptor.encrypt(bytes);
                    } catch (Exception e) {
                        e.printStackTrace();
                    }
                }
                JarEntry ne = new JarEntry(name);
                dstJar.putNextEntry(ne);
                dstJar.write(bytes);
                baos.reset();
            }
            srcJar.close();
            dstJar.close();
            dstFos.close();
        } catch (Exception e) {
            e.printStackTrace();
        }
    }
}
调用ecrypt方法,传入文件名称即可完成jar包的加密操作。生成jar文件和源文件在同一目录,${源文件名}_encrypted.jar,测试一下是否加密成功,打开JD-GUI,载入加密后的jar包发现加密后的jar包无法进行反编译,加密成功。
2、jar包启动解密操作
正确的去启动命令:加载DLL文件,并且指向启动类,指定main函数入口启动
java -agentpath:C:\\Users\\Administrator\\source\\repos\\demoDll\\x64\\Debug\\demoDll.dll -cp demo_encrypted.jar com.allen.BootMain


