Opencv学习(1):高斯滤波
快乐虾@http://blog.csdn.net/lights_joy/
欢迎转载,但请保留作者信息
本文适用于opencv3.0.0, vs2013
Opencv中提供了高斯滤波函数:
/** @brief Blurs an image using a Gaussian filter.

The function convolves the source image with the specified Gaussian kernel. In-place filtering is
supported.

@param src input image; the image can have any number of channels, which are processed
independently, but the depth should be CV_8U, CV_16U, CV_16S, CV_32F or CV_64F.
@param dst output image of the same size and type as src.
@param ksize Gaussian kernel size. ksize.width and ksize.height can differ but they both must be
positive and odd. Or, they can be zero's and then they are computed from sigma.
@param sigmaX Gaussian kernel standard deviation in X direction.
@param sigmaY Gaussian kernel standard deviation in Y direction; if sigmaY is zero, it is set to be
equal to sigmaX, if both sigmas are zeros, they are computed from ksize.width and ksize.height,
respectively (see cv::getGaussianKernel for details); to fully control the result regardless of
possible future modifications of all this semantics, it is recommended to specify all of ksize,
sigmaX, and sigmaY.
@param borderType pixel extrapolation method, see cv::BorderTypes

@sa  sepFilter2D, filter2D, blur, boxFilter, bilateralFilter, medianBlur
 */
CV_EXPORTS_W void GaussianBlur( InputArray src, OutputArray dst, Size ksize,
                                double sigmaX, double sigmaY = 0,
                                int borderType = BORDER_DEFAULT );
本节学习一下它的实现和使用。
1. 高斯函数的定义
高斯函数的形式为:
![]()
其中 a、b 与 c 为实数常数 ,且a > 0.
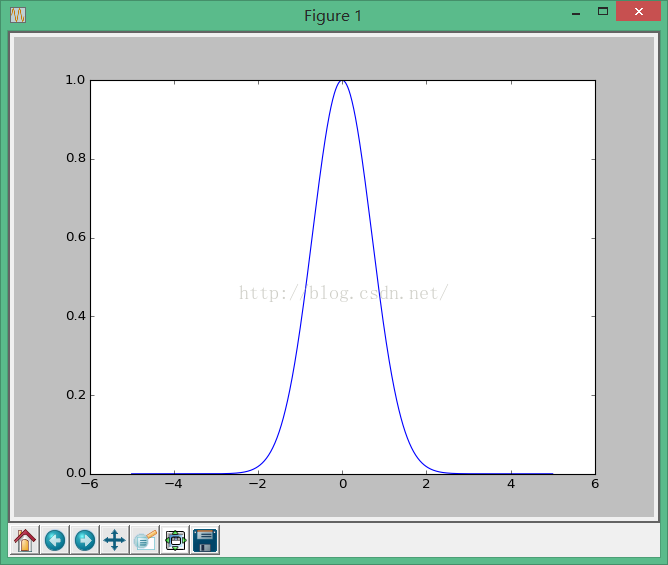
当a=1, b = 0, c = 1时,此函数图形如下:
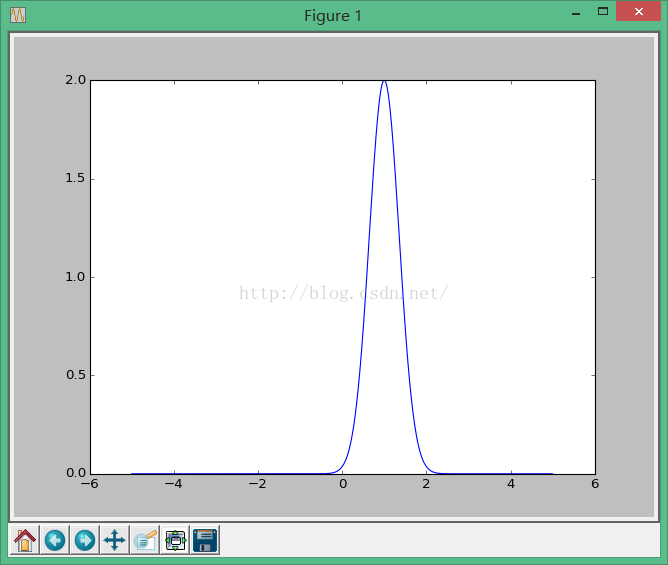
在上面三个参数中,a控制尖峰的值,b控制中心点偏离0点的值,c控制上升速度。
当a=2, b=1, c=0.5时图形如下,可以明显看出这种影响。
2. 平滑处理中的高斯函数
由于高斯函数的可分离性,Opencv将二维高斯函数卷积分两步来进行,首先将图像与一维高斯函数进行卷积,然后将卷积结果与方向垂直的相同一维高斯函数卷积。在每个方向上都是一维的卷积,且高斯函数的形式变为了:
这里的ksize为选择的核大小,i为要计算核函数中点的序号。
这里的alpha为归一化系数,用于保证计算出的ksize个数之和为1。
当sigma<=0,则计算公式为:sigma =0.3*((ksize-1)*0.5 - 1) + 0.8 .
sigma>0,则就用该输入参数sigma。
Opencv中高斯核的生成由函数getGaussianKernel完成。
cv::Mat cv::getGaussianKernel( int n, double sigma, int ktype )
{
    const int SMALL_GAUSSIAN_SIZE = 7;
    static const float small_gaussian_tab[][SMALL_GAUSSIAN_SIZE] =
    {
        {1.f},
        {0.25f, 0.5f, 0.25f},
        {0.0625f, 0.25f, 0.375f, 0.25f, 0.0625f},
        {0.03125f, 0.109375f, 0.21875f, 0.28125f, 0.21875f, 0.109375f, 0.03125f}
    };

    const float* fixed_kernel = n % 2 == 1 && n <= SMALL_GAUSSIAN_SIZE && sigma <= 0 ?
        small_gaussian_tab[n>>1] : 0;

    CV_Assert( ktype == CV_32F || ktype == CV_64F );
    Mat kernel(n, 1, ktype);
    float* cf = kernel.ptr();
    double* cd = kernel.ptr();

    double sigmaX = sigma > 0 ? sigma : ((n-1)*0.5 - 1)*0.3 + 0.8;
    double scale2X = -0.5/(sigmaX*sigmaX);
    double sum = 0;

    int i;
    for( i = 0; i < n; i++ )
    {
        double x = i - (n-1)*0.5;
        double t = fixed_kernel ? (double)fixed_kernel[i] : std::exp(scale2X*x*x);
        if( ktype == CV_32F )
        {
            cf[i] = (float)t;
            sum += cf[i];
        }
        else
        {
            cd[i] = t;
            sum += cd[i];
        }
    }

    sum = 1./sum;
    for( i = 0; i < n; i++ )
    {
        if( ktype == CV_32F )
            cf[i] = (float)(cf[i]*sum);
        else
            cd[i] *= sum;
    }

    return kernel;
}
这个函数其实比较简单,只是有一点需要注意:
当sigma<=0,则sigma =0.3*((ksize-1)*0.5 - 1) + 0.8 .
当ksize确定了之后,其实它就是一个常数,因而公式
的计算结果也是一个常数。Opencv为了加快计算速度,在ksize较小时直接将这些常数值写在代码中,即small_gaussian_tab这个数组的值(注意,这个数组仅当输入的sigma参数<=0时才有效)。
3. sigma对滤波结果的影响
从上面的分析可以看出,高斯滤波器宽度(决定着平滑程度)是由参数σ表征的,而且σ和平滑程度的关系是非常简单的。σ越大,高斯滤波器的频带就越宽,平滑程度就越好,图像也将越模糊。通过调节平滑程度参数σ,可在图像特征过分模糊(过平滑)与平滑图像中由于噪声和细纹理所引起的过多的不希望突变量(欠平滑)之间取得折衷。
同样取核大小为5,比较一下:
当sigma为1时:
而当sigma为3时:
显然后者的模糊程度更高。


