FastDFS学习笔记(单机版安装)
前言
FastDFS(Fast Distributed File System) 是一款使用 c 语言编写的开源轻量级分布式文件系统,它为互联网量身定制,充分考虑了冗余备份、负载均衡、线性扩容等机制,并注重高可用、高性能等指标,使用 FastDFS 很容易搭建一套高性能的文件服务器集群。本文不讲解原理和架构,只描述我在学习过程中搭建单机版FastDFS的安装和测试过程,并将其总结成一篇详细的部署文档分享给大家。
一、逻辑规划
(1)部署架构
FastDFS由Tracker、Storage和Client三个组件构成,Tracker跟踪服务器,主要做调度工作,起到均衡的作用,存储服务器;Storage存储服务器,主要提供容量和备份服务;Client客户端,上传下载数据的服务器。本次部署目标为单机结构,使用A、B两台机器,其中A机器部署Tracker,B机器部署Storage,搭建完成后在A机器上运行Client程序测试上传、下载。

(2)服务器环境
| 服务器IP | 操作系统版本 | FastDFS版本 |
| 47.104.101.255 | CentOS | 7.4.1708 (Core) |
| gcc | 4.8.5 20150623 | |
| libfastcommon | 1.0.38 | |
| fastdfs | 5.11 | |
| 182.92.118.32 | CentOS | 7.7.1908 (Core) |
| gcc | 4.8.5 20150623 | |
| libfastcommon | 1.0.38 | |
| fastdfs | 5.11 |
二、安装FastDFS
FastDFS源文件安装包,同时包含Tracker、Storage、Client(仅用于测试)三个组件,而Tracker和Storage的安装完全一致仅在配置文件上作出区分,启动时加载哪个配置文件就扮演哪个角色,因此本文仅描述一遍安装过程但会分别重点描述两种配置文件的配置和启动。以下描述A、B两台机器的安装过程。
2.1 检查环境
FastDFS需要gcc环境和perl环境,所以在安装之前需要用命令检查一下系统中是否安装有这两个环境。
gcc -v

perl -v
阿里云服务器需要执行如下命令安装gcc
sed -i 's/^exclude/#exclude/' /etc/yum.conf && yum -y install gcc gcc-c++ && sed -i 's/^#exclude/exclude/' /etc/yum.conf普通服务器安装gcc
yum -y install gcc gcc-c++补充:
- perl下载地址 https://www.perl.org/ ,安装教程参见https://www.runoob.com/perl/perl-environment.html
- 安装过程如果因缺少环境报错,则可先清除编译./make.sh clean后安装环境,然后再次编译
2.2. 安装libfastcommon依赖库
libfastcommon是FastDFS的依赖库,安装FastDFS之前必须先安装它,下面阐述安装过程。
(1)下载安装包
将下载的库文件统一放到/home/user中便于查找,我使用wget直接下载。
wget https://github.com/happyfish100/libfastcommon/archive/V1.0.38.tar.gz(2)解压V1.0.38.tar.gz文件
tar -zxvf V1.0.38.tar.gz(3)编译安装
进入解压后的libfastcommon-1.0.38文件夹执行编译安装。
[root@izm5eg3h4a24foo7fyjqalz libfastcommon-1.0.38]# ./make.sh
cc -Wall -D_FILE_OFFSET_BITS=64 -D_GNU_SOURCE -g -O3 -c -o hash.o hash.c
cc -Wall -D_FILE_OFFSET_BITS=64 -D_GNU_SOURCE -g -O3 -c -o chain.o chain.c
cc -Wall -D_FILE_OFFSET_BITS=64 -D_GNU_SOURCE -g -O3 -c -o shared_func.o shared_func.c
cc -Wall -D_FILE_OFFSET_BITS=64 -D_GNU_SOURCE -g -O3 -c -o ini_file_reader.o ini_file_reader.c
cc -Wall -D_FILE_OFFSET_BITS=64 -D_GNU_SOURCE -g -O3 -c -o logger.o logger.c
cc -Wall -D_FILE_OFFSET_BITS=64 -D_GNU_SOURCE -g -O3 -c -o sockopt.o sockopt.c
cc -Wall -D_FILE_OFFSET_BITS=64 -D_GNU_SOURCE -g -O3 -c -o base64.o base64.c
[root@izm5eg3h4a24foo7fyjqalz libfastcommon-1.0.38]# ./make.sh install
mkdir -p /usr/lib64
mkdir -p /usr/lib
mkdir -p /usr/include/fastcommon
install -m 755 libfastcommon.so /usr/lib64
install -m 644 common_define.h hash.h chain.h logger.h base64.h shared_func.h pthread_func.h ini_file_reader.h _os_define.h sockopt.h sched_thread.h http_func.h md5.h local_ip_func.h avl_tree.h ioevent.h ioevent_loop.h fast_task_queue.h fast_timer.h process_ctrl.h fast_mblock.h connection_pool.h fast_mpool.h fast_allocator.h fast_buffer.h skiplist.h multi_skiplist.h flat_skiplist.h skiplist_common.h system_info.h fast_blocked_queue.h php7_ext_wrapper.h id_generator.h char_converter.h char_convert_loader.h common_blocked_queue.h multi_socket_client.h skiplist_set.h /usr/include/fastcommon
if [ ! -e /usr/lib/libfastcommon.so ]; then ln -s /usr/lib64/libfastcommon.so /usr/lib/libfastcommon.so; fi(5)配置环境变量和软链接
配置环境变量,64位系统会安装在/usr/lib64下
export LD_LIBRARY_PATH=/usr/lib64/建立软链接
ln -s /usr/lib64/libfastcommon.so /usr/local/lib/libfastcommon.so2.3. 安装FastDFS
(1)下载安装包
wget https://github.com/happyfish100/fastdfs/archive/V5.11.tar.gz(2)编译安装
解压文件进入目录执行编译安装
[root@izm5eg3h4a24foo7fyjqalz fastdfs-5.11]# ./make.sh[root@izm5eg3h4a24foo7fyjqalz fastdfs-5.11]# ./make.sh install
mkdir -p /usr/bin
mkdir -p /etc/fdfs
cp -f fdfs_trackerd /usr/bin
if [ ! -f /etc/fdfs/tracker.conf.sample ]; then cp -f ../conf/tracker.conf /etc/fdfs/tracker.conf.sample; fi
if [ ! -f /etc/fdfs/storage_ids.conf.sample ]; then cp -f ../conf/storage_ids.conf /etc/fdfs/storage_ids.conf.sample; fi
mkdir -p /usr/bin
mkdir -p /etc/fdfs
cp -f fdfs_storaged /usr/bin
if [ ! -f /etc/fdfs/storage.conf.sample ]; then cp -f ../conf/storage.conf /etc/fdfs/storage.conf.sample; fi
mkdir -p /usr/bin
mkdir -p /etc/fdfs
mkdir -p /usr/lib64
mkdir -p /usr/lib
cp -f fdfs_monitor fdfs_test fdfs_test1 fdfs_crc32 fdfs_upload_file fdfs_download_file fdfs_delete_file fdfs_file_info fdfs_appender_test fdfs_appender_test1 fdfs_append_file fdfs_upload_appender /usr/bin
if [ 0 -eq 1 ]; then cp -f libfdfsclient.a /usr/lib64; cp -f libfdfsclient.a /usr/lib/;fi
if [ 1 -eq 1 ]; then cp -f libfdfsclient.so /usr/lib64; cp -f libfdfsclient.so /usr/lib/;fi
mkdir -p /usr/include/fastdfs
cp -f ../common/fdfs_define.h ../common/fdfs_global.h ../common/mime_file_parser.h ../common/fdfs_http_shared.h ../tracker/tracker_types.h ../tracker/tracker_proto.h ../tracker/fdfs_shared_func.h ../storage/trunk_mgr/trunk_shared.h tracker_client.h storage_client.h storage_client1.h client_func.h client_global.h fdfs_client.h /usr/include/fastdfs
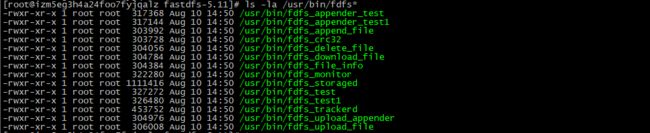
if [ ! -f /etc/fdfs/client.conf.sample ]; then cp -f ../conf/client.conf /etc/fdfs/client.conf.sample; fi安装完成后查看可执行命令 ls -la /usr/bin/fdfs*
三、A机器配置Tracker服务
安装完成之后默认安装在/etc/fdfs目录,并会生成这四个配置文件
[root@izm5eg3h4a24foo7fyjqalz fdfs]# cd /etc/fdfs/
[root@izm5eg3h4a24foo7fyjqalz fdfs]# ll
total 24
-rw-r--r-- 1 root root 1461 Aug 10 14:50 client.conf.sample
-rw-r--r-- 1 root root 7927 Aug 10 14:50 storage.conf.sample
-rw-r--r-- 1 root root  105 Aug 10 14:50 storage_ids.conf.sample
-rw-r--r-- 1 root root 7389 Aug 10 14:50 tracker.conf.sample
(1)配置tracker.conf文件
删除tracker.conf.sample文件的.sample扩展名
mv tracker.conf.sample tracker.conf编辑文件
vi tracker.conf以下列出的内容为必须配置项
# the base path to store data and log files
base_path=/home/user/fastdfs/tracker   # tracker存储data和log的跟路径,必须提前创建好

# HTTP port on this tracker server
http.server_port=22122 # 默认端口可以不修改
(2)启动tracker(支持start|stop|restart)
/usr/bin/fdfs_trackerd /etc/fdfs/tracker.conf start(3)查看日志
查看tracker启动日志,进入刚刚指定的base_path(/home/user/fastdfs/tracker)中有个logs目录,查看tracker.log文件

四、B机器配置Storage服务
Storage的安装和tracker安装完全一致,实质上二者仅差一个配置文件
(1)配置storage.conf文件
安装完成之后默认安装在/etc/fdfs中,找到storage.conf.sample删除.sample扩展名
mv storage.conf.sample storag.conf编辑配置文件
vi storage.conf以下列出的为必须配置项
base_path=/home/user/fastdfs/storage   #storage存储data和log的跟路径,必须提前创建好
port=23000  #storge默认23000,同一个组的storage端口号必须一致
group_name=group1  #默认组名,根据实际情况修改
store_path_count=1  #存储路径个数,需要和store_path个数匹配
store_path0=/home/user/fastdfs/storage  #如果为空,则使用base_path
tracker_server=47.104.101.255:22122 #配置该storage监听的tracker的ip和port
(2)启动storage(支持start|stop|restart)
/usr/bin/fdfs_storaged /etc/fdfs/storage.conf start(3)查看日志
进入/home/user/fastdfs/logs目录查看启动日志
五、配置Client测试存储服务
单机版FastDFS搭建好后,在A服务器安装的FastDFS程序基础上配置一个client测试程序。
(1)配置client.conf文件
进入/ect/fdfs/目录去掉client.conf.sample文件的.sample扩展名,编辑文件配置如下内容。
# the base path to store log files
base_path=/home/user/fastdfs/client   # 存放日志目录须事先创建好
# tracker_server can ocur more than once, and tracker_server format is
#  "host:port", host can be hostname or ip address
tracker_server=47.104.101.255:22122 # tracker服务器ip地址+端口
(2)上传测试

[root@izm5eg3h4a24foo7fyjqalz app]# fdfs_upload_file /etc/fdfs/client.conf test.jpg
group1/M00/00/00/rBEu4l8yAG-AclEfAAA8vWLrRnk890.jpg- group1:组名或称卷
- M00:虚拟驱动器名,对应storage配置文件中的 store_path0=/home/user/fastdfs/storage/data(data为程序自动创建)
- /00/00/:生成的存储目录
- rBEu4l8yAG-AclEfAAA8vWLrRnk890.jpg:文件名
(3)下载测试

[root@izm5eg3h4a24foo7fyjqalz app]# /usr/bin/fdfs_download_file /etc/fdfs/client.conf group1/M00/00/00/rBEu4l8yAG-AclEfAAA8vWLrRnk890.jpg
[root@izm5eg3h4a24foo7fyjqalz app]# ls
rBEu4l8yAG-AclEfAAA8vWLrRnk890.jpg
查看存储状态
fdfs_monitor /etc/fdfs/client.conf到此在liunx服务器上搭建单机版FastDFS工作已经全部完成,并通过了上传、下载测试,但这个demo是单机版的在实际生产环境中不实用,所以下一篇文章我计划在此基础上搭建分布式集群模拟生产环境。