Hystrix Dashboard
本文章基于spring-boot-starter-parent 2.0.6RELEASE,spring-cloud-dependencies Finchley.SR2。
Hystrix Dashboard是什么
Hystrix提供了对于微服务调用状态的监控信息,但是需要结合spring-boot-actuator模块一起使用。
Hystrix Dashboard主要用来实时监控Hystrix的各项指标信息。通过Hystrix Dashboard反馈的实时信息,可以帮助我们快速发现系统中存在的问题。
我们在服务容错保护Hystrix - Spring Cloud系列(三)文章中例子的基础上进行改造,来显示下Dashboard的用法。
- User:服务消费者
- Order:服务提供者
- Eureka:服务注册中心
我们先来看下Hystrix Dashboard长什么样子
新建一个Spring Boot工程,命名为hystrix-dashboard。
pom.xml
		org.springframework.boot
		spring-boot-starter-web
		2.0.6.RELEASE


		org.springframework.cloud
		spring-cloud-starter-netflix-hystrix-dashboard
		2.0.2.RELEASE
pom中引入了Hystrix Dashboard的相关依赖。
项目启动类:AppHystrixDashboard.java
@SpringBootApplication
@EnableHystrixDashboard
public class AppHystrixDashboard {
    public static void main(String[] args) {
        SpringApplication.run(AppHystrixDashboard.class);
    }
}
启动类中增加了@EnableHystrixDashboard注解。
配置文件:application.yml
server:
  port: 9000
只需要简单配置启动端口号即可。启动项目,浏览器访问http://localhost:9000/hystrix即可看到Hystrix Dashboard的监控首页。
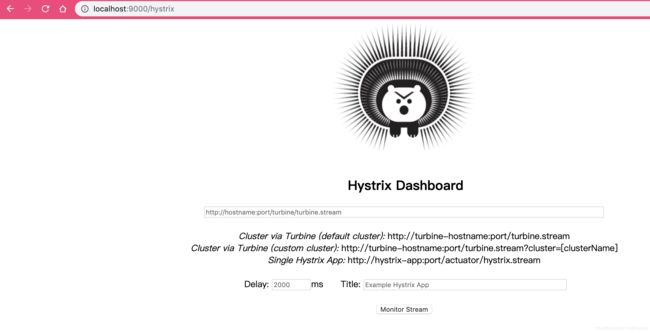
从首页中我们可以看出并没有具体的监控信息,从页面上的文件内容我们可以知道,Hystrix Dashboard共支持三种不同的监控方式:
- 默认的集群监控:
http://turbine-hostname:port/turbine.stream - 指定的集群监控:
http://turbine-hostname:port/turbine.stream?cluster=[clusterName] - 单体应用的监控:
http://hystrix-app:port/actuator/hystrix.stream
页面上面的几个参数局域
- 最上面的输入框: 输入上面所说的三种监控方式的地址,用于访问具体的监控信息页面。
- Delay: 该参数用来控制服务器上轮询监控信息的延迟时间,默认2000毫秒。
- Title: 该参数对应头部标题Hystrix Stream之后的内容,默认会使用具体监控实例的Url。
我们先来看下单个服务实例的监控,从http://hystrix-app:port/actuator/hystrix.stream连接中可以看出,Hystrix Dashboard监控单节点实例需要访问实例的actuator/hystrix.stream接口,我们自然就需要为服务实例添加这个端点。
第一步:User工程中引入starter-actuator依赖
pom.xml
	org.springframework.boot
	spring-boot-starter-actuator
	2.0.6.RELEASE
第二步:application.yml加入配置
management:
  endpoints:
    web:
      exposure:
        include: '*'
需要注意的是在Spring Cloud Finchley 版本以前访问路径是/hystrix.stream,如果是Finchley的话就需要加入上面的配置。因为spring Boot 2.0.x以后的actuator只暴露了info和health2个端点,这里我们把所有端点开放,include: '*'代表开放所有端点。
启动User、Order、Eureka工程,浏览器访问http://localhost:5000/actuator/hystrix.stream会看到如下页面,因为监控的实例本身还没有调用任何服务,所以监控端点也没记录任何信息。

新开一个浏览器tab页,访问下Order服务http://localhost:5000/getOrder.do,重新刷新下刚才的页面可以看到已经有数据返回了,说明我们的埋点生效了。

从浏览器中的信息可以看出这些信息是刚刚请求微服务时所记录的监控信息,但是直接去看这些信息肯定是不友好的,所以Hystrix Dashboard就派上用场了。
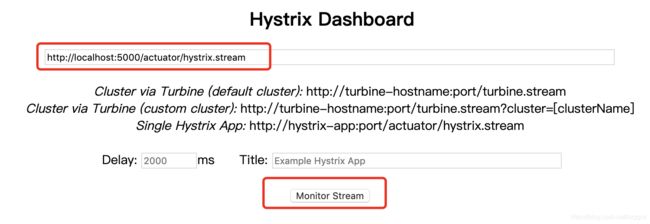
在Hystrix Dashboard中间这个输入框中,填入User服务的监控地址,也就是http://localhost:5000/actuator/hystrix.stream,点击Monitor Stream按钮,就会跳转到具体的监控页面:
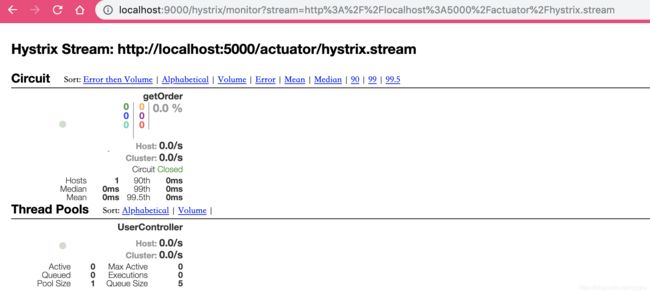
Hystrix仪表盘相关概念
多次请求http://localhost:5000/getOrder.do,会发现监控页面的数据也在实时的更新
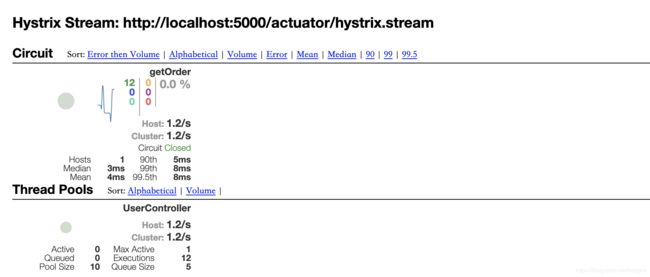
下面来介绍下图形中各元素的具体含义:
- 实心圆: 共有两种含义。通过颜色的变化代表了实例的健康程度,它的健康度从绿色、黄色、橙色、红色递减。通过圆的大小来代表请求流量的大小,流量越大该实心圆就越大。所以通过该实心圆的展示,就可以在大量的实例中快速的发现故障实例和高压力实例。
- 曲线: 记录2分钟内流量的相对变化,可以通过它来观察到流量的上升和下降趋势。
- 其他数量指标:

Terbine集群监控
从Hystrix Dashboard的监控首页中可以看出,集群的监控端点是http://turbine-hostname:port/turbine.stream,需要我们引入Trubine聚合服务,通过它来汇集监控信息,并将聚合后的信息提供给Hystrix Dashboard。
结合Eureka构建聚合服务
第一步:新建一个Spring Boot工程,命名turbine
pom.xml
		org.springframework.boot
		spring-boot-starter-web
		2.0.6.RELEASE


		org.springframework.cloud
		spring-cloud-netflix-turbine
		2.0.2.RELEASE


		org.springframework.cloud
		spring-cloud-starter-netflix-eureka-client
		2.0.2.RELEASE
application.yml
spring.application.name: turbine

turbine:
  appConfig: user-micro # 需要收集信息的服务名
  cluster-name-expression: default # 指定集群名称,
  combine-host-port: true # 同一主机上的服务通过主机名和端口号的组合来进行区分,默认以host来区分

server:
  port: 9090

eureka:
  client:
    serviceUrl:
      defaultZone: http://localhost:8081/eureka
项目启动类:AppTurbine
@SpringBootApplication
@EnableTurbine
@EnableDiscoveryClient
public class AppTurbine {
    public static void main(String[] args) {
        SpringApplication.run(AppTurbine.class);
    }
}
第二步: 复制一个User工程,端口号为5001,启动两个User工程实例
到目前为止,根据我们搭建的工程,Turbine的运行流程可以展示为下图所示:
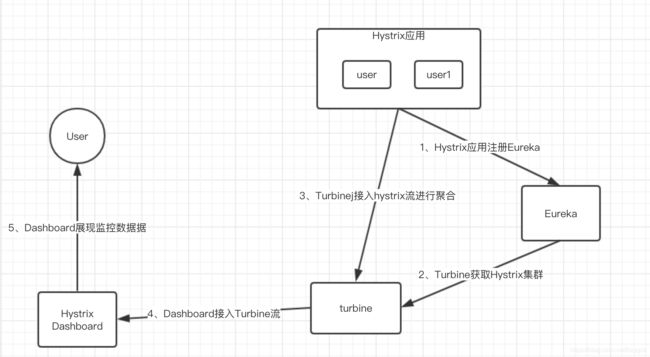
分别启动eureka、order、user、user1、hystrix-dashboard、turbine等工程,然后访问http://localhost:9000/hystrix(Hystrix Dashboard的监控首页),在首页输入框中输入http://localhost:9090/turbine.stream,点击Monitor Stream按钮。可以发现页面此时处于loding状态,因为现在还没有收集到任何metrics数据。多次访问http://localhost:5000/getOrder.do和http://localhost:5001/getOrder.do,再次刷新监控页面即可看到监控页面有数据了。
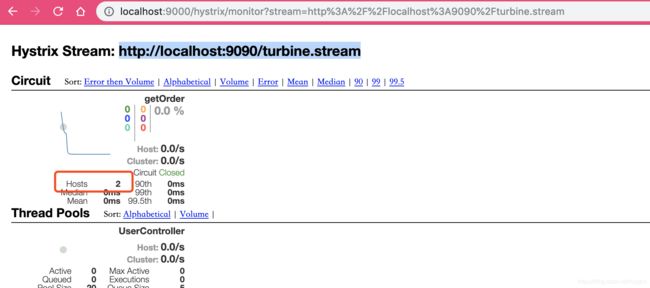
可以看到红框中的Hosts值已变成2。虽然启动了两个user实例,但是只展现了一个监控图。这是因为这两个user实例是同一个服务名称,而对于集群来说我们关注的是服务集群的高可用性,所有Turbine会将相同的服务作为整体来看待,并汇总成一个监控图。读者可以尝试将其中一个user工程的spring.application.name换成不同的值,就会发现是两个监控图形,这里不再演示。
参考资料:
1、Spring Cloud 官网–Hystrix
2、Spring Cloud微服务实战 翟永超著