自动化java接口测试(五)sprintBoot简单开发接口
1.简单案例
搭建maven例子就不写了 ,上网学下
首先说说为啥测试人员也要学springboot,因为这个是现在最流行的开发框架,我们不但要学懂如何测试接口,还要学习开发人员是如何使用这个框架来开发接口,知己知彼,百战不殆,这里我们主要是用springboot开发简单的接口而已,非常简单
创建一个maven项目

1配置pom文件
        Chapter
        com.course.code
        1.0-SNAPSHOT

       org.springframework.boot
		spring-boot-starter-parent
		2.2.4.RELEASE


    Chapter10


                org.apache.maven.plugins
                maven-compiler-plugin

                    1.8
                    1.8


        2.6.1


            org.springframework.boot
            spring-boot-starter-web


            io.springfox
            springfox-swagger2
            ${swagger.version}


            io.springfox
            springfox-swagger-ui
            ${swagger.version}


            org.projectlombok
            lombok
            1.16.14
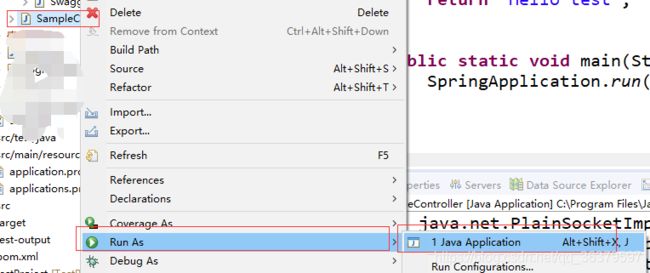
src/java/java 包新建SampleController.java
package com.test.testInterface.springBoot;

import org.springframework.boot.SpringApplication;

import org.springframework.boot.autoconfigure.EnableAutoConfiguration;
import org.springframework.boot.autoconfigure.jdbc.DataSourceAutoConfiguration;
import org.springframework.stereotype.Controller;
import org.springframework.web.bind.annotation.RequestMapping;
import org.springframework.web.bind.annotation.ResponseBody;

//@EnableAutoConfiguration 使用自动化配置,exclude 则是忽略DataSourceAutoConfiguration的配置,这里是对数据库的配置暂时忽略
@Controller
@EnableAutoConfiguration(exclude = { DataSourceAutoConfiguration.class })
public class SampleController {

//如果url访问/,就会返回"Hello World"信息
	@RequestMapping("/")
	@ResponseBody
	String home() {
		return "Hello World";
	}
//如果url访问/test,就会返回"Hello World"信息
	@RequestMapping("/test")
	@ResponseBody
	String test() {
		return "Hello test";
	}
//主要用启动springboot的配置文件,在后面的注解才会生效
	public static void main(String[] args) throws Exception {
		SpringApplication.run(SampleController.class, args);
	}
}
在src/java/resources 包中新增application.properties
server.port=${port:8888}执行

在浏览器上可以看到


最简单的案例完成了
2,配置API接口工具Swagger-UI
pom文件,上面的代码已经给出,不重复写入,在我们编写接口后,因为需要给出API文档给测试人员进行测试,那么,如果用word文档或者是excel文档进行更新的时候,开发人员会随时修改代码,造成的文档代码不一致,那就比较麻烦,这个Swagger-UI,则提供了API生成,开发修改了接口代码后,会直接同步,项目重新启动后,Swagger-UI会自动生产新的接口代码,所以不会有差异性,Swagger-UI生产出来的在线API文档不但可以取代开发人员的API文档的编写和维护工作,还可以在线同步,没有差异性。方便测试人员对接口的跟踪

新建Swagger-UI配置文件SwaggerConfig.java
package com.test.testInterface.springBoot.SwaggerConfig;

import org.springframework.context.annotation.Bean;
import org.springframework.context.annotation.Configuration;

import springfox.documentation.builders.ApiInfoBuilder;
import springfox.documentation.builders.PathSelectors;
import springfox.documentation.service.ApiInfo;
import springfox.documentation.service.Contact;
import springfox.documentation.spi.DocumentationType;
import springfox.documentation.spring.web.plugins.Docket;
import springfox.documentation.swagger2.annotations.EnableSwagger2;

//@Configuration 告诉springboot我是一个配置文件
//@EnableSwagger2 启动Swagger的使用
@Configuration
@EnableSwagger2
public class SwaggerConfig {

	//这里写明要包含的哪些路径
	    @Bean
	    public Docket api(){
	        return new Docket(DocumentationType.SWAGGER_2)
	                .apiInfo(apiInfo())
	                .pathMapping("/")
	                .select()
	                .paths(PathSelectors.regex("/.*"))
	                .build();
	    }
	//这里是API文档的基本信息
	    private ApiInfo apiInfo() {
	        return  new ApiInfoBuilder().title("我的接口文档")
	                .contact(new Contact("wangwenqing","","[email protected]"))
	                .description("这是我的swaggerui生成的接口文档")
	                .version("1.0.0.0")
	                .build();

	    }
}
浏览器访问
http://localhost:8888/swagger-ui.html 出现空白页面,是因为我们还没有告诉swagger,因为我们只设置了配置,但是还是需要在接口文件中写注解,标明哪些是接口需要发布到swagger,接下来我们对接口文件进行注解配置,我们会在第3块中详细讲解这个配置如果在接口代码中使用
3,带cookie的和参数的get/post请求代码案例
由于第1部分是官方的案例,接口和mian方法的类没有分开来,对我们以后工作会造成混乱,为了分开更利于开发维护,下面我们先尝试分开
1,src/main/java编写main的启动springboot的代码Application.java:
这个文件主要是用来启动SPringboot的配置和功能
@SpringBootApplication:这是一个入口类,把项目托管给这个类了
@ComponentScan:把项目托管给这个类后,那需要知道要扫描哪些包,告诉Application类,你要扫描哪些包,这样这些包下面的类使用的注解才会生效
package com.test.testInterface.springBoot;

import org.springframework.boot.SpringApplication;
import org.springframework.boot.autoconfigure.SpringBootApplication;
import org.springframework.context.annotation.ComponentScan;

//@SpringBootApplication这是一个入口类,把项目托管给这个类了
//@ComponentScan:把项目托管给这个类后,那需要知道要扫描哪些包,告诉Application类,你要扫描哪些包,这样这些包下面的类使用的注解才会生效
@SpringBootApplication
@ComponentScan("com.test.testInterface.springBoot")
public class Application {
	//类名为Application,一看就知道是springBoot启动文件
	public static void main(String[] args) {
		SpringApplication.run(Application.class, args);
	}
}
新建com.test.testInterface.springBoot.Request包,然后我们要编写基本的get代码GetMethod.java
package com.test.testInterface.springBoot.Request;

import org.springframework.context.annotation.ComponentScan;
import org.springframework.web.bind.annotation.RequestMapping;
import org.springframework.web.bind.annotation.RequestMethod;
import org.springframework.web.bind.annotation.RestController;
//@RestController:通知Application,我是一个接口,配合@ComponentScan使用,scan负责扫描带@RestController注解的文件

@RestController
public class GetMethod {
	@RequestMapping(value = "/testGet", method = RequestMethod.GET)
	public String getCookies() {
		return "恭喜你获得信息成功";
	}

}
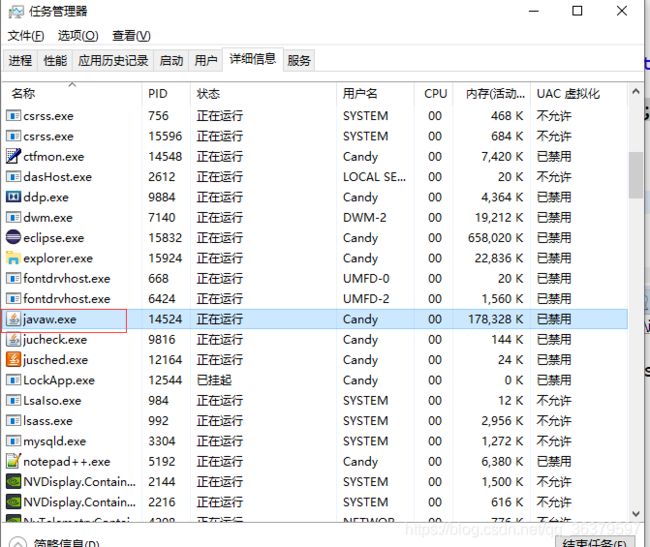
启动Application.java,在浏览器中数入链接,访问成功

如果端口号被占用,在win10下,直接删除进程就可以了,如下图
现在,我们的接口还是处于没有文档阶段,没有可视化文档,不能容易管理,那如何配合swagger,使用注解
@Api(value = "/")//这个写在类上面
@ApiOperation(value = "testGet", httpMethod = "GET")//这个写在方法里面
package com.test.testInterface.springBoot.Request;

import org.springframework.web.bind.annotation.RequestMapping;
import org.springframework.web.bind.annotation.RequestMethod;
import org.springframework.web.bind.annotation.RestController;

import io.swagger.annotations.Api;
import io.swagger.annotations.ApiOperation;
//@RestController:通知Application,我是一个接口,配合@ComponentScan使用,scan负责扫描带@RestController注解的文件
//@Api 和@ApiOperation配合swagger的配置使用,声明这个类的内部某个方法是接口类,需要发布到API文档中
@RestController
@Api(value = "/", description = "这是我全部的get方法")
public class GetMethod {
	@RequestMapping(value = "/testGet", method = RequestMethod.GET)
	@ApiOperation(value = "这是testGet", httpMethod = "GET")
	public String getCookies() {
		return "恭喜你访问testGet信息成功";
	}

}
再次进行访问http://localhost:8888/swagger-ui.html,出现以下界面,点击try it out 可以对接口进行简单测试

以上是简单的springboot启动文件和get接口代码分离,且配合了swagger生成API的文档的功能
下面是带Cookie和返回cookie的get/post请求的代码,自行学习
GetMethod.java
package com.test.testInterface.springBoot.Request;

import java.util.HashMap;
import java.util.Map;
import java.util.Objects;

import javax.servlet.http.Cookie;
import javax.servlet.http.HttpServletRequest;
import javax.servlet.http.HttpServletResponse;

import org.springframework.web.bind.annotation.PathVariable;
import org.springframework.web.bind.annotation.RequestMapping;
import org.springframework.web.bind.annotation.RequestMethod;
import org.springframework.web.bind.annotation.RequestParam;
import org.springframework.web.bind.annotation.RestController;

import io.swagger.annotations.Api;
import io.swagger.annotations.ApiOperation;

//@RestController:通知Application,我是一个接口,配合@ComponentScan使用,scan负责扫描带@RestController注解的文件
//@Api 和@ApiOperation配合swagger的配置使用,声明这个类的内部某个方法是接口类,需要发布到API文档中
@RestController
@Api(value = "/", description = "这是我全部的get方法")
public class GetMethod {
	@RequestMapping(value = "/testGet", method = RequestMethod.GET)
	@ApiOperation(value = "这是testGet", httpMethod = "GET")
	public String getCookies() {
		return "恭喜你访问testGet信息成功";
	}

	@RequestMapping(value = "/getCookies", method = RequestMethod.GET)
	@ApiOperation(value = "通过这个方法可以获取到Cookies", httpMethod = "GET")
	public String getCookies(HttpServletResponse response) {
		// HttpServerletRequest 装请求信息的类
		// HttpServerletResponse 装响应信息的类
		Cookie cookie = new Cookie("login", "true");
		response.addCookie(cookie);
		return "恭喜你获得cookies信息成功";
	}

	/**
	 * 要求客户端携带cookies访问 这是一个需要携带cookies信息才能访问的get请求
	 */
	@RequestMapping(value = "/get/with/cookies", method = RequestMethod.GET)
	@ApiOperation(value = "要求客户端携带cookies访问", httpMethod = "GET")
	public String getWithCookies(HttpServletRequest request) {
		Cookie[] cookies = request.getCookies();
		if (Objects.isNull(cookies)) {
			return "你必须携带cookies信息来";
		}
		for (Cookie cookie : cookies) {
			if (cookie.getName().equals("login") && cookie.getValue().equals("true")) {
				return "这是一个需要携带cookies信息才能访问的get请求!";
			}
		}

		return "你必须携带cookies信息来";
	}

	/**
	 * 开发一个需要携带参数才能访问的get请求。 第一种实现方式 url: key=value&key=value 我们来模拟获取商品列表
	 */
	@RequestMapping(value = "/get/with/param", method = RequestMethod.GET)
	@ApiOperation(value = "需求携带参数才能访问的get请求方法一", httpMethod = "GET")
	public Map getList(@RequestParam Integer start, @RequestParam Integer end) {
		Map myList = new HashMap<>();

		myList.put("鞋", 400);
		myList.put("干脆面", 1);
		myList.put("衬衫", 300);

		return myList;

	}

	/**
	 * 第二种需要携带参数访问的get请求 url:ip:port/get/with/param/10/20
	 */
	@RequestMapping(value = "/get/with/param/{start}/{end}")
	@ApiOperation(value = "需求携带参数才能访问的get请求的第二种实现", httpMethod = "GET")
	public Map myGetList(@PathVariable Integer start, @PathVariable Integer end) {

		Map myList = new HashMap<>();

		myList.put("鞋", 400);
		myList.put("干脆面", 1);
		myList.put("衬衫", 300);

		return myList;

	}

}
PostMethod.java 和GetMethod放同一个目录下即可
package com.test.testInterface.springBoot.Request;

import javax.servlet.http.Cookie;
import javax.servlet.http.HttpServletResponse;

import org.springframework.web.bind.annotation.RequestMapping;
import org.springframework.web.bind.annotation.RequestMethod;
import org.springframework.web.bind.annotation.RequestParam;
import org.springframework.web.bind.annotation.RestController;

import io.swagger.annotations.Api;
import io.swagger.annotations.ApiOperation;

@RestController
@Api(value = "/", description = "这是我全部的post请求")
@RequestMapping("/v1")
public class PostMethod {
	// 这个变量是用来装我们cookies信息的
	private static Cookie cookie;

	// 用户登陆成功获取到cookies,然后再访问其他接口获取到列表

	@RequestMapping(value = "/login", method = RequestMethod.POST)
	@ApiOperation(value = "登陆接口,成功后获取cookies信息", httpMethod = "POST")
	public String login(HttpServletResponse response,
			@RequestParam(value = "userName", required = true) String userName,
			@RequestParam(value = "password", required = true) String password) {
		if (userName.equals("zhangsan") && password.equals("123456")) {
			cookie = new Cookie("login", "true");
			response.addCookie(cookie);
			return "恭喜你登陆成功了!";
		}
		return "用户名或者是密码错误!";
	}
}
最后,启动Application.java后

4这个lombok插件,有很多功能,比如让我们省略对setting,getting的方法编写
那上面,我们传递的参数都是以String形式的,但是现实中,我们可以要求请求带入一个对象类型的或者是返回一个对象类型的,数据组形式的,应该怎么传??那对象里面如果有很多私有属性,那我们得维护setting和getting方法,这使用到lombok插件就可以让Lombok自动去维护,不需要我们在去编写代码
pom文件:上面pon代码有,不用重复编写

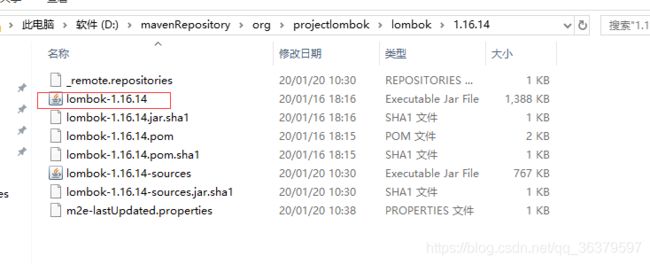
下载jar包后,在maven jar包管理中找出lombok jar包,双击
双击后出现安装界面,只要IDE匹配到你安装的目录就可以了
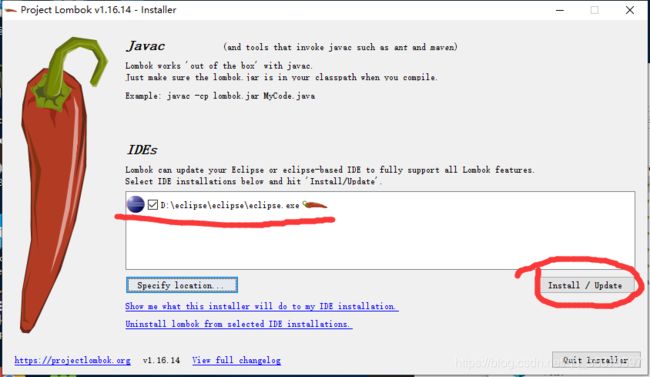
注意如果eclipse没有安装到默认目录,那么需要点击Specify location..选择eclipse.exe所在的路径,然后点击Install/update即可完成安装
(如果eclipse启动失败,则 在eclipse安装目录下打开eclipse.ini )

把最后这句,修改为
-Xbootclasspath/a:lombok.jar
-javaagent:lombok.jar
即可启动正常
1,新建bean包,创建User.java文件,没有get和set方法,全部交给@data去处理
package com.test.testInterface.springBoot.bean;

import lombok.Data;

//@Data 使用这个标签,就可以不用编写get和set方法
//虽然导入lombok jar 包,为何还要安装IDE的lombok插件?因为只是要IDE识别到不出错而已,实际在发布到服务器上,是不需要安装lombok插件,只需要在pom配置了就可以了
@Data
public class User {
	private String userName;
	private String password;
	private String name;
	private String age;
	private String sex;
}
2,在PostMethod中进行测试,编写post的接口
Request请求中body携带user对象
public String getUserList(HttpServletRequest request, @RequestBody User u)
注意事项:
c.getName().equals("login") && u.getUserName().equals("zhangsan") && u.getPassword().equals("123456")
匹配的代码一定要用equals,如果用==的话,容易出现,参数不匹配的错误
package com.test.testInterface.springBoot.Request;

import javax.servlet.http.Cookie;
import javax.servlet.http.HttpServletRequest;
import javax.servlet.http.HttpServletResponse;

import org.springframework.web.bind.annotation.RequestBody;
import org.springframework.web.bind.annotation.RequestMapping;
import org.springframework.web.bind.annotation.RequestMethod;
import org.springframework.web.bind.annotation.RequestParam;
import org.springframework.web.bind.annotation.RestController;

import com.test.testInterface.springBoot.bean.User;

import io.swagger.annotations.Api;
import io.swagger.annotations.ApiOperation;

@RestController
@Api(value = "/", description = "这是我全部的post请求")
@RequestMapping("/v1")
public class PostMethod {
	// 这个变量是用来装我们cookies信息的
	private static Cookie cookie;

	// 用户登陆成功获取到cookies,然后再访问其他接口获取到列表

	@RequestMapping(value = "/login", method = RequestMethod.POST)
	@ApiOperation(value = "登陆接口,成功后获取cookies信息", httpMethod = "POST")
	public String login(HttpServletResponse response,
			@RequestParam(value = "userName", required = true) String userName,
			@RequestParam(value = "password", required = true) String password) {
		if (userName.equals("zhangsan") && password.equals("123456")) {
			cookie = new Cookie("login", "true");
			response.addCookie(cookie);
			return "恭喜你登陆成功了!";
		}
		return "用户名或者是密码错误!";
	}
//这里采用了request请求中body体中携带User对象
	@RequestMapping(value = "/getUserList", method = RequestMethod.POST)
	@ApiOperation(value = "获取用户列表", httpMethod = "POST")
	public String getUserList(HttpServletRequest request, @RequestBody User u) {
//@RequestBody 这里是采用了json格式了
		User user;
		// 获取cookies
		Cookie[] cookies = request.getCookies();
		// 验证cookies是否合法
		for (Cookie c : cookies) {
			if (c.getName().equals("login") && u.getUserName().equals("zhangsan") && u.getPassword().equals("123456")) {
				user = new User();
				user.setName("lisi");
				user.setAge("18");
				user.setSex("man");
				return user.toString();
			}

		}

		return "参数不合法";
	}
}
启动application.java后,

执行getUserList接口,检查结果,在getUserList中的参数中,参照右边的Example Value参数体
{
"age": "18",
"name": "login",
"password": "123456",
"sex": "man",
"userName": "zhangsan"
}
这个数据在用postman进行传递的时候,实际是用body来进行传递的,写在body里面


那在jmeter中如何传递带json格式参数的请求?
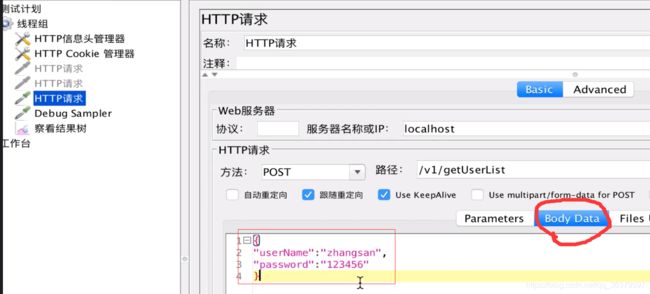


就可以正常解决了