Python:使用API——使用Pygal可视化仓库
来源:《Python编程:从入门到实践》
文章目录
- 2 使用Pygal可视化仓库
- 2.1 改进Pygal图表
- 2.2 添加自定义工具提示
- 2.3 根据数据绘图
- 2.4 在图表中添加可单击的链接
2 使用Pygal可视化仓库
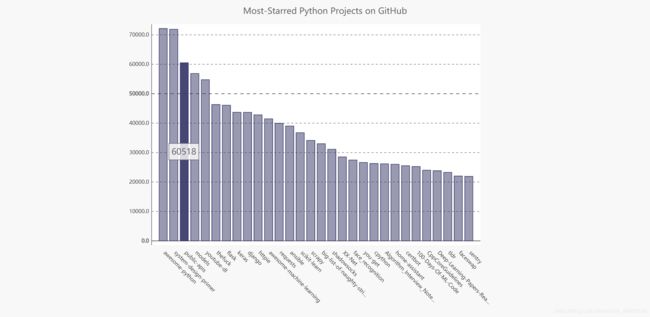
- 上个部分获得有趣的数据后,现在来进行可视化,呈现GitHub上Python项目的受欢迎程度
- 我们将创建一个交互式条形图:条形的高度表示项目获得了多少颗星
- 单机条形将进入项目在GitHub上的主页
python_repos.py
import requests
import pygal
from pygal.style import LightColorizedStyle as LCS, LightenStyle as LS

# 执行API调用并存储响应
URL = 'https://api.github.com/search/repositories?q=language:python&sort=stars'
r = requests.get(URL)
print("Status code:", r.status_code)

# 将API响应存储在一个变量中
response_dict = r.json()
print("Total repositories:", response_dict['total_count'])

# 探索有关仓库的信息
repo_dicts = response_dict['items']

names, stars = [], []
for repo_dict in repo_dicts:
    names.append(repo_dict['name'])
    stars.append(repo_dict['stargazers_count'])

# 可视化
my_style = LS('#333366', base_style=LCS)
chart = pygal.Bar(style=my_style, x_label_rotation=45, show_legend=False)
chart.title = 'Most-Starred Python Projects on GitHub'
chart.x_labels = names

chart.add('', stars)
chart.render_to_file('python_repos.svg')
- 导入
pygal以及要应用于图表的Pygal样式 - 创建两个空列表,用于存储将包含在图表中的信息
使用LightenStyle类(别名LS)定义一种样式,并将其基色设置为深蓝色;还传递了实参base_style,已使用LightColorizedStyle类(别名LCS)使用Bar()创建一个简单的条形图,并向它传递了my_style;还传递了两个样式实参:让标签绕x轴旋转45度(x_label_rotation=45),并隐藏了图例(show_legend=False)

2.1 改进Pygal图表
- 将进行多个方面的定制,因此先来稍微调整代码的结构,创建一个配置对象,在其中包含要传递给Bar()的所有定制:
python_repos.py
--snip--
# 可视化
my_style = LS('#333366', base_style=LCS)

my_config = pygal.Config()
my_config.x_label_rotation = 45
my_config.show_legend = False
my_config.title_font_size = 24
my_config.label_font_size = 14
my_config.major_label_font_size = 18
my_config.truncate_label = 15
my_config.show_y_guides = False
my_config.width = 1000

chart = pygal.Bar(my_config, style=my_style)
chart.title = 'Most-Starred Python Projects on GitHub'
chart.x_labels = names

chart.add('', stars)
chart.render_to_file('python_repos.svg')
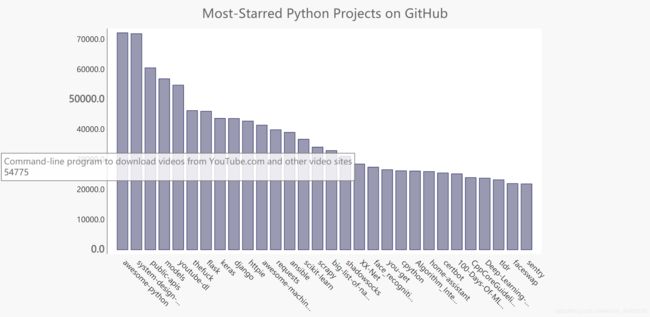
- 我们创建了一个Pygal类Config实例,命名为my_config
- 在这个图表中,副标签是x轴上的项目名&y轴上的大部分数字
- 主标签是y轴上为5000整数倍的刻度;这些刻度应更大,以与副标签区分开
truncate_label将较长的项目名缩短为15个字符(如果将鼠标指向被截短的项目名,将显示完整的项目名)- show_y_guides=False以隐藏图表中的水平线
- 最后自定义了宽度,让图表更充分地利用浏览器地可用空间

2.2 添加自定义工具提示
- 在Pygal中,将鼠标指向条形将显示它表示地信息,这通常称为 工具提示
- 这个实例中,当前显示的是项目获得了多少颗星
- 项目来创建一个自定义工具提示,以同时显示项目的描述
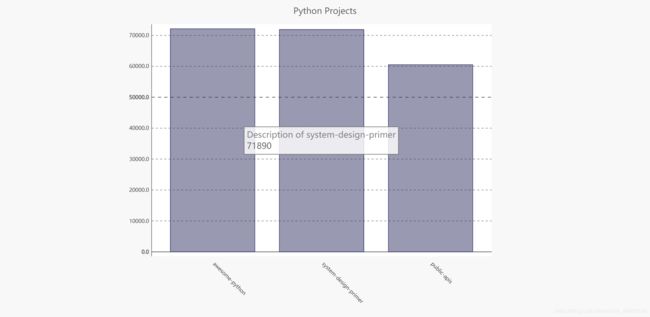
- 下面看一个简单的示例,它可视化前三个项目,并给每个项目对应的条形都指定自定义标签
- 为此,向add()传递一个字典列表,而不是值列表:
bar_descriptions.py
import pygal
from pygal.style import LightColorizedStyle as LCS, LightenStyle as LS

my_style = LS('#333366', base_style=LCS)
chart = pygal.Bar(style=my_style, x_label_rotation=45, show_legend=False)

chart.title = 'Python Projects'
chart.x_labels = ['awesome-python', 'system-design-primer', 'public-apis']

plot_dicts = [
    {'value': 72145, 'label': 'Description of awesome-python'},
    {'value': 71890, 'label': 'Description of system-design-primer'},
    {'value': 60522, 'label': 'Description of public-apis'},
    ]

chart.add('', plot_dicts)
chart.render_to_file('bar_descriptions.svg')
- 定义了一个名为plot_dicts的列表,其中包含三个字典,分别针对三个项目
- 每个字典包含两个键:‘value’和’label’
- Pygal根据与键’value’相关联的数字来确定条形的高度
- Pygal根据与键’label’相关联的字符串给条形创建工具提示
- 上图显示了一个工具提示:除默认工具提示(获得star数量)外,Pygal还显示了刚传入的自定义提示
2.3 根据数据绘图
python_repos.py
--snip--
# 探索有关仓库的信息
repo_dicts = response_dict['items']

names, plot_dicts = [], []
for repo_dict in repo_dicts:
    names.append(repo_dict['name'])

    plot_dict = {
        'value': repo_dict['stargazers_count'],
        'label': repo_dict['description'],
        }
    plot_dicts.append(plot_dict)

# 可视化
my_style = LS('#333366', base_style=LCS)
--snip--

chart.add('', plot_dicts)
chart.render_to_file('python_repos.svg')
2.4 在图表中添加可单击的链接
- 在为每个项目创建的字典中,只需添加一个键为’xlink’的键-值对
python_repos.py
--snip--
names, plot_dicts = [], []
for repo_dict in repo_dicts:
    names.append(repo_dict['name'])

    plot_dict = {
        'value': repo_dict['stargazers_count'],
        'label': repo_dict['description'],
        'xlink': repo_dict['html_url'],
        }
    plot_dicts.append(plot_dict)
--snip--
- Pygal根据与键’xlink’相关联的URL将每个条形都转换为活跃的链接
- 至此,对API获取的数据进行了可视化,它是交互性的,包含丰富的信息!

