Springboot-学习springsecurity
初识springsecurity
老方法了,复制别人的项目。这次本来想复制松哥的V部落,打算复制完成后好好地自我欣赏一番,但奈何出师未捷,路遇猛虎,springsecurity像一座大山一样挡在我面前,让我不能前进。
项目地址:https://github.com/lenve/VBlog。松哥的这个项目是Vue+springboot做的,认证登录部分用了springsecurity,当然Vue我也不会用,所以打算用thymeleaf来做前端,毕竟之前的myBill项目写的还算完整,所以学到了一点thymeleaf的东西,但springsecurity确实什么都不知道,就算之前听说过,面对时也完全是一脸懵逼。逢山开路遇水搭桥,在进过了一系列纠结之后,我打算干掉这座山,好好看看springsecurity是什么东西。
万变不离其宗先用百度看看什么是springsecurity。确实是长长的一堆,我也就看了一遍就忘了。然后昨天一边上班一边看博客,就这样明白了点什么东西,登录认证和权限管理应该是springsecurity最基本的功能。而复制松哥的项目刚好就是这两个东西最先要解决。当然这个项目我也复制了一些登录的部分,只是登录之后列出所有用户会有权限问题,即使是用admin登录,经过我几番分析,问题就是admin的权限出问题了,代码如下
@Override
    protected void configure(HttpSecurity http) throws Exception {
        http.authorizeRequests()
                .antMatchers("/admin/category/all").authenticated()
                //.antMatchers("/admin/**","/reg").hasRole("超级管理员")///admin/**的URL都需要有超级管理员角色,如果使用.hasAuthority()方法来配置,需要在参数中加上ROLE_,如下.hasAuthority("ROLE_超级管理员")
                .anyRequest().authenticated()//其他的路径都是登录后即可访问
,我本来就是用管理员权限的用户登录的,但就是有权限不足的问题,至于怎么正确的改我就没分析出来,就简单的把第5行屏蔽了,然后自然就没有权限问题。但这样改了之后就相当于admin这个权限没什么作用了,所以我决定自己搞个demo,弄懂其中的道理。之前在复制白卷时也在权限这里碰了一鼻子灰,对此耿耿于怀,所以就真的打算弄懂登录认证和权限问题。
周五写到这就不想写了,摸了一下午的鱼,打算周六写,但周六就更不想动了,博客翻都不想翻开。到了周六的晚上就暗下决心周天早上放弃LOL,一定搞好权限管理问题。
周五早早就把代码都GitHub了,所以今早边吃泡面就把代码clone下来,吃完就热情满满的开工。
原本打算搞一个demo把springsecurity简单的学一学,但是后来发现简单的一点的demo根本就没法完成框架级别的设计,于是边百度边自己琢磨。不负有心人啊,今早还是搞好了,基于spring security的登录认证和权限管理完全生效。
结构分析

bean是实体类包,Role是权限类,User是用户,WebSecurityConfig是spring security的配置类,PermitController是我试验权限是否生效用的,其他就不做介绍了,之后我会贴代码出来。
数据库展示
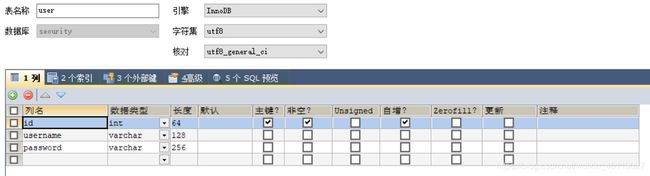
由于这次我没用sql脚本,而是直接用SQLyog建的数据,所以只能贴数据库的图片出来。
user-table
roles-table

roles_user-table
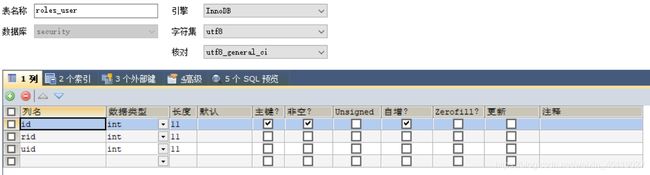
建表时注意password大小还是要大一些好,毕竟是要加密的,还有roles table的权限名字一定是要"ROLE_"开头。如下图所示。

代码分析
其实我觉得这不能叫分析,应该叫解释才更合理,但奈何…唉…没办法,分析就分析吧。
这里着重说一下websecurityconfig和userservice。
登录认证和权限管理配置
先把代码贴出来再说。
package com.example.config;

//引入的包就不一一例举了,我这里省略。
import ...

/**
 * Create by Administrator on 2020/3/5.
 */
@Configuration
public class WebSecurityConfig extends WebSecurityConfigurerAdapter {

    @Bean
    //密码加密
    public PasswordEncoder passwordEncoder(){
        return new BCryptPasswordEncoder();
    }
    @Override
    protected void configure(HttpSecurity http) throws Exception {
        http.formLogin()
        		//登陆页的URI,如果不自定义就会用默认的
                .loginPage("/index.html")
                //登陆处理URI"/login",我用的thymeleaf提交form请求
                .loginProcessingUrl("/login").successHandler(new AuthenticationSuccessHandler() {
            @Override
            //登陆请求处理成功后的处理,我这里直接重定向到我的主页面main.html
            public void onAuthenticationSuccess(HttpServletRequest httpServletRequest, HttpServletResponse httpServletResponse, Authentication authentication) throws IOException, ServletException {
                httpServletResponse.sendRedirect("/main");
            }
        })
                .and()
                //带有认证功能的请求
                .authorizeRequests()
                //注册请求,无权限要求
                .antMatchers("/regist").permitAll()
                //开始的登录索引,无权限要求
                .antMatchers("/index.html").permitAll()
                //"/admin/**",URI带有/admin的都需要ROLE_ADMIN权限
                .antMatchers("/admin/**").hasAuthority("ROLE_ADMIN")
                //其他请求有用户登录认证即可
                .anyRequest().authenticated()
                .and()
                //退出登录无权限要求
                .logout().permitAll()
                .and()
                .csrf().disable()
                //受到无权限请求的拒绝时发送"/no_permit"请求,我这里就是跳转到无权限页no_permit.html
                //这里也可以自定义一个类来专门处理
                .exceptionHandling().accessDeniedPage("/no_permit");
    }
}
@Bean
public PasswordEncoder passwordEncoder(){
return new BCryptPasswordEncoder();
}
密码加密应该是springsecurity的一个基本功能。如果不注入,就会有找不到passwordEncoder的报错,还好我机灵,当时很快就理解了这个错误的原因。
我在这里用的应该是比较简单的BCryptPasswordEncoder加密方式,大家尽可以用其他的加密方式。
protected void configure(HttpSecurity http) throws Exception {…},这个方法的介绍我都写在注释里了,方便阅读和理解。
没有权限的处理
@GetMapping("/no_permit")
    public String noPermit(HttpServletRequest httpServletRequest){
        System.out.println("noPermit method = " + httpServletRequest.getMethod());
        System.out.println("noPermit URI = " + httpServletRequest.getRequestURI());
        System.out.println("noPermit URL = " + httpServletRequest.getRequestURL());
        return "redirect:/main/no_permit";
    }

    @GetMapping("/main/no_permit")
    public String permit(HttpServletRequest httpServletRequest){
        System.out.println("permit method = " + httpServletRequest.getMethod());
        return "no_permit";
    }
这里我为了能在浏览器的地址栏上显示能让人容易理解为无权限,我用了一下"redirect:/main/no_permit",希望能理解。这个我感觉还是自己的前端知识太欠缺的原因,因为如果正常来说,没权限的话就直接弹窗提示就好了,没必要在往下走,所以,唉…
用户的登录和注册
package com.example.service;

import ...

/**
 * Create by Administrator on 2020/3/6.
 */
@Service
public class UserService implements UserDetailsService {

    @Autowired
    UserMapper userMapper;
    @Autowired
    RoleMapper roleMapper;
    @Autowired
    PasswordEncoder encoder;

    @Override
    public UserDetails loadUserByUsername(String s) throws UsernameNotFoundException {
        User user = userMapper.getUserByName(s);
        if(user == null){
            return (UserDetails) new User();
        }
        List authorities = new ArrayList<>();

        List roles = roleMapper.getRoleByUid(user.getId());
        for (Role role : roles){
            authorities.add(new SimpleGrantedAuthority(role.getRole()));
        }
        user.setRoles(roles);
        return new org.springframework.security.core.userdetails.User(user.getUsername(), user.getPassword(), authorities);
    }

    public int registUser(User user) {
        String p = encoder.encode(user.getPassword());
        user.setPassword(p);
        userMapper.addUser(user);

        if(user.getUsername().equals("root")){
            roleMapper.setRole(1, user.getId());
        }else {
            roleMapper.setRole(2, user.getId());
        }
        return 1;
    }
}
和我之前的springboot项目不同,这次的用户登录写在了service层,我觉得很大的原因就是userservice要实现UserDetailsService类,然后要重写loadUserByUsername方法,最后要返回一个UserDetails。其实这一系列的关联也是我在能成功登录之后才理解的。
这里的返回一定要注意,return new org.springframework.security.core.userdetails.User(user.getUsername(), user.getPassword(), authorities);,为什么要返回这样的一个类型,我觉的这也是springsecurity的功能,重写的loadUserByUsername方法就是要返回UserDetails,它其中包括了认证信息,如图所示
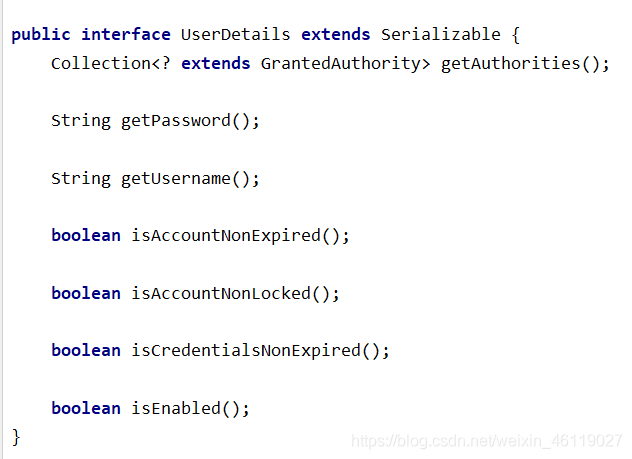
而我们的user除了用户名和密码并没有其他的属性,所以就算返回我们的user,还是会报错,所以这里既然用了springsecurity就要遵从它的要求。
对注册用户来说,无非就是给用户的明密码加密和给用户赋权。
总结
每次不知道怎么往下写的时候,我就会想起来该写总结了。
其实我的最终目的不是前端thymeleaf加后端springboot,而是vue做前端,springboot做后台,毕竟vue刚刚火起来。前几天买的vue的书还没到,所以将就先用thymeleaf来搞一下登录认证和权限管理,说实在的也是顺便复习一下之前学的thymeleaf。
这次对数据库的sql语句我还是有了新的认识,比如select r.* from roles r, roles_user ru where r.id = ru.rid and ru.uid = #{uid}这种联合查询我之前就没用过,这次用之前我就又花时间了解了一下,确实是个好方法。
这次的内容不多,就先写到这。最后分享一下GitHub的链接https://github.com/azermu-milk/SpringbootTest.git,这里的代码导入IDEA就能运行。也许我会不定时更新。