SPRING CLOUD微服务实战笔记--服务治理:Spring Cloud Eureka(一)
文章目录
- 服务治理
- Netflix Eureka
- 搭建服务注册中心
- 注册服务提供者
- 高可用注册中心
- 服务发现与消费
服务治理
服务治理可以说是微服务架构中最为核心和基础的模块,主要用来实现各个微服务实例的自动化注册与发现
- 服务注册:
1)构建注册中心
2)服务单元向注册中心注册服务
3)分类组织服务清单
4)检测清单服务是否可用,不可用则剔除,以便排除故障 - 服务发现:
1)服务调用方请求注册中心
2)注册中心返回服务提供方服务清单
3)从服务清单以某种轮询策略取出一个位置调用(客户端负载均衡)
Netflix Eureka
Eureka服务端:
1.分片故障转入自我保护模式,并继续提供服务
2.分片恢复,同步分片
Eureka客户端:
1.向注册中心注册自身服务,并周期性发送心跳报文来更新服务租约
2.从服务端查询注册服务信息并缓存到本地并周期性地刷新服务状态
搭建服务注册中心
pom.xml加入以下依赖:
<dependency>
			<groupId>org.springframework.cloudgroupId>
			<artifactId>spring-cloud-starter-eureka-serverartifactId>
			<version>1.4.6.RELEASEversion>
dependency>
使用注解@EnableEurekaServer启动一个服务注册中心
防止默认设置下,该服务注册中心会将自己作为客户端来尝试注册自己,需要禁用客户端注册行为,在application.properties中加入:
server.port=1111
eureka.instance.hostname=localhost
#不向注册中心注册自己
eureka.client.register-with-eureka=false
#不需要去检索服务
eureka.client.fetch-registry=false
eureka.client.service-url.defaultZone=http://${eureka.instance.hostname}:${server.port}/eureka/
访问http://localhost:1111/,返回页面如下

可以看到Instances currently registered with Eureka中没有服务,接下来任务就是注册服务
总结三步就是:
1.pom.xml中加入spring-cloud-starter-eureka-server
2.在启动类上加上@EnableEurekaServer
3.配置application.properties
#不向注册中心注册自己
eureka.client.register-with-eureka=false
#不需要去检索服务
eureka.client.fetch-registry=false
注册服务提供者
注册服务提供者分为四步:
1.pom.xml中加入spring-cloud-starter-eureka
2.改造请求处理接口,通过注入DiscoveryClient对象,在日志中打印出服务的相关内容
3.在启动类上加入@EnableEurekaClient注解,激活Eureka中的DiscoveryClient实现
4.在application.properties中加入spring.application.name作为服务名,再用eureka.client.serviceUrl.defaultZone属性来指定服务注册中心的地址
服务提供方服务注册成功如下:
[nfoReplicator-0] com.netflix.discovery.DiscoveryClient : DiscoveryClient_HELLO-SERVICE/192.168.1.105:hello-service - registration status: 204
服务注册中的控制台显示如下,则服务被注册成功:
main] o.s.c.n.e.s.EurekaServiceRegistry : Registering application hello-service with eureka with status UP
高可用注册中心
1.在之前的基础上再复制一个注册中心项目出来,创建application-peer1.properties
spring.application.name=eureka-server
server.port=1111
eureka.instance.hostname=peer1
eureka.client.service-url.defaultZone=http://peer2:1112/eureka/
2.在原有的注册中心上创建application-peer2.properties
spring.application.name=eureka-server
server.port=1112
eureka.instance.hostname=peer2
eureka.client.service-url.defaultZone=http://peer1:1111/eureka/
3.在/etc/hosts文件中添加对peer1和peer2的转换,或者直接将properties中写出地址
127.0.0.1  peer1
127.0.0.1  peer2
4.启动项目
根据之前的学习,可以知道
在application.properties中加入spring.profiles.active=peer1,就可以启动application-peer1.properties
在application.properties中加入spring.profiles.active=peer2,就可以启动application-peer2.properties
直接运行主类,就可以不用打jar包了
5.服务提供方启动
使用之前单节点模块的服务提供方,修改application.properties
spring.application.name=hello-service
eureka.client.service-url.defaultZone=http://localhost:1111/eureka/,http://localhost:1112/eureka/
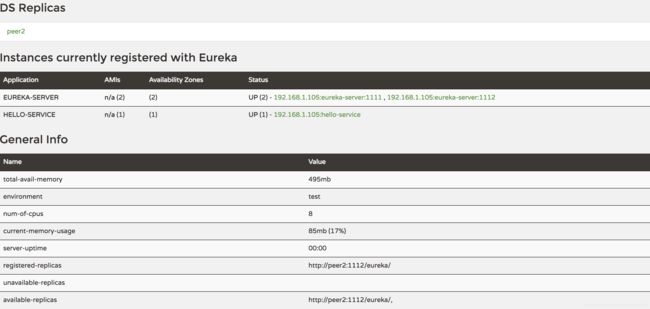
访问localhost:1112连接效果如下:

访问localhost:1111连接效果如下:

6.遇到的问题:
1)启动顺序
先启动服务提供方会报连接超时,原因就是服务注册中心没有启动,所以应该先启动服务注册中心
com.sun.jersey.api.client.ClientHandlerException: java.net.ConnectException: Connection refused (Connection refused)
	at com.sun.jersey.client.apache4.ApacheHttpClient4Handler.handle(ApacheHttpClient4Handler.java:187) ~[jersey-apache-client4-1.19.1.jar:1.19.1]
	at com.sun.jersey.api.client.filter.GZIPContentEncodingFilter.handle(GZIPContentEncodingFilter.java:123) ~[jersey-client-1.19.1.jar:1.19.1]
	at com.netflix.discovery.EurekaIdentityHeaderFilter.handle(EurekaIdentityHeaderFilter.java:27) ~[eureka-client-1.7.2.jar:1.7.2]
	at com.sun.jersey.api.client.Client.handle(Client.java:652) ~[jersey-client-1.19.1.jar:1.19.1]
	at com.sun.jersey.api.client.WebResource.handle(WebResource.java:682) ~[jersey-client-1.19.1.jar:1.19.1]
	at com.sun.jersey.api.client.WebResource.access$200(WebResource.java:74) ~[jersey-client-1.19.1.jar:1.19.1]
	at com.sun.jersey.api.client.WebResource$Builder.get(WebResource.java:509) ~[jersey-client-1.19.1.jar:1.19.1]
2)注册中心显示unavailable-replicas

修改两个注册服务中心的application.properties
eureka.client.register-with-eureka=true
eureka.client.fetch-registry=true
再次访问localhost:1111,显示如下

再次访问localhost:1112,显示如下:

这样断开peer1,则服务同时也向peer2注册,所以在peer2上依然可以访问服务,从而实现了服务注册中心的高可用
服务发现与消费
1.为了实验Ribbon客户端负载均衡功能,需要先启动两个不同端口的服务
java -jar  xxx.jar  --server.port=8081
java -jar  xxx.jar  --server.port=8082
2.创建一个工程来实现服务消费者,可以直接复制一个服务提供方的工程来进行修改
在pom.xml中加入依赖
<dependency>
	<groupId>org.springframework.cloudgroupId>
	<artifactId>spring-cloud-starter-ribbonartifactId>
	<version>1.4.6.RELEASEversion>
dependency>
3.创建主类
@EnableEurekaClient
@SpringBootApplication
public class DemoApplication {
	@Bean
	@LoadBalanced
	RestTemplate restTemplate(){
		return new RestTemplate();
	}

	public static void main(String[] args) {
		SpringApplication.run(DemoApplication.class, args);
	}

}
4.修改客户端工程的application.properties,配置上Eureka服务注册中心的位置
spring.application.name=ribbon-consumer
server.port=9000
eureka.client.service-url.defaultZone=http://localhost:1111/eureka/,http://localhost:1112/eureka/
5.配置好后,启动应用,可以看到ribbon-consumer的服务

Ribbon的负载均衡是通过客户端中配置的ribbonServerList服务端列表去轮询访问来实现的
Ribbon负载均衡原理:当Ribbon与Eureka联合使用时,Ribbon的服务实例清单RibbonServerList会被DiscoveryEnableNIWSServerList重写,扩展成从Eureka注册中心中获取服务端列表.另外也会用NIWSDiscoveryPing来取代IPing,它将职责委托给Eureka来确定服务端是否已经启动.
