深入JAVA并发编程(十):线程池(三)
ScheduledThreadPoolExecutor
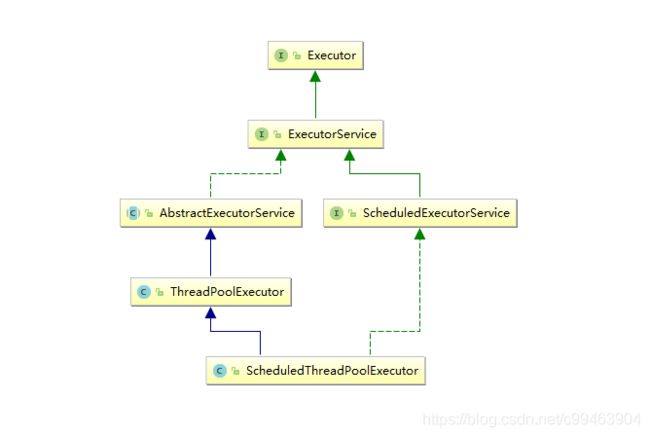
ScheduledThreadPoolExecutor是可对任务进行延迟/预定调度的执行器(Executor),此类Executor一般实现了ScheduledExecutorService这个接口。
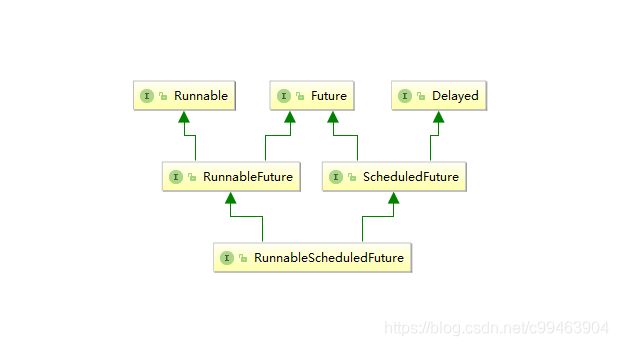
从继承图中可以看到,ScheduledThreadPoolExecutor继承了ThreadPoolExecutor这个普通线程池,我们知道ThreadPoolExecutor中提交的任务都是实现了Runnable接口,但是ScheduledThreadPoolExecutor比较特殊,由于要满足任务的延迟/周期调度功能,它会对所有的Runnable任务都进行包装,包装成一个RunnableScheduledFuture任务。
RunnableScheduledFuture是Future模式中的一个接口,关于Future模式,我们后面会讲解,这里只要知道RunnableScheduledFuture的作用就是可以异步地执行【延时/周期任务】。
另外,我们知道在ThreadPoolExecutor中,需要指定一个阻塞队列作为任务队列。ScheduledThreadPoolExecutor中也一样,不过特殊的是,ScheduledThreadPoolExecutor中的任务队列是一种特殊的延时队列(DelayQueue)。
我们曾经在并发容器中,分析过DelayQueue,DelayQueue底层基于优先队列(PriorityQueue)实现,是一种“堆”结构,通过该种阻塞队列可以实现任务的延迟到期执行(即每次从队列获取的任务都是最先到期的任务)。
ScheduledThreadPoolExecutor在内部定义了DelayQueue的变种——DelayedWorkQueue,它和DelayQueue类似,只不过要求所有入队元素必须实现RunnableScheduledFuture接口。
ScheduledThreadPoolExecutor源码分析
首先我们来看下它的构造方法
    public ScheduledThreadPoolExecutor(int corePoolSize) {
        super(corePoolSize, Integer.MAX_VALUE, 0, NANOSECONDS,
              new DelayedWorkQueue());
    }


    public ScheduledThreadPoolExecutor(int corePoolSize,
                                       ThreadFactory threadFactory) {
        super(corePoolSize, Integer.MAX_VALUE, 0, NANOSECONDS,
              new DelayedWorkQueue(), threadFactory);
    }


    public ScheduledThreadPoolExecutor(int corePoolSize,
                                       RejectedExecutionHandler handler) {
        super(corePoolSize, Integer.MAX_VALUE, 0, NANOSECONDS,
              new DelayedWorkQueue(), handler);
    }


    public ScheduledThreadPoolExecutor(int corePoolSize,
                                       ThreadFactory threadFactory,
                                       RejectedExecutionHandler handler) {
        super(corePoolSize, Integer.MAX_VALUE, 0, NANOSECONDS,
              new DelayedWorkQueue(), threadFactory, handler);
    }
我们发现其构造方法内部实际上调用了其父类ThreadPoolExecutor的构造方法,但是区别是任务队列的选择——DelayedWorkQueue,我们后面会详细介绍它的实现原理。
线程池的调度
ScheduledThreadPoolExecutor的核心调度方法是schedule、scheduleAtFixedRate、scheduleWithFixedDelay。
我们通过schedule方法来看下整个调度流程:
该方法的作用是提交一个延迟执行的任务,任务在提交delay时间后开始执行,任务只会执行一次。
    public ScheduledFuture<?> schedule(Runnable command,
                                       long delay,
                                       TimeUnit unit) {
        if (command == null || unit == null)
            throw new NullPointerException();
        RunnableScheduledFuture<?> t = decorateTask(command,
            new ScheduledFutureTask<Void>(command, null,
                                          triggerTime(delay, unit)));
        delayedExecute(t);
        return t;
    }
decorateTask方法会把Runnable任务包装成ScheduledFutureTask,用户可以根据自己的需要覆写该方法:
    protected <V> RunnableScheduledFuture<V> decorateTask(
        Runnable runnable, RunnableScheduledFuture<V> task) {
        return task;
    }
注意:ScheduledFutureTask是RunnableScheduledFuture接口的实现类,任务通过period字段来表示任务类型
    private class ScheduledFutureTask<V>
            extends FutureTask<V> implements RunnableScheduledFuture<V> {

	    /**
	     * 任务序号, 自增唯一
	     */
        private final long sequenceNumber;

        /**
	     * 首次执行的时间点
	     */
        private long time;

        /**
         * 任务类型
	     * 0: 非周期任务
	     * >0: fixed-rate任务
	     * <0: fixed-delay任务
	     */
        private final long period;

        /** The actual task to be re-enqueued by reExecutePeriodic */
        RunnableScheduledFuture<V> outerTask = this;

        /**
	     * 在堆中的索引
	     */
        int heapIndex;

        /**
         * Creates a one-shot action with given nanoTime-based trigger time.
         */
        ScheduledFutureTask(Runnable r, V result, long ns) {
            super(r, result);
            this.time = ns;
            this.period = 0;
            this.sequenceNumber = sequencer.getAndIncrement();
        }

        /**
         * Creates a periodic action with given nano time and period.
         */
        ScheduledFutureTask(Runnable r, V result, long ns, long period) {
            super(r, result);
            this.time = ns;
            this.period = period;
            this.sequenceNumber = sequencer.getAndIncrement();
        }

        /**
         * Creates a one-shot action with given nanoTime-based trigger time.
         */
        ScheduledFutureTask(Callable<V> callable, long ns) {
            super(callable);
            this.time = ns;
            this.period = 0;
            this.sequenceNumber = sequencer.getAndIncrement();
        }

        public long getDelay(TimeUnit unit) {
            return unit.convert(time - now(), NANOSECONDS);
        }

        public int compareTo(Delayed other) {
            if (other == this) // compare zero if same object
                return 0;
            if (other instanceof ScheduledFutureTask) {
                ScheduledFutureTask<?> x = (ScheduledFutureTask<?>)other;
                long diff = time - x.time;
                if (diff < 0)
                    return -1;
                else if (diff > 0)
                    return 1;
                else if (sequenceNumber < x.sequenceNumber)
                    return -1;
                else
                    return 1;
            }
            long diff = getDelay(NANOSECONDS) - other.getDelay(NANOSECONDS);
            return (diff < 0) ? -1 : (diff > 0) ? 1 : 0;
        }

        /**
         * Returns {@code true} if this is a periodic (not a one-shot) action.
         *
         * @return {@code true} if periodic
         */
        public boolean isPeriodic() {
            return period != 0;
        }

        /**
         * Sets the next time to run for a periodic task.
         */
        private void setNextRunTime() {
            long p = period;
            if (p > 0)
                time += p;
            else
                time = triggerTime(-p);
        }

        public boolean cancel(boolean mayInterruptIfRunning) {
            boolean cancelled = super.cancel(mayInterruptIfRunning);
            if (cancelled && removeOnCancel && heapIndex >= 0)
                remove(this);
            return cancelled;
        }

        /**
         * Overrides FutureTask version so as to reset/requeue if periodic.
         */
        public void run() {
            boolean periodic = isPeriodic();
            if (!canRunInCurrentRunState(periodic))
                cancel(false);
            else if (!periodic)
                ScheduledFutureTask.super.run();
            else if (ScheduledFutureTask.super.runAndReset()) {
                setNextRunTime();
                reExecutePeriodic(outerTask);
            }
        }
    }
ScheduledThreadPoolExecutor中的任务队列——DelayedWorkQueue,保存的元素就是ScheduledFutureTask。DelayedWorkQueue是一种堆结构,time最小的任务会排在堆顶(表示最早过期),每次出队都是取堆顶元素,这样最快到期的任务就会被先执行。如果两个ScheduledFutureTask的time相同,就比较它们的序号——sequenceNumber,序号小的代表先被提交,所以就会先执行。
schedule的核心是其中的delayedExecute方法:
    private void delayedExecute(RunnableScheduledFuture<?> task) {
    	//线程池已关闭,拒绝该任务
        if (isShutdown())
            reject(task);
        else {
        	// 将任务入队
            super.getQueue().add(task);
            // 如果线程池已关闭且该任务是非周期任务, 则将其从队列移除
            if (isShutdown() &&
                !canRunInCurrentRunState(task.isPeriodic()) &&
                remove(task))
                // 取消任务
                task.cancel(false);
            else
                ensurePrestart();
        }
    }
整个过程如下
(1)首先,任务被提交到线程池后,会判断线程池的状态,如果线程池已关闭会执行拒绝策略。
(2)然后,将任务添加到阻塞队列中。(注意,由于DelayedWorkQueue是无界队列,所以一定会add成功)
(3)然后,会调用ensurePrestart创建一个工作线程,加入到核心线程池或者非核心线程池:
    void ensurePrestart() {
        int wc = workerCountOf(ctl.get());
        if (wc < corePoolSize)
            addWorker(null, true);
        else if (wc == 0)
            addWorker(null, false);
    }
通过ensurePrestart可以看到,如果核心线程池未满,则新建的工作线程会被放到核心线程池中。如果核心线程池已经满了,ScheduledThreadPoolExecutor不会像ThreadPoolExecutor那样再去创建归属于非核心线程池的工作线程,而是直接返回。也就是说,在ScheduledThreadPoolExecutor中,一旦核心线程池满了,就不会再去创建工作线程。
这里思考一点,什么时候会执行else if (wc == 0)创建一个归属于非核心线程池的工作线程?
答案是,当通过setCorePoolSize方法设置核心线程池大小为0时,这里必须要保证任务能够被执行,所以会创建一个工作线程,放到非核心线程池中。
最后,线程池中的工作线程会去任务队列获取任务并执行,当任务被执行完成后,如果该任务是周期任务,则会重置time字段,并重新插入队列中,等待下次执行。这里注意从队列中获取元素的方法:
-
对于核心线程池中的工作线程来说,如果没有超时设置(allowCoreThreadTimeOut == false),则会使用阻塞方法take获取任务(因为没有超时限制,所以会一直等待直到队列中有任务);如果设置了超时,则会使用poll方法(方法入参需要超时时间),超时还没拿到任务的话,该工作线程就会被回收。
-
对于非工作线程来说,都是调用poll获取队列元素,超时取不到任务就会被回收。
上面我们知道了如何向延迟队列添加元素,接下来我们来看下线程池中的线程如何获取并执行任务。我们知道具体执行任务的都是Worker线程,然后调用任务的run方法执行,这里的任务是ScheduledFutureTask,我们来看下ScheduledFutureTask的run方法
        public void run() {
        	//判断是不是周期任务
            boolean periodic = isPeriodic();
            //在线程池处于正在关闭状态是能否继续执行,默认是false
            if (!canRunInCurrentRunState(periodic))
            	//取消任务
                cancel(false);
            //如果不是周期任务,那么调用父类的run方法执行任务
            else if (!periodic)
                ScheduledFutureTask.super.run();
            //如果是周期任务,那么调用父类的runAndReset方法执行任务
            //调用成功后,设置下次执行的时间,并加入到任务队列
            else if (ScheduledFutureTask.super.runAndReset()) {
                setNextRunTime();
                reExecutePeriodic(outerTask);
            }
        }
在调用run方法的时候,会检测线程池的状态,如果线程池处于正在关闭的状态(比如调用shutdown方法但尚未执行完成),会调用canRunInCurrentRunState方法,这个方法根据ScheduledThreadPoolExecutor的成员变量continueExistingPeriodicTasksAfterShutdown决定是否继续执行:
//参数periodic为是否是周期任务
boolean canRunInCurrentRunState(boolean periodic) {
	return isRunningOrShutdown(periodic ? continueExistingPeriodicTasksAfterShutdown :
                                   executeExistingDelayedTasksAfterShutdown);
}
经过上述判断后,任务的执行就正式开始了:对于一般的定时任务,默认通过调用父类FutureTask的run方法执行任务。对于周期任务,则是调用父类的runAndReset方法执行任务。对于周期任务,每执行一次,就会调用setNextRunTime方法来算出下次执行的时间:
private void setNextRunTime() {
	long p = period;
    if (p > 0)
        time += p;
    else
        time = triggerTime(-p);
}
setNextRunTime方法会根据周期任务的执行策略来算出下次执行的时间,当period为正数时,说明用户调用的是scheduleAtFixedRate提交的周期任务,反之则是调用的scheduleWithFixedDelay提交的任务。前者会严格按照每隔时间period纳秒就执行一次,后者会根据任务实际的完成时间为起点往后推triggerTime纳秒作为下次的执行时间。
设定完时间后,就会调用reExecutePeriodic方法来使任务重新加入到任务队列:
void reExecutePeriodic(RunnableScheduledFuture<?> task) {
	//再次检测线程池状态,并进行上述判断
	if (canRunInCurrentRunState(true)) {
		//重新入队
    	super.getQueue().add(task);
        if (!canRunInCurrentRunState(true) && remove(task))
            task.cancel(false);
        else
        	//确保线程池有工作线程
            ensurePrestart();
    }
}
延时队列
DelayedWorkQueue,该队列和已经介绍过的DelayQueue区别不大,只不过队列元素是RunnableScheduledFuture:
DelayedWorkQueue是一个无界队列,在队列元素满了以后会自动扩容,它并没有像DelayQueue那样,将队列操作委托给PriorityQueue,而是自己重新实现了一遍堆的核心操作——上浮、下沉。我这里不再赘述这些堆操作,读者可以参考PriorityBlockingQueue自行阅读源码。
我们关键来看下入队和出队方法
        public boolean offer(Runnable x) {
            if (x == null)
                throw new NullPointerException();
            //将插入的任务转为RunnableScheduledFuture类型
            RunnableScheduledFuture<?> e = (RunnableScheduledFuture<?>)x;
            final ReentrantLock lock = this.lock;
            //加锁
            lock.lock();
            try {
                int i = size;
                //如果当前数组容量已满,那么调用grow方法扩容
                if (i >= queue.length)
                    grow();
                size = i + 1;
                //如果数组元素数量为0,那么放入数组首部
                if (i == 0) {
                    queue[0] = e;
                    setIndex(e, 0);
                //否则调用siftUp方法入队
                } else {
                    siftUp(i, e);
                }
                //如果队列头部就是插入的元素(即执行时间最近的任务),那么唤醒一个在available上等待的线程
                if (queue[0] == e) {
                    leader = null;
                    available.signal();
                }
            } finally {
                lock.unlock();
            }
            return true;
        }
private void siftUp(int k, RunnableScheduledFuture<?> key) {
	while (k > 0) {
		//相当于将k/2
    	int parent = (k - 1) >>> 1;
        RunnableScheduledFuture<?> e = queue[parent];
        //比较大小,直到key的执行时间晚于queue[parent]
        if (key.compareTo(e) >= 0)
            break;
        queue[k] = e;
        setIndex(e, k);
        k = parent;
    }
    //向数组插入元素
    queue[k] = key;
    setIndex(key, k);
}
我们来看下出队方法
        public RunnableScheduledFuture<?> take() throws InterruptedException {
            final ReentrantLock lock = this.lock;
            //尝试获得锁,如果线程被Interrupt则方法抛出异常,随即结束
            lock.lockInterruptibly();
            try {
            	//自旋操作,直到获取到元素为止
                for (;;) {
                    RunnableScheduledFuture<?> first = queue[0];
                    //如果队列头部为空,就阻塞当前线程,同时释放锁
                    if (first == null)
                        available.await();
                    else {
                    	//获取队头任务开始执行的时间,单位为纳秒
                        long delay = first.getDelay(NANOSECONDS);
                        //如果小于等于0,说明已经达到执行时间,从队列中弹出这个元素并返回
                        if (delay <= 0)
                            return finishPoll(first);
                        first = null; // don't retain ref while waiting
                        //到这里说明没有任务到达执行时间,这里和dealyQueue的处理一样
                        //如果leader不为null,那么阻塞当前线程
                        if (leader != null)
                            available.await();
                        else {
                        	//否则将当前线程作为leader
                            Thread thisThread = Thread.currentThread();
                            leader = thisThread;
                            try {
                            	//等待delay时间,再次重试
                                available.awaitNanos(delay);
                            } finally {
                                if (leader == thisThread)
                                    leader = null;
                            }
                        }
                    }
                }
            } finally {
            	//如果leader为null并且队列头部不为空,那么唤醒等待的线程
                if (leader == null && queue[0] != null)
                    available.signal();
                lock.unlock();
            }
        }
Future模式
Future模式是Java多线程设计模式中的一种常见模式,它的主要作用就是异步地执行任务,并在需要的时候获取结果。我们知道,同步调用一个方法时,需要等待方法执行完成,调用线程才会继续往下执行,如果是一些比较复杂的任务,需要等待的时间可能就会比较长。
遇到这种情况呢,我们一般是新建线程异步执行该任务,如下:
public void calculate(){
    Thread t = new Thread(new Runnable() {
        @Override
        public void run() {
            model.calculate();
        }
    });
    t.start();
}
但是,这样有一个问题,就是拿不到计算结果,也不知道任务到底什么时候计算结束。Future模式就是来解决这个问题的。
Future模式,可以让调用方立即返回,然后自己会在后面慢慢处理,此时调用者拿到的仅仅是一个凭证,调用者可以先去处理其它任务,在真正需要用到调用结果的场合,再使用凭证去获取调用结果。这个凭证就是这里的Future。
Future模式可以理解为一种凭证,拿着该凭证在将来的某个时间点可以取到我想要的东西,可见,Future模式的命名是很有深意且很恰当的。
JDK提供了一系列的接口来实现Future模式。
首先是Callable接口,它功能和Runnable类似,但是具有返回值。表示一个具有返回结果的任务
@FunctionalInterface
public interface Callable<V> {

    V call() throws Exception;
}
所以,如果需要返回值的任务类我们需要实现Callable接口。
如下例,我们进行了运算,然后返回一个Double值:
public class ComplexTask implements Callable<Double> {
    @Override
    public Double call() {
        // complex calculating...
        return ThreadLocalRandom.current().nextDouble();
    }
}
J.U.C还提供了Future接口和它的实现类FutureTask,这个就是凭证,用来获取任务结果。
ComplexTask task = new ComplexTask();
Future<Double> future = new FutureTask<Double>(task);
上面的FutureTask就是真实的“凭证”,Future则是该凭证的接口。
public interface Future<V> {

    boolean cancel(boolean mayInterruptIfRunning);


    boolean isCancelled();


    boolean isDone();


    V get() throws InterruptedException, ExecutionException;


    V get(long timeout, TimeUnit unit)
        throws InterruptedException, ExecutionException, TimeoutException;
}
Future接口很简单,提供了isCancelled和isDone两个方法监控任务的执行状态,一个cancel方法用于取消任务的执行。两个get方法用于获取任务的执行结果,如果任务未执行完成,除非设置超时,否则调用线程将会阻塞。
此外,为了能够被线程或线程池执行任务,凭证还需要实现Runnable接口,所以J.U.C还提供了一个RunnableFuture接口,其实就是组合了Runnable和Future接口:
public interface RunnableFuture<V> extends Runnable, Future<V> {

    void run();
}
上面提到的FutureTask,其实就是实现了RunnableFuture接口的“凭证”:
从FutureTask的构造函数可以知道,FutureTask既可以包装Callable任务,也可以包装Runnable任务,但最终都是将Runnable转换成Callable任务。
最终,我们可以以下面这种方式使用Future模式,异步地获取任务的执行结果。
public static void main(String[] args) throws ExecutionException, InterruptedException {
    ComplexTask task = new ComplexTask();
    Future<Double> future = new FutureTask<Double>(task);

    // time passed...

    Double result = future.get();
}
通过上面的分析,可以看到,整个Future模式其实就三个核心组件:
- 任务类,即示例中的ComplexTask
- Future接口(调用方使用该凭证获取真实任务/数据的结果),即Future接口
- Future实现类(用于对真实任务/数据进行包装),即FutureTask实现类

