【Android】Dagger2 + MVVM
背景
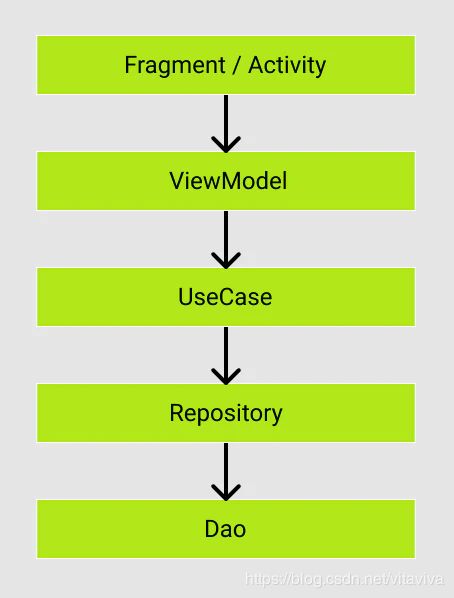
一个标准的Android的MVVM架构是分层规划实现的,各层之间有清晰的依赖关系。借助Dagger2完成MVVM各层所需的依赖注入,可以让项目结构变得更清爽和更可维护。
虽然Dagger2有一定使用门槛,但是MVVM的项目结构大都相同,实现一个Dagger2+Retrofit2(+OkHttp3)+ViewModel 的最小构成实践,对其他类似项目具有一定参考意义。
构成
1. gradle
final DAGGER_VERSION = '2.25.3'
    final RETROFIT_VERSION = '2.7.0'

    // retrofit
    implementation "com.squareup.retrofit2:adapter-rxjava2:$RETROFIT_VERSION"
    implementation "com.squareup.retrofit2:converter-moshi:$RETROFIT_VERSION"
    implementation "com.squareup.retrofit2:retrofit:$RETROFIT_VERSION"

    // dagger2
    implementation "com.google.dagger:dagger:$DAGGER_VERSION"
    implementation "com.google.dagger:dagger-android:$DAGGER_VERSION"
    implementation "com.google.dagger:dagger-android-support:$DAGGER_VERSION"
    kapt "com.google.dagger:dagger-compiler:$DAGGER_VERSION"
    kapt "com.google.dagger:dagger-android-processor:$DAGGER_VERSION"
    implementation "com.squareup.okhttp3:logging-interceptor:4.2.2"

    // Android Architecture Components
    implementation "androidx.lifecycle:lifecycle-extensions:2.2.0-rc03"
    implementation "androidx.lifecycle:lifecycle-livedata:2.2.0-rc03"
各种依赖库的配置:Dagger2、Retrofit2、AAC,以及J神推荐的Json库Moshi
2. Application
AppModule.kt
@Module
abstract class AppModule {
    @Binds
    abstract fun provideContext(application: App): Context
}
AppComponent.kt
@Singleton
@Component(
    modules = [
        AndroidInjectionModule::class,
        AppModule::class,
        MainActivityBuilder::class]
)
interface AppComponent : AndroidInjector<App> {
    @Component.Factory
    interface Factory {
        fun create(@BindsInstance app: App): AppComponent
    }
}
- Component使用
@Component.Factory替代@Comonent.Builder,参考Factory与Builder比较 - Component中添加AndroidInjectionModule的依赖,可以避免AndroidSupportInjectionModule的额外依赖,减少DispatchingAndroidInjector的依赖关系
App.kt
class App : DaggerApplication() {
    override fun applicationInjector(): AndroidInjector<out DaggerApplication> {
        return DaggerAppComponent.factory()
            .create(this)
    }
}
App继承DaggerApplication,简化代码,无需再在onCreate中进行inject
3. Activity
MainActivityBuilder.kt
@Module
abstract class MainActivityBuilder {
    @ActivityScope
    @ContributesAndroidInjector
    abstract fun bindMainActivity(): MainActivity
}
在Activity的Module中限定@ActivityScope
MainActivity.kt
class MainActivity : DaggerAppCompatActivity()
MainActivity继承DaggerAppCompatActivity,简化代码,无需再在DaggerAppCompatActivity中调用AndroidInjection.inject(this)
到此为止Activity已经被注入到AppComponent,可以在运行时提供使用
4. Fragment
MainFragmentModule.kt
@Module
internal abstract class MainFragmentModule {
    @ContributesAndroidInjector
    abstract fun provideMainFragment(): MainFragment
}
MainActivityBuilder.kt
@Module
abstract class MainActivityBuilder {
    @ActivityScope
    @ContributesAndroidInjector(modules = [MainFragmentModule::class]) // 追加
    abstract fun bindMainActivity(): MainActivity
}
MainFragment继承DaggerFragment,可以自动实现HasAndroidInjector,而且无需AndroidSupportInjection.inject(this)。
MainFragment.kt
class MainFragment : DaggerFragment() {
5. Retrofit
Api.kt
interface Api
ApiModule.kt
使用Moshi进行Json解析
@Module
class ApiModule {
    companion object {
        const val API_READ_TIMEOUT: Long = 10
        const val API_CONNECT_TIMEOUT: Long = 10
    }

    @Provides
    @Singleton
    fun provideOkhttpClient(): OkHttpClient {
        val logInterceptor = HttpLoggingInterceptor()
        logInterceptor.level = HttpLoggingInterceptor.Level.BODY

        return OkHttpClient.Builder()
            .addInterceptor {
                val httpUrl = it.request().url
                val requestBuilder = it.request().newBuilder().url(httpUrl)
                it.proceed(requestBuilder.build())
            }
            .addInterceptor(logInterceptor)
            .readTimeout(API_READ_TIMEOUT, TimeUnit.SECONDS)
            .connectTimeout(API_CONNECT_TIMEOUT, TimeUnit.SECONDS)
            .build()
    }

    @Provides
    @Singleton
    fun provideRetrofit(okHttpClient: OkHttpClient): Retrofit {
        val moshi = Moshi.Builder()
            .add(KotlinJsonAdapterFactory())
            .build()
        return Retrofit.Builder()
            .client(okHttpClient)
            .baseUrl("https://api.github.com/")
            .addConverterFactory(MoshiConverterFactory.create(moshi))
            .addCallAdapterFactory(RxJava2CallAdapterFactory.create())
            .build()
    }

    @Provides
    @Singleton
    fun provideAPI(retrofit: Retrofit): Api {
        return retrofit.create(Api::class.java)
    }
}
AppComponent
更新AppComponent,在其中追加ApiModule
@Singleton
@Component(
    modules = [
        AndroidInjectionModule::class,
        AppModule::class,
        MainActivityBuilder::class,
        ApiModule::class    // 追加
    ]
)

interface AppComponent : AndroidInjector<App> {
    @Component.Factory
    interface Factory {
        fun create(@BindsInstance app: App,
                   @BindsInstance apiModule: ApiModule): AppComponent // 追加
    }
}
App.kt
class App : DaggerApplication() {
    override fun applicationInjector(): AndroidInjector<out DaggerApplication> {
        return DaggerAppComponent.factory()
            .create(this, ApiModule()) //  追加ApiModule()
    }
}
6. ViewModel
ViewModelFactory.kt
为了能够为ViewModel动态传入参数,我们定义一个工厂
class ViewModelFactory @Inject constructor(
    private val creators: Map<Class<out ViewModel>, @JvmSuppressWildcards Provider<ViewModel>>
) : ViewModelProvider.Factory {

    override fun <T: ViewModel> create(modelClass: Class<T>): T {
        var creator: Provider<out ViewModel>? = creators[modelClass]
        if (creator == null) {
            for ((key, value) in creators) {
                if (modelClass.isAssignableFrom(key)) {
                    creator = value
                    break
                }
            }
        }
        if (creator == null) {
            throw IllegalArgumentException("unknown model class " + modelClass)
        }
        try {
            @Suppress("UNCHECKED_CAST")
            return creator.get() as T
        } catch (e: Exception) {
            throw RuntimeException(e)
        }
    }
}
ViewModelModule.kt
@MustBeDocumented
@Target(
        AnnotationTarget.FUNCTION,
        AnnotationTarget.PROPERTY_GETTER,
        AnnotationTarget.PROPERTY_SETTER
)
@Retention(AnnotationRetention.RUNTIME)
@MapKey internal annotation class ViewModelKey(val value: KClass<out ViewModel>)
ViewModelModule.kt
@Module
interface ViewModelModule {
    @Binds
    fun bindViewModelFactory(factory: ViewModelFactory): ViewModelProvider.Factory
}
MainViewModel.kt
创建MainFragment中需要使用的MainViewModel
class MainViewModel @Inject constructor(private val useCase: MainUseCase): ViewModel() {
}
因为MainViewModel中需要使用UseCase,通过构造函数注入。
MainUseCase.kt
MainUseCase中需要注入MainRepository`
class MainUseCase @Inject constructor(private val repository: MainRepository) {
}
MainRepository.kt
MainRepository需要注入Api
class MainRepository @Inject constructor(private val api: Api) {
}
MainFragmentModule.kt
更新MainFragmentModule,在MainFragment的Scope中(添加@FragmentScope)追加MainViewModel,以供其运行时取用。
@Module
internal abstract class MainFragmentModule {
    @ContributesAndroidInjector
    @FragmentScope
    abstract fun provideMainFragment(): MainFragment

    // 追加
    @Binds
    @IntoMap
    @ViewModelKey(MainViewModel::class)
    @FragmentScope
    internal abstract fun bindMainViewModel(viewModel: MainViewModel): ViewModel
}
MainFragment.kt
最后,在MainFragment中注入ViewModelFactory,运行时通过其创建MainViewModel
class MainFragment : DaggerFragment() {

    @Inject
    lateinit var viewModelFactory: ViewModelFactory
    lateinit var viewModel: MainViewModel

    override fun onCreateView(
        inflater: LayoutInflater, container: ViewGroup?,
        savedInstanceState: Bundle?
    ): View? {
        // Inflate the layout for this fragment
        viewModel = ViewModelProvider(this, viewModelFactory).get(MainViewModel::class.java)
        return inflater.inflate(R.layout.fragment_main, container, false)
    }
Build完成后,所以的Dagger代码生成,依赖注入关系成功建立。
PS1: UseCase、Repository等的接口依赖
上面例子中UseCase、Repository是直接被注入到所需的对象中,但是实际项目中它们可能是以接口形式被依赖的,例如ViewModel依赖MainUserCase接口,而非MainUseCaseImpl
interface MainUseCase {
    fun hoge()
}

class MainUseCaseImpl @Inject constructor(private val repository: MainRepository): MainUseCase {
    override fun hoge() {
         // 。。。
    }
}
此时可以再增加一个Module,将依赖的实现和接口分离
MainModule.kt
@Module
internal object MainModule {
    @Singleton
    @Provides
    @JvmStatic
    fun provideMainRepository(api: Api): MainRepository =
        MainRepositoryImpl(api)

    @Singleton
    @Provides
    @JvmStatic
    fun provideMainUseCase(repository: MainRepository): MainUseCase =
        MainUseCaseImpl(repository)
}
AppComponent.kt
@Singleton
@Component(
    modules = [
        AndroidInjectionModule::class,
        AppModule::class,
        ApiModule::class,
        MainActivityBuilder::class,
        MainModule::class // 追加
    ]
)
PS2:ViewModel的实例化
上面代码中使用lateinit var声明ViewModel,然后通过ViewModelProvider运行时创建ViewModel。
Android-KTX中提供了最新的功能,可以帮助我们优化这种写法
implementation 'androidx.fragment:fragment-ktx:1.2.0-rc04'
MainFrgment.kt
可以通过下面方式使用默认的factory创建ViewModel:
private val viewModel: MainViewModel by viewModels()
当想例子中那样需要使用自定义factory时:
private val viewModel: MainViewModel by viewModels { viewModelFactory }
一行代码搞定,减少了不必要的模板代码。
最后
以上例子介绍了如何使用Dagger创建一个最小构成的MVVVM项目,具体的一些Dagger注解的使用没有详细展开,有需要可以查阅Dagger官网,官网的文档还是很详细的。
Dagger起步很难,实际项目中大多是像上面这样提供一些脚手架代码,然后后面照猫画虎的添加Module或者Component。正因为Dagger起步难,所以写了这篇文章帮大家快速上手,在项目中一旦用起来就会发现Dagger的功能确实强大,不是其他DI框架所能比拟的,建议大家勇敢尝试。