windows下vscode配置C/C++环境
windows下vscode配置C/C++环境
- 安装vscode
- 安装mingw-w64
- 添加插件
- 配置C/C++环境
记录一个 C/C++ 工作环境配置方案仅供参考
安装vscode
vscode官网传送门
安装mingw-w64
mingw-w64官网传送门

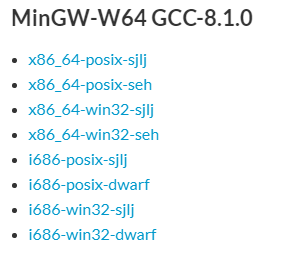
不要点击 “Download Lasted Version”,往下滑,找到最新版的 "x86_64-posix-seh"下载
配置MinGW环境变量
我的电脑–属性–高级系统设置–环境变量–Path
MinGW安装位置 …/mingw-w64/bin
![]()
验证是否配置成功 win+r — cmd ---- g++ -v
![]()
添加插件
配置C/C++环境
在想要的位置新建一个projects文件夹。
vscode 文件选项 — 打开文件夹 (ctrl + k ctrl + o)
新建一个 test.cpp文件
#include 在 VS Code 中打开工具窗口 (默认Ctrl+Alt+P) ,输入 C/CPP: Edit Configurations来生成配置文件
在自动打开的c_cpp_properties.json中配置 Include路径等内容

按下ctrl+F5,选择C++(GDB/LLDB),再选择g++.exe,会出现launch.json文件。
{
    "version": "0.2.0",
    "configurations": [
        {
            "name": "C/C++",
            "type": "cppdbg",
            "request": "launch",
            "program": "${fileDirname}/${fileBasenameNoExtension}.exe",
            "args": [],
            "stopAtEntry": false,
            "cwd": "${workspaceFolder}",
            "environment": [],
            "externalConsole": true,
            "MIMode": "gdb",
            "miDebuggerPath": "D:/software/study/mingw64/bin/gdb.exe",
            "preLaunchTask": "g++",
            "setupCommands": [
                {
                    "description": "Enable pretty-printing for gdb",
                    "text": "-enable-pretty-printing",
                    "ignoreFailures": true
                }
            ],
        },
    ]
}
回到test.cpp文件,按下ctrl+F5,应该会出现下图,点击配置任务

自动生成tasks.json文件,粘贴下面代码:
{
    "version": "2.0.0",
    "command": "g++",
    "args": [
        "-g",
        "${file}",
        "-o",
        "${fileDirname}/${fileBasenameNoExtension}.exe"
    ],
    "problemMatcher": {
        "owner": "cpp",
        "fileLocation": [
            "relative",
            "${workspaceRoot}"
        ],
        "pattern": {
            "regexp": "^(.*):(\\d+):(\\d+):\\s+(warning|error):\\s+(.*)$",
            "file": 1,
            "line": 2,
            "column": 3,
            "severity": 4,
            "message": 5
        }
    },
    "group": {
        "kind": "build",
        "isDefault": true
    }
}
在projects文件夹底下应该会有 一个.vscode文件夹,其中已经包含了launch.json文件和tasks.json文件,我们在.vscode中创建一个setting.json文件,并粘贴上下面的代码:
{
    "files.associations": {
        "iostream": "cpp",
        "cmath": "cpp",
        "ostream": "cpp",
        "cstring": "cpp",
        "queue": "cpp",
        "chrono": "cpp",
        "random": "cpp",
        "limits": "cpp",
        "valarray": "cpp",
        "*.tcc": "cpp",
        "iosfwd": "cpp",
        "bitset": "cpp",
        "complex": "cpp",
        "cstddef": "cpp",
        "iomanip": "cpp",
        "istream": "cpp",
        "algorithm": "cpp",
        "map": "cpp",
        "array": "cpp",
        "atomic": "cpp",
        "cctype": "cpp",
        "cfenv": "cpp",
        "charconv": "cpp",
        "cinttypes": "cpp",
        "clocale": "cpp",
        "codecvt": "cpp",
        "condition_variable": "cpp",
        "csetjmp": "cpp",
        "csignal": "cpp",
        "cstdarg": "cpp",
        "cstdint": "cpp",
        "cstdio": "cpp",
        "cstdlib": "cpp",
        "ctime": "cpp",
        "cuchar": "cpp",
        "cwchar": "cpp",
        "cwctype": "cpp",
        "deque": "cpp",
        "forward_list": "cpp",
        "list": "cpp",
        "unordered_map": "cpp",
        "unordered_set": "cpp",
        "vector": "cpp",
        "exception": "cpp",
        "functional": "cpp",
        "iterator": "cpp",
        "memory": "cpp",
        "memory_resource": "cpp",
        "numeric": "cpp",
        "optional": "cpp",
        "ratio": "cpp",
        "regex": "cpp",
        "set": "cpp",
        "string": "cpp",
        "string_view": "cpp",
        "system_error": "cpp",
        "tuple": "cpp",
        "type_traits": "cpp",
        "utility": "cpp",
        "fstream": "cpp",
        "future": "cpp",
        "initializer_list": "cpp",
        "mutex": "cpp",
        "new": "cpp",
        "scoped_allocator": "cpp",
        "shared_mutex": "cpp",
        "sstream": "cpp",
        "stdexcept": "cpp",
        "streambuf": "cpp",
        "thread": "cpp",
        "typeindex": "cpp",
        "typeinfo": "cpp"
    }
}
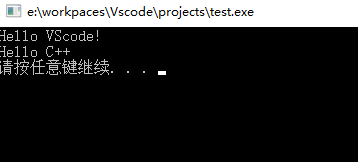
返回到test.cpp文件,按下ctrl+F5,应该就可以正常编译运行了。

如果想要在vscode终端内显示,可以在launch.json文件中更改
"externalConsole": false,

