Java集成PayPal支付
Java集成PayPal支付
1、申请账号
浏览器中输入:https://www.paypal.com,点击 “注册“

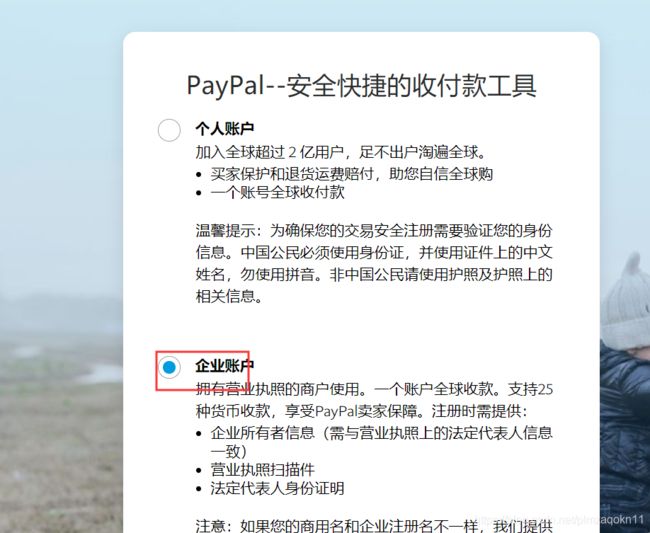
选择 ”企业账号“ ,信息可以随意填写
2、进入开发者界面创建开发账号
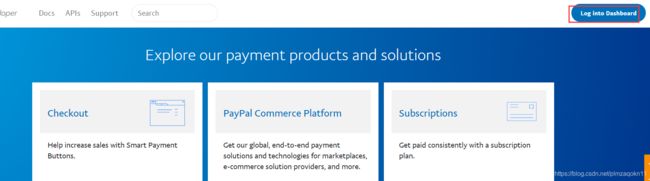
1、在浏览器中输入:https://developer.paypal.com/,登录刚创建的账号
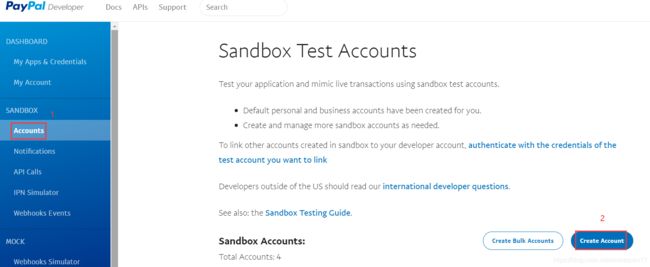
2、登录成功后进入以下界面,选择:SANBOX下的Accounts标签
3、创建个人账号和商家账号
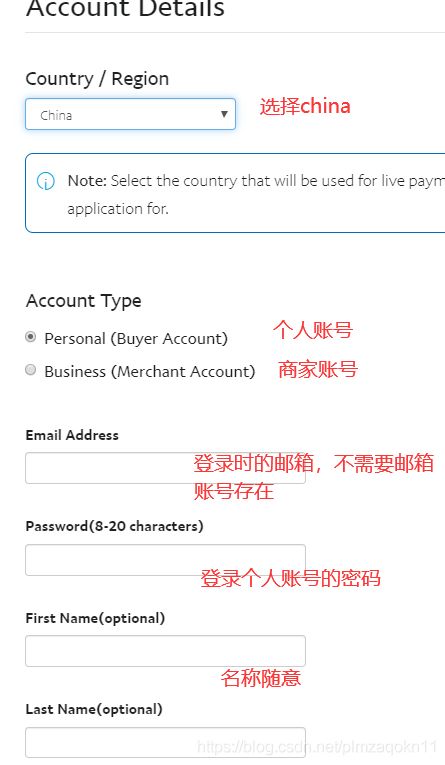
注意:创建时选择以下链接,填写详细信息(否则直接快速创建之后,不能创建账号的密码了,未找到原因)

个人账号:
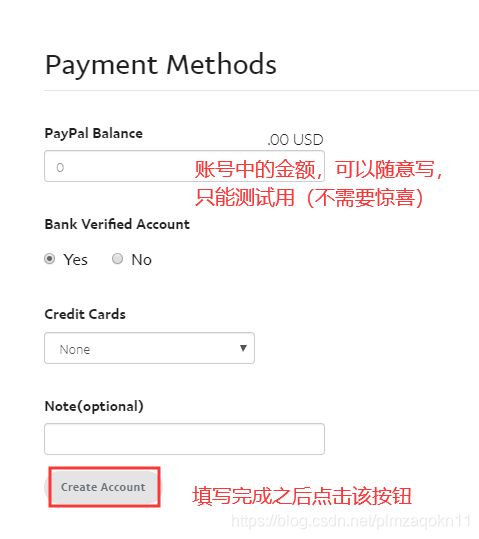
商家账号:
原理同上,注意 Account Type 选项需要选择 Business (Merchant Account)
创建完成之后如下图:

4、创建APP


点击创建好的APP

可以查看到开发时需要的 client id 和 secret

5、查看创建好的账号
在浏览器输入:https://www.sandbox.paypal.com/,点击登录,输入创建好的 ”商家账号“ 的邮箱和密码

3、开始撸代码
1、创建springboot项目,并引入PayPal的sdk
4.0.0 org.springframework.boot spring-boot-starter-parent 2.2.2.RELEASE com.study testPaypal 0.0.1-SNAPSHOT testPaypal Demo project for Spring Boot UTF-8 1.8 org.springframework.boot spring-boot-starter-thymeleaf org.springframework.boot spring-boot-starter-web org.springframework.boot spring-boot-devtools runtime true org.springframework.boot spring-boot-starter-test test org.junit.vintage junit-vintage-engine com.paypal.sdk rest-api-sdk 1.14.0 org.springframework.boot spring-boot-maven-plugin
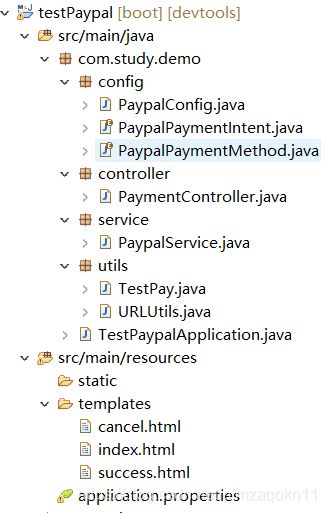
2、目录结构和源代码
import org.springframework.beans.factory.annotation.Value;
import org.springframework.context.annotation.Bean;
import org.springframework.context.annotation.Configuration;
import com.paypal.base.rest.APIContext;
import com.paypal.base.rest.PayPalRESTException;
/**
* 配置类,注入PayPal需要的认证信息
*/
@Configuration
public class PaypalConfig {
//统一在application.properties文件中录入
@Value("${paypal.client.app}")
private String clientId;
@Value("${paypal.client.secret}")
private String clientSecret;
@Value("${paypal.mode}")
private String mode;
/**
* 注入APIContext,APP的认证信息clientId,Secret,开发者账号创建APP时提供
* 每次调用时都需要创建一次
* @return
* @throws PayPalRESTException
*/
@Bean
public APIContext apiContext() throws PayPalRESTException{
APIContext apiContext = new APIContext(clientId,clientSecret,mode);
return apiContext;
}
}
/**
* 交易时参数枚举-意图
*/
public enum PaypalPaymentIntent {
sale, authorize, order
}
/**
* 交易时参数枚举-作用
*/
public enum PaypalPaymentMethod {
credit_card, paypal
}
/**
* 获取请求url的util
*/
public class URLUtils {
public static String getBaseURl(HttpServletRequest request) {
String scheme = request.getScheme();
String serverName = request.getServerName();
int serverPort = request.getServerPort();
String contextPath = request.getContextPath();
StringBuffer url = new StringBuffer();
url.append(scheme).append("://").append(serverName);
if ((serverPort != 80) && (serverPort != 443)) {
url.append(":").append(serverPort);
}
url.append(contextPath);
if(url.toString().endsWith("/")){
url.append("/");
}
return url.toString();
}
}
import java.util.ArrayList;
import java.util.List;
import org.springframework.beans.factory.annotation.Autowired;
import org.springframework.stereotype.Service;
import com.paypal.api.payments.Amount;
import com.paypal.api.payments.Payer;
import com.paypal.api.payments.Payment;
import com.paypal.api.payments.RedirectUrls;
import com.paypal.api.payments.PaymentExecution;
import com.paypal.api.payments.Transaction;
import com.paypal.base.rest.APIContext;
import com.paypal.base.rest.PayPalRESTException;
import com.study.demo.config.PaypalPaymentIntent;
import com.study.demo.config.PaypalPaymentMethod;
/**
* 支付service类
*/
@Service
public class PaypalService {
//注入认证信息bean
@Autowired
private APIContext apiContext;
/**
* 支付方法
* @param total 交易金额
* @param currency 货币类型
* @param method 枚举-作用
* @param intent 枚举-意图
* @param description 交易描述
* @param cancelUrl 交易取消后跳转url
* @param successUrl 交易成功后跳转url
* @return
* @throws PayPalRESTException
*/
public Payment createPayment(
Double total,
String currency,
PaypalPaymentMethod method,
PaypalPaymentIntent intent,
String description,
String cancelUrl,
String successUrl) throws PayPalRESTException{
//设置金额和单位对象
Amount amount = new Amount();
amount.setCurrency(currency);
amount.setTotal(String.format("%.2f", total));
//设置具体的交易对象
Transaction transaction = new Transaction();
transaction.setDescription(description);
transaction.setAmount(amount);
//交易集合-可以添加多个交易对象
List transactions = new ArrayList<>();
transactions.add(transaction);
Payer payer = new Payer();
payer.setPaymentMethod(method.toString());
Payment payment = new Payment();
payment.setIntent(intent.toString());
payment.setPayer(payer);
payment.setTransactions(transactions);
//设置反馈url
RedirectUrls redirectUrls = new RedirectUrls();
redirectUrls.setCancelUrl(cancelUrl);
redirectUrls.setReturnUrl(successUrl);
//加入反馈对象
payment.setRedirectUrls(redirectUrls);
//加入认证并创建交易
return payment.create(apiContext);
}
/**
* 并执行交易(相当于提交事务)
* @param paymentId
* @param payerId
* @return
* @throws PayPalRESTException
*/
public Payment executePayment(String paymentId, String payerId) throws PayPalRESTException{
Payment payment = new Payment();
payment.setId(paymentId);
PaymentExecution paymentExecute = new PaymentExecution();
paymentExecute.setPayerId(payerId);
return payment.execute(apiContext, paymentExecute);
}
}
import javax.servlet.http.HttpServletRequest;
import org.slf4j.Logger;
import org.slf4j.LoggerFactory;
import org.springframework.beans.factory.annotation.Autowired;
import org.springframework.stereotype.Controller;
import org.springframework.web.bind.annotation.RequestMapping;
import org.springframework.web.bind.annotation.RequestMethod;
import org.springframework.web.bind.annotation.RequestParam;
import com.paypal.api.payments.Links;
import com.paypal.api.payments.Payment;
import com.paypal.base.rest.PayPalRESTException;
import com.study.demo.config.PaypalPaymentIntent;
import com.study.demo.config.PaypalPaymentMethod;
import com.study.demo.service.PaypalService;
import com.study.demo.utils.URLUtils;
@Controller
@RequestMapping("/")
public class PaymentController {
public static final String PAYPAL_SUCCESS_URL = "pay/success";
public static final String PAYPAL_CANCEL_URL = "pay/cancel";
private Logger log = LoggerFactory.getLogger(getClass());
@Autowired
private PaypalService paypalService;
/**
* 进入项目跳转
* @return
*/
@RequestMapping(method = RequestMethod.GET)
public String index(){
return "index";
}
/**
* 开始交易
* @param request
* @return
*/
@RequestMapping(method = RequestMethod.POST, value = "pay")
public String pay(HttpServletRequest request){
String cancelUrl = URLUtils.getBaseURl(request) + "/" + PAYPAL_CANCEL_URL;
String successUrl = URLUtils.getBaseURl(request) + "/" + PAYPAL_SUCCESS_URL;
try {
//调用交易方法
Payment payment = paypalService.createPayment(
300.00,
"USD",
PaypalPaymentMethod.paypal,
PaypalPaymentIntent.sale,
"payment description",
cancelUrl,
successUrl);
//交易成功后,跳转反馈地址
for(Links links : payment.getLinks()){
if(links.getRel().equals("approval_url")){
return "redirect:" + links.getHref();
}
}
} catch (PayPalRESTException e) {
log.error(e.getMessage());
}
return "redirect:/";
}
/**
* 交易取消
* @return
*/
@RequestMapping(method = RequestMethod.GET, value = PAYPAL_CANCEL_URL)
public String cancelPay(){
return "cancel";
}
/**
* 交易成功,并执行交易(相当于提交事务)
* @param paymentId
* @param payerId
* @return
*/
@RequestMapping(method = RequestMethod.GET, value = PAYPAL_SUCCESS_URL)
public String successPay(@RequestParam("paymentId") String paymentId, @RequestParam("PayerID") String payerId){
try {
Payment payment = paypalService.executePayment(paymentId, payerId);
if(payment.getState().equals("approved")){
return "success";
}
} catch (PayPalRESTException e) {
log.error(e.getMessage());
}
return "redirect:/";
}
}
import org.springframework.boot.SpringApplication;
import org.springframework.boot.autoconfigure.SpringBootApplication;
@SpringBootApplication
public class TestPaypalApplication {
public static void main(String[] args) {
SpringApplication.run(TestPaypalApplication.class, args);
}
}
cancel.html
Insert title here


Canceled by user
index.html
Insert title here
success.html
Insert title here


Payment Success
application.properties

红线中的参数值,对应开发者账号创建APP后,点开APP显示的两个值,复制过来即可
3、运行测试
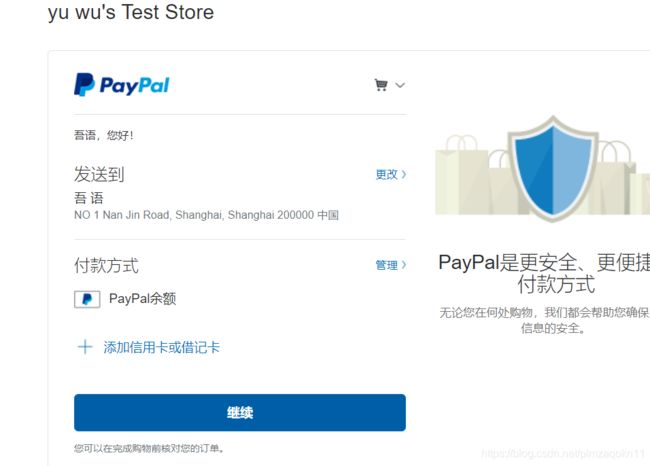
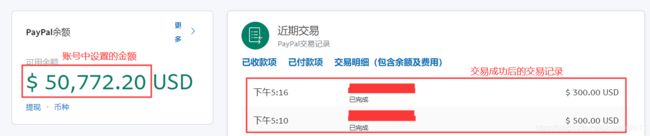
启动项目之后在浏览器中输入:http://localhost:8088 ,然后点击按钮,稍等一会弹出登录界面(注意:本人在谷歌浏览器中测试会在后台报错,在360浏览器中则正常),输入个人账号(买家账号),确认之后,再次弹出界面,点击继续即可完成交易
在浏览器输入:https://www.sandbox.paypal.com/,点击登录,输入创建好的 ”商家账号“ 的邮箱和密码
补充:
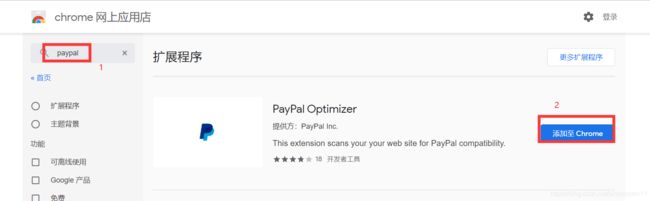
1、在谷歌浏览器中添加paypal,即可支持PayPal,调用后台方法时不会报错
设置——扩展程序
4、网址整理
https://www.paypal.com 官网,用于注册企业账号
https://developer.paypal.com/ 开发者界面,用于创建沙盒环境
https://www.sandbox.paypal.com/ 沙盒环境界面,用于查看测试账号的信息
https://github.com/paypal/PayPal-Java-SDK/wiki/Making-First-Call paypal-java-sdk在git中的文档,不过有点老了
参考:https://blog.csdn.net/change_on/article/details/73881791