Android原生集成MUI框架进行混合开发
开发APP中我们经常进行原生结合H5进行混合开发,下面将进行详细讲解Android原生集成MUI框架进行混合开发(项目Demo如下,有需要的可以下载查看),下一篇讲述,Android原生和MUI(也适合H5与原生交互)交互的实现。
1:mui官方框架介绍及开发要点:(https://dev.dcloud.net.cn/mui/)如下为官方页面:
今天我们就要把这个号称最接近原生开发的框架集成到我们Android原生本地中。
2:首先作为例子我们下载下来mui的官方框架Hellomui,以hellomui这个框架集成到我们的Android原生本地中去。
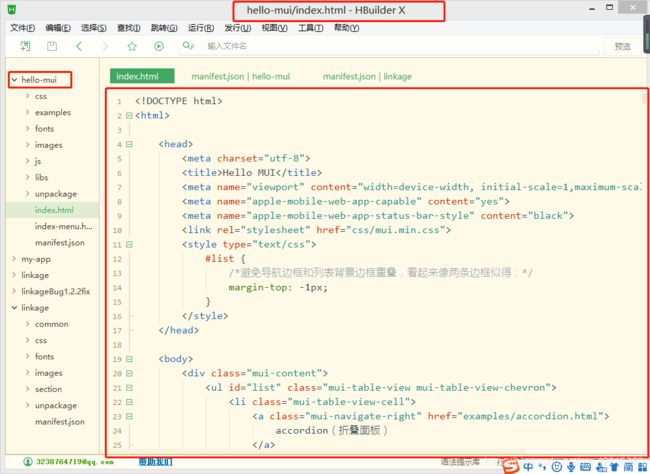
下载完成后使用H5开发工具HBuild X打开hellomui项目如下(正常在手机上运行):
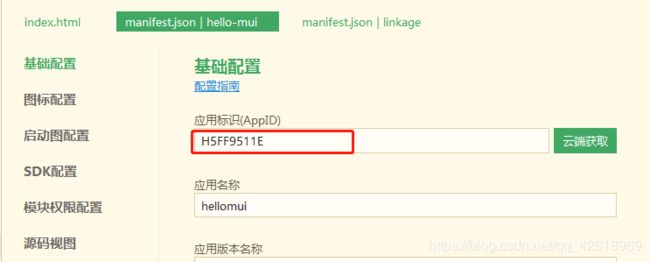
3:在该项目中有个manifest.json的文件,打开该文件其中有个基础配置打开配置应用标识(AppID)点击从云端获取后生成如下(真正的项目中配置各种你开发项目中需要的配置信息,如权限,启动页,SDK配置,源码视图等配置):
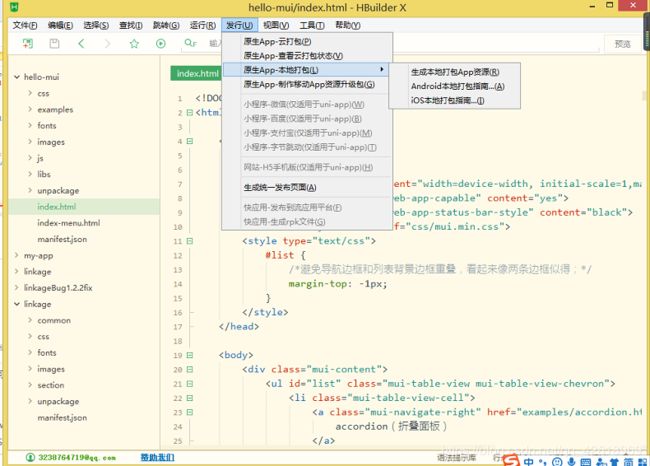
这个AppID是集成打原生中需要配置的。然后点击运行—>原生App-本地打包—>生成本地App资源如下图,等待一会打包成功后底部会有生成本地资源包的路径至此H5端准备完毕:
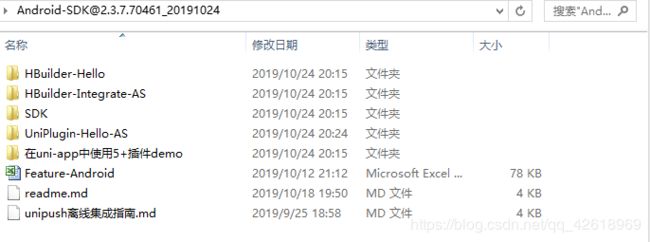
4:在AndroidStudio中新建一个项目这里我新建一个项目叫AndroidMUI项目,一直点击下一步完成项目的构建(就是一个简单的HelloWorld的界面显示),然后下载Android集成需要的SDK(https://ask.dcloud.net.cn/article/103)找到最新的下载就可以了,下载后目录如下(这里有集成所需的全部配置和文件信息):
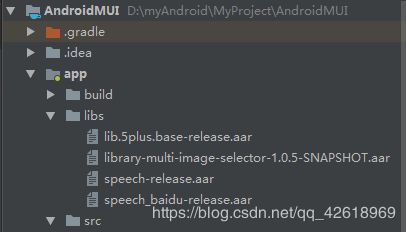
5:在AndroidStudio中打开AndroidMUI项目切换到project视图—>app下的libs中添加如下文件(这里只是简单的选取几个,文件是上图中SDK目录下的文件,这些文件很多可以适配所有开发者需要的类似于aar的SDK工具包,我们直接复制我们开发需要的并粘贴到app下的libs包中即可)如下所示:
6:在app—>src—>main文件夹下新建assets文件夹—>在改文件夹下新建两个文件夹apps和data文件夹,然后把我们HBuildX中打包的文件复制到apps文件夹下,在data中复制对应的文件(上述第四步中下载的目录中有个UniPlugin-Hello_AS文件夹,找到后打开是一个AndroidDemo项目,找到app—>src—>main文件夹下assets文件夹中的data文件夹下复制过来)配置后如下:
7:大开app下的build.gradle文件配置如下:
apply plugin: 'com.android.application'

android {
    compileSdkVersion 26
    defaultConfig {
        applicationId "com.example.andyyuan.androidmui"
        minSdkVersion 19
        targetSdkVersion 26
        versionCode 1
        versionName "1.0"
        testInstrumentationRunner "android.support.test.runner.AndroidJUnitRunner"
    }
    buildTypes {
        release {
            minifyEnabled false
            proguardFiles getDefaultProguardFile('proguard-android.txt'), 'proguard-rules.pro'
        }
    }

    aaptOptions {
        additionalParameters '--auto-add-overlay'
        //noCompress 'foo', 'bar'
        ignoreAssetsPattern "!.svn:!.git:.*:!CVS:!thumbs.db:!picasa.ini:!*.scc:*~"
    }
}
repositories {
    flatDir {
        dirs 'libs'
    }
}

dependencies {
    implementation fileTree(dir: 'libs', include: ['*.jar'])
    implementation fileTree(include: ['*.aar'], dir: 'libs')
    implementation 'com.android.support:appcompat-v7:26.1.0'
    implementation 'com.android.support.constraint:constraint-layout:1.1.3'
    testImplementation 'junit:junit:4.12'
    androidTestImplementation 'com.android.support.test:runner:1.0.2'
    androidTestImplementation 'com.android.support.test.espresso:espresso-core:3.0.2'
}
8:在AndroidManifest.xml文件中添加如下权限配置:
在application节点下配置如下:
9:在assets下的data中dcloud_properties.xml文件中添加如下插件配置:
10:新增PGPlugintest.java文件如下:
/**
 * 5+ SDK 扩展插件示例
 * 5+ 扩扎插件在使用时需要以下两个地方进行配置
 * 1  WebApp的mainfest.json文件的permissions节点下添加JS标识
 * 2  assets/data/properties.xml文件添加JS标识和原生类的对应关系
 * 本插件对应的JS文件在 assets/apps/H5Plugin/js/test.js
 * 本插件对应的使用的HTML assest/apps/H5plugin/index.html
 *
 * 更详细说明请参考文档http://ask.dcloud.net.cn/article/66
 **/
public class PGPlugintest extends StandardFeature {

    public void onStart(Context pContext, Bundle pSavedInstanceState, String[] pRuntimeArgs) {

        /**
         * 如果需要在应用启动时进行初始化,可以继承这个方法,并在properties.xml文件的service节点添加扩展插件的注册即可触发onStart方法
         * */
    }

    //
//    public void onStart(Context pContext, Bundle pSavedInstanceState, String[] pRuntimeArgs) {
//
//    /**
//     * 如果需要在应用启动时进行初始化,可以继承这个方法,并在properties.xml文件的service节点添加扩展插件的注册即可触发onStart方法
//     * */
//    }
//
    public void PluginTestFunction(IWebview pWebview, JSONArray array)


    {


        Log.e(TAG, String.format("webview = %s, jsonArray = %s", pWebview, array));
        // Toast.makeText(mApplicationContext, array.toString(), Toast.LENGTH_SHORT).show();


        // 原生代码中获取JS层传递的参数,
        // 参数的获取顺序与JS层传递的顺序一致
        String CallBackID = array.optString(0);
        JSONArray newArray = new JSONArray();


        newArray.put(array.optString(1));
        newArray.put(array.optString(2));
        newArray.put(array.optString(3));
        newArray.put(array.optString(4));
        // 调用方法将原生代码的执行结果返回给js层并触发相应的JS层回调函数
        JSUtil.execCallback(pWebview, CallBackID, newArray, JSUtil.OK, false);


    }

    public String PluginTestFunctionSyncArrayArgu(IWebview pWebview, JSONArray array) {
        JSONArray newArray = null;
        JSONObject retJSONObj = null;
        try {

            newArray = array.optJSONArray(0);
            String inValue1 = newArray.getString(0);
            String inValue2 = newArray.getString(1);
            String inValue3 = newArray.getString(2);
            String inValue4 = newArray.getString(3);

            retJSONObj = new JSONObject();
            retJSONObj.putOpt("RetArgu1", inValue1);
            retJSONObj.putOpt("RetArgu2", inValue2);
            retJSONObj.putOpt("RetArgu3", inValue3);
            retJSONObj.putOpt("RetArgu4", inValue4);

        } catch (JSONException e1) {
            e1.printStackTrace();
        }

        return JSUtil.wrapJsVar(retJSONObj);
    }

    public String PluginTestFunctionSync(IWebview pWebview, JSONArray array) {
        String inValue1 = array.optString(0);
        String inValue2 = array.optString(1);
        String inValue3 = array.optString(2);
        String inValue4 = array.optString(3);

        String ReturnValue = inValue1 + "-" + inValue2 + "-" + inValue3 + "-" + inValue4;
        // 只能返回String类型到JS层。
        return JSUtil.wrapJsVar(ReturnValue, true);
    }


}
OK,点击编译,运行成功!
