AndroidQ 从app到驱动 第五章 编写JNI层完成HelloService与Hal层的对接
前面四篇文章,分别介绍了驱动添加,hal层添加,HelloService添加,以及上层测试应用的添加,这里进行我们的最后一步,完成HelloService与Hal层的对接。
AndroidQ 从app到驱动 第一章 编写Linux内核驱动程序
AndroidQ 从app到驱动 第二章 添加HAL层,先打通JNI层到驱动的访问
AndroidQ 从app到驱动 第三章 SystemServer服务中添加 HelloService
AndroidQ 从app到驱动 第四章 编写app验证新添加的helloservice是否正常
AndroidQ 从app到驱动 第五章 编写JNI层完成HelloService与Hal层的对接
AndroidQ 从app到驱动 第六章 从app到驱动的所有的代码整理
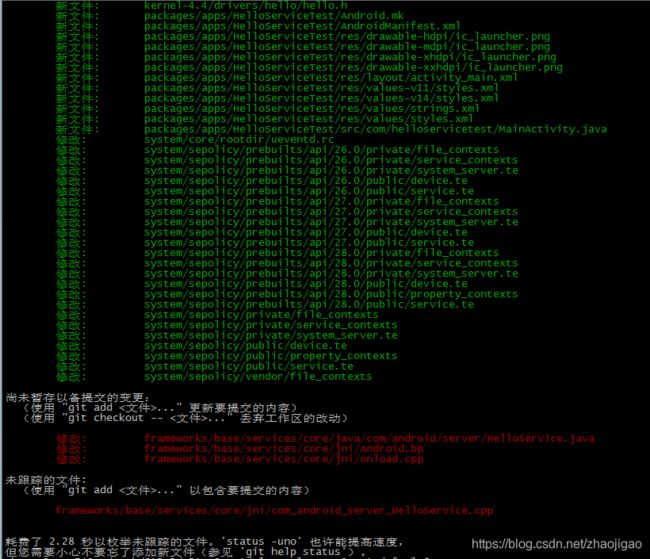
按照惯例,先上图,介绍修改点。图片只关注红色新添加的部分。
截图显示,这里修改了三个文件,新添加了一个文件,修改内容比较少,而且修改的HelloService.java 是之前新添加的文件。下面依次介绍下这几个文件的修改点。
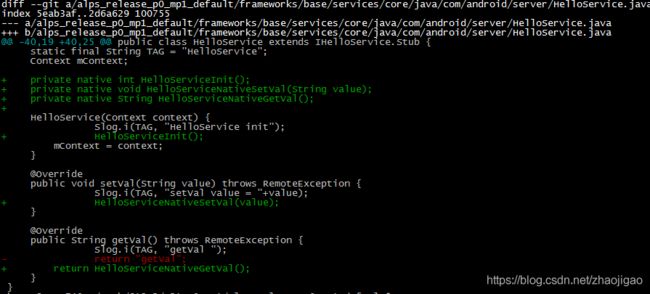
1)frameworks/base/services/core/java/com/android/server/HelloService.java 的修改,这里添加了对JNI层接口的访问,时间接口对接。
2)frameworks/base/services/core/jni/Android.bp的修改。这里的修改使得新添加的app文件能够参与编译。
3)frameworks/base/services/core/jni/onload.cpp 的修改,这里添加jni层接口的初始化部分,使得我们新添加的JNI层接口在系统初始化的时候能够正常加载到。
4)frameworks/base/services/core/jni/com_android_server_HelloService.cpp 文件的内容。这里是JNI层的具体实现,代码结构比较简单,就不做解释了。
/*
 * Copyright (C) 2018 The Android Open Source Project
 *
 * Licensed under the Apache License, Version 2.0 (the "License");
 * you may not use this file except in compliance with the License.
 * You may obtain a copy of the License at
 *
 *      http://www.apache.org/licenses/LICENSE-2.0
 *
 * Unless required by applicable law or agreed to in writing, software
 * distributed under the License is distributed on an "AS IS" BASIS,
 * WITHOUT WARRANTIES OR CONDITIONS OF ANY KIND, either express or implied.
 * See the License for the specific language governing permissions and
 * limitations under the License.
 */
#define LOG_TAG "Hello_JNI"
#include "jni.h"
#include "core_jni_helpers.h"

#include
#include
#include
#include

namespace {

struct hello_device* hello_device = NULL;

 static inline int hello_device_open(const hw_module_t* module, struct hello_device** device) {
     return module->methods->open(module, HELLO_HARDWARE_MODULE_ID, (struct hw_device_t**)device);
 }

static jint HelloServiceInit(JNIEnv* env, jobject /* clazz */) {
	ALOGE("com_android_server_HelloService HelloServiceInit");
	const hw_module_t *hw_module = NULL;
    ALOGE("Hello JNI: initializing......");
    if(hw_get_module(HELLO_HARDWARE_MODULE_ID, &hw_module) == 0) {
        ALOGE("Hello JNI: hello Stub found.");
        if(hello_device_open(hw_module, &hello_device) == 0) {
          ALOGE("Hello JNI: hello device is open.");
          return 0;
        }
        ALOGE("Hello JNI: failed to open hello device.");
        return -1;
    }
    ALOGE("Hello JNI: failed to get hello stub hw_module.");
    return -1;
}


static void HelloServiceNativeSetVal(JNIEnv* env, jobject clazz,jstring nativeValue) {
	ALOGE("com_android_server_HelloService HelloServiceNativeSetVal");
    if(!hello_device) {
      ALOGI("Hello JNI: hello_device is not open.");
      return;
    }

	const char* local_value = (nativeValue) ? env->GetStringUTFChars(nativeValue, NULL) : NULL;
	ALOGE("com_android_server_HelloService HelloServiceNativeSetVal local_value = %s",local_value);
    hello_device->write_string(hello_device, local_value);
    ALOGI("Hello JNI: write string %s to Hello hello_device.", local_value);
	env->ReleaseStringUTFChars(nativeValue, local_value);
}

static jstring HelloServiceNativeGetVal(JNIEnv* env,jobject clazz) {
    ALOGE("com_android_server_HelloService HelloServiceNativeGetVal");
    if(!hello_device) {
       ALOGE("Hello JNI: hello_device is not open.");
       return NULL;
     }
     char read_str[50];
     hello_device->read_string(hello_device,read_str);
     ALOGE("Hello JNI: read string %s from Hello hello_device.", read_str);
	 jstring result = (env)->NewStringUTF(read_str);
     return result;
}

static const JNINativeMethod methods[] = {
    {"HelloServiceInit", "()I", (void*) HelloServiceInit},
    {"HelloServiceNativeSetVal", "(Ljava/lang/String;)V",(void*) HelloServiceNativeSetVal},
    {"HelloServiceNativeGetVal", "()Ljava/lang/String;",(void*) HelloServiceNativeGetVal},
};

}

namespace android {

int register_android_server_HelloService(JNIEnv *env) {
    return jniRegisterNativeMethods(env, "com/android/server/HelloService", methods, NELEM(methods));
}

}
至此,添加JNI层需要修改的地方就修改完毕了,剩下的就是编译验证。
验证结果如下:
1)系统初始化时候的log
06-02 19:34:34.075124   671   671 E Hello_JNI: com_android_server_HelloService HelloServiceInit
06-02 19:34:34.075183   671   671 E Hello_JNI: Hello JNI: initializing......
06-02 19:34:34.090683   671   671 E Hello_JNI: Hello JNI: hello Stub found.
06-02 19:34:34.090891   671   671 E Legacy HelloHAL: Hello: hello_device_open name = hello
06-02 19:34:34.091773   671   671 E Legacy HelloHAL: Hello: open /dev/hello successfully.
06-02 19:34:34.091888   671   671 E Hello_JNI: Hello JNI: hello device is open.
log显示,HelloService能够正常调用到JNI层,JNI层调用Hal层正常,Hal层可以正常打开驱动。(这里由于HelloService的log在另一个log文件中,因此就没有贴出来。mtk的log,区分system log跟main log)
2)测试应用执行的log
06-02 19:38:07.288  2598  2598 I HelloServiceTest: HelloService TEST setVal HELLO to drivers
06-02 19:38:07.288  2598  2598 E HelloManager: HelloManager setVal
06-02 19:38:07.289   660  1987 I HelloService: setVal value = HELLO
06-02 19:38:07.289   660  1987 E Hello_JNI: com_android_server_HelloService HelloServiceNativeSetVal
06-02 19:38:07.289   660  1987 E Hello_JNI: com_android_server_HelloService HelloServiceNativeSetVal local_value = HELLO
06-02 19:38:07.289   660  1987 E Legacy HelloHAL: Hello:write string: HELLO
06-02 19:38:07.289   660  1987 I Hello_JNI: Hello JNI: write string HELLO to Hello hello_device.

06-02 19:38:07.290  2598  2598 E HelloManager: HelloManager getVal
06-02 19:38:07.291   660  1987 I HelloService: getVal
06-02 19:38:07.291   660  1987 E Hello_JNI: com_android_server_HelloService HelloServiceNativeGetVal
06-02 19:38:07.291   660  1987 E Legacy HelloHAL: Hello:read hello_read_string
06-02 19:38:07.291   660  1987 E Hello_JNI: Hello JNI: read string HELLO from Hello hello_device.
06-02 19:38:07.291  2598  2598 I HelloServiceTest: HelloService TEST getVal = HELLO


kernel的log
<1>[   59.096713]  (0)[1987:Binder:660_D]hello_write AAAAAAAAAAAAAA.
<1>[   59.096743]  (0)[1987:Binder:660_D]hello_write BBBBBBBBBBBBBBB.
<1>[   59.096750]  (0)[1987:Binder:660_D]hello_write CCCCCCCCCCCCCC.
<1>[   59.098570]  (0)[1987:Binder:660_D]hello_read.
<1>[   59.098600]  (0)[1987:Binder:660_D]hello_read AAAAAAAAAAAAAA.
<1>[   59.098606]  (0)[1987:Binder:660_D]hello_read BBBBBBBBBBBBBBB.
<1>[   59.098612]  (0)[1987:Binder:660_D]hello_read CCCCCCCCCCCCCCCCC.
log显示,执行结果正常,至此,从app到驱动的所有流程就调通了,当然这个仅仅只是入门,添加的这些仅仅用于学习测试用,当然会有各种问题欢迎评论,讨论研究!
