Android布局实验(LinearLayout,RelativeLayout,TableLayout)
Android布局实验
布局定义用户界面的视觉结构,如Activity或应用小部件的 UI。您可以通过两种方式声明布局:
- 在 XML 中声明 UI 元素。Android 提供了对应于 View 类及其子类的简明 XML 词汇,如用于小部件和布局的词汇;
- 运行时实例化布局元素。您的应用可以通过编程创建 View 对象和 ViewGroup 对象(并操纵其属性)。
Android 框架让您可以灵活地使用以下一种或两种方法来声明和管理应用的 UI。例如,您可以在 XML 中声明应用的默认布局,包括将出现在布局中的屏幕元素及其属性。然后,您可以在应用中添加可在运行时修改屏幕对象(包括那些已在 XML 中声明的对象)状态的代码。
在 XML 中声明 UI 的优点在于,您可以更好地将应用的外观与控制应用行为的代码隔离。您的 UI 描述位于应用代码外部,这意味着您在修改或调整描述时无需修改您的源代码并重新编译。例如,您可以创建适用于不同屏幕方向、不同设备屏幕尺寸和不同语言的 XML 布局。此外,在 XML 中声明布局还能更轻松地显示 UI 的结构,从而简化问题调试过程。因此,本文将侧重于示范如何在 XML 中声明布局。如果您对在运行时实例化 View 对象感兴趣,请参阅 ViewGroup 类和 View 类的参考资料。下面来简单介绍LInearLayout,RelativeLayout,TableLayout布局
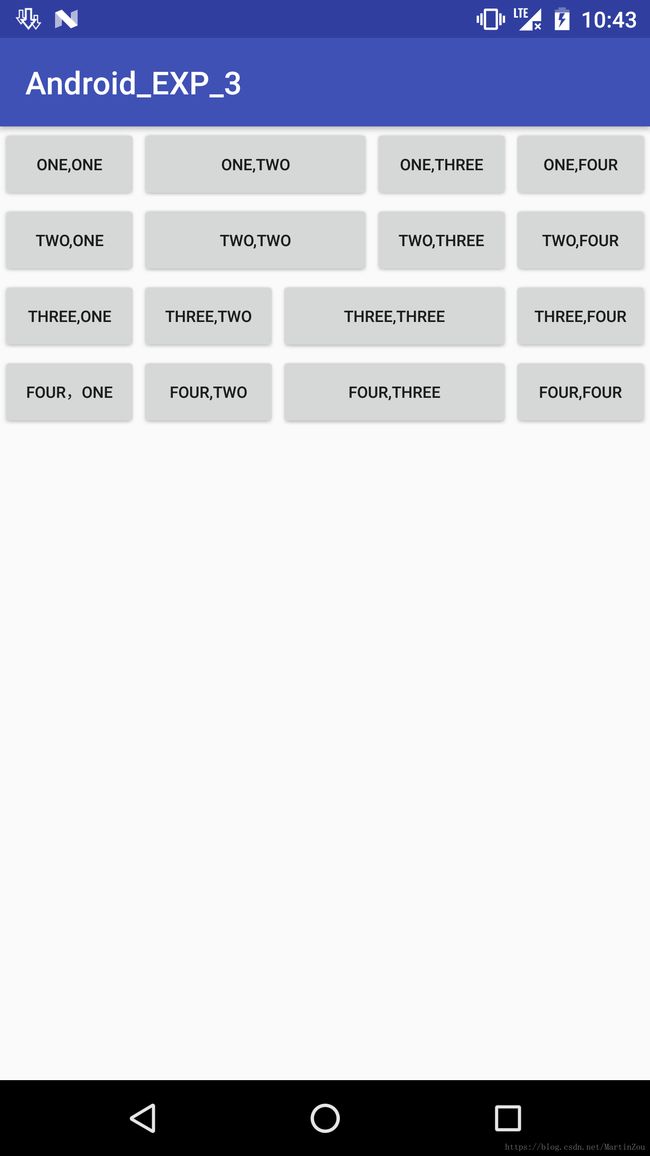
1.LinearLayout布局(线性布局)
LinearLayout是一个试图组,用于使所有自试图在单个方向(垂直或水平)保持对齐,可以使用android:orientation属性来指定布局方向
这里需要注意的是LinearLayout中子控件或子布局的属性设置,如果LinearLayout的排列方向是horizontal,内部的控件就绝对不能将宽度指定为match_parent,因为这样的话的单独一个控件就会将整个水平方向占满,其他的控件就没有可放置的位置了。同样的道理,如果LinearLayout的排列方向是vertical,内部的控件就不能将高度指定为match_parent。想对子控件的位置更好的控制,LinearLayout也支持子视图的权重划分android:layout_weight以及android:layout_gravity属性。
- android:layout_weight: 此属性根据视图应在屏幕上占据的控件量向视图分配“重要性的值”,值越大,所占的屏幕空间越大。子视图指定权重值后,系统会按照子视图声明的权重值的比例,将视图组中的剩余空间分配给子视图。默认权重为0。举个例子,如果是在水平的LinearLayout中有三个子空间,他们的权重都为1时,每个空间的width的长度为整个屏幕宽度的三分之一,如果第三个空间的权重为2,那么,它将获得总剩余宽度的一般,其他两个均享剩下的宽度
- android:layout_gravity: 此属性是用来指定控件在布局中的对齐方式,常用的取值有:
| 值 | 说明 |
|---|---|
| top | 对象与其容器的顶部对齐, 不改变其大小 |
| bottom | 对象与其容器的底部对齐, 不改变其大小 |
| left | 对象与其容器的左侧对齐, 不改变其大小 |
| right | 对象与其容器的右侧对齐, 不改变其大小 |
| center_vertical | 垂直对其方式:垂直方向上居中对齐, 不改变其大小 |
| center_horizontal | 水平对其方式:水平方向上居中对齐, 不改变其大小 |
| center | 对象横纵居中, 不改变其大小 |
| fill_vertical | 必要的时候增加对象的纵向大小,以完全充满其容器. 垂直方向填充 |
| fill_horizontal | 必要的时候增加对象的纵向大小,以完全充满其容器. 垂直方向填充 |
| fill | 必要的时候增加对象的横纵向大小,以完全充满容器 |
下面贴上实现效果图与代码
效果图为:
<LinearLayout xmlns:android="http://schemas.android.com/apk/res/android"
android:orientation="vertical" android:layout_width="match_parent"
android:layout_height="match_parent">
<LinearLayout
android:orientation="horizontal"
android:layout_width="match_parent"
android:layout_height="wrap_content">
<Button
android:textSize="10dp"
android:layout_width="wrap_content"
android:layout_height="wrap_content"
android:text="One,One"
/>
<Button
android:textSize="10dp"
android:layout_weight="1"
android:layout_width="wrap_content"
android:layout_height="wrap_content"
android:text="One,Two"
/>
<Button
android:textSize="10dp"
android:layout_width="wrap_content"
android:layout_height="wrap_content"
android:text="One,Three"
/>
<Button
android:textSize="10dp"
android:layout_width="wrap_content"
android:layout_height="wrap_content"
android:text="One,Four" />
LinearLayout>
<LinearLayout
android:orientation="horizontal"
android:layout_width="match_parent"
android:layout_height="wrap_content">
<Button
android:textSize="10dp"
android:layout_width="wrap_content"
android:layout_height="wrap_content"
android:text="Two,One" />
<Button
android:textSize="10dp"
android:layout_width="wrap_content"
android:layout_height="wrap_content"
android:layout_weight="1"
android:text="Two,Two" />
<Button
android:textSize="10dp"
android:layout_width="wrap_content"
android:layout_height="wrap_content"
android:text="Two,Three" />
<Button
android:textSize="10dp"
android:layout_width="wrap_content"
android:layout_height="wrap_content"
android:text="Two,Four" />
LinearLayout>
<LinearLayout
android:textSize="10dp"
android:orientation="horizontal"
android:layout_width="match_parent"
android:layout_height="wrap_content">
<Button
android:textSize="10dp"
android:layout_width="wrap_content"
android:layout_height="wrap_content"
android:text="Three,One"/>
<Button
android:textSize="10dp"
android:layout_width="wrap_content"
android:layout_height="wrap_content"
android:text="Three,Two"/>
<Button
android:layout_weight="1"
android:textSize="10dp"
android:layout_width="wrap_content"
android:layout_height="wrap_content"
android:text="Three,Three"/>
<Button
android:textSize="10dp"
android:layout_width="wrap_content"
android:layout_height="match_parent"
android:text="Three,Four"/>
LinearLayout>
<LinearLayout
android:layout_width="match_parent"
android:layout_height="wrap_content">
<Button
android:textSize="10dp"
android:layout_width="wrap_content"
android:layout_height="wrap_content"
android:text="Four,One"
/>
<Button
android:textSize="10dp"
android:layout_width="wrap_content"
android:layout_height="wrap_content"
android:text="Four,Two"
/>
<Button
android:layout_weight="1"
android:textSize="10dp"
android:layout_width="wrap_content"
android:layout_height="wrap_content"
android:text="Four,Three"
/>
<Button
android:textSize="10dp"
android:layout_width="wrap_content"
android:layout_height="wrap_content"
android:text="Four,Four"
/>
LinearLayout>
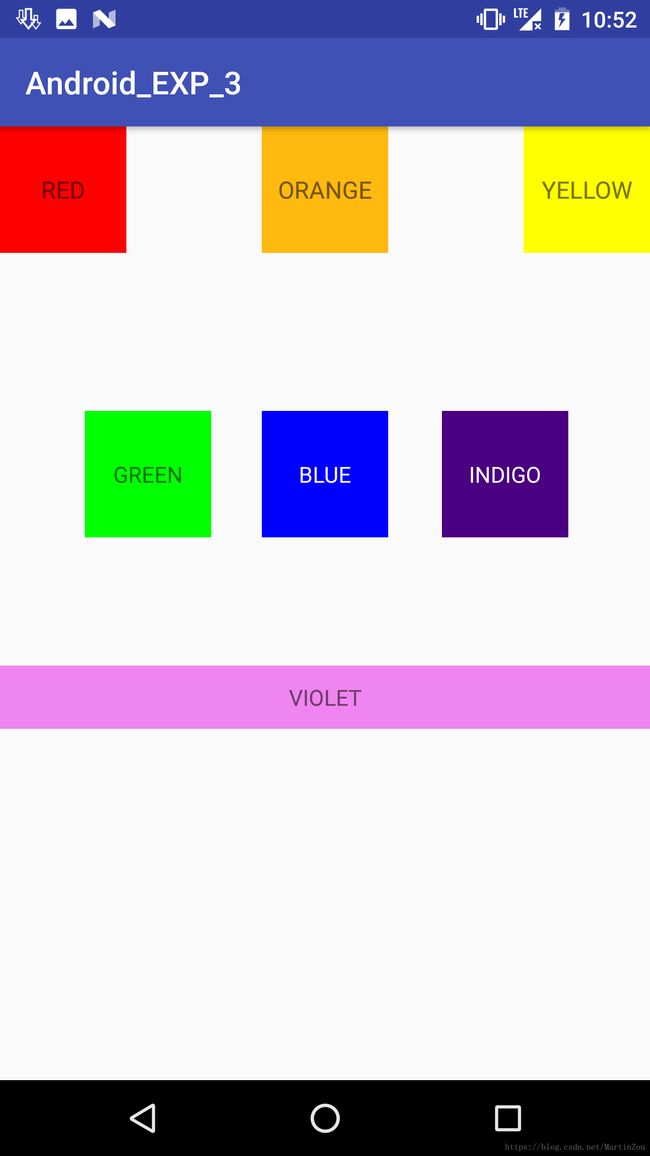
LinearLayout>2.RelativeLayout布局(相对布局)
RelativeLayout又称作相对布局,也是一种非常常用的布局。和LInearLayout的排列规则不同的是,RelativeLayout显得更加随意一些,它可以通过相对定位的方式让控件出现在布局的任何位置。RelativeLayout中的属性很多,但是可以归纳记忆,下面列出常用的属性
android:layout_above="@id/xxx"  --将控件置于给定ID控件之上

android:layout_below="@id/xxx"  --将控件置于给定ID控件之下

android:layout_toLeftOf="@id/xxx"  --将控件的右边缘和给定ID控件的左边缘对齐

android:layout_toRightOf="@id/xxx"  --将控件的左边缘和给定ID控件的右边缘对齐

android:layout_alignLeft="@id/xxx"  --将控件的左边缘和给定ID控件的左边缘对齐

android:layout_alignTop="@id/xxx"  --将控件的上边缘和给定ID控件的上边缘对齐

android:layout_alignRight="@id/xxx"  --将控件的右边缘和给定ID控件的右边缘对齐

android:layout_alignBottom="@id/xxx"  --将控件的底边缘和给定ID控件的底边缘对齐

android:layout_alignParentLeft="true"  --将控件的左边缘和父控件的左边缘对齐

android:layout_alignParentTop="true"  --将控件的上边缘和父控件的上边缘对齐

android:layout_alignParentRight="true"  --将控件的右边缘和父控件的右边缘对齐

android:layout_alignParentBottom="true" --将控件的底边缘和父控件的底边缘对齐

android:layout_centerInParent="true"  --将控件置于父控件的中心位置

android:layout_centerHorizontal="true"  --将控件置于水平方向的中心位置

android:layout_centerVertical="true"  --将控件置于垂直方向的中心位置
margin 与padding 区别
padding是站在父view的角度,是自己的内容与其父控件的边之间的距离。margin则是站在自己的角度描述问题,自己与旁边的某个组件的距离,如果同一级只有一个view,那么它的效果基本上就和padding一样了
layout_alignParentEnd与layout_alignParentStart所表示的是与父布局的左边与右边对齐(大部分的国家是从左往右开始,少部分国家为从右往左)
实现的效果为
代码为
<RelativeLayout xmlns:android="http://schemas.android.com/apk/res/android"
android:layout_width="match_parent" android:layout_height="match_parent">
<TextView
android:id="@+id/red"
android:layout_width="80dp"
android:layout_height="80dp"
android:textSize="15sp"
android:gravity="center"
android:text="RED"
android:layout_alignParentStart="true"
android:layout_alignParentTop="true"
android:background="#FF0000"
/>
<TextView
android:id="@+id/orange"
android:layout_width="80dp"
android:layout_height="80dp"
android:layout_alignParentTop="true"
android:layout_centerHorizontal="true"
android:background="#FFB90F"
android:gravity="center"
android:text="ORANGE"
android:textSize="15sp" />
<TextView
android:id="@+id/yellow"
android:layout_width="80dp"
android:layout_height="80dp"
android:layout_alignParentEnd="true"
android:layout_alignParentTop="true"
android:background="#FFFF00"
android:gravity="center"
android:text="YELLOW"
android:textSize="15sp" />
<TextView
android:layout_width="80dp"
android:layout_height="80dp"
android:layout_alignTop="@+id/BLUE"
android:layout_marginEnd="32dp"
android:layout_toStartOf="@+id/BLUE"
android:background="#00FF00"
android:gravity="center"
android:text="GREEN"
android:id="@+id/green" />
<TextView
android:id="@+id/BLUE"
android:layout_width="80dp"
android:layout_height="80dp"
android:layout_alignStart="@+id/orange"
android:layout_below="@+id/orange"
android:layout_marginTop="100dp"
android:background="#0000FF"
android:gravity="center"
android:text="BLUE"
android:textColor="#FFFFFF" />
<TextView
android:id="@+id/indigo"
android:layout_width="80dp"
android:layout_height="80dp"
android:textColor="#FFFFFF"
android:layout_alignTop="@+id/BLUE"
android:layout_marginStart="34dp"
android:layout_toEndOf="@+id/BLUE"
android:background="#4B0082"
android:gravity="center"
android:text="INDIGO" />
<TextView
android:layout_width="match_parent"
android:layout_height="40dp"
android:layout_alignParentStart="true"
android:layout_below="@+id/BLUE"
android:layout_marginTop="81dp"
android:background="#EF85EF"
android:gravity="center"
android:text="VIOLET" />
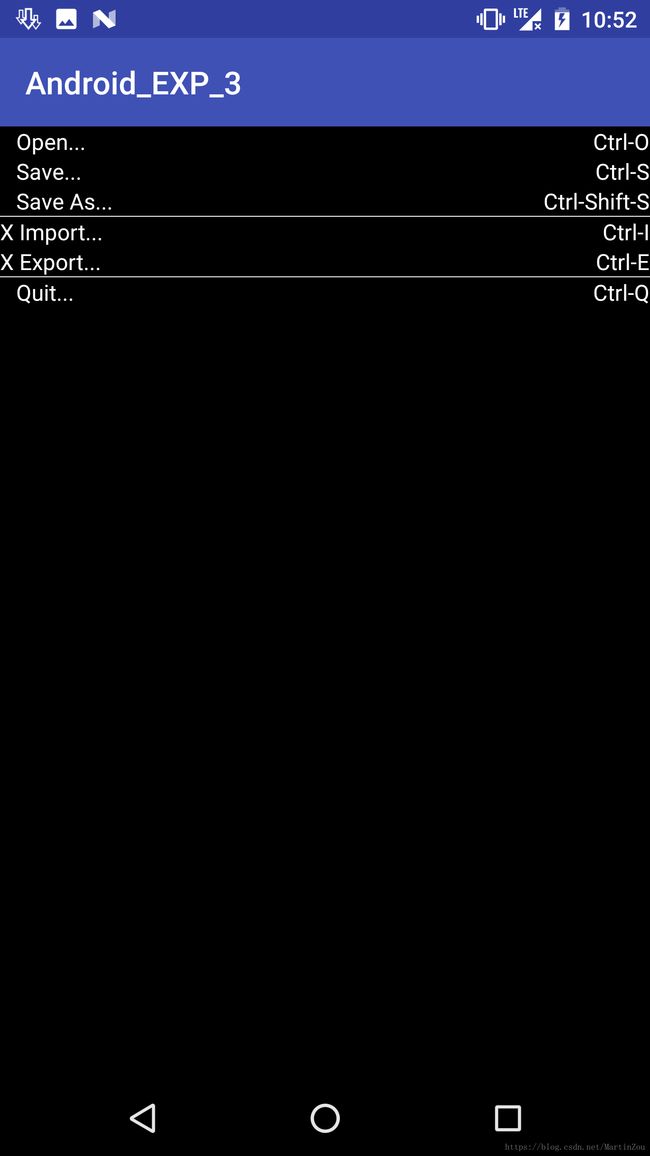
RelativeLayout>3.TableLayout布局(表格布局)
TableLayout以行和列的形式对控件进行管理,每一行为一个TableRow对象,每加入一个TableRow就表示添加一行,然后在TableRow中每添加一个控件,就表示在该行中加入了一列,TableRow中的控件是不能指定宽度的。除了添加TableRow,也可以直接添加View控件,一个View控件占一行。
以下为常用属性
    android:collapseColumns:设置需要被隐藏的列的序号
    android:shrinkColumns:设置允许被收缩的列的列序号
    android:stretchColumns:设置运行被拉伸的列的列序号

    以上这三个属性的列号都是从0开始算的,比如shrinkColunmns = "2",对应的是第三列!
    可以设置多个,用逗号隔开比如"0,2",如果是所有列都生效,则用"*"号即可
    除了这三个常用属性,还有两个属性,分别就是跳格子以及合并单元格,这和HTML中的Table类似:

    android:layout_column="2":表示的就是跳过第二个,直接显示到第三个格子处,从1开始算的!
    android:layout_span="4":表示合并4个单元格,也就说这个组件占4个单元格
实现效果如下:
实现代码如下:
<TableLayout xmlns:android="http://schemas.android.com/apk/res/android"
    android:layout_width="match_parent" android:layout_height="match_parent"
    android:background="#000000"
    android:stretchColumns="*">

    <TableRow android:layout_height="60dp"
        >

        <TextView
            android:layout_height="match_parent"
            android:textSize="14sp"
            android:text="   Open..."
            android:gravity="left"
            android:textColor="#FFFFFF" />

        <TextView
            android:layout_height="match_parent"
            android:text="Ctrl-O"
            android:textSize="14sp"
            android:gravity="right"
            android:textColor="#FFFFFF" />

    TableRow>
    <TableRow android:layout_height="60dp"
        >

        <TextView
            android:layout_height="match_parent"
            android:textSize="14sp"
            android:text="   Save..."
            android:gravity="left"
            android:textColor="#FFFFFF" />

        <TextView
            android:layout_height="match_parent"
            android:text="Ctrl-S"
            android:textSize="14sp"
            android:gravity="right"
            android:textColor="#FFFFFF" />

    TableRow>
    <TableRow android:layout_height="60dp"
        >

        <TextView
            android:layout_height="match_parent"
            android:textSize="14sp"
            android:text="   Save As..."
            android:gravity="left"
            android:textColor="#FFFFFF" />

        <TextView
            android:layout_height="match_parent"
            android:text="Ctrl-Shift-S"
            android:textSize="14sp"
            android:gravity="right"
            android:textColor="#FFFFFF" />

    TableRow>


    <View  android:layout_height="2px"
        android:layout_width="match_parent"
        android:background="#FFFFFF"
        />
    <TableRow android:layout_height="60dp"
        >

        <TextView
            android:layout_height="match_parent"
            android:textSize="14sp"
            android:text="X Import..."
            android:gravity="left"
            android:textColor="#FFFFFF" />

        <TextView
            android:layout_height="match_parent"
            android:text="Ctrl-I"
            android:textSize="14sp"
            android:gravity="right"
            android:textColor="#FFFFFF" />

    TableRow>
    <TableRow android:layout_height="60dp"
        >

        <TextView
            android:layout_height="match_parent"
            android:textSize="14sp"
            android:text="X Export..."
            android:gravity="left"
            android:textColor="#FFFFFF" />

        <TextView
            android:layout_height="match_parent"
            android:text="Ctrl-E"
            android:textSize="14sp"
            android:gravity="right"
            android:textColor="#FFFFFF" />

    TableRow>

    <View  android:layout_height="2px"
        android:layout_width="match_parent"
        android:background="#FFFFFF"
        />
    <TableRow android:layout_height="60dp"
        >

        <TextView
            android:layout_height="match_parent"
            android:textSize="14sp"
            android:text="   Quit..."
            android:gravity="left"
            android:textColor="#FFFFFF" />

        <TextView
            android:layout_height="match_parent"
            android:text="Ctrl-Q"
            android:textSize="14sp"
            android:gravity="right"
            android:textColor="#FFFFFF" />

    TableRow>


TableLayout>