nextcloud----安装
  随笔-
 42
 文章-
 0
 评论-
 0
基于LNMP平台部署NextCloud私有云盘
一、NextCloud概述
云盘这个词无论是做技术出身的朋友还是普通的网民,想必已经听的非常多了,在日常生活当中我们用的最多的云盘莫过于百度网盘了
在前几年百花齐放的网盘市场,到现如今只剩下了百度网盘,说起百度网盘大家并不陌生,特别是它限速的特征,让广大朋友久久不能忘怀啊
不过也没办法,任何企业都是以盈利为目的,你既然享受了线上存储给你带来的便利,那你就得交钱,不交钱就给你限速,限到你哭晕在厕所
另一方面我们需要知道,做存储也是非常烧钱的,譬如给用户提供数据存储的磁盘开销,以及给用户提供数据上传与下载的带宽开销,所以大家也得谅解
有限速?不安全?要会员? 基于这几点大家可能会想到部署个人存储,部署个人存储的程序大家可能又会想到 Seafile、dropbox、OwnCloud、Syncbox,这其中有些是开源的,有些是收费的
今天写的这篇文章是基于 NextCloud 这个开源程序的,那NextCloud又是啥呢?NextCloud 由原 OwnCloud 团队所打造,号称是下一代存储,用过之后也算是实至名归
如果要部署个人云存储,那么使用 NextCloud 绝对是一个非常好的选择,开源这个特点咱们就抛开不说了,NextCloud 使用PHP与JavaScript 所编写
支持多种数据库类型,包括:MySQL、Oracle、Mariadb、SQLite、PostgreSQL 等主流的数据库
与此同时 NextCloud 也为 Linux、Windows、Android、ios、Mac 等各种主流平台提供了相应的客户端
从而实现了跨平台的设备数据共享与同步,不仅如此 NextCloud 还提供了许多应用软件与插件的安装,包括 office文档、日历、邮件、思维导图、在线编辑、文件管理、等丰富的附加功能
所以要是自己部署私有云存储,或者团队需要进行数据共享,那么 NextCloud 可以称得上是首选
说了那么多,下面进入正题,本文基于(CentOS7+Nginx-1.16.1+MySQL-5.6.45+PHP-7.3.13+Redis-3.2.13)来部署NextCloud
所采用的部署方式均为源码(.tar.gz),因为使用源码部署,在后面需要安装某些软件的扩展时非常方便、需要注意:这里的PHP版本需要5.X以上的,否则部署完成以后,在浏览访问会提示版本过低
二、NextCloud部署
1)准备工作
1、关闭相应的安全软件、否则放行相应的流量
1
2
[root@nextcloud ~]# setenforce 0
[root@nextcloud ~]# systemctl stop firewalld
2、提前安装所有的依赖包
1
2
3
4
5
6
[root@nextcloud ~]# yum clean all && yum makecache
[root@nextcloud ~]# yum -y install libss-devel libstdc++-devel dbus-devel libaio-devel \
bison-devel libverto-devel curl curl-devel openssl openssl-devel bzip2 bzip2-devel \
icu libicu-devel gmp gmp-devel readline readline-devel pcre pcre-devel zlib zlib-devel gcc gcc-c++ ncurses-devel \
libaio-devel freetype freetype-devel ImageMagick ImageMagick-devel autoconf m4 libgcc e2fsprogs perl-Data-Dumper \
libcurl libcurl-devel libxml2 libxml2-devel gd gd-devel libjpeg libjpeg-devel libpng libpng-devel libxslt libxslt-devel
3、为MySQL与Nginx创建专门的运行用户
1
2
3
[root@nextcloud ~]# groupadd mysql
[root@nextcloud ~]# useradd -M -s /sbin/nologin nginx
[root@nextcloud ~]# useradd -M -s /sbin/nologin mysql -g mysql
2)部署Nginx
1、下载并安装Nginx
1
2
3
4
[root@nextcloud ~]# wget -c http:
//www.nginx.org/download/nginx-1.16.1.tar.gz
[root@nextcloud ~]# tar xf nginx-1.16.1.tar.gz -C /usr/src/
[root@nextcloud ~]# cd /usr/src/nginx-1.16.1/
[root@nextcloud nginx-1.16.1]# ./configure --prefix=/etc/nginx --user=nginx --
group
=nginx --with-http_ssl_module --with-http_stub_status_module && make -j 8 && make install -j 8 && cd ~
2、添加Nginx至环境变量、并将其添加为系统服务
1
2
3
4
5
6
7
8
9
10
11
12
13
14
15
16
17
18
19
20
21
22
23
[root@nextcloud ~]# echo
'export PATH=/etc/nginx/sbin:$PATH'
>> /etc/profile
[root@nextcloud ~]# source /etc/profile && nginx
[root@nextcloud ~]# cat > /usr/lib/systemd/system/nginx.service << EOF
[Unit]
Description=nginx
After=network.target
[Service]
Type=forking
PIDFile=/etc/nginx/logs/nginx.pid
ExecStart=/etc/nginx/sbin/nginx
ExecReload=killall -s HUP $(cat /etc/nginx/logs/nginx.pid)
ExecStop=killall -s QUIT $(cat /etc/nginx/logs/nginx.pid)
PrivateTmp=Flase
[Install]
WantedBy=multi-user.target
EOF
[root@nextcloud ~]# systemctl daemon-reload && pkill -9 nginx
[root@nextcloud ~]# systemctl restart nginx && systemctl enable nginx
Created symlink
from
/etc/systemd/system/multi-user.target.wants/nginx.service to /usr/lib/systemd/system/nginx.service.
3)部署MySQL
1、安装MySQL之前、我们先安装cmake工具
1
2
3
4
[root@nextcloud ~]# wget -c https:
//cmake.org/files/v2.8/cmake-2.8.12.tar.gz
[root@nextcloud ~]# tar xf cmake-2.8.12.tar.gz -C /usr/src/
[root@nextcloud ~]# cd /usr/src/cmake-2.8.12/
[root@nextcloud cmake-2.8.12]# ./configure && gmake -j 8 && gmake install && cd
2、下载并安装MySQL
1
2
3
4
5
6
7
8
9
10
11
12
13
[root@nextcloud ~]# wget -c https:
//downloads.mysql.com/archives/get/file/mysql-5.6.45.tar.gz
[root@nextcloud ~]# tar xf mysql-5.6.45.tar.gz -C /usr/src/
[root@nextcloud ~]# cd /usr/src/mysql-5.6.45/
[root@nextcloud mysql-5.6.45]# cmake -DCMAKE_INSTALL_PREFIX=/usr/local/mysql \
-DSYSCONFDIR=/etc \
-DMYSQL_DATADIR=/usr/local/mysql/data \
-DENABLED_LOCAL_INFILE=ON \
-DDEFAULT_CHARSET=utf8 \
-DDEFAULT_COLLATION=utf8_general_ci \
-DWITH_EXTRA_CHARSETS=all \
-DWITH_DEBUG=0 \
-DMYSQL_UNIX_ADDR=/usr/local/mysql/tmp/mysql.sock
make -j 8 && make install -j 8 && cd ~
3、将MySQL添加至环境变量、并创建对应的存储目录、授予对应的权限
1
2
3
4
5
6
7
8
9
10
11
[root@nextcloud ~]# mkdir /usr/local/mysql/tmp
[root@nextcloud ~]# mkdir /usr/local/mysql/log
[root@nextcloud ~]# mkdir /usr/local/mysql/pid
[root@nextcloud ~]# mkdir /usr/local/mysql/binlog
[root@nextcloud ~]# mkdir /usr/local/mysql/relaylog
[root@nextcloud ~]# mkdir /usr/local/mysql/tmpdata
[root@nextcloud ~]# chown -R mysql:mysql /usr/local/mysql
[root@nextcloud ~]# echo
'export PATH=/usr/local/mysql/bin:$PATH'
>> /etc/profile
[root@nextcloud ~]# source /etc/profile
[root@nextcloud ~]# mv /etc/my.cnf /etc/my.cnf.bak
[root@nextcloud ~]# cd /usr/src/mysql-5.6.45 && cp support-files/my-
default
.cnf /etc/my.cnf
4、优化MySQL配置文件以提升性能
1
2
3
4
5
6
7
8
9
10
11
12
13
14
15
16
17
18
19
20
21
22
23
24
25
26
27
28
29
30
31
32
33
34
35
36
37
38
39
40
41
42
43
44
45
46
47
48
49
50
51
52
53
54
55
56
57
58
59
60
61
62
63
64
65
66
67
68
69
70
71
72
73
74
75
76
77
[root@nextcloud mysql-5.6.45]# cat > /etc/my.cnf << EOF
[client]
port = 3306
socket = /usr/local/mysql/tmp/mysql.sock
[mysqld]
user = mysql
port = 3306
bind_address = 0.0.0.0
max_connections = 3600
max_connect_errors = 200
autocommit = ON
skip-name-resolve
symbolic-links = 0
skip-external-locking
explicit_defaults_for_timestamp = ON
basedir = /usr/local/mysql
datadir = /usr/local/mysql/data
socket = /usr/local/mysql/tmp/mysql.sock
innodb_tmpdir = /usr/local/mysql/tmpdata
pid-file = /usr/local/mysql/pid/mysql.pid
log-error = /usr/local/mysql/log/mysql_error.log
character-
set
-server = utf8
init_connect = SET NAMES utf8
collation-server = utf8_general_ci
slow_query_log = ON
long_query_time = 1
relay_log_recovery = 1
log_slow_admin_statements = 1
log_slow_slave_statements = 1
min_examined_row_limit = 960
log_queries_not_using_indexes = OFF
slow_query_log_file = /usr/local/mysql/log/mysql_slow.log
server-id = 11
sync_binlog = 0
expire_logs_days = 9
max_binlog_size = 512M
max_binlog_cache_size = 8M
transaction_isolation = repeatable-read
back_log = 300
max_allowed_packet = 64M
sort_buffer_size = 1M
join_buffer_size = 1M
read_buffer_size = 2M
read_rnd_buffer_size = 2M
thread_cache_size = 64
thread_stack = 256K
query_cache_size = 32M
query_cache_limit = 2M
query_cache_min_res_unit = 2k
tmp_table_size = 64M
max_heap_table_size = 64M
table_open_cache = 4096
open_files_limit = 65535
table_open_cache_instances = 8
connect_timeout = 9
interactive_timeout = 21600
wait_timeout = 21600
default
-storage-engine = InnoDB
innodb_buffer_pool_size = 2G
innodb_log_file_size = 128M
innodb_log_files_in_group = 3
innodb_log_buffer_size = 16M
innodb_flush_log_at_trx_commit = 2
innodb_file_per_table = 1
innodb_read_io_threads = 8
innodb_write_io_threads = 8
innodb_flush_method = O_DIRECT
innodb_thread_concurrency = 16
innodb_large_prefix = ON
innodb_file_format = barracuda
EOF
5、对MySQL进行初始化
1
2
3
[root@nextcloud mysql-5.6.45]# BASEDIR=
"/usr/local/mysql"
[root@nextcloud mysql-5.6.45]# DATADIR=
"/usr/local/mysql/data"
[root@nextcloud mysql-5.6.45]# /usr/local/mysql/scripts/mysql_install_db --user=mysql --basedir=$BASEDIR --datadir=$DATADIR
6、将MySQL添加为系统服务
1
2
3
4
5
6
7
8
9
10
11
12
13
14
15
16
17
18
19
[root@nextcloud mysql-5.6.45]# cp support-files/mysql.server /usr/local/mysql/bin/mysql.sh
[root@nextcloud mysql-5.6.45]# chmod +x /usr/local/mysql/bin/mysql.sh && cd ~
[root@nextcloud ~]# cat > /usr/lib/systemd/system/mysql.service << EOF
[Unit]
Description=MySQL
After=network.target
[Service]
User=mysql
Group=mysql
LimitNOFILE=65535
Type=forking
ExecStart=/usr/local/mysql/bin/mysql.sh start
ExecStop=/usr/local/mysql/bin/mysql.sh stop
[Install]
WantedBy=multi-user.target
EOF
7、启动MySQL服务
1
2
3
4
5
6
[root@nextcloud ~]# systemctl start mysql
[root@nextcloud ~]# netstat -anput | grep mysql
tcp 0 0 0.0.0.0:3306 0.0.0.0:* LISTEN 32584/mysqld
[root@nextcloud ~]# systemctl enable mysql
Created symlink
from
/etc/systemd/system/multi-user.target.wants/mysql.service to /usr/lib/systemd/system/mysql.service.
4)安装libzip库
1
2
3
4
5
6
7
8
9
10
11
12
[root@nextcloud ~]# wget -c https:
//nih.at/libzip/libzip-1.2.0.tar.gz
[root@nextcloud ~]# tar xf libzip-1.2.0.tar.gz -C /usr/src/
[root@nextcloud ~]# cd /usr/src/libzip-1.2.0/
[root@nextcloud libzip-1.2.0]# ./configure && make -j 8 && make install -j 8 && cd ~
[root@nextcloud ~]# cp /usr/local/lib/libzip/include/zipconf.h /usr/local/include/zipconf.h
[root@nextcloud ~]# cat > /etc/ld.so.conf.d/local.conf << EOF
/usr/local/lib64
/usr/local/lib
/usr/lib
/usr/lib64
EOF
[root@nextcloud ~]# ldconfig -v
5)部署PHP
1、下载并安装PHP
1
2
3
4
5
6
7
8
9
10
11
12
[root@nextcloud ~]# wget -c https:
//www.php.net/distributions/php-7.3.13.tar.gz
[root@nextcloud ~]# tar xf php-7.3.13.tar.gz -C /usr/src/
[root@nextcloud ~]# cd /usr/src/php-7.3.13/
[root@nextcloud php-7.3.13]# ./configure --prefix=/usr/local/php7 --with-config-file-path=/usr/local/php7 --enable-mbstring --enable-fpm \
--with-gd --with-zlib --enable-inline-optimization --with-jpeg-dir=/usr/lib --disable-debug --disable-rpath \
--enable-shared --with-libxml-dir --with-xmlrpc --enable-soap --with-openssl --enable-exif --enable-fileinfo \
--enable-filter --with-pcre-dir --enable-ftp --with-openssl-dir --with-jpeg-dir --with-png-dir --with-zlib-dir \
--with-freetype-dir --with-gettext --with-gmp --enable-json --enable-mbregex --enable-mbregex-backtrack \
--with-onig --enable-pdo --with-mysqli=mysqlnd --with-pdo-mysql=mysqlnd --with-zlib-dir --with-pdo-sqlite --enable-session --enable-shmop \
--enable-simplexml --enable-sockets --enable-sysvmsg --enable-sysvsem --enable-sysvshm --enable-wddx --with-libxml-dir --with-xsl --enable-zip \
--enable-mysqlnd-compression-support --with-pear --enable-opcache --with-mhash --with-pcre-regex --with-sqlite3 --enable-bcmath --with-iconv --with-bz2 \
--enable-calendar --with-curl --with-cdb --enable-dom --without-pear --disable-phar && make -j 8 && make install -j 8
2、复制参考文件、并为PHP创建软链接
1
2
3
[root@nextcloud php-7.3.13]# cp php.ini-production /usr/local/php7/php.ini
[root@nextcloud php-7.3.13]# ln -s /usr/local/php7/bin/* /usr/local/bin/
[root@nextcloud php-7.3.13]# ln -s /usr/local/php7/sbin/* /usr/local/sbin/ && cd ~
6)部署redis
1、下载并安装redis
1
2
3
4
[root@nextcloud ~]# wget -c http:
//download.redis.io/releases/redis-3.2.13.tar.gz
[root@nextcloud ~]# tar xf redis-3.2.13.tar.gz -C /usr/src/
[root@nextcloud ~]# cd /usr/src/redis-3.2.13/
[root@nextcloud redis-3.2.13]# make -j 8 && make PREFIX=/usr/local/redis install && cd ~
2、创建对应的存储目录、并做好软连接
1
2
3
4
5
6
7
8
[root@nextcloud ~]# mkdir /usr/local/redis/conf
[root@nextcloud ~]# mkdir /usr/local/redis/pid
[root@nextcloud ~]# mkdir /usr/local/redis/log
[root@nextcloud ~]# mkdir /usr/local/redis/tmp
[root@nextcloud ~]# mkdir /usr/local/redis/data
[root@nextcloud ~]# cp /usr/src/redis-3.2.13/redis.conf /usr/local/redis/conf/
[root@nextcloud ~]# cp /usr/local/redis/conf/redis.conf /usr/local/redis/conf/redis.conf.bak
[root@nextcloud ~]# ln -s /usr/local/redis/bin/* /usr/local/bin/
3、定义redis配置文件以优化性能
1
2
3
4
5
6
7
8
9
10
11
12
13
14
15
16
17
18
19
20
21
22
23
24
25
26
27
28
29
30
31
32
33
34
35
36
37
38
39
40
41
42
43
44
45
46
47
48
49
50
51
52
53
54
55
56
57
58
59
60
61
62
63
64
65
66
67
[root@nextcloud ~]# cat > /usr/local/redis/conf/redis.conf << EOF
bind 0.0.0.0
port 6379
timeout 180
daemonize yes
maxclients 6500
protected
-mode yes
requirepass abc-123
tcp-backlog 2048
tcp-keepalive 300
databases 16
supervised no
syslog-enabled yes
syslog-ident redis
syslog-facility local0
loglevel notice
logfile
"/usr/local/redis/log/redis.log"
pidfile
"/usr/local/redis/pid/redis.pid"
unixsocketperm 755
unixsocket
"/usr/local/redis/tmp/redis.sock"
slowlog-log-slower-than 5000
slowlog-max-len 128
dir
"/usr/local/redis/data"
save 900 1
save 300 10
save 60 10000
rdbcompression yes
rdbchecksum no
dbfilename dump.rdb
stop-writes-
on
-bgsave-error no
appendonly yes
appendfsync everysec
aof-load-truncated yes
appendfilename appendonly.aof
no-appendfsync-
on
-rewrite no
auto-aof-rewrite-percentage 100
auto-aof-rewrite-min-size 64mb
aof-rewrite-incremental-fsync yes
repl-diskless-sync no
repl-diskless-sync-delay 5
repl-disable-tcp-nodelay no
repl-backlog-size 1mb
repl-backlog-ttl 3600
slave-priority 100
hz 10
maxmemory-policy noeviction
activerehashing yes
hash-max-ziplist-value 64
hash-max-ziplist-entries 512
list-compress-depth 0
lua-time-limit 5000
notify-keyspace-events
""
list-max-ziplist-size -2
latency-monitor-threshold 0
set
-max-intset-entries 512
zset-max-ziplist-entries 128
zset-max-ziplist-value 64
hll-sparse-max-bytes 3000
client-output-buffer-limit normal 0 0 0
client-output-buffer-limit pubsub 32mb 8mb 60
client-output-buffer-limit slave 256mb 64mb 60
EOF
4、将redis添加为系统服务、最后启动redis服务即可
1
2
3
4
5
6
7
8
9
10
11
12
13
14
15
[root@nextcloud ~]# cat > /usr/lib/systemd/system/redis.service << EOF
[Unit]
Description=redis
After=network.target
[Service]
Type=forking
LimitNOFILE=10240
ExecStart=/usr/local/bin/redis-server /usr/local/redis/conf/redis.conf
[Install]
WantedBy=multi-user.target
EOF
systemctl enable redis
systemctl start redis
7)安装intl模块、因为部署OwnCloud要用到、这里部署的是NextCloud 所以这个也可以不安装
1
2
3
4
5
6
7
8
9
[root@nextcloud ~]# cd /usr/src/php-7.3.13/ext/intl/
[root@nextcloud intl]# /usr/local/php7/bin/phpize
Configuring
for
:
PHP Api Version: 20180731
Zend Module Api No: 20180731
Zend Extension Api No: 320180731
[root@nextcloud intl]# ./configure --with-php-config=/usr/local/php7/bin/php-config && make -j 8 && make install -j 8
[root@nextcloud intl]# cp /usr/local/php7/lib/php/extensions/no-debug-non-zts-20180731/intl.so /usr/local/php7/include/php/ext/
[root@nextcloud intl]# sed -i
'3i extension=intl.so'
/usr/local/php7/php.ini && cd
8)安装imagick模块、用于图像处理
1
2
3
4
5
6
7
8
9
10
11
[root@nextcloud ~]# wget -c https:
//pecl.php.net/get/imagick-3.4.4.tgz
[root@nextcloud ~]# tar xf imagick-3.4.4.tgz -C /usr/src/
[root@nextcloud ~]# cd /usr/src/imagick-3.4.4/
[root@nextcloud imagick-3.4.4]# /usr/local/php7/bin/phpize
Configuring
for
:
PHP Api Version: 20180731
Zend Module Api No: 20180731
Zend Extension Api No: 320180731
[root@nextcloud imagick-3.4.4]# ./configure --with-php-config=/usr/local/php7/bin/php-config && make -j 8 && make install -j 8
[root@nextcloud imagick-3.4.4]# cp /usr/local/php7/lib/php/extensions/no-debug-non-zts-20180731/imagick.so /usr/local/php7/include/php/ext/
[root@nextcloud imagick-3.4.4]# sed -i
'4i extension=imagick.so'
/usr/local/php7/php.ini && cd
9)安装opcache模块、用于提升性能
1
2
3
4
5
6
7
8
[root@nextcloud ~]# cd /usr/src/php-7.3.13/ext/opcache/
[root@nextcloud opcache]# /usr/local/php7/bin/phpize
Configuring
for
:
PHP Api Version: 20180731
Zend Module Api No: 20180731
Zend Extension Api No: 320180731
[root@nextcloud opcache]# ./configure --with-php-config=/usr/local/php7/bin/php-config && make -j 8 && make install -j 8 && cd ~
[root@nextcloud ~]# cp /usr/local/php7/lib/php/extensions/no-debug-non-zts-20180731/opcache.so /usr/local/php7/include/php/ext/
10)安装redis模块、用于缓存数据、提升性能
1
2
3
4
5
6
7
8
9
10
11
[root@nextcloud ~]# wget -c http:
//pecl.php.net/get/redis-3.1.6.tgz
[root@nextcloud ~]# tar xf redis-3.1.6.tgz -C /usr/src/
[root@nextcloud ~]# cd /usr/src/redis-3.1.6/
[root@nextcloud redis-3.1.6]# /usr/local/php7/bin/phpize
Configuring
for
:
PHP Api Version: 20180731
Zend Module Api No: 20180731
Zend Extension Api No: 320180731
[root@nextcloud redis-3.1.6]# ./configure --with-php-config=/usr/local/php7/bin/php-config && make -j 8 && make install -j 8 && cd ~
[root@nextcloud ~]# cp /usr/local/php7/lib/php/extensions/no-debug-non-zts-20180731/redis.so /usr/local/php7/include/php/ext/
[root@nextcloud ~]# sed -i
'5i extension=redis.so'
/usr/local/php7/php.ini
11)编辑PHP配置文件、优化相应的参数以提升性能
注意:这里面的配置项、在PHP的配置文件当中几乎都有了、但都是注释的、只需将其打开并调整相应参数即可、最后的那个 zend_extension 需要添加在 [opcache] 下
1
2
3
4
5
6
7
8
9
10
11
12
13
14
15
16
[root@nextcloud ~]# cp /usr/local/php7/php.ini /usr/local/php7/php.ini.bak
[root@nextcloud ~]# vim /usr/local/php7/php.ini
memory_limit = 1024M
max_execution_time = 0
post_max_size = 10800M
upload_max_filesize = 10240M
opcache.enable=1
opcache.enable_cli=1
opcache.fast_shutdown = 1
opcache.save_comments = 1
opcache.revalidate_freq = 5
opcache.validate_timestamps = 0
opcache.memory_consumption = 512
opcache.interned_strings_buffer = 8
opcache.max_accelerated_files = 10000
zend_extension = /usr/local/php7/include/php/ext/opcache.so
12)复制模板文件、并将PID的路径改为绝对路径
1
2
3
[root@nextcloud ~]# cp /usr/local/php7/etc/php-fpm.conf.
default
/usr/local/php7/etc/php-fpm.conf
[root@nextcloud ~]# cp /usr/local/php7/etc/php-fpm.d/www.conf.
default
/usr/local/php7/etc/php-fpm.d/www.conf
[root@nextcloud ~]# sed -i
's#;pid = run/php-fpm.pid#pid = /usr/local/php7/var/run/php-fpm.pid#'
/usr/local/php7/etc/php-fpm.conf
13)更改属主与属组、并开启动态模式、调整动态参数、最后需要打开环境变量、打开变量、不然在NextCloud检测中、会提示找不到路径
1
2
3
4
5
6
7
8
9
10
11
12
13
14
15
[root@nextcloud ~]# cp /usr/local/php7/etc/php-fpm.d/www.conf /usr/local/php7/etc/php-fpm.d/www.conf.bak
[root@nextcloud ~]# vim /usr/local/php7/etc/php-fpm.d/www.conf
user = nginx
group
= nginx
pm = dynamic
pm.max_children = 130
pm.start_servers = 15
pm.min_spare_servers = 6
pm.max_spare_servers = 35
env[HOSTNAME] = $HOSTNAME
env[PATH] = /usr/local/bin:/usr/bin:/bin
env[TMP] = /tmp
env[TMPDIR] = /tmp
env[TEMP] = /tmp
14)启动 php-fpm 服务的时候、大家先使用 -t 选项 检查一下、然后即可启动 php-fpm 服务、如果有错误、那就根据提示进行排查、最后使用 -m 选项 查看自己安装了那些模块
1
2
3
4
5
6
7
8
9
10
11
12
13
14
15
16
17
18
19
20
21
22
23
24
25
26
27
28
29
30
31
32
33
34
35
36
37
38
39
40
41
42
43
44
45
46
47
48
49
50
51
52
53
54
55
56
57
58
59
60
61
62
[root@nextcloud ~]# /usr/local/sbin/php-fpm -t #检查
[20-Dec-2019 15:14:12] NOTICE: configuration file /usr/local/php7/etc/php-fpm.conf test
is
successful
[root@nextcloud ~]# echo $?
0
[root@nextcloud ~]# /usr/local/sbin/php-fpm #以上检查成果之后就使用此命令启动 php-fpm 服务
[root@nextcloud ~]# /usr/local/sbin/php-fpm -m #使用 -m 选项、查看自己安装了那些模块
bcmath
bz2
calendar
cgi-fcgi
Core
ctype
curl
date
dba
dom
exif
fileinfo
filter
ftp
gd
gettext
gmp
hash
iconv
imagick
intl
json
libxml
mbstring
mysqli
mysqlnd
openssl
pcre
PDO
pdo_mysql
pdo_sqlite
posix
redis
Reflection
session
shmop
SimpleXML
soap
sockets
SPL
sqlite3
standard
sysvmsg
sysvsem
sysvshm
tokenizer
wddx
xml
xmlreader
xmlrpc
xmlwriter
xsl
zip
zlib
15)下载 NextCloud 软件包、并解压至 Nginx 相关目录、最后授予相应的权限
1
2
3
4
[root@nextcloud ~]# wget -c https:
//download.nextcloud.com/server/releases/nextcloud-17.0.2.zip
[root@nextcloud ~]# unzip nextcloud-17.0.2.zip > /dev/
null
[root@nextcloud ~]# mv nextcloud /etc/nginx/html/cloud
[root@nextcloud ~]# chown -R nginx:nginx /etc/nginx/html/cloud
16)定义 Nginx 配置文件、将访问目录指向 NextCloud 刚刚解压的目录
1
2
3
4
5
6
7
8
9
10
11
12
13
14
15
16
17
18
19
20
21
22
23
24
25
26
27
28
29
30
31
32
33
34
35
36
37
38
39
40
41
42
43
44
45
46
47
48
49
50
51
52
53
54
55
56
57
58
59
60
61
62
63
64
65
66
67
68
69
70
71
72
73
74
75
76
77
78
79
80
81
82
83
84
85
86
87
88
89
90
91
92
93
94
95
96
97
98
99
100
101
102
103
104
105
106
107
108
109
110
111
112
113
114
115
116
117
118
[root@nextcloud ~]# cp /etc/nginx/conf/nginx.conf /etc/nginx/conf/nginx.conf.bak
[root@nextcloud ~]# vim /etc/nginx/conf/nginx.conf
user nginx;
worker_processes 8;
worker_rlimit_nofile 65535;
worker_cpu_affinity 00000001 00000010 00000100 00001000 00010000 00100000 01000000 10000000;
pid /etc/nginx/logs/nginx.pid; #自定义
error_log /etc/nginx/logs/error.log info; #自定义
events {
use epoll;
worker_connections 65535;
}
http {
include mime.types;
default_type application/octet-stream;
log_format mds
'$remote_addr - $remote_user [$time_local] "$request" '
'$status $body_bytes_sent "$http_referer" '
'"$http_user_agent" "$http_x_forwarded_for"'
;
access_log logs/access.log mds;
sendfile
on
;
tcp_nopush
on
;
tcp_nodelay
on
;
send_timeout 10;
keepalive_timeout 60;
server_tokens off;
client_max_body_size 512m;
fastcgi_buffers 64 4K;
client_header_buffer_size 15k;
large_client_header_buffers 4 128k;
open_file_cache_valid 30s;
open_file_cache_min_uses 2;
open_file_cache max=65535 inactive=20s;
gzip
on
;
gzip_min_length 3k;
gzip_buffers 4 16k;
gzip_http_version 1.1;
gzip_comp_level 1;
gzip_vary
on
;
gzip_types text/plain application/x-javascript text/css application/xml;
server {
listen 80; #自定义
server_name www.mds.com; #自定义
charset utf-8;
root /etc/nginx/html/cloud; #自定义
add_header Referrer-Policy
"no-referrer"
always;
add_header X-Content-Type-Options
"nosniff"
always;
add_header X-Download-Options
"noopen"
always;
add_header X-Frame-Options
"SAMEORIGIN"
always;
add_header X-Permitted-Cross-Domain-Policies
"none"
always;
add_header X-Robots-Tag
"none"
always;
add_header X-XSS-Protection
"1; mode=block"
always;
fastcgi_hide_header X-Powered-By;
location ~ ^\/(?:index|remote|
public
|cron|core\/ajax\/update|status|ocs\/v[12]|updater\/.+|oc[ms]-provider\/.+)\.php(?:$|\/) {
fastcgi_split_path_info ^(.+?\.php)(\/.*|)$;
set
$path_info $fastcgi_path_info;
try_files $fastcgi_script_name =404;
include fastcgi_params;
fastcgi_param SCRIPT_FILENAME $document_root$fastcgi_script_name;
fastcgi_param PATH_INFO $path_info;
fastcgi_param modHeadersAvailable
true
;
fastcgi_param front_controller_active
true
;
fastcgi_intercept_errors
on
;
fastcgi_request_buffering off;
fastcgi_pass 127.0.0.1:9000; #自定义
}
rewrite /.well-known/carddav /remote.php/dav permanent;
rewrite /.well-known/caldav /remote.php/dav permanent;
location / {
rewrite ^ /index.php;
}
location ~ \.(?:png|html|ttf|ico|jpg|jpeg|bcmap)$ {
try_files $uri /index.php$request_uri;
access_log off;
}
location ~ ^\/(?:updater|oc[ms]-provider)(?:$|\/) {
try_files $uri/ =404;
index index.php;
}
location ~ ^\/(?:\.|autotest|occ|issue|indie|db_|console) {
deny all;
}
location ~ ^\/(?:build|tests|config|lib|3rdparty|templates|data)\/ {
deny all;
}
location ~ \.(?:css|js|woff2?|svg|gif|map)$ {
try_files $uri /index.php$request_uri;
add_header Cache-Control
"public, max-age=15778463"
;
add_header Referrer-Policy
"no-referrer"
always;
add_header X-Content-Type-Options
"nosniff"
always;
add_header X-Download-Options
"noopen"
always;
add_header X-Frame-Options
"SAMEORIGIN"
always;
add_header X-Permitted-Cross-Domain-Policies
"none"
always;
add_header X-Robots-Tag
"none"
always;
add_header X-XSS-Protection
"1; mode=block"
always;
access_log off;
}
}
}
17)添加hosts映射、最后重启 Nginx 服务即可
1
2
3
4
5
6
7
8
9
10
11
12
13
14
15
16
17
[root@nextcloud ~]# echo
"10.2.3.11 www.mds.com"
>> /etc/hosts
[root@nextcloud ~]# cat /etc/hosts
127.0.0.1 localhost localhost.localdomain localhost4 localhost4.localdomain4
::1 localhost localhost.localdomain localhost6 localhost6.localdomain6
10.2.3.11 www.mds.com
[root@nextcloud ~]# nginx -t
nginx: the configuration file /etc/nginx/conf/nginx.conf syntax
is
ok
nginx: configuration file /etc/nginx/conf/nginx.conf test
is
successful
[root@nextcloud ~]#
[root@nextcloud ~]# systemctl restart nginx
[root@nextcloud ~]#
[root@nextcloud ~]# netstat -anput | grep nginx
tcp 0 0 0.0.0.0:80 0.0.0.0:* LISTEN 106307/nginx: maste
[root@nextcloud ~]#
[root@nextcloud ~]# systemctl | grep nginx
nginx.service loaded active running nginx
18)为 NextCloud 创建数据存储目录、并为其设置权限
1
2
[root@nextcloud ~]# mkdir -p /opt/cloud/data
[root@nextcloud ~]# chown -R nginx:nginx /opt/cloud/data/
19)创建 NextCloud 所使用的数据库、并为其授权、最后重启MySQL服务即可
1
2
3
4
5
[root@nextcloud ~]# mysqladmin -u root password
'abc-123'
2> /dev/
null
[root@nextcloud ~]# mysql -u root -pabc-123 -e
"drop database test;"
2> /dev/
null
[root@nextcloud ~]# mysql -u root -pabc-123 -e
"create database cloud;"
2> /dev/
null
[root@nextcloud ~]# mysql -u root -pabc-123 -e
"grant all privileges on cloud.* to 'cloud'@'10.2.3.%' identified by 'abc-123'"
2> /dev/
null
[root@nextcloud ~]# systemctl restart mysql
20)确认所有服务都已全部启动
1
2
3
4
5
6
7
[root@nextcloud ~]# netstat -anput
Active Internet connections (servers and established)
Proto Recv-Q Send-Q Local Address Foreign Address State PID/Program name
tcp 0 0 127.0.0.1:9000 0.0.0.0:* LISTEN 106095/php-fpm: mas
tcp 0 0 0.0.0.0:3306 0.0.0.0:* LISTEN 107289/mysqld
tcp 0 0 0.0.0.0:6379 0.0.0.0:* LISTEN 107484/redis-server
tcp 0 0 0.0.0.0:80 0.0.0.0:* LISTEN 106307/nginx: maste
三、NextCloud使用
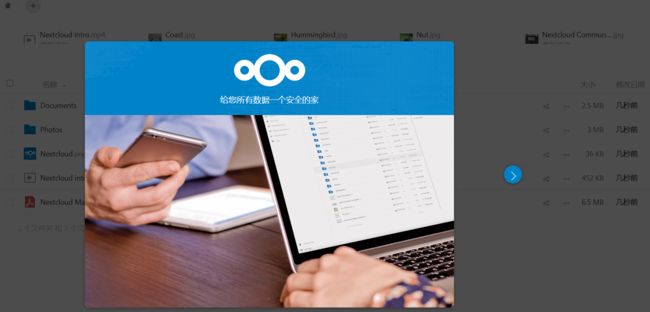
1、初始化 NextCloud
提示:在浏览器中、输入 www.mds.com 即可出现如下界面、按照提示添加完成以后、点击安装完成即

2、初始化完成以后、即可跳到如下界面
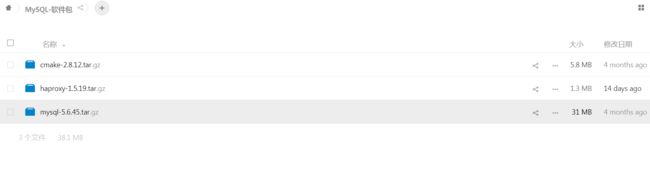
3、上传软件包
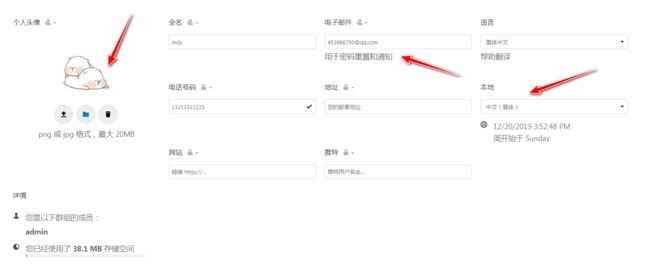
4、设置头像、设置邮件、设置语言
5、查看 NextCloud 日志、如果有错误、请按照提示进行解决

6、查看系统负载情况

7、为 NextCloud 添加 redis 缓存、内容需要放在括号内、不要放在括号外、最后重启各个服务即可
1
2
3
4
5
6
7
8
9
10
11
12
13
14
15
[root@nextcloud ~]# cp /etc/nginx/html/cloud/config/config.php /etc/nginx/html/cloud/config/config.php.bak
[root@nextcloud ~]# vim /etc/nginx/html/cloud/config/config.php
'memcache.local'
=>
'\OC\Memcache\Redis'
,
'redis'
=> array (
'host'
=>
'10.2.3.11'
,
'port'
=>
'6379'
,
'password'
=>
'abc-123'
,
'timeout'
=> 1.5,
'memcache.locking'
=>
'\OC\Memcache\Redis'
,
),
[root@nextcloud ~]# pkill -9 php-fpm
[root@nextcloud ~]# /usr/local/sbin/php-fpm
[root@nextcloud ~]# systemctl restart nginx mysql redis
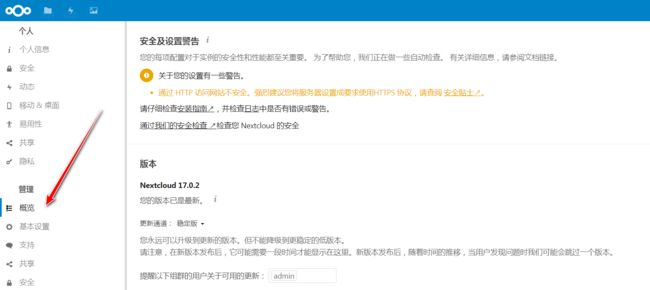
8、点击概览、可以看见有两个提示、第一个是要求使用 https 、这里主要解决的是第二个警告
注意:它要求使用 https 因为我这里是虚拟机、不是云服务器、所以这里我就不再赘述、如果是云服务器、那就自己去申请证书即可、而下面的配置主要就是解决第二个警告、只需执行如下命令即可
1
2
3
4
5
6
7
8
9
10
[root@nextcloud ~]# sudo -u nginx /usr/local/bin/php /etc/nginx/html/cloud/occ db:convert-filecache-bigint
The process control (PCNTL) extensions are required
in
case
you want to interrupt
long
running commands - see http:
//php.net/manual/en/book.pcntl.php
Following columns will be updated:
* mounts.storage_id
* mounts.root_id
* mounts.mount_id
This can take up to hours, depending
on
the number of files
in
your instance!
Continue with the conversion (y/n)? [n] y #回答 y 即可
9、确认所有警告都已解决、如下所示
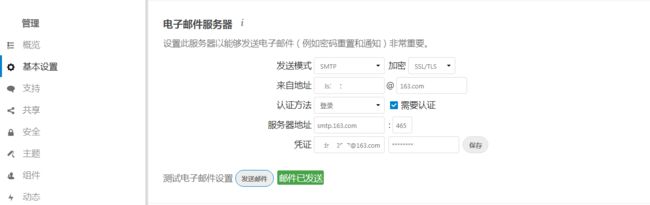
10、对 NextCloud 配置邮件测试
注意:这一步是配置发件人、而收件人是刚刚在个人信息里面所配置的邮箱
11、查看发送的邮件

12、将 NextCloud 挂载到本地
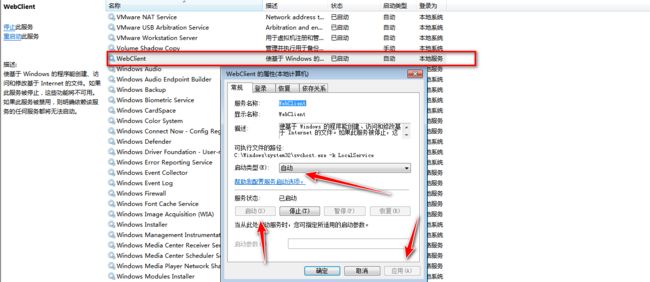
注意:需要先修改注册表
路径为:HKEY_LOCAL_MACHINE\SYSTEM\CurrentControlSet\services\WebClient\Parameters、里面有个名为 BasicAuthLevel 的项、值本为1、将其修改为 2 即可、接下来去服务里面开启 WebClieent 服务

进入 NextCloud 复制这个 URL 连接
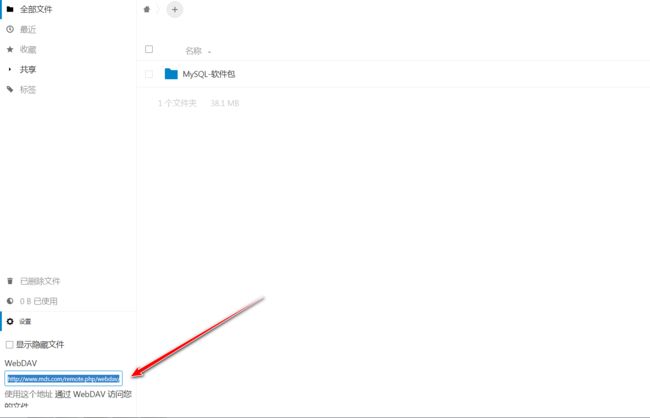
接下来就直接在 Windows 当中映射即可、如下所示
输入用户名和密码、这里登录 NextCloud 的密码
可以看到、映射成功、并且可以正常复制文件、这样就可以像使用本地磁盘一样来使用 NextCloud 了


【只是为了打发时间】
分类: 网站应用
好文要顶 关注我 收藏该文


 0
0
0
0
« 上一篇: yum仓库配置与内网源部署记录
» 下一篇: CentOS使用465端口发送邮件
posted @
2019-12-20 10:37 怀岭以南 阅读(
473) 评论(
0) 编辑 收藏
最新 IT 新闻:
· 陆奇最新思考:疫情之下,中国有哪些数字化创新机会?
· 英特尔:今年会有新的 10nm 工艺芯片,7nm 预计 2021 年首发
· 途牛第四季度净亏损5270万美元 CFO辛怡因个人原因辞职
· 深网|消息称携程正洽谈收购神州租车,做大租车业务平台
· 一文读懂三大运营商力推的5G消息:利益诉求不同导致推广阻力大
» 更多新闻...
【推荐】腾讯云产品限时秒杀,爆款1核2G云服务器99元/年!
· nextcloud私有云盘的部署
· nextcloud私有云盘的部署
· Docker部署Nextcloud私有网盘
· LNMP架构部署
· LNMP架构部署
» 更多推荐...