汇总-13台虚拟机搭建一个高可用负载均衡集群架构
要求
用13台虚拟机搭建一个高可用负载均衡集群架构出来,并运行三个站点,具体需求如下。
-
设计你认为合理的架构,用visio把架构图画出来
-
搭建lnmp、tomcat+jdk环境
-
三个站点分别为:discuz论坛、dedecms企业网站以及zrlog博客
-
由于机器有限,尽可能地把三个站点放到同一台服务器上,然后做负载均衡集群,要求所有站点域名解析到一个ip上,也就是说只有一个出口ip
-
需要共享静态文件,比如discuz需要共享的目录是 data/attachment,dedecms需要共享upload(具体目录,你可以先上传一个图片,查看图片所在目录)
-
设计合理的目录、文件权限,比如discuz的data目录需要给php-fpm进程用户可写权限,其他目录不用写的就不要给写权限(目录755,文件644,属主属组root)
-
所有服务器要求只能普通用户登录,而且只能密钥登录,root只能普通用户sudo
-
给所有服务器做一个简单的命令审计功能
-
php-fpm服务要求设置慢执行日志,超时时间为2s,并做日志切割,日志保留一月
-
所有站点都需要配置访问日志,并做日志切割,要求静态文件日志不做记录,日志保留一月
-
制定合理的mysql数据备份方案,并写备份脚本,要求把备份数据传输到备份服务器
-
制定代码、静态文件的备份方案,并写备份脚本,要求把备份数据传输到备份服务器
-
编写数据恢复文档,能保证当数据丢失在2小时内恢复所有数据
-
搭建zabbix监控告警系统,要求监控各个基础指标(cpu、内存、硬盘),网卡流量需要成图,还需要监控web站点的可用性,
-
定制自定义监控脚本,监控web服务器的并发连接数,接入zabbix,成图,设置触发器,超过100告警
-
定制自定义监控脚本,监控mysql的队列,接入zabbix,成图,设置触发器,队列超过300告警
-
定制自定义监控脚本,监控mysql的慢查询日志,接入zabbix,成图,设置触发器,每分钟超过60条日志需要告警,需要仔细分析慢查询日志的规律,确定日志条数
-
利用jmx,在zabbix上监控tomcat
-
给三个站点的后台访问做二次认证,增加安全性
-
用shell脚本实现文件、代码同步上线(参考分发系统)
架构图
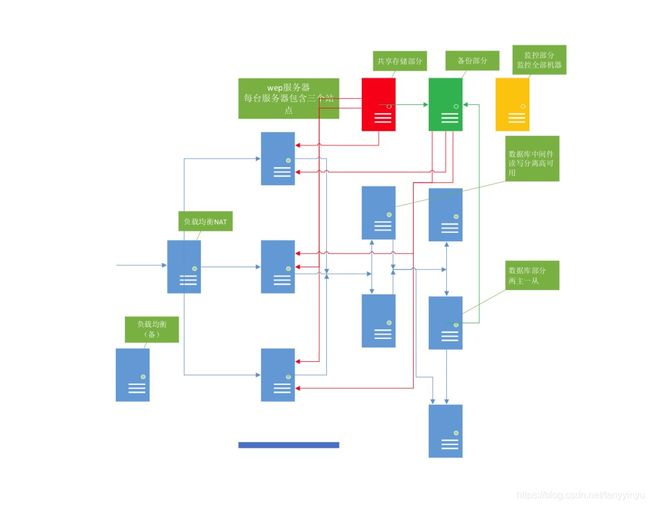
- LB部分使用两台虚拟机,使用NAT模式,一台有问题,另外一台手动上线,使用公网IP
- Wep部分使用三台虚拟机,每台虚拟机有三个站点的虚拟主机配置,达到负载均衡要求
- 数据库使用Atlas实现读写分离,两台Atlas实现高可用
- 数据库三台,实现两主一从,主机只写,二主和从机只读,两个主机可高可用
- 静态文件共享使用nfs服务,一台主机,另使用备份机器跟这台主机实现高可用
- 备份主机,备份nfs主机的静态文件和二主机的数据库内容
- zabbix主机监控所有机器的基础状态,另监控web, 数据库队列和数据库慢查询日志条数
IP与主机角色情况
| 角色 | IP | VIP | keepalived组 |
|---|---|---|---|
| LB | 166 | / | / |
| LB | 166 | / | / |
| wep | 3 | / | / |
| wep | 4 | / | / |
| wep | 5 | / | / |
| atlas | 104 | 106 | 101 |
| atlas | 105 | 106 | 101 |
| mysql主 | 100 | 103 | 100 |
| mysql二主 | 101 | 103 | 100 |
| mysql从 | 102 | / | / |
| nfs | 107 | 109 | 102 |
| backup | 108 | 109 | 102 |
| zabbix | 110 | / | / |
| 角色 | IP | VIP | 分配工作编号 |
|---|---|---|---|
| LB | 159 | / | 1 |
| LB备 | 147 | / | 2 |
| wep1 | 148 | / | 3 |
| wep2 | 149 | / | 4 |
| wep3 | 150 | / | 5 |
| atlas1 | 151 | 106 | 6 |
| atlas2 | 152 | 106 | 7 |
| mysql主 | 153 | 103 | 8 |
| mysql二主 | 154 | 103 | 9 |
| mysql从 | 155 | / | 10 |
| nfs | 156 | 109 | 11 |
| backup | 157 | 109 | 12 |
| zabbix | 158 | / | 13 |
以下配置说明有一部分已改写成将要用到的IP
LB部分
LVS NAT模式配置
-
一台服务器做为director(dir),三台作为real server (RS)
dir有一个内网IP(192.168.21.166)和一个外网IP vmware主机模式(192.168.31.166)
三个rs只有内网(192.168.21.100)和(192.168.21.101)和(192.168.21.102)
并且需要把三个rs的内网网关设置为dir的内网 192.168.21.166
vi /etc/sysconfig/network-scripts/ifcfg-ens33(注意网卡名字)
修改完成重启网卡 systemctl restart network
route -n查看网关 -
关闭防火墙和selinux
systemctl stop firewalld;systemctl disable firewalld
getenforce查看状态要是没关闭就需要关闭 setenforce 0
vi /etc/selinux/config 修改selinux为disabled -
yum install -y iptables-services
systemctl start iptables
iptables -F 清空规则
services iptables save 调用一个空规则 -
dir上安装ipvsadm yum install -y ipvsadm
dir上编写脚本 vim/usr/local/sbin/lvs_nat.sh 增加
#! /bin/bash
- director 服务器上开启路由转发功能:
echo 1 > /proc/sys/net/ipv4/ip_forward
# 关闭icmp的重定向
echo 0 > /proc/sys/net/ipv4/conf/all/send_redirects
echo 0 > /proc/sys/net/ipv4/conf/default/send_redirects
echo 0 > /proc/sys/net/ipv4/conf/eth0/send_redirects
echo 0 > /proc/sys/net/ipv4/conf/eth1/send_redirects
#注意区分网卡名字,可能主机网卡名字不一致
echo 0 > /proc/sys/net/ipv4/conf/ens33/send_redirects
echo 0 > /proc/sys/net/ipv4/conf/ens37/send_redirects
echo 0 > /proc/sys/net/ipv4/conf/ens37/send_redirects
# director 设置nat防火墙
iptables -t nat -F
iptables -t nat -X
iptables -t nat -A POSTROUTING -s 192.168.21.0/24  -j MASQUERADE
# director设置ipvsadm
IPVSADM='/sbin/ipvsadm'
$IPVSADM -C
$IPVSADM -A -t 192.168.31.166:80 -s rr -p 3
$IPVSADM -a -t 192.168.31.166:80 -r 192.168.21.100:80 -m -w 1
$IPVSADM -a -t 192.168.31.166:80 -r 192.168.21.101:80 -m -w 1
$IPVSADM -a -t 192.168.31.166:80 -r 192.168.21.102:80 -m -w 1
- 三个rs上面都安装nginx yum install -y nginx
启动nginx
systemctl start nginx
编辑配置文件进行区分
vi /usr/share/nginx/html/index.html
然后使用curl 192.168.31.166进行测试
wep部分
discuz论坛、dedecms企业网站以及zrlog博客
- 3台机器配置 nginx 服务
- PHP 服务
- 每台机器的 nginx 配置3个虚拟主机
- 每个虚拟主机配置一个站点
- Nginx 安装方法
使用 yum 安装
创建文件 /etc/yum.repos.d/nginx.repo
使用 vi 编辑这个文件
内容是:
[nginx-stable]
name=nginx stable repo
baseurl=http://nginx.org/packages/centos/ r e l e a s e v e r / releasever/ releasever/basearch/
gpgcheck=1
enabled=1
gpgkey=https://nginx.org/keys/nginx_signing.key
module_hotfixes=true
编辑完成,保存退出
-
使用 yum install -y nginx
等待安装完成
默认配置文件路径是 /etc/nginx/nginx.conf -
Systemctl start nginx 启动 nginx服务
可以在 /etc/nginx/conf.d/ 目录下配置虚拟主机配置文件

-
Listen 是监听的端口
Server_name 是指定网站的域名

root上面是指定存放网站文件的根目录
Index 是指定启动的首页文件名 -
配置文件设置好,测试是否可以连通
Yum install -y telnet 这个工具可以测试端口通不通

这样就表示端口没通 -
就需要防火墙开放端口才行
firewall-cmd --add-prot=80/tcp –permanent
firewall-cmd –reload
上面是修改防火墙配置 开放80端口
然后重载配置文件 -
nginx配置文件修改完成,需要nginx -t 检查语法错误
然后 nginx -s reload 重载一下 -
设置好虚拟主机后,还需要把 虚拟主机的域名与真实主机的ip进行绑定
vi /etc/hosts 编辑文件

类似这样把 虚拟主机的域名 与 本机 ip 进行绑定
然后保存退出
这样外面的机器用这个域名访问本机ip的时候
Nginx就会把请求发送到对应的虚拟主机上去
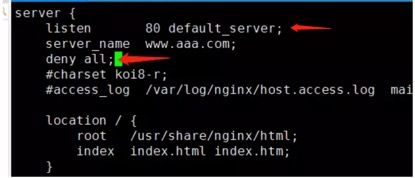
如图,还需要把默认虚拟主机禁止掉
在原本的默认虚拟主机配置文件内加入一行
deny all; 这样就把默认虚拟主机禁止了
这样用户就只能通过域名访问特定的虚拟主机
nginx -t && nginx -s reload 重载一下配置文件
php安装方法
./configure --prefix=/usr/local/php-fpm --with-config-file-path=/usr/local/php-fpm/etc --enable-fpm --with-fpm-user=php-fpm --with-fpm-group=php-fpm --with-mysqli --with-pdo-mysql=/usr/local/mysql --with-mysql-sock=/tmp/mysql.sock --with-libxml-dir --with-gd --with-jpeg-dir --with-png-dir --with-freetype-dir --with-iconv-dir --with-zlib-dir --enable-soap --enable-ftp --enable-mbstring --enable-exif --with-pear --with-curl --with-openssl
上面是 php 安装编译参数
-
还要装一些环境包
Yum install -y libxml2.x86_64
Yum install -y gcc
Yum install -y openssl-devel
Yum install -y libcurl-devel
Yum install -y libjpeg-turbo-devel
Yum install -y libpng-devel
Yum install -y freetype-devel
预先安装以上的包,可以避免很多编译错误
检测通过后 -
使用 make && make install 开始编译
-
Cd /usr/local/php-fpm/etc/
找到 php-fpm.conf.default 文件
这个文件是 php 配置文件的模板
复制并重命名为 php-fpm.conf
这样就有php的配置文件了 -
还有另外一个配置文件是需要的
进入源码包目录
找到 php.ini-development 文件
复制到 /usr/local/php-fpm/etc/ 目录下
并重命名为 php.ini
这样两个配置文件就齐全了 -
还是进入源码包目录
Cp sapi/fpm/init.d.php-fpm /etc/init.d/php-fpm
把 init.d.php-fpm 文件复制到 /etc/init.d/
并重命名为php-fpm
这个是 php-fpm 服务启动文件
使用这个文件启动 php-fpm 服务
使用 chkconfig –add php-fpm 添加服务到服务列表
使用 chkconfig –list 查看是否添加成功
使用 chkconfig php-fpm on
使用 service php-fpm start 开启服务
如果提示权限不够
就使用 chmod 755 /etc/init.d/php-fpm -
如果提示跟 pool 有关的错误信息
应该是 pool 的配置文件的问题
使用 cd /usr/local/php-fpm/etc/php-fpm.d/
目录内有 www.conf.default 文件
这是一个配置文件的模板
还是使用 cp www.conf.default www.conf
把模板文件复制一份并重命名为 www.conf
这样 pool 的配置文件就有了 -
还需要创建 php-fpm 的用户
使用 useradd php-fpm 添加这个用户
然后继续启动服务 service php-fpm start -
服务监听的是 9000 端口
使用 netstat -lntp 查看 -
网站访问日志,不记录静态文件信息
可以在虚拟主机配置文件添加以下代码
location ~* \.(png|jpeg|gif|js|css|bmp|flv)$ {
	access_log off;
}
用户认证
-
有些浏览器没办法显示认证页面,如qq,测试用safari;
-
可以全网需要认证,语名如下:
       location / {

            root   html;

            index  index.html index.htm;

            auth_basic "User Authentication";              ## 认证弹窗提示语

            auth_basic_user_file /etc/nginx/user_passwd;		#安装httpd-tools,命令htpasswd -c /etc/nginx/user_passwd user1创建第一个用户,再加用户的命令是htpasswd -m /etc/nginx/user_passwd user2;

        }
- 如局部需要认证
要定义全局根目录,把root, index语句从location语句里搬出来;
root   /data/wwwroot/bbs.tany.com;
	index  index.html index.htm index.php;

location /jiami/
       {
       auth_basic "User Authentication";
       auth_basic_user_file /etc/nginx/user_passwd;
       }
- php链接需要用户认证,要把php解释语句也话在认证语句下;
root    /data/wwwroot/bbs.tany.com/;
        index  index.html index.htm index.php;
location ~ /admin.php
       {
       auth_basic "User Authentication";
       auth_basic_user_file /etc/nginx/user_passwd;
 fastcgi_pass   127.0.0.1:9000;
        fastcgi_index  index.php;
        fastcgi_param  SCRIPT_FILENAME /data/wwwroot/bbs.tany.com$fastcgi_script_name;
        include        fastcgi_params;
       }
- php链接用户认证测试结果:
[root@draft conf.d]# curl -x127.0.0.1:80 bbs.tany.com/admin.php -I
HTTP/1.1 401 Unauthorized
Server: nginx/1.16.1
Date: Mon, 14 Oct 2019 03:14:32 GMT
Content-Type: text/html
Content-Length: 179
Connection: keep-alive
WWW-Authenticate: Basic realm="User Authentication"

[root@draft conf.d]# curl -x127.0.0.1:80 -uuser1:123456 bbs.tany.com/admin.php -I
HTTP/1.1 200 OK
Server: nginx/1.16.1
Date: Mon, 14 Oct 2019 03:14:48 GMT
Content-Type: text/html; charset=utf-8
Connection: keep-alive
X-Powered-By: PHP/7.3.0
Set-Cookie: hHen_2132_saltkey=c5j6yjU7; expires=Wed, 13-Nov-2019 03:14:48 GMT; Max-Age=2592000; path=/; HttpOnly
Set-Cookie: hHen_2132_lastvisit=1571019288; expires=Wed, 13-Nov-2019 03:14:48 GMT; Max-Age=2592000; path=/
Set-Cookie: hHen_2132_sid=c335Pu; expires=Tue, 15-Oct-2019 03:14:48 GMT; Max-Age=86400; path=/
Set-Cookie: hHen_2132_lastact=1571022888%09admin.php%09; expires=Tue, 15-Oct-2019 03:14:48 GMT; Max-Age=86400; path=/
-
慢日志的设置方法
使用 cd /usr/local/php-fpm/etc/php-fpm.d
使用vi www.conf 编辑配置文件
搜索 slowlog
下面添加一行代码
类似 slowlog = /tmp/php.slow
后面的路径文件名称都可以自定义 -
系统日志切割服务叫做 logrotate
配置文件的位置是 /etc/logrotate.conf -
php需要读写discuz的目录和授权命令
chown -R php-fpm config data uc_server/data uc_client/data
zrlog安装与配置
- zrlog是java应用,JAVA 应用要运行起来,需要一个JVM(JAVA虚拟机)
Oracle官方JDK下载地址: https://www.oracle.com/technetwork/java/javase/downloads/index.html
- CentOS7上yum安装openjdk
yum install -y java-1.8.0-openjdk
- 下载地址:
https://tomcat.apache.org/download-90.cgi
- 安装命令
wget https://mirrors.tuna.tsinghua.edu.cn/apache/tomcat/tomcat-9/v9.0.27/bin/apache-tomcat-9.0.27.tar.gz
tar zxf apache-tomcat-9.0.27.tar.gz
mv apache-tomcat-9.0.27.tar.gz /usr/local/tomcat	#转移过去即安装安成;
/usr/local/tomcat/bin/startup.sh	#启动;
- 端口说明
[root@draft webapps]# netstat -lntp |grep java
tcp6       0      0 :::8009                 :::*                    LISTEN      52635/java          #AJP端口(第三方的应用连接使用这个接口,与tomcat结合起来);
tcp6       0      0 :::8080                 :::*                    LISTEN      52635/java          #web端口;
tcp6       0      0 127.0.0.1:8005          :::*                    LISTEN      52635/java         #shutdown ( 管理端口)
- 安装zrlog
wget 'http://dl.zrlog.com/release/zrlog-2.1.0-3617b2e-release.war?attname=ROOT.war&ref=index'		#下载zrlog;
mv zrlog-2.1.0-3617b2e-release.war\?attname\=ROOT.war\&ref\=index  zrlog-2.1.0.war		#修改包名字;
mv zrlog-2.1.0.war  /usr/local/tomcat/webapps/ 		#移动,自动解压;
cd !$
mv ROOT ROOT.bak		#备份ROOT,访问$host:8080会访问到tomcat, 数据目录就是ROOT;
mv zrlog-2.1.0 ROOT		#放置网站数据;
- 防火墙设置
firewall-cmd --add-port=8080/tcp --permanent
firewall-cmd --reload
- 数据库操作
mysql -uroot -paming-linux -e "create database zrlog"
mysql -uroot -paming-linux -e "grant all on zrlog.* to 'zrlog'@'127.0.0.1' identified by 'zrlog-pass'"	#新建数据库和新增用户;
- nginx代理tomcat
配置方法
server {

	server_name j.tany.com;	#

        location /
        {
            proxy_pass http://127.0.0.1:8080;
            proxy_set_header Host $host;
            proxy_set_header X-Real-IP $remote_addr;
            proxy_set_header X-Forwarded-For $proxy_add_x_forwarded_for;
        }
}
数据部分
数据库安装
数据库依赖包安装和其他准备
- 安装perl
- 安装perl-Data-Dumper
- 安装libaio-devel
- 关闭selinux
- 调试阶段关闭防火墙,后续可开放3306或相应端口
数据库版本5.7.25
- 安装路径/usr/local/mysql
- 数据路径/data/mysql
- 放置启动脚本到/etc/init.d/
- 设置开机启动
- 把/usr/local/mysql/bin加到环境变量
- socket位置/tmp/mysql.sock
- log-error位置/var/log/mysql.log
单个数据库安装
[root@second src]# tar -zxf mysql-5.7.25-linux-glibc2.12-x86_64.tar.gz
[root@second src]# mv mysql-5.7.25-linux-glibc2.12-x86_64 /usr/local/mysql
[root@second src]# cd /usr/local/mysql
[root@second src]#useradd mysql
[root@second src]#mkdir /data/mysql
[root@second src]#chown -R mysql:mysql /data/mysql
[root@second mysql]# bin/mysqld --initialize --user=mysql --basedir=/usr/local/mysql --datadir=/data/mysql
会自动生成一个密码,需要复制用于修改密码
此时配置文件应该已经被更新,不需要作调整
[root@second mysql]# cp support-files/mysql.server /etc/init.d/mysqld
[root@second src]#chkconfig --add mysqld
[root@second src]#vi /etc/bashrc
PATH=$PATH:/usr/local/mysql/bin
之后重启终端即更新了环境变量
[root@second src]#sevice mysqld start
5.7版本不能直接在命令行输入密码登陆
[root@second src]#mysql -uroot -p
mysql> alter user ‘root’@‘localhost’ identified by ‘******’;
安装完成
其他设置,如慢查询,时间
slow_query_log=ON
slow_query_log_file=/data/mysql/slow.log
long_query_time=2
进入mysql设置
SET GLOBAL log_timestamps=SYSTEM;
两主一从设置
- 数据库编号分别为:100(主机,支持读写), 101(第二主机,支持读,主机下线时支持读写), 102(二主机下的从机,支持读)
- 一般状态,主机只写,二主机和从机支持读;试验时主机下线,二主机上线,二主机支持读写,从机还是可以更新信息,当主机上线时,而且同步完成,可以通过关闭二主机的keepalived完成恢复,把读的机器变回两台;
- 主机开启log_bin
- 日志模式使用mixed
- 主机和第二主机创建同步帐号
repli:password - 第二主机要开启log-slave-updates(把来自主机的操作再写进binlog, 用于从机同步)
log_slave_updates=1
步骤
- 先做二主与主机同步
- 再做主机与二主同步
- 再做从机与二主机同步
注意:从机数据库据需要以下配置;
server-id=102
relay_log=/data/mysql/slaver
主从具体步骤
-
准备工作
两台机器安装好MySQL -
主机操作
- 修改my.cnf
[root@draft support-files]# vi /etc/my.cnf #添加以下语句;

server-id=149	#id可以自己设置,跟从机器要不一样;
log_bin=main		#配置binlog的名字,可自定义,配置后在数据目录里,生成main前缀的文件,恢复数据的重要文件;

[root@draft support-files]# ll /data/mysql
总用量 191652
-rw-r-----. 1 mysql mysql  3226709 11月  5 10:22 main.000001
-rw-r-----. 1 mysql mysql     1304 11月  5 13:21 main.000002
-rw-r-----. 1 mysql mysql       28 11月  5 10:22 main.index

service mysqld restart   #重启服务;
- 使两台机器的数据库内容相同
如在主机器上有bbs数据库,可以把这个数据库用sqldump备份,在从机器上新建bbs数据库,并将备份内容导入
这个实验的逻辑是:
开启binlog之前的数据,使用mysqldump同步;开启binlog,重启数据库;在同步以前主机和从机都不能写入,保证数据一样;然后再确认主机同步的状态点;从机实施同步,同步到主机的状态点,之后主机的所有操作都会同点到从机上;
- 创建用作数据同步的用户;
grant reload, super, replication slave, replication client on *.* to 'repli'@'192.168.87.150' identified by 'password';
flush tables with read lock;  #关闭所有打开的表,同时对于所有数据库中的表都加一个读锁,直到显示地执行unlock tables,该操作常常用于数据备份的时候;运行后只能读操作,不能写;


mysql> show master status;		#需要记录File和Position信息;开始主从同步的状态点;
+-------------+----------+--------------+------------------+-------------------+
| File        | Position | Binlog_Do_DB | Binlog_Ignore_DB | Executed_Gtid_Set |
+-------------+----------+--------------+------------------+-------------------+
| main.000001 |  3225820 |              |                  |                   |
+-------------+----------+--------------+------------------+-------------------+
1 row in set (0.00 sec)
- 从机操作
- 修改my.cnf
[root@second ~]# vi /etc/my.cnf #添加以下语句;

server-id=150	#id可以自己设置,跟从机器要不一样;

service mysqld restart   #重启服务;
- 使用mysqldump同步基础数据,不具体说明;
- 配置同步状态点后的数据
 进入从数据库;

stop slave;   #重启后slave会启动(之前已经启动slave的情况下),必须要stop,再做以下的连接主库的操作,不能做两次slave;

ERROR 3021 (HY000): This operation cannot be performed with a running slave io thread; run STOP SLAVE IO_THREAD FOR CHANNEL '' first.		#不停止slave,做change master操作的错误;

change master to master_host='192.168.87.149', master_user='repl', master_password='password', master_log_file='main.000001', master_log_pos=3225820;
#将数据库设置从主数据库的状态点开始建立同步,需要用户信息,从主数据库获取的File和Position信息用在这里;
start slave;       #启动从机的同步;
start slave说明:
不带任何参数,表示同时启动I/O 线程和SQL线程。
I/O线程从主库读取bin log,并存储到relay log中继日志文件中。
SQL线程读取中继日志,解析后,在从库重放。
stop slave说明:停止I/O 线程和SQL线程。
- 主机unlock tables;
进入主机数据库;
unlock tables;   #主库可以重新写操作;
- 查看连接情况
连接正常的情况如下:
操作主机 数据库,自动同步到 从机 数据库;
进入从机数据库;

mysql> show slave status\G
*************************** 1. row ***************************
               Slave_IO_State: Waiting for master to send event
                  Master_Host: 192.168.87.149
                  Master_User: repl
                  Master_Port: 3306
                Connect_Retry: 60
              Master_Log_File: main.000002
          Read_Master_Log_Pos: 336
               Relay_Log_File: second-relay-bin.000003
                Relay_Log_Pos: 539
        Relay_Master_Log_File: main.000002
             Slave_IO_Running: Yes			#需要关注,stop slave;命令后变成No;
            Slave_SQL_Running: Yes		#需要关注;
              Replicate_Do_DB:
          Replicate_Ignore_DB:
           Replicate_Do_Table:
       Replicate_Ignore_Table:
      Replicate_Wild_Do_Table:
  Replicate_Wild_Ignore_Table:
                   Last_Errno: 0
                   Last_Error:
                 Skip_Counter: 0
          Exec_Master_Log_Pos: 336
              Relay_Log_Space: 1774
              Until_Condition: None
               Until_Log_File:
                Until_Log_Pos: 0
           Master_SSL_Allowed: No
           Master_SSL_CA_File:
           Master_SSL_CA_Path:
              Master_SSL_Cert:
            Master_SSL_Cipher:
               Master_SSL_Key:
        Seconds_Behind_Master: 0		#需要关注;
Master_SSL_Verify_Server_Cert: No
                Last_IO_Errno: 0				#需要关注,这些是错误信息;
                Last_IO_Error: 				#需要关注;
               Last_SQL_Errno: 0			#需要关注;
               Last_SQL_Error: 				#需要关注;
  Replicate_Ignore_Server_Ids:
             Master_Server_Id: 149
                  Master_UUID: 996fb237-ff4e-11e9-8cda-000c29bde900
             Master_Info_File: /data/mysql/master.info
                    SQL_Delay: 0
          SQL_Remaining_Delay: NULL
      Slave_SQL_Running_State: Slave has read all relay log; waiting for more updates
           Master_Retry_Count: 86400
                  Master_Bind:
      Last_IO_Error_Timestamp:
     Last_SQL_Error_Timestamp:
               Master_SSL_Crl:
           Master_SSL_Crlpath:
           Retrieved_Gtid_Set:
            Executed_Gtid_Set:
                Auto_Position: 0
         Replicate_Rewrite_DB:
                 Channel_Name:
           Master_TLS_Version:
1 row in set (0.00 sec)
数据库密码管理
- root帐号密码由创建人暂管
- 库帐号与密码:
zrlog:zrlog discuz:discuz dedecms:dedecms - 数据库IP地址:
192.168.**.100(主机)192.168.**.101(二主) 191.168.**.102(从机)
读写分离
- 服务器安装Atlas
- 修改配置文件
- 即可使用专门的端口登陆工作界面和管理界面;
- 工作界面跟使用任何一台数据库是一样的;
- 具体操作
Atlas下载路径与安装说明
https://github.com/Qihoo360/Atlas/releases/tag/2.2.1
https://github.com/Qihoo360/Atlas/wiki/Installing-Atlas
[root@tanyvlinux3 mysql-proxy]# rpm -ivh Atlas-2.2.1.el6.x86_64.rpm
ls /usr/local/mysql-proxy
ln -s /usr/local/mysql-proxy/bin/encrypt /bin/encrypt  ##制作软链接;
ln -s /usr/local/mysql-proxy/bin/mysql-proxyd /bin/mysql-proxyd  #制作软链接;
encrypt password #加密密码,用在配置文件里连接后端服务器;
echo 'mysql-proxy test start' >> /etc/rc.local #开机启动;
mysql-proxy test start  #启动服务;
mysql -udaili -ppassword -h127.0.0.1 -P2346  #端口号改动过;用户界面登陆;
mysql -uuser -ppassword -h127.0.0.1 -P2345 #管理界面登陆;
配置文件范例
[mysql-proxy]
admin-username = user   #用于登陆管理界面;
admin-password = password
proxy-backend-addresses = 192.168.87.100:3306   #主机;
proxy-read-only-backend-addresses = 192.168.87.101:3306@1, 192.168.87.102:3306@1  #两个读的从机;
pwds =daili:ZDcnmf6Yuxg=    #工作界面帐号用户名跟后端一样;
#这个帐号就相当于平常我们用于web跟数据库对接的帐号;需要在所有主从机上新建一个库的帐号和密码,授权IP为atlas的IP;
#然后在atlas机器上,生成加密密码,把用户名和加密密码加到配置文件里,重启;
#web程序连接数据库时,就可以使用这个主从机上建立的帐号和密码,Atlas的IP和专用端口连接到所有主从机;
daemon = true
keepalive = true
event-threads = 8
log-level = message
log-path = /usr/local/mysql-proxy/log
sql-log-slow = 10
instance = test
proxy-address = 0.0.0.0:2346
admin-address = 0.0.0.0:2345
Atlas 高可用
- 两台机器安装keepalived后修改好配置文件和自检脚本即可;
非抢占模式的配置文件:
#global_defs {
#   notification_email {
#     [email protected]
#   }
#   notification_email_from [email protected]
#   smtp_server 127.0.0.1
#   smtp_connect_timeout 30
#   router_id LVS_DEVEL
#}

vrrp_script chk_proxy {
    script "/usr/local/sbin/check_proxy.sh"
    interval 3
}

vrrp_instance VI_1 {
    state BACKUP
    interface ens33
    virtual_router_id 101
    priority 100
    advert_int 1
    nopreempt
    authentication {
        auth_type PASS
        auth_pass tany.com
    }
    virtual_ipaddress {
        192.168.87.106
    }

    track_script {
        chk_ proxy
    }

}
check_proxy.sh
#!/bin/bash
#时间变量,用于记录日志
d=`date --date today +%Y%m%d_%H:%M:%S`
#计算nginx进程数量
n=`ps -C mysql-proxy --no-heading|wc -l`
#如果进程为0,则启动nginx,并且再次检测nginx进程数量,
#如果还为0,说明nginx无法启动,此时需要关闭keepalived
if [ $n -lt "2" ]; then
        mysql-proxy test start
        n2=`ps -C mysql-proxy --no-heading|wc -l`
        if [ $n2 -lt "2"  ]; then
                echo "$d mysql-proxy down,keepalived will stop" >> /var/log/check_proxy.log
                systemctl stop keepalived
        fi
fi
启动
systemctl start keepalived
mysql写 高可用
非抢占模式配置文件:
#global_defs {
#   notification_email {
#     [email protected]
#   }
#   notification_email_from [email protected]
#   smtp_server 127.0.0.1
#   smtp_connect_timeout 30
#   router_id LVS_DEVEL
#}

vrrp_script chk_mysql {
    script "/usr/local/sbin/check_sql.sh"
    interval 3
}

vrrp_instance VI_1 {
    state BACKUP
    interface ens33
    virtual_router_id 100
    priority 100
    advert_int 1
    nopreempt
    authentication {
        auth_type PASS
        auth_pass tany.com
    }
    virtual_ipaddress {
        192.168.87.103
    }

    track_script {
        chk_mysql
    }

}
check_sql.sh
#!/bin/bash
#时间变量,用于记录日志
d=`date --date today +%Y%m%d_%H:%M:%S`
#计算nginx进程数量
n=`ps -C mysqld --no-heading|wc -l`
#如果进程为0,则启动nginx,并且再次检测nginx进程数量,
#如果还为0,说明nginx无法启动,此时需要关闭keepalived
if [ $n -eq "0" ]; then
        service mysqld start
        n2=`ps -C mysqld --no-heading|wc -l`
        if [ $n2 -eq "0"  ]; then
                echo "$d mysqld down,keepalived will stop" >> /var/log/check_sql.log
                systemctl stop keepalived
        fi
fi
- 启动
systemctl start keepalived
静态文件共享
- 先在服务端搭建服务
客户端挂载
虚拟主机配置使用相应的目录
共享静态目录以下配置以discuz dedecms zrlog目录为例
discuz的静态目录为/data/attachment
yum install nfs-utils -y
[root@draft ~]# vi /etc/exports
/data/discuz 192.168.**.0/24(rw,sync,no_root_squash,anonuid=1000,anongid=1000)
/data/dedecms 192.168.**.0/24(rw,sync,no_root_squash,anonuid=1000,anongid=1000)
/data/zrlog 192.168.**.0/24(rw,sync,no_root_squash,anonuid=1000,anongid=1000)
systemctl start nfs
mkdir -p /data/discuz  /data/dedecms /data/zrlog
chmod 777 /data/discuz /data/dedecms /data/zrlog
wep开机自动挂载
 echo "192.168.**.109:/data/discuz /data/wwwroot/bbs.com nfs defaults 0 0" >> /etc/fstab
 echo "192.168.**.109:/data/dedecms /*** nfs defaults 0 0" >> /etc/fstab
 echo "192.168.**.109:/data/zrlog /usr/local/tomcat/webapps/ROOT nfs defaults 0 0" >> /etc/fstab
nfs 高可用
- 使用keepalived做高可用,安装在nfs 机器上和备份机器上
- 使用脚本做自检的同时,做一次rsync,把数据推到备份机上
- 如果NFS下线,备份机器上线做NFS服务器,备份机器跟NFS有同样的共享目录
- 恢复不争抢IP,可以做一个脚本同步内容,再把机器改回去,即关闭备份机的keepalived;
- 需要一个普通用户两台机器上做好密钥认证,这样才能同步数据,用户sync:sync
- nfs高可用配置文件:
#global_defs {
#   notification_email {
#     [email protected]
#   }
#   notification_email_from [email protected]
#   smtp_server 127.0.0.1
#   smtp_connect_timeout 30
#   router_id LVS_DEVEL
#}

vrrp_script chk_nfs {
    script "/usr/local/sbin/check_nfs.sh"
    interval 3
}

vrrp_instance VI_1 {
    state BACKUP
    interface ens33
    virtual_router_id 102
    priority 100
    advert_int 1
    nopreempt
    authentication {
        auth_type PASS
        auth_pass tany.com
    }
    virtual_ipaddress {
        192.168.87.109
    }

    track_script {
        chk_nfs
    }

}
- nfs机器自检脚本check_sql.sh 并把内容推送过备份机器
#!/bin/bash
#时间变量,用于记录日志
d=`date --date today +%Y%m%d_%H:%M:%S`
#计算nginx进程数量
n=`ps aux | grep rpc | wc -l`
#如果进程为0,则启动nginx,并且再次检测nginx进程数量,
#如果还为0,说明nginx无法启动,此时需要关闭keepalived
if [ $n -lt "6" ]; then
        systemctl start nfs
        n2=`ps aux | grep rpc | wc -l`
        if [ $n2 -lt "6"  ]; then
                echo "$d nfs down,keepalived will stop" >> /var/log/check_nfs.log
                systemctl stop keepalived
        fi
else
		rsync -av /data/discuz [email protected].**.108:/data/discuz
        rsync -av /data/dedecms [email protected].**.108:/data/dedecms
        rsync -av /data/zrlog [email protected].**.108:/data/zrlog
fi
- 备份机器高可用配置
#global_defs {
#   notification_email {
#     [email protected]
#   }
#   notification_email_from [email protected]
#   smtp_server 127.0.0.1
#   smtp_connect_timeout 30
#   router_id LVS_DEVEL
#}

vrrp_script chk_nfs {
    script "/usr/local/sbin/check_nfs.sh"
    interval 3
}

vrrp_instance VI_1 {
    state BACKUP
    interface ens33
    virtual_router_id 102
    priority 90
    advert_int 1
    nopreempt
    authentication {
        auth_type PASS
        auth_pass tany.com
    }
    virtual_ipaddress {
        192.168.87.109
    }

    track_script {
        chk_nfs
    }

}
- check_sql.sh备份机的自检脚本,不同步内容,以免出错
#!/bin/bash
#时间变量,用于记录日志
d=`date --date today +%Y%m%d_%H:%M:%S`
#计算nginx进程数量
n=`ps aux | grep rpc | wc -l`
#如果进程为0,则启动nginx,并且再次检测nginx进程数量,
#如果还为0,说明nginx无法启动,此时需要关闭keepalived
if [ $n -lt "6" ]; then
        systemctl start nfs
        n2=`ps aux | grep rpc | wc -l`
        if [ $n2 -lt "6"  ]; then
                echo "$d nfs down,keepalived will stop" >> /var/log/check_nfs.log
                systemctl stop keepalived
        fi
fi
注意:取消了root用户登陆ssh后,rsync也不能使用,因为也是使用22端口,另外keepalived是以root权限运行的。
mysqldump每天双备份压缩删除脚本
- 变量会跟
_符号连结在一起,因为_可以用于定义变量,斜杠/,:,.是不怕的; - 每天备份数据库
- 每天把备份文件同度到rsync服务端
- 每天把前天的文件压缩
- 每天把七天前的文件删除
#! /bin/bash
#daily backup part
dump=/usr/local/mysql/bin/mysqldump
user=dumper
pw=password
tip=192.168.87.149
la=`date +%Y-%m-%d`
sdate=`date +%d`
dir=/data/backup

#local backup
for db in mysql zabbix;      #使用了for 语句,确实简单很多;
   do
        $dump -u$user -p$pw $db > $dir/"$db"_$la.sql
        sleep 2
        rsync -av $dir/"$db"_$la.sql $tip::file/"$db"_$sdate.sql   #rsync同步同时修改名字可以让远端保留30天的文件;
   done
#far end backup, module file     #同步到远端;
rsync -av $dir/ $tip::file/
#compress
zdate=`date -d "-2day" +%Y-%m-%d`    #使用时间区分要压缩的文件;
gzip /data/backup/*$zdate.sql     #gzip可以将每个文件单独压缩;
#del
ddate=`date -d "-7day" +%Y-%m-%d`    #使用时间区分要删除的文件;
if [ ! -d "/data/backup/del" ]
        then
	   mkdir /data/backup/del
fi
mv $dir/*$ddate* $dir/del/      #先移动到目录,后删除,更安全;
rm -rf $dir/del/*
用户认证
- 只能密钥登陆,说明要设置配置文件
vi /etc/ssh/sshd_config
PasswordAuthentication no
- 另外所有用户要生成密钥文件,然后帮他们创建用户和把公钥复制在相应的机器上
- 普通用户做了密钥认证后就不需要交互来传文件
- 只是两台机器互相先登陆一下就不用输yes
限制root用户远程登陆
用root用户远程登陆是有比较大的风险的,特别是用密码登陆,因为密码会告知不同的人,一个人没有保护好密码将会有很大的问题。如果希望将root密码保护起来,不希望任何人远程使用root密码,可以用如下做法:
设置visudo,用户ut1使用su命令有root权限,即可以切换在任何用户包括root,不用PW:(这样一个用户就有方法获得root权限,而不用输入密码)
root    ALL=(ALL)       ALL
ut1     ALL=(ALL)       NOPASSWD: /usr/bin/su
[root@tanyvlinux ~]# su ut1
[ut1@tanyvlinux root]$ sudo su -
上一次登录:一 9月  2 19:46:28 CST 2019pts/0 上
再修ssh配置文件,取消root登陆:
vi /etc/ssh/sshd_config
改为no以后,密码和密钥都不能登陆。
当然,我们也可以给ut1赋予某些权限,而不是全部root权限。
命令记录
vi /etc/profile #在最后加入以下内容;
if [ ! -d  /usr/local/domob/records/${LOGNAME} ]

then

mkdir -p /usr/local/domob/records/${LOGNAME}

chmod 300 /usr/local/domob/records/${LOGNAME}

fi

export HISTORY_FILE="/usr/local/domob/records/${LOGNAME}/bash_history"

export PROMPT_COMMAND='{ date "+%Y-%m-%d %T ##### $(who am i |awk "{print \$1\" \"\$2\" \"\$5}") #### $(history 1 | { read x cmd; echo "$cmd"; })"; } >>$HISTORY_FILE'
source /etc/profile
文件代码同步上线
代码上线脚本:
#! /bin/bash
# code syn to different server
#reminder
read -p "你是否已经更新了文件列表/root/synfile.list?确认请输入y或者Y,否则按其他任意键退出脚本。" c
if [ -z "$c" ]      #没有输入退出;
	then
   	   exit 1
fi
if [ $c == "y" -o $c == "Y" ]     #输入Y or y继续执行,否则退出;
	then
	   echo "脚本将在2秒后,继续执行。"
	   for i in 1 2       #延时功能;
		do
		   echo -n "."
		   sleep 1
		done
	   echo
	else
	   exit 1
fi
#clean the /root/rsync.exp file      #主同步expect函数,只执行一次,完成后删除,以免错误执行;
[ -f /root/rsync.exp ] && rm -f /root/rsync.exp    #检查有没有同名称文件残留,删除;

#create the rsync.exp
cat > /root/rsync.exp <
监控部分
-
ZABBIX 服务端安装
安装前提需要先安装mysql或者mariadb
官网下载:https://www.zabbix.com/download 目前最新版本为4.4 -
rpm –ivh zabbix
yum install -y zabbix-agent zabbix-get zabbix-server-mysql zabbix-web zabbix-web-mysql(服务端)
启动mysql :systemctl start mysql -
编辑配置文件,设置默认字符集:vi/etc/my.cnf
在下面增加以下配置
character_set_server = utf8
重启mysql服务: systemctl restart mysql
登录mysql:mysql –uroot –ppassword创建zabbix库
create database zabbix character set utf8; -
创建用户
grant all on zabbix.* to ‘zabbix’@‘127.0.0.1’ identified by ‘username-zabbix’; -
导入原始数据:
cd /usr/share/doc/zabbix-server-mysql-3.2.7(版本号可能不同)
gzip -d create.sql.gz
mysql -uroot -ppassword zabbix < create.sql -
启动zabbix:systemctl start zabbix-server
启动httpd:systemctl start httpd -
如果启动了nginx需要先停掉才能启动httpd
/etc/init.d/ nginx stop
设置开机自动启动
Systemctl enable httpd
Systemctl enable zabbix-server
Systemctl disable nginx
Chkconfig nginx off -
修改zabbix配置文件
vim /etc/zabbix/zabbix_server.conf
DBHost=127.0.0.1
定义DBname=zabbix
DBuser=zabbix
DBpassword=password-zabbix
重启zabbix服务:systemctl restart zabbix-server -
查看监听端口:netstat –lntp |gerp zabbix 10051端口
-
进入浏览器进行配置
http:/ip/zabbix
mysql用户名:zabbix 密码:password-zabbix
登录zabbix
默认账号:admin 密码:zabbix
登录完成过后修改密码,语言根据自己选择中文或者英文 -
客户端安装:
同样官网下载
rpm –ivh zabbix
yum install -y zabbix-agent (客户端) -
编辑配置文件vim /etc/zabbix/zabbix_agentd.conf
修改server=服务端的IP地址,默认是本机127.0.0.1 被动
ServerActive=服务端IP地址,默认也是127.0.0.1 主动
Hostname=自定义主机名
启动服务:systemctl start zabbix-agent
查看端口netstat-lntp 10050端口
队列脚本
zabbix监控队列用帐号
processlist权限
授权127.0.0.1自检
grant process on *.* to [email protected]
#! /bin/bash
mysql=/usr/local/mysql/bin/mysql
log="-udb -ppassword -h127.0.0.1"
processlist () {
        $mysql $log -e "show processlist;" | wc -l
}
$1
慢查询脚本
#! /bin/bash
f=`date +%Y-%m-%d`T`date +%H`
min=`date -d "1 minutes ago"  +%M`
slow () {
number=`cat /data/mysql/100slow.log |grep $f:$min: |wc -l`
echo $number
}
$1
脚本导入zabbix web界面使用 & 监控nginx配置
- agent虚拟主机配置
[root@draft ~]# vi /etc/nginx/conf.d/default.conf 		#将以下语句放在虚拟主机配置文件的最后面;正在使用default.conf;

location /nginx_status
{
        stub_status on;		#主要语句;
        access_log   off;
        allow 127.0.0.1;
        deny all;
    }

[root@draft ~]# service nginx start		#启动服务;
Redirecting to /bin/systemctl start nginx.service
[root@draft ~]# nginx -s reload		#重新加载;
[root@draft ~]# curl -x127.0.0.1:80 127.0.0.1/nginx_status		#检查虚拟主机配置,以下为运行结果;
Active connections: 2
server accepts handled requests
 2 2 7 					#服务器接受,处理和总请求数;
Reading: 0 Writing: 1 Waiting: 1   #说明如下;
- agent编写监控脚本
[root@draft ~]# vi /usr/local/sbin/ngx_status.sh		#写入以下内容;

#!/bin/bash
url="http://127.0.0.1/nginx_status" 	#定义两个变量,放便使用;
curl=/usr/bin/curl

# 检测nginx进程是否存在
function ping {
    /sbin/pidof nginx | wc -l
}
# 检测nginx性能
function active {
    $curl $url 2>/dev/null| grep 'Active' | awk '{print $NF}'
}
function reading {
    $curl $url 2>/dev/null| grep 'Reading' | awk '{print $2}'
}
function writing {
    $curl $url 2>/dev/null| grep 'Writing' | awk '{print $4}'
}
function waiting {
    $curl $url 2>/dev/null| grep 'Waiting' | awk '{print $6}'
}
function accepts {
    $curl $url 2>/dev/null| awk NR==3 | awk '{print $1}'
}
function handled {
    $curl $url 2>/dev/null| awk NR==3 | awk '{print $2}'
}
function requests {
    $curl $url 2>/dev/null| awk NR==3 | awk '{print $3}'
}
$1

[root@draft ~]# chmod 755 !$
chmod 755 /usr/local/sbin/ngx_status.sh
[root@draft ~]# ll !$
ll /usr/local/sbin/ngx_status.sh
-rwxr-xr-x. 1 root root 735 11月 16 16:09 /usr/local/sbin/ngx_status.sh
- 将脚本指定给zabbix agent使用
[root@second mysql]# vi /etc/zabbix/zabbix_agentd.conf # 增加

UserParameter=nginx.status[*],/usr/local/sbin/ngx_status.sh $1

[root@second mysql]# systemctl restart zabbix-agent
- 服务端上测试脚本
[root@draft sbin]zabbix_get  -s 192.168.87.150 -k 'nginx.status[accepts]'
2
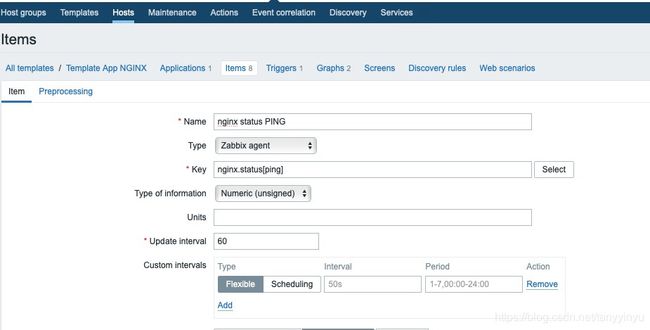
- 配置zabbix-server web界面使用脚本监控zabbix-agent的nginx
新建template
在template里添加item, item的项目跟脚本相关,以nginx-ping函数为例
把相应主机链接到template上即可完成监控
zabbix 监控tomcat
- zabbix server需要增加zabbix-java-gateway服务
- tomcat增加JMX模块的使用,会启动一个端口
JMX在Java编程语言中定义了应用程序以及网络管理和监控的体系结构、设计模式、应用程序接口以及服务。通常使用JMX来监控系统的运行状态或管理系统的某些方面,比如清空缓存、重新加载配置文件等
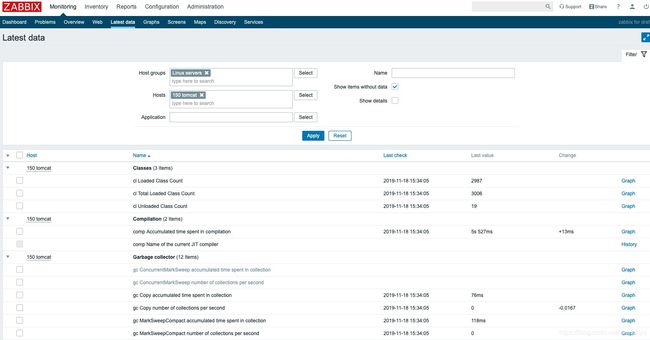
- zabbix-java-gateway通过JMX服务的端口获得tomcat运行的相关数据
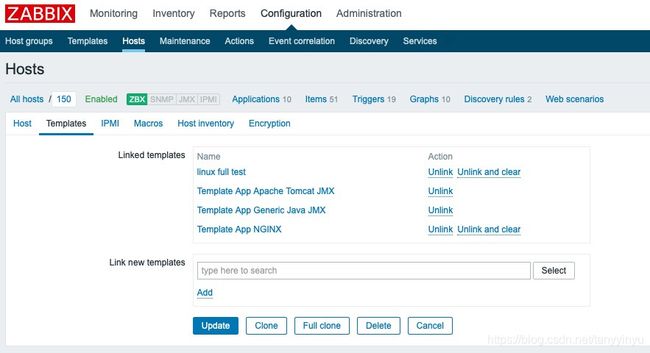
- 在zabbix web界面建立监控主机和链接监控模板
- 安装zabbix_java_gateway
[root@draft ~]# yum install zabbix-java-gateway
[root@draft ~]# vi /etc/zabbix/zabbix_java_gateway.conf 	#配置文件相关语句的修改;
LISTEN_IP="0.0.0.0"
START_POLLERS=5
[root@draft ~]# vi /etc/zabbix/zabbix_server.conf 		#server配置文件的修改;
JavaGateway=127.0.0.1
port 10052
Start poller 5
[root@draft ~]# systemctl start zabbix-java-gateway
[root@draft ~]# ps aux |grep zabbix_java |wc -l		#进程已启动;
2
[root@draft ~]# netstat -lntp			#端口启用;
Active Internet connections (only servers)
Proto Recv-Q Send-Q Local Address           Foreign Address         State       PID/Program name
tcp6       0      0 :::10052                :::*                    LISTEN      9850/java
[root@draft ~]# systemctl restart zabbix-server
- 需要监控的tomcat主机上启动JMX
[root@second init.d]# vi /usr/local/tomcat/bin/catalina.sh #在第一行下写入以下信息,启动JMX;
export CATALINA_OPTS="$CATALINA_OPTS -Dcom.sun.management.jmxremote
-Djava.rmi.server.hostname=192.168.87.150	#修改成该机器的IP;
-Dcom.sun.management.jmxremote.port=9999	#可指定一个port号码;
-Dcom.sun.management.jmxremote.ssl=false
-Dcom.sun.management.jmxremote.authenticate=false"
[root@second init.d]# service tomcat restart
Stoping Tomcat
waiting for processes to exit
Starting tomcat
Tomcat started.
Tomcat is running with pid: 9646
[root@second init.d]# netstat -lntp		#9999端口启用了;
Active Internet connections (only servers)
Proto Recv-Q Send-Q Local Address           Foreign Address         State       PID/Program name
tcp6       0      0 :::9999                 :::*                    LISTEN      9646/java
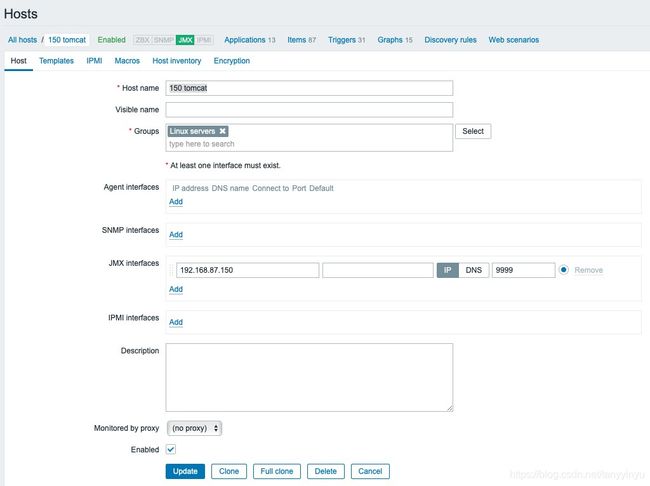
- zabbix web界面添加主机和配置
-
Configuration - Hosts - create host - 填写主机名 - 填写JMX interfaces(JMX的IP与端口) - 清除其他interface
-
选择templates - 选择templates(两个java的) - Add - Update
完成配置
- 查看检查数据
