Ubuntu16.04安装Densepose全过程(源码安装caffe2+配置Detectron)
前言
DensePose是基于caffe2和Detectron的.现在caffe2已经被并入pytorch,所以要想源码安装caffe2,只能先克隆pytorch,同时要注意的是,Detectron只适用于GPU版本的caffe2.
官方说源码安装caffe2以及detectron需要cuda8.0+cudnn6.0,经过亲自试验,cuda9.0+cudnn7.1也可以.
注意:经过多次尝试,发现只有使用python2.7版本才能编译成功gpu版本的caffe2!!!python3编译不通过!!!!
基础环境:ubuntu16.04+cuda9.0+cudnn7.1+python2.7
说明:cuda和cudnn的安装过程在此省略,过程可见我的另一篇博客:https://blog.csdn.net/weixin_40369473/article/details/82223775
源码编译安装caffe2(可参考官网https://caffe2.ai/docs/getting-started.html?platform=ubuntu&configuration=compile)
安装依赖:
sudo apt-get install -y --no-install-recommends \
      libgflags-dev \
      cmake
clone+build
(编译时间很长,如果之前基础环境没问题,这里应该就没问题,之前我就是用的python3,结果利用cuda9.0时候只能编译成功cpu版本的caffe2,而利用cuda8.0的时候直接编译不通过,所以再强调一遍,一定要python2.7!!)
git clone https://github.com/pytorch/pytorch.git && cd pytorch
git submodule update --init --recursive
python setup.py install
检查caffe2是否安装成功
python -c 'from caffe2.python import core' 2>/dev/null && echo "Success" || echo "Failure"
Success
检查是否是gpu版本的caffe2
>>> import caffe2
>>> from caffe2.python import workspace
>>> print(workspace.NumCudaDevices())
1
至此,caffe2编译安装成功
安装cocoapi
# COCOAPI=/path/to/clone/cocoapi
git clone https://github.com/cocodataset/cocoapi.git $COCOAPI
cd $COCOAPI/PythonAPI
# Install into global site-packages
make install
安装Densepose
clone
# DENSEPOSE=/path/to/clone/densepose
git clone https://github.com/facebookresearch/densepose $DENSEPOSE
安装python依赖
pip install -r $DENSEPOSE/requirements.txt编译
cd densepose
make
Check that Detectron tests pass
cd densepose
python detectron/tests/test_spatial_narrow_as_op.py
(Python test_spatial_narrow_as_op.py出错)
此时可能会报错说没有发现Detectron ops lib,此时我们需要将之前编译的build的路径添加到环境中
sudo gedit .bashrc
在最后加上:export PYTHONPATH=/home/wlw/pytorch/build:$PYTHONPATH

或者打开:densepose/detectron/utils/env.py
在import sys下一行加上:sys.path.insert(0, '/home/wlw/pytorch/build')
重新运行,OK!
Build the custom operators library
(这一步是问题最多的一步)(make ops failing (Could not find a package "Caffe2")
cd densepose
make ops
当执行上述命令后,可能会报以下错误(不能发现caffe2):
By not providing "FindCaffe2.cmake" in CMAKE_MODULE_PATH this project has
  asked CMake to find a package configuration file provided by "Caffe2", but
  CMake did not find one.

  Could not find a package configuration file provided by "Caffe2" with any
  of the following names:

   Caffe2Config.cmake
   caffe2-config.cmake

  Add the installation prefix of "Caffe2" to CMAKE_PREFIX_PATH or set
  "Caffe2_DIR" to a directory containing one of the above files.  If "Caffe2"
  provides a separate development package or SDK, be sure it has been
  installed.
这是因为caffe2的路径没找对,没有找到正确的Caffe2Config.cmake,此时需要在终端输入:
export Caffe2_DIR=/home/wlw/pytorch/torch/lib/tmp_install/share/cmake/Caffe2
这里有个小技巧:可能你输入上述命令后还会有其他比如:recipe for target 'ops' failed的问题,那还是因为没有找到正确的Caffe2Config.cmake,此时你可以在你的计算机中找到所有Caffe2Config.cmake的文件,将他们的路径一个一个放到Caffe2_DIR之后,然后sudo make clean,重新make,再make ops,不出意外,总有一个路径正确,然后make ops成功.
注意:上述的make 和make ops 前面最好不要加sudo,反正我加了sudo之后,就总是出错.
Check that the custom operator tests pass
cd densepose
python detectron/tests/test_zero_even_op.py
这一步应该是会出现最后一个问题:OSError: /home/wlw/densepose/build/libcaffe2_detectron_custom_ops_gpu.so: undefined symbol: _ZN6google8protobuf8internal9ArenaImpl28AllocateAlignedAndAddCleanupEmPFvPvE
这是因为protobuf的多版本冲突问题,所以需要在densepose/目录下找到CMakeLists.txt,进行set(PROTOBUF_LIB "/home/wlw/pytorch/build/lib/libprotobuf.a")设置,完整文件如下:
cmake_minimum_required(VERSION 2.8.12 FATAL_ERROR)

# Find the Caffe2 package.
# Caffe2 exports the required targets, so find_package should work for
# the standard Caffe2 installation. If you encounter problems with finding
# the Caffe2 package, make sure you have run `make install` when installing
# Caffe2 (`make install` populates your share/cmake/Caffe2).
find_package(Caffe2 REQUIRED)

if (${CAFFE2_VERSION} VERSION_LESS 0.8.2)
  # Pre-0.8.2 caffe2 does not have proper interface libraries set up, so we
  # will rely on the old path.
  message(WARNING
      "You are using an older version of Caffe2 (version " ${CAFFE2_VERSION}
      "). Please consider moving to a newer version.")
  include(cmake/legacy/legacymake.cmake)
  return()
endif()

# Add compiler flags.
set(CMAKE_C_FLAGS "${CMAKE_C_FLAGS} -std=c11")
set(CMAKE_CXX_FLAGS "${CMAKE_CXX_FLAGS} -std=c++11 -O2 -fPIC -Wno-narrowing")

# Print configuration summary.
include(cmake/Summary.cmake)
detectron_print_config_summary()

# Collect custom ops sources.
file(GLOB CUSTOM_OPS_CPU_SRCS ${CMAKE_CURRENT_SOURCE_DIR}/detectron/ops/*.cc)
file(GLOB CUSTOM_OPS_GPU_SRCS ${CMAKE_CURRENT_SOURCE_DIR}/detectron/ops/*.cu)

# Install custom CPU ops lib.
add_library(
     caffe2_detectron_custom_ops SHARED
     ${CUSTOM_OPS_CPU_SRCS})

#target_link_libraries(caffe2_detectron_custom_ops caffe2_library)
# static protobuf library

add_library(libprotobuf STATIC IMPORTED)
set(PROTOBUF_LIB "/home/wlw/pytorch/build/lib/libprotobuf.a")
set_property(TARGET libprotobuf PROPERTY IMPORTED_LOCATION "${PROTOBUF_LIB}")
target_link_libraries(caffe2_detectron_custom_ops caffe2_library libprotobuf)
install(TARGETS caffe2_detectron_custom_ops DESTINATION lib)

# Install custom GPU ops lib, if gpu is present.
if (CAFFE2_USE_CUDA OR CAFFE2_FOUND_CUDA)
  # Additional -I prefix is required for CMake versions before commit (< 3.7):
  # https://github.com/Kitware/CMake/commit/7ded655f7ba82ea72a82d0555449f2df5ef38594
  list(APPEND CUDA_INCLUDE_DIRS -I${CAFFE2_INCLUDE_DIRS})
  CUDA_ADD_LIBRARY(
      caffe2_detectron_custom_ops_gpu SHARED
      ${CUSTOM_OPS_CPU_SRCS}
      ${CUSTOM_OPS_GPU_SRCS})

  #target_link_libraries(caffe2_detectron_custom_ops_gpu caffe2_gpu_library)
  target_link_libraries(caffe2_detectron_custom_ops_gpu caffe2_gpu_library libprotobuf)
  install(TARGETS caffe2_detectron_custom_ops_gpu DESTINATION lib)
endif()
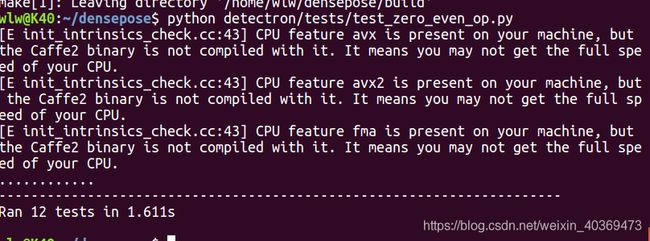
修改完成后,重新sudo make clean+make+make ops,然后重新运行:python detectron/tests/test_zero_even_op.py,成功后的界面如下:
至此,所有环境搭建成功!

