spring cloud config的运用与原理
spring cloud config 运用与原理
- spring cloud config 应用场景
- 多样化仓库
- 实例搭建
- config-server 模块的构建
- pom引入的依赖
- application.properties其中字段的配置
- 启动类注解
- 启动准备与日志分析
- spring cloud config client端搭建
- pom依赖
- 启动准备
- 启动分析
- Controller层编写
- client端获取动态获取消息
- spring boot actuator执行器刷新
- spring cloud bus组合动态获取server端最新值
- client端
- server端
- spring cloud config的高可用配置
- 修改client端配置文件实现高可用
spring cloud config 应用场景
作为一个开发而言,知道每个项目都有其需要维护的配置文件,如果项目量小而言,以人力尚可以接受。项目量一但增多,传统的维护方式就变的困难,所以需要一个统一的配置中心来维护所有服务的配置文件。再言,传统的项目配置文件配置数据发生改变,需要重启服务使其生效,spring cloud config 可以不需要进行重启对应的服务。
多样化仓库
spring cloud config 支持配置文件库除了大家所知的git,svn外,spring cloud config还支持valut,credhub,composite以及本地文件仓库。当你在配置服务中需要可以对配置中心的仓库进行显示配置,不对其配置的话默认仓库是git。
实例搭建
接下来给大家介绍一些spring cloud config 的实例搭建。当前笔者使用的spring boot版本为2.1.3.RELEASE, spring cloud 版本为Greenwich.SR1,与目前多数文章使用的spring boot1.x版本还是有些许不同的。
config-server 模块的构建
pom引入的依赖
            org.springframework.boot
            spring-boot-starter-web


            org.springframework.cloud
            spring-cloud-config-server
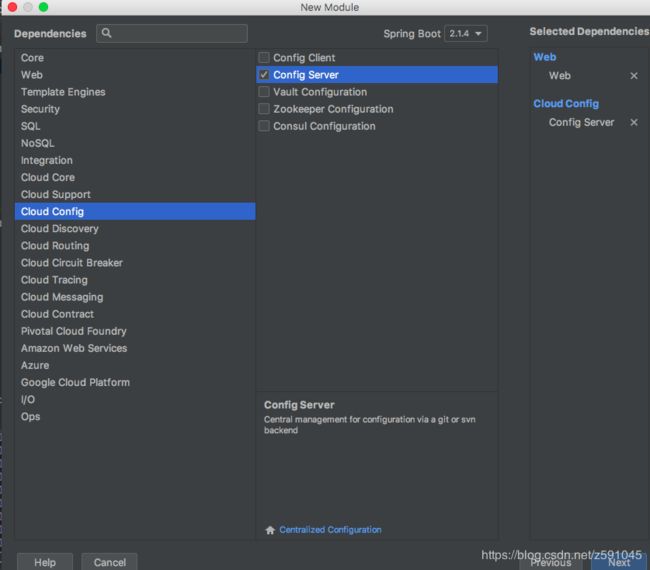
只需引入web和config-server的依赖就可以,如果是通过idea进行搭建的话,可以通过spring initializr ,勾选web ,以及spring cloud config 模块自动导入pom依赖
application.properties其中字段的配置
# 服务名称
spring.application.name=config-server
# 启动端口
server.port=7001
# 仓库地址,HTTP方式
spring.cloud.config.server.git.uri=***
# 仓库搜索路径
spring.cloud.config.server.git.search-paths=***
# 访问仓库的用户名
spring.cloud.config.server.git.username=****
# 访问仓库的密码
spring.cloud.config.server.git.password=***
大部分配置大家都熟悉,主要介绍几个重要配置,一个是spring.cloud.config.server.git.uri,这个指定了你的git仓库地址,属于必填值,不填的话或者地址错误的话启动失败会报错。username, password根据你的git仓库而言,如果是公共仓库不需要用户及密码不填也可以。其他不填的话也会报错。spring cloud config 除了支持username, password 认证外,也可以通过公私钥文件进行git认证。
spring.cloud.config.server.git.ignore-local-ssh-settings=true
spring.cloud.config.server.git.host-key=someHostKey
spring.cloud.config.server.git.host-key-algorithm=ssh-rsa
spring.cloud.config.server.git.private-key=***
使用私钥来代替用户名密码的安全验证,配置案例由官网提供的,不过大部分开发更优先于使用用户名密码配置。
启动类注解
启动一个spring cloud config server端项目只需要加入一个@EnableConfigServer注解就可以了
@EnableConfigServer
@SpringBootApplication
public class SpringCloudConfigServerApplication {

    public static void main(String[] args) {
        SpringApplication.run(SpringCloudConfigServerApplication.class, args);
    }

}
接下来研究一下@EnableConfigServer这个注解做了什么操作
@Target({ElementType.TYPE})
@Retention(RetentionPolicy.RUNTIME)
@Documented
@Import({ConfigServerConfiguration.class})
public @interface EnableConfigServer {
}
进入到这个EnableConfigServer类,发现引入了ConfigServerConfiguration类。
@Configuration
public class ConfigServerConfiguration {
    public ConfigServerConfiguration() {
    }

    @Bean
    public ConfigServerConfiguration.Marker enableConfigServerMarker() {
        return new ConfigServerConfiguration.Marker();
    }

    class Marker {
        Marker() {
        }
    }
}
进入ConfigServerConfiguration类,发现创建了一个内部类Marker,并将其注解成一个bean注入到spring容器。
import org.springframework.boot.autoconfigure.condition.ConditionalOnBean;
import org.springframework.boot.context.properties.EnableConfigurationProperties;
import org.springframework.cloud.config.server.config.ConfigServerConfiguration.Marker;
import org.springframework.context.annotation.Configuration;
import org.springframework.context.annotation.Import;

@Configuration
@ConditionalOnBean({Marker.class})
@EnableConfigurationProperties({ConfigServerProperties.class})
@Import({EnvironmentRepositoryConfiguration.class, CompositeConfiguration.class, ResourceRepositoryConfiguration.class, ConfigServerEncryptionConfiguration.class, ConfigServerMvcConfiguration.class})
public class ConfigServerAutoConfiguration {
    public ConfigServerAutoConfiguration() {
    }
}
在ConfigServerAutoConfiguration类里发现maker这个bean被注入进来,并引进了更多文件,简单的介绍一下各类的作用。
- EnvironmentRepositoryConfiguration: 环境变量存储相关的配置类
- CompositeConfiguration:组合方式的环境仓库配置类
- ResourceRepositoryConfiguration:资源仓库相关的配置类
- ConfigServerEncryptionConfiguration:加密断点相关的配置类
- ConfigServerMvcConfiguration:对外暴露的MVC端点控制器的配置类
现在主要研究一下EnvironmentRepositoryConfiguration这个类,官方文档中也标明Environment相关为核心类。
@Configuration
@EnableConfigurationProperties({SvnKitEnvironmentProperties.class, CredhubEnvironmentProperties.class, JdbcEnvironmentProperties.class, NativeEnvironmentProperties.class, VaultEnvironmentProperties.class})
@Import({CompositeRepositoryConfiguration.class, JdbcRepositoryConfiguration.class, VaultRepositoryConfiguration.class, CredhubConfiguration.class, CredhubRepositoryConfiguration.class, SvnRepositoryConfiguration.class, NativeRepositoryConfiguration.class, GitRepositoryConfiguration.class, DefaultRepositoryConfiguration.class})
public class EnvironmentRepositoryConfiguration {
    public EnvironmentRepositoryConfiguration() {
    }

    @Bean
    @ConditionalOnProperty(
        value = {"spring.cloud.config.server.health.enabled"},
        matchIfMissing = true
    )
    public ConfigServerHealthIndicator configServerHealthIndicator(EnvironmentRepository repository) {
        return new ConfigServerHealthIndicator(repository);
    }

    @Bean
    @ConditionalOnMissingBean(
        search = SearchStrategy.CURRENT
    )
    public MultipleJGitEnvironmentProperties multipleJGitEnvironmentProperties() {
        return new MultipleJGitEnvironmentProperties();
    }
代码太长,所以只贴部分代码,从代码中可以了解到他引入了很多的仓库类,说明了spring cloud config
支持以及各种远程库的具体实现。介绍一个git仓库,对于其它仓库,本文就不再叙述,读者有兴趣可自行了解
@Configuration
@Profile({"git"})
class GitRepositoryConfiguration extends DefaultRepositoryConfiguration {
    GitRepositoryConfiguration() {
    }
}
从代码中可以观察到git仓库还继承了默认的仓库配置,证实了spring cloud config默认配置是git。git仓库的实现类JGitEnvironmentRepository,JGitEnvironmentRepository实现类为MultipleJGitEnvironmentProperties。此类做了什么呢
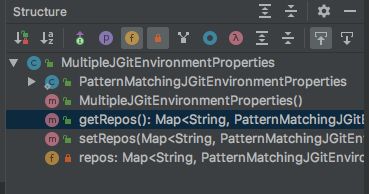
从图中可知获得配置信息。因此,可以总结spring cloud config server启动的时候根据profile值启动对应的环境库去加载和获取配置信息。
启动准备与日志分析
启动之前要在对应的git上创建一个文件,用来存储客户端需要的配置信息。对于读者而言,创建文件轻而易举,所以笔者不做描述,运行启动类。

  .   ____          _            __ _ _
 /\\ / ___'_ __ _ _(_)_ __  __ _ \ \ \ \
( ( )\___ | '_ | '_| | '_ \/ _` | \ \ \ \
 \\/  ___)| |_)| | | | | || (_| |  ) ) ) )
  '  |____| .__|_| |_|_| |_\__, | / / / /
 =========|_|==============|___/=/_/_/_/
 :: Spring Boot ::        (v2.1.3.RELEASE)

2019-04-11 15:47:14.912  INFO 25554 --- [           main] s.s.s.SpringCloudConfigServerApplication : No active profile set, falling back to default profiles: default
2019-04-11 15:47:16.742  INFO 25554 --- [           main] o.s.cloud.context.scope.GenericScope     : BeanFactory id=02d0bffd-a788-3d22-8702-495331a8c7d5
日志并没有什么强调的,阐述的就是根据spring检查你的profile值去生成对应的仓库bean。
主要查看一下Endpoints

从endpoints可以了解到加载bean的数量名称,bean的健康状况,以及适配的访问方式。
| 访问方式 | 应用 |
|---|---|
| /{label}/{name}-{profiles}.properties | /分支名称/应用名称-profiles |
| /{name}-{profiles}.properties | /应用名称-profiles |
| /{name}/{profiles}.properties | /应用名称/profiles |
| /{name}/{profiles}/{label}.properties | /应用名称/profiles/分支名称 |
列举了常用的几种格式,考虑到开发的习惯不同,所以做了多种展示风格,除了properties格式,还支持yml,yaml,json格式展示。打开浏览器,访问http://localhost:7001/spring-cloud-config-client/dev/master。

可以看到正确获取到git仓库中文件的值,看下启动日志发现一条消息
2019-04-11 16:15:13.241 INFO 25554 --- [nio-7001-exec-1] o.s.c.c.s.e.NativeEnvironmentRepository : Adding property source: file:/var/folders/kv/2vl0bp4125j6f6g1rhx16sj80000gn/T/config-repo-4695149201886670502/config/spring-cloud-config-client-dev.properties
这条消息说明server端在获取到git仓库文件的时候,会缓存到本地目录下,向client端发送配置信息从本地缓存中读取。

换一种方式展示,看各个读者喜好。虽spring cloud config 支持properties,yml,yaml,json四种展示格式。读取文件只支持properties,yml,yaml文件格式。
远程仓库更新的时候,server端监听器监听到变化,会进行数据的同步,至此,server端算是告一段落。
spring cloud config client端搭建
pom依赖
创建一个新的模块,pom依赖相比于server端而言,只是从服务端变成client端引用。
            org.springframework.cloud
            spring-cloud-starter-config
启动准备
在application.propertries同级目录下,创建一个bootstrap.properties配置文件。
# 获取server端配置文件名
spring.application.name=spring-cloud-config-client
# 文件profile值
spring.cloud.config.profile=dev
# 文件分支
spring.cloud.config.label=master
# server端地址
spring.cloud.config.uri=http://localhost:7001
spring.application.name与git仓库中文件的名称对应,接下来解释一下为何需要创建bootstrap配置文件。在启动spring boot项目时候,项目会加载application配置文件,而bootstrap文件会优于application加载。
启动分析
client端启动不需要加任何注解,spring boot启动的@configuration里包含了对client的端注解。
@Configuration
@EnableConfigurationProperties
public class ConfigServiceBootstrapConfiguration {
    @Autowired
    private ConfigurableEnvironment environment;

    public ConfigServiceBootstrapConfiguration() {
    }

    @Bean
    public ConfigClientProperties configClientProperties() {
        ConfigClientProperties client = new ConfigClientProperties(this.environment);
        return client;
    }
这个类的用来读取bootstrap.properties 配置文件信息并通过HTTP方式从server端拉取文件。
  .   ____          _            __ _ _
 /\\ / ___'_ __ _ _(_)_ __  __ _ \ \ \ \
( ( )\___ | '_ | '_| | '_ \/ _` | \ \ \ \
 \\/  ___)| |_)| | | | | || (_| |  ) ) ) )
  '  |____| .__|_| |_|_| |_\__, | / / / /
 =========|_|==============|___/=/_/_/_/
 :: Spring Boot ::        (v2.1.4.RELEASE)

2019-04-11 17:32:36.501  INFO 26542 --- [           main] c.c.c.ConfigServicePropertySourceLocator : Multiple Config Server Urls found listed.
2019-04-11 17:32:36.502  INFO 26542 --- [           main] c.c.c.ConfigServicePropertySourceLocator : Fetching config from server at : http://localhost:7001
2019-04-11 17:32:37.288  INFO 26542 --- [           main] c.c.c.ConfigServicePropertySourceLocator : Located environment: name=spring-cloud-config-client, profiles=[dev], label=master, version=789bfe0c437dc1676a8b75b7de74dbf13dc7b52a, state=null
2019-04-11 17:32:37.288  INFO 26542 --- [           main] b.c.PropertySourceBootstrapConfiguration : Located property source: CompositePropertySource {name='configService', propertySources=[MapPropertySource {name='configClient'}, MapPropertySource {name='http://gitlab.alibaba-inc.com/wb-wxj443666/spring-cloud-study.git/config/spring-cloud-config-client-dev.properties'}]}
2019-04-11 17:32:37.298  INFO 26542 --- [           main] s.s.s.SpringCloudConfigClientApplication : No active profile set, falling back to default profiles: default
2019-04-11 17
从启动日志可以清楚的了解从boostrap文件获得的本地环境以及从从服务端拉取到的文件信息。
Controller层编写
创建一个controller层用来显示获取到git文件的值。
@RestController
public class ConfigClientController {

    @Value("${form}")
    private String form;

    @GetMapping("form")
    public String getForm(){
        return form;
    }
}
启动,访问http://localhost:8080/form,观察结果。
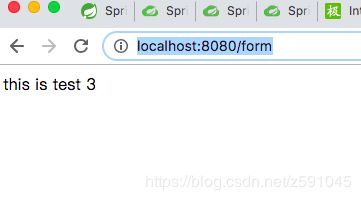
可以确认已经成功获取到server端git文件中的值,至此,spring cloud config基础的一个demo演示完毕了。
client端获取动态获取消息
方才完成了一个基础demo,看似没有问题,笔者更改一下git仓库文件的值。

然后刷新一下server端

正确获取到了,再看一下client端的值。

刷新按钮点爆了值也不会发生变化。这就问题所在,只有重启client端才能看到最新值,不过这样的话就与预期结果相差太多。接下来就介绍两种动态刷新client端方案。
spring boot actuator执行器刷新
简单介绍一下spring boot actuator,是spring boot项目运行的一个监视器服务,启动项目的endpoints就是由spring boot actuator输出的,包含了对spring boot的bean的监视,健康状况的管理,可以通过/actuator 查看各种项目运行的信息。
首先,在client端的pom文件加入spring boot actuator的引用
            org.springframework.boot
            spring-boot-starter-actuator
其次,在Controller层加一个注解@RefreshScope
@RefreshScope
@RestController
public class ConfigClientController {

    @Value("${form}")
    private String form;

    @GetMapping("form")
    public String getForm(){
        return form;
    }
}
此注解是标明刷新范围。然后在boostrap配置文件添加一行信息
management.endpoints.web.exposure.include=*
这行配置是表示对外暴露的节点,*表示全部暴露,也可以根据用户自行配置需要暴露的endpoints。关于网上众多文章所提到的management.security.enabled=false这个配置,如今已经不可用了。官方文档中提到endpoints中会包含很多敏感信息,需要小心的暴露它们。所以移除了management.security.enabled=false。
接下来用post方式访问
http://localhost:8080/actuator/refresh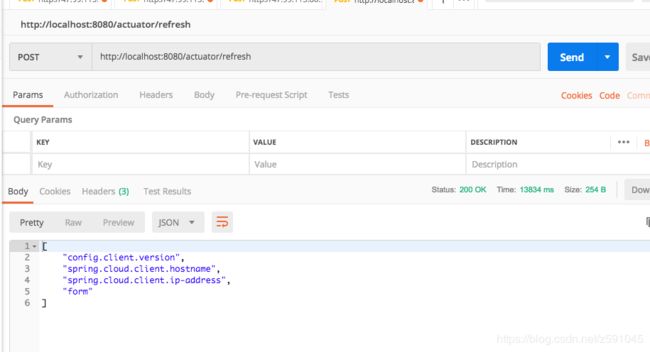
这时候,刷新一下客户端,发现已经取到最新的值。
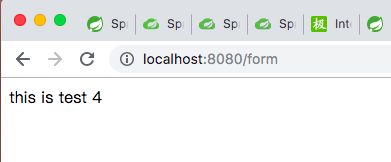
这样就实现了动态刷新,但是存在一个问题。每次更新文件都需要子服务手动刷新来获取最新值,服务量一旦过大对于维护以及体验都很糟糕。所以接下来介绍第二种与spring cloud bus搭配实现无需子服务手动刷新即可动态获取服务端最新值。
spring cloud bus组合动态获取server端最新值
spring cloud bus 目前支持者rabbit以及kafka两种MQ,kafka主要针对大数据,读者若想了解spring cloud bus 可以参考这篇文章 spring cloud bus介绍与源码分析所以笔者目前所用的MQ是rabbit,从官方上pull下rabbit docker镜像并启动。目前spring cloud bus动态刷新获取server的最新文件有两种方式,分别是针对client端以及server端的两种方案。
client端
添加pom依赖
            org.springframework.cloud
            spring-cloud-starter-bus-amqp
            2.1.1.RELEASE
application.properties文件的修改
# mq的ip地址
spring.rabbitmq.host=localhost
# mq的端口
spring.rabbitmq.port=8088
# mq的用户密码
spring.rabbitmq.password=guest
# mq的用户名
spring.rabbitmq.username=guest
# 开启mq的日志追踪
spring.cloud.bus.trace.enabled=true
之前在bootstrap的配置文件中management.endpoints.web.exposure.include=*暴露了所有endpoint,如果没有配置的话,需要进行配置management.endpoints.web.exposure.include=bus-refresh暴露出bus-refresh节点。
观察下启动日志
2019-04-15 15:47:33.198  WARN 35860 --- [           main] o.s.boot.actuate.endpoint.EndpointId     : Endpoint ID 'bus-env' contains invalid characters, please migrate to a valid format.
2019-04-15 15:47:33.205  WARN 35860 --- [           main] o.s.boot.actuate.endpoint.EndpointId     : Endpoint ID 'bus-refresh' contains invalid characters, please migrate to a valid format.
2019-04-15 15:47:33.961  INFO 35860 --- [           main] o.s.cloud.context.scope.GenericScope     : BeanFactory id=baac4e8e-51e6-329d-9818-ccb41443f5f8
2019-04-15 15:47:33.979  INFO 35860 --- [           main] faultConfiguringBeanFactoryPostProcessor : No bean named 'errorChannel' has been explicitly defined. Therefore, a default PublishSubscribeChannel will be created.
2019-04-15 15:47:34.019  INFO 35860 --- [           main] faultConfiguringBeanFactoryPostProcessor : No bean named 'taskScheduler' has been explicitly defined. Therefore, a default ThreadPoolTaskScheduler will be created.
2019-04-15 15:47:34.040  INFO 35860 --- [           main] faultConfiguringBeanFactoryPostProcessor : No bean named 'integrationHeaderChannelRegistry' has been explicitly defined. Therefore, a default DefaultHeaderChannelRegistry will be created.

2019-04-15 15:47:36.006  INFO 35860 --- [           main] o.s.s.c.ThreadPoolTaskScheduler          : Initializing ExecutorService 'taskScheduler'
2019-04-15 15:47:36.575  INFO 35860 --- [           main] o.s.s.concurrent.ThreadPoolTaskExecutor  : Initializing ExecutorService 'applicationTaskExecutor'
2019-04-15 15:47:37.511  INFO 35860 --- [           main] o.s.b.a.e.web.EndpointLinksResolver      : Exposing 22 endpoint(s) beneath base path '/actuator'
2019-04-15 15:47:37.635  INFO 35860 --- [           main] o.s.c.s.m.DirectWithAttributesChannel    : Channel 'spring-cloud-config-client-1.springCloudBusInput' has 1 subscriber(s).
2019-04-15 15:47:37.919  INFO 35860 --- [           main] o.s.i.monitor.IntegrationMBeanExporter   : Registering MessageChannel errorChannel
2019-04-15 15:47:38.102  INFO 35860 --- [           main] o.s.i.monitor.IntegrationMBeanExporter   : Registering MessageChannel springCloudBusInput
2019-04-15 15:47:38.153  INFO 35860 --- [           main] o.s.i.monitor.IntegrationMBeanExporter   : Registering MessageChannel nullChannel
2019-04-15 15:47:38.206  INFO 35860 --- [           main] o.s.i.monitor.IntegrationMBeanExporter   : Registering MessageChannel springCloudBusOutput
2019-04-15 15:47:38.231  INFO 35860 --- [           main] o.s.i.monitor.IntegrationMBeanExporter   : Registering MessageHandler errorLogger
2019-04-15 15:47:38.266  INFO 35860 --- [           main] o.s.i.monitor.IntegrationMBeanExporter   : Registering MessageHandler org.springframework.cloud.stream.binding.StreamListenerMessageHandler@124d26ba
2019-04-15 15:47:38.358  INFO 35860 --- [           main] o.s.i.endpoint.EventDrivenConsumer       : Adding {logging-channel-adapter:_org.springframework.integration.errorLogger} as a subscriber to the 'errorChannel' channel
2019-04-15 15:47:38.359  INFO 35860 --- [           main] o.s.i.channel.PublishSubscribeChannel    : Channel 'spring-cloud-config-client-1.errorChannel' has 1 subscriber(s).
2019-04-15 15:47:38.359  INFO 35860 --- [           main] o.s.i.endpoint.EventDrivenConsumer       : started _org.springframework.integration.errorLogger
2019-04-15 15:47:43.762  INFO 35860 --- [           main] c.c.c.ConfigServicePropertySourceLocator : Located environment: name=spring-cloud-config-client, profiles=[dev], label=master, version=f249fd7d30cd33be291ab1c0d82b6047f6695a4c, state=null
2019-04-15 15:47:43.763  INFO 35860 --- [           main] b.c.PropertySourceBootstrapConfiguration : Located property source: CompositePropertySource {name='configService', propertySources=[MapPropertySource {name='configClient'}, MapPropertySource {name='http://gitlab.alibaba-inc.com/wb-wxj443666/spring-cloud-study.git/config/spring-cloud-config-client-dev.properties'}]}
2019-04-15 15:47:43.975  INFO 35860 --- [           main] o.s.a.r.c.CachingConnectionFactory       : Attempting to connect to: [localhost:8088]
2019-04-15 15:47:44.109  INFO 35860 --- [           main] o.s.a.r.c.CachingConnectionFactory       : Created new connection: rabbitConnectionFactory#6f2e1024:0/SimpleConnection@74ba6ff5 [delegate=amqp://[email protected]:8088/, localPort= 64876]
2019-04-15 15:47:44.227  INFO 35860 --- [           main] o.s.c.s.m.DirectWithAttributesChannel    : Channel 'spring-cloud-config-client-1.springCloudBusOutput' has 1 subscriber(s).
2019-04-15 15:47:44.263  INFO 35860 --- [           main] c.s.b.r.p.RabbitExchangeQueueProvisioner : declaring queue for inbound: springCloudBus.anonymous.3hRrK5n5R_Cf4QbeWTpCTQ, bound to: springCloudBus
2019-04-15 15:47:44.318  INFO 35860 --- [           main] o.s.i.monitor.IntegrationMBeanExporter   : Registering MessageChannel springCloudBus.anonymous.3hRrK5n5R_Cf4QbeWTpCTQ.errors
2019-04-15 15:47:44.442  INFO 35860 --- [           main] o.s.c.stream.binder.BinderErrorChannel   : Channel 'spring-cloud-config-client-1.springCloudBus.anonymous.3hRrK5n5R_Cf4QbeWTpCTQ.errors' has 1 subscriber(s).
2019-04-15 15:47:44.443  INFO 35860 --- [           main] o.s.c.stream.binder.BinderErrorChannel   : Channel 'spring-cloud-config-client-1.springCloudBus.anonymous.3hRrK5n5R_Cf4QbeWTpCTQ.errors' has 2 subscriber(s).
2019-04-15 15:47:44.512  INFO 35860 --- [           main] o.s.i.a.i.AmqpInboundChannelAdapter      : started inbound.springCloudBus.anonymous.3hRrK5n5R_Cf4QbeWTpCTQ
2019-04-15 15:47:44.650  INFO 35860 --- [           main] o.s.b.w.embedded.tomcat.TomcatWebServer  : Tomcat started on port(s): 8080 (http) with context path ''
2019-04-15 15:47:44.654  INFO 35860 --- [           main] s.s.s.SpringCloudConfigClientApplication : Started SpringCloudConfigClientApplication in 26.703 seconds (JVM running for 32.515)
了解到spring cloud bus已经正常运行了。同理,可以在写一个client模块也用同样方式去启动,笔者让client second端指定的配置文件为spring-cloud-config-client-second-dev.properties ,相应的在git仓库创建这个文件。

服务端继续保持现状,无需改变。现在启动了一个服务端,两个客户端,分别有各自的配置文件。

分别修改每个配置文件的值


修改后,可以手动发送一个post请求到任一client端,如localhost:7005/actuator/bus-refresh

也可以如图通过idea的endpoints视图手动点击触发。接下来验证结果的时候到了


只发送了一次请求,可以看到所有子服务都更新了。如果只想一次刷新部分子服务怎办呢,
client ip:port/actuator/destination=param 的请求就可以, http://127.0.0.1:8080/actuator/bus-refresh/destination=customers:7005,比如这个post请求指定了只更新port等于7005的服务项目。
接下来介绍第二种改变server端来实现子服务动态刷新获取最新值的方法。
server端
在现有client端都加入了spring cloud bus 的基础上。server端和client类似,也加入一样的依赖和配置消息。唯一的差异应该在localhost:7001/actuator/bus-refresh post请求上,server端只需向自己发送一个post请求,就可以让所有子服务获取最新的文件。
这两种解决方案没多大区别,孰优孰劣也没法确定,看个人使用喜好吧。
spring cloud config的高可用配置
关于网上所用的大部分spring cloud config高可用都是通过和eureka搭配使用,让其成为一项服务注册上去。从笔者而言,因为eureka2之后的版本闭源,放弃维护后。现在很多企业也不愿采用eureka,而选择继续维护的zoomkeeper。spring zoomkepper集成了自己的配置中心,不需要专门去构建spring cloud config,所以目前用eureka去做spring cloud config高可用的话有些鸡肋,不过针对目前部分企业还在使用eureka暂时无法更换注册中心的话,还是有存在必要的,不过笔者更推荐第二种更改客户端配置实现高可用。
修改client端配置文件实现高可用
spring cloud config 在2之后的版本已经支持高可用了,只需要更改客户端的spring.cloud.config.uri=http://localhost:7001, http://localhost:7002就可以。启动和运行时会自动扫描所配置的server端是否可用,如果第一个无法使用就继续扫描下一个,直到可用为止。
main] c.c.c.ConfigServicePropertySourceLocator : Multiple Config Server Urls found listed.
2019-04-15 15:47:28.824  INFO 35860 --- [           main] c.c.c.ConfigServicePropertySourceLocator : Fetching config from server at : http://localhost:7001
2019-04-15 15:47:29.197  INFO 35860 --- [           main] c.c.c.ConfigServicePropertySourceLocator : Connect Timeout Exception on Url - http://localhost:7001. Will be trying the next url if available
2019-04-15 15:47:29.197  INFO 35860 --- [           main] c.c.c.ConfigServicePropertySourceLocator : Fetching config from server at : http://localhost:7002
2019-04-15 15:47:32.274  INFO 35860 --- [           main] c.c.c.ConfigServicePropertySourceLocator : Located environment: name=spring-cloud-config-client, profiles=[dev], label=master, version=f249fd7d30cd33be291ab1c0d82b6047f6695a4c, state=null
从日志可以确认到client端启动时候的server端选择,相比erueka服务注册, 更简洁也无需更多的配置。