SpringBoot学习笔记四——整合
SpringBoot连接数据库&整合MyBatis框架
连接Oracle需要的依赖:
	com.oracle
	ojdbc6
	version>11.2.0.1.0
springBoot配置连接Oracle:
#springboot连接Oracle数据库
spring.datasource.driver-class-name = oracle.jdbc.OracleDriver
spring.datasource.url = jdbc:oracle:thin:@ip:port/key
spring.datasource.username = username
spring.datasource.password = password
我们可以使用SpringBoot自带的JdbcTemplate模板进行操作数据库:
        String sql = "select * from TICKET where START_STATION = ?";
		RowMapper rowMapper = new BeanPropertyRowMapper(TicketDto.class);
		List ticketDtoResultList = null;
		try {
			ticketDtoResultList = (List) jdbcTemplate.query(sql, rowMapper,startArea);
		} catch (DataAccessException e) {
			logger.debug("!!!!!!!!!SQL查询出错"+e);
		}
单条记录查询使用queryForObject方法;
实际上更多的是使用MyBatis框架进行操作:
整合MyBatis
引入依赖:
    org.mybatis.spring.boot
    mybatis-spring-boot-starter
    2.1.0
编写Mapper接口:
package com.mlgg.mapper;

import com.mlgg.my12306.param.TicketDto;
import org.apache.ibatis.annotations.Mapper;
import org.apache.ibatis.annotations.Param;
import org.apache.ibatis.annotations.Select;

import java.util.List;

@Mapper
public interface TicketMapper {

    @Select("select * from TICKET where START_STATION = #{startArea} AND END_STATION = #{distArea} ")
    List checkTicketByStationAndTime(@Param("startArea") String startArea, @Param("distArea") String distArea, @Param("startTime") String startTime);
}
测试一下:
package com.mlgg.service;

import com.mlgg.mapper.TicketMapper;
import com.mlgg.my12306.param.TicketDto;
import org.junit.Test;
import org.junit.runner.RunWith;
import org.springframework.beans.factory.annotation.Autowired;
import org.springframework.boot.test.context.SpringBootTest;
import org.springframework.test.context.junit4.SpringRunner;

import java.util.List;

@RunWith(SpringRunner.class)
@SpringBootTest
public class ServiceApplicationTests {
    @Autowired
    TicketMapper ticketMapper;

	@Test
    public void CheckTicket(){
        List ResultList = ticketMapper.checkTicketByStationAndTime("西安市", "北京市", "");
        for (TicketDto dto: ResultList
             ) {
            System.out.println(dto);
        }
    }
}
结果:
SpringBoot整合RabbitMQ
引入starter:
            org.springframework.boot
            spring-boot-starter-amqp
SpringBoot-RabbitMQ的自动配置文件——RabbitAutoConfiguration.java 提供了自动创建Rabbit工厂ConnectionFactory,创建工厂根据的Rabbit配置在RabbitProperties.java中,将Rabbit发送和接收消息封装在RabbitTemplate.java中,将Rabbit的管理封装在AmqpAdmin.java中。
整合的时候假设我们已经入门了RabbitMQ 哈 ~
测试消息中间件
我们前面说了,Rabbit消息操作封装在RabbitTemplate中,且已经交给了Spring管理,所以我们在测试的时候将RabbitTemplate注入到测试类中,编写发布者和订阅者测试方法:
package com.mlgg.demo;

import org.junit.Test;
import org.junit.runner.RunWith;
import org.springframework.amqp.core.AmqpTemplate;
import org.springframework.beans.factory.annotation.Autowired;
import org.springframework.boot.test.context.SpringBootTest;
import org.springframework.test.context.junit4.SpringRunner;

import java.util.ArrayList;
import java.util.Arrays;
import java.util.HashMap;
import java.util.Map;

@RunWith(SpringRunner.class)
@SpringBootTest
public class DemoApplicationTests {

    @Autowired
    AmqpTemplate amqpTemplate;

    //Publisher
    @Test
    public void contextLoads() {
        Map map = new HashMap<>();
        map.put("msg", "这是第一条消息");
        map.put("data", Arrays.asList("hello world"));
        map.put("flag", false);
        amqpTemplate.convertAndSend("exchange.direct","atguigu.news", map);
    }

    @Test
    public void receiveLoads() throws Exception {
        Object o = amqpTemplate.receiveAndConvert("atguigu.news");
        if (o == null) {
            throw new Exception("null");
        } else {
            System.out.println(o.getClass());
            System.out.println(o);
        }
    }

}
提供者将消息进行序列化并发送,我们在管理平台上看一下发送的消息:
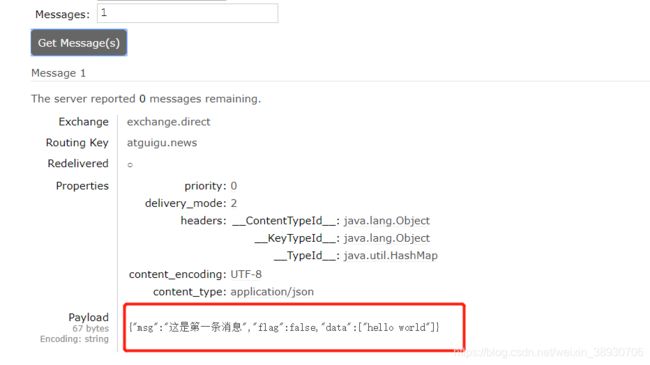
Payload乱码的原因是,rabbitMQ默认使用JVM序列化,我们可以通过覆写配置来实现JSON序列化:
package com.mlgg.demo.configuration;

import org.springframework.amqp.support.converter.Jackson2JsonMessageConverter;
import org.springframework.amqp.support.converter.MessageConverter;
import org.springframework.context.annotation.Bean;
import org.springframework.context.annotation.Configuration;

@Configuration
public class MyAMQPConfig {

    @Bean
    public MessageConverter messageConverter(){
        return new Jackson2JsonMessageConverter();
    }
}
消费者在控制台根据序列化结果进行反序列化,打印了订阅到的消息,看一下测试的结果:


