学习muduo库(12)之定时器相关的类TimerQueue
准备知识:
int timer_create(int clockid,int flags);

//成功返回0
参数:
clockid:
第一个参数一般为CLOCK_REALTIME或者CLOCK_MONOTONIC,其参数意义为参数意义
CLOCK_REALTIME:相对时间,从1970.1.1到目前时间,之所以说其为相对时间,是因为我们只要改变当前系统的时间,从1970.1.1到当前时间就会发生变化,所以说其为相对时间
CLOCK_MONOTONIC:与CLOCK_REALTIME相反,它是以绝对时间为准,获取的时间为系统最近一次重启到现在的时间,更该系统时间对其没影响
flags:
- TFD_CLOEXEC::为新的文件描述符设置运行时关闭标志(FD_CLOEXEC)。
- TFD_NONBLOCK:为底层的打开文件描述符设置O_NONBLOCK标志,随后的读操作将是非阻塞式地。
解释:
timerfd_create()把时间变成了一个文件描述符,该文件描述符会在超时时变得可读,这种特性可以使我们在写服务器程序时,很方便的便把定时事件变成和其他I/O事件一样的处理方式.
int timerfd_settime(int fd,int flags
                    const struct itimerspec *new_value
                    struct itimerspec *old_value);
                    //成功返回0
参数:
fd:上面的timerfd_create()函数返回的定时器文件描述符
flags:flags为0表示相对定时器,为TFD_TIMER_ABSTIME表示绝对定时器
new_value:新的定时时间
old_value:旧的定时时间,一般为零。
struct itimerspec {
               struct timespec it_interval;  /* Interval for periodic timer */
               struct timespec it_value;     /* Initial expiration */
           };

struct timespec {
               time_t tv_sec;                /* Seconds */
               long   tv_nsec;               /* Nanoseconds */
           };
it_value;第一次到时时间
it_interval : 间隔时间,如果为一次定时器,此值为零。
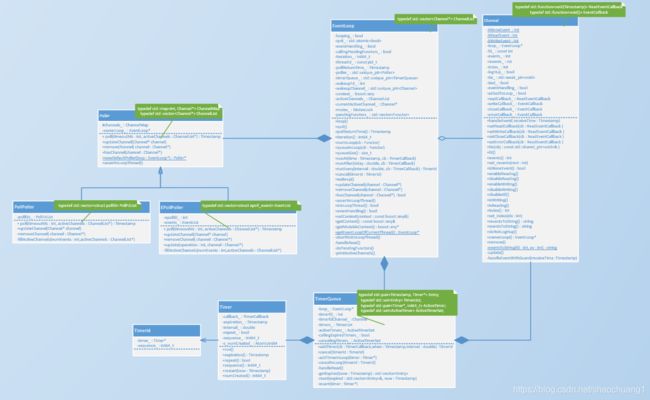
UML:
解释:
每一个eventloop都有一个timerqueue,每一个timerqueue会有很多timer。定时器相关的类设计的很巧妙,整个timerqueue仅仅只用了一个linux提供的timefd来实现的。而且整个定时器类都是不可见,只需要通过eventloop暴露出来的接口来使用就行了。而这里的定时器又好比是一个I/O事件,所以需要将timerqueue与一个channel关联起来,通过channel将定时器事件添加到poll或者是epoll中。
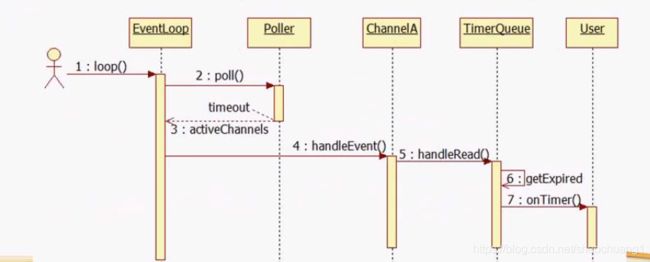
其实这里的定时器事件,与其他事件的处理工程相似,可以参考我的上一篇博客。
TImer是怎么做到线程安全的:
TimerId runAt(Timestamp time, TimerCallback cb);//在某个时刻运行定时器

TimerId runAfter(double delay, TimerCallback cb);//过一段时间运行定时器

TimerId runEvery(double interval, TimerCallback cb);//每隔一段时间运行定时器

void cancel(TimerId timerId);//取消定时器
以上是eventloop中用来设置定时器的接口,而且这几个接口是可以跨线程调用的,这是怎么做到线程安全的呢?
TimerId EventLoop::runAt(Timestamp time, TimerCallback cb)
{
  return timerQueue_->addTimer(std::move(cb), time, 0.0);
}


TimerId TimerQueue::addTimer(TimerCallback cb,//回调函数//增加一个定时器
                             Timestamp when,//超时时间
                             double interval)//间隔时间
{
  Timer* timer = new Timer(std::move(cb), when, interval);
  loop_->runInLoop(
      std::bind(&TimerQueue::addTimerInLoop, this, timer));
  return TimerId(timer, timer->sequence());
}


void EventLoop::runInLoop(Functor cb)//在I/O线程中执行某个回调函数,该函数可以跨线程调用
{
  if (isInLoopThread())
  {
    cb();//如果是当前I/O线程调用runinloop,则同步调用cb
  }
  else
  {
    queueInLoop(std::move(cb));//如果是其他线程调用runinloop,测异步的将cb添加到队列中
  }
}

void EventLoop::queueInLoop(Functor cb)
{
  {
  MutexLockGuard lock(mutex_);
  pendingFunctors_.push_back(std::move(cb));
  }

  if (!isInLoopThread() || callingPendingFunctors_)
  {
    wakeup();
  }
}
以上的函数需要一点耐心才能看明白。其实每一次设置定时器都会产生一个Timer,并将这个Timer添加到Timerqueue中。而如果在其他线程中调用了runAT()这个函数,“产生一个Timer,并将这个Timer添加到Timerqueue”这个过程,并不会在此线程中完成,而是将这个过程添加到了pendingFunctors_,最终在eventloop的loop中通过doPendingFunctors()来执行这个过程。也就是说所有的Timer都是由eventloop对象所在的线程生成的,因此是线程安全的。
有一个问题:
上面的操作虽然是保证了线程安全,但是将Timer的生成放在了loop()中,也就是说loop()中所有的事情都处理完了,才会生成Timer,这就会导致定时器不够精确。


