本文的主要内容是使用NVIDIA提供的Nsight Tegra软件建立OpenCL项目,测试设备为Nexus 7 2013 WiFi版(Android 4.4.4)。
主要参考的资料为“高通平台下安卓opencl小例子”[1],“基于 Android* 操作系统的 OpenCL™ 入门”[2]。
写这篇文章的目的是因为资料[1]中使用的是Eclipse作为开发工具,而用Eclipse+NDK开发感觉调试时不是很方便,而用集成在Visual Studio中的Nsight Tegra调试还是比较方便的。而且[1]中的OpenCL代码是写在C源文件中的,如果.cl文件内容较多时,看起来比较奇怪。
1.需要准备的工具软件(我现在正在使用的版本)
- Visual Studio 2013
- NVIDIA® Nsight™ Tegra®, Visual Studio Edition 3.0
- Android NDK r10e
- AdrenoSDK
- libOpenCL.so
其中AdrenoSDK需要在高通的官方网站下载,实际上只需要用到里面的几个CL头文件,文章末尾会提供下载,这样就不需要下载AdrenoSDK了;libOpenCL.so需要在你用adb pull命令从自己的测试设备上提取到PC机上。例如.so文件在/system/vendor/lib/目录下,就在PC上的命令行里面运行 adb pull /system/vendor/lib/libOpenCL.so 就好了[1]。
2.具体步骤
各种软件的安装就不在赘述了。
新建项目,如图所示,选择Hello World Demo。

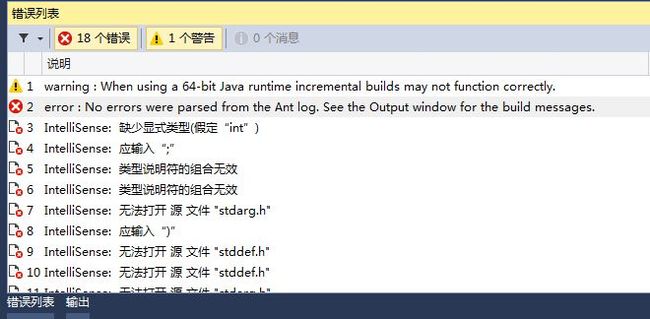
先生成一下项目,如果出现下面这样的错误,那就是Target API Level设置有误,因为我的Nexus 7的系统是4.4.4,所以选android-19。
在项目属性页面设置修改“Min Android API Level”和“Target Android API Level”。

xml文件里面也要修改。

这样就可以看到Hello World Demo编译成功的消息了。如果还有其它错误就根据输出的错误信息自行检查一下吧。
看到Demo编译成功,就可以进行下一步的操作了。
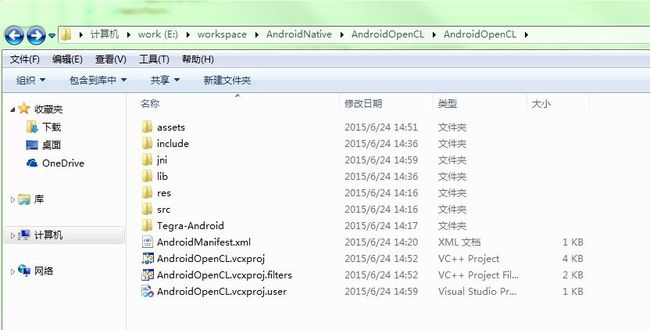
首先,如图所示,在项目文件夹下面添加include和lib文件夹,把CL文件夹(文章末尾会提供下载)复制到include里,把libOpenCL.so复制到lib里。
这样做的目的是后面可以使用到相对路径。然后在项目属性里面分别修改如下几个地方(主要就是引用OpenCL的头文件和库文件)。

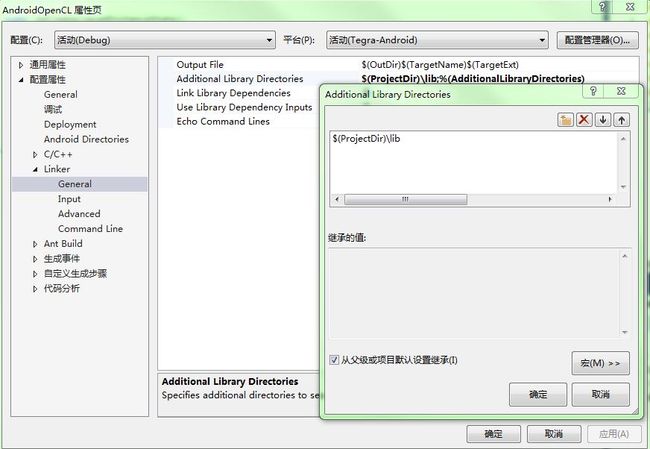
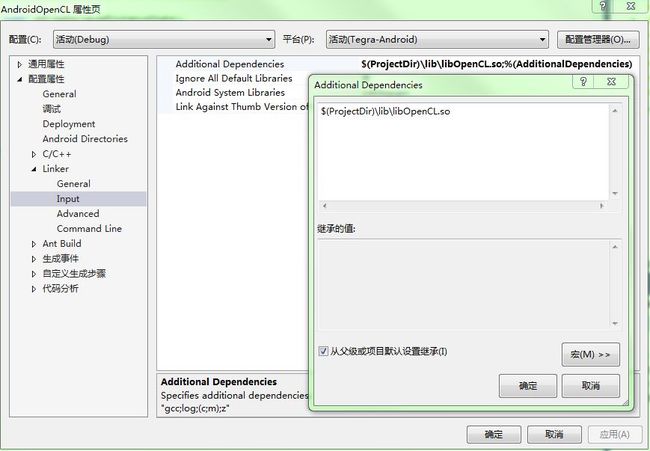
添加完后重新生成一下,无错误就可以继续下去。
修改HelloJni.java的内容如下。


  1 /*
  2  * Copyright (C) 2009 The Android Open Source Project
  3  *
  4  * Licensed under the Apache License, Version 2.0 (the "License");
  5  * you may not use this file except in compliance with the License.
  6  * You may obtain a copy of the License at
  7  *
  8  *      http://www.apache.org/licenses/LICENSE-2.0
  9  *
 10  * Unless required by applicable law or agreed to in writing, software
 11  * distributed under the License is distributed on an "AS IS" BASIS,
 12  * WITHOUT WARRANTIES OR CONDITIONS OF ANY KIND, either express or implied.
 13  * See the License for the specific language governing permissions and
 14  * limitations under the License.
 15  */
 16 package com.example.hellojni;
 17
 18 import java.io.BufferedReader;
 19 import java.io.IOException;
 20 import java.io.InputStream;
 21 import java.io.InputStreamReader;
 22
 23 import android.app.Activity;
 24 import android.widget.TextView;
 25 import android.os.Bundle;
 26
 27 public class HelloJni extends Activity
 28 {
 29     private TextView tv;
 30
 31     /** Called when the activity is first created. */
 32     @Override
 33     public void onCreate(Bundle savedInstanceState)
 34     {
 35         super.onCreate(savedInstanceState);
 36
 37         /*
 38          * Create a TextView and set its content. the text is retrieved by
 39          * calling a native function.
 40          */
 41         tv = new TextView(this);
 42         tv.setText(initOpenCL(getOpenCLProgram()));
 43         setContentView(tv);
 44     }
 45
 46     private String getOpenCLProgram()
 47     {
 48         /*
 49          * OpenCL program text is stored in a separate file in assets directory.
 50          * Here you need to load it as a single string.
 51          *
 52          * In fact, the program may be directly built into native source code
 53          * where OpenCL API is used, it is useful for short kernels (few lines)
 54          * because it doesn't involve loading code and you don't need to pass it
 55          * from Java to native side.
 56          */
 57
 58         try
 59         {
 60             StringBuilder buffer = new StringBuilder();
 61             InputStream stream = getAssets().open("step.cl");
 62             BufferedReader reader = new BufferedReader(new InputStreamReader(
 63                         stream));
 64             String s;
 65
 66             while ((s = reader.readLine()) != null)
 67             {
 68                 buffer.append(s);
 69                 buffer.append("\n");
 70             }
 71
 72             reader.close();
 73             return buffer.toString();
 74         }
 75         catch (IOException e)
 76         {
 77             e.printStackTrace();
 78         }
 79         return "";
 80
 81     }
 82
 83     /*
 84      * A native method that is implemented by the 'Android4' native library,
 85      * which is packaged with this application.
 86      */
 87
 88     /*
 89      * This is another native method declaration that is *not* implemented by
 90      * 'Android4'. This is simply to show that you can declare as many native
 91      * methods in your Java code as you want, their implementation is searched
 92      * in the currently loaded native libraries only the first time you call
 93      * them.
 94      *
 95      * Trying to call this function will result in a
 96      * java.lang.UnsatisfiedLinkError exception !
 97      */
 98
 99     private native String initOpenCL(String openCLProgramText);
100
101     public native String testOpenCL();
102
103     public native String getPlatformName();
104
105     public native String getDeviceName();
106
107     /*
108      * this is used to load the 'Android4' library on application startup. The
109      * library has already been unpacked into
110      * /data/data/com.example.HelloJni/lib/libAndroid4.so at installation time
111      * by the package manager.
112      */
113     static
114     {
115         System.loadLibrary("AndroidOpenCL");
116     }
117 }
在jni文件夹下面添加HelloJni.h,内容如下。
1 /* DO NOT EDIT THIS FILE - it is machine generated */ 2 #include3 /* Header for class com_example_ocl_MainActivity */ 4 5 #ifndef HelloJni 6 #define HelloJni 7 #ifdef __cplusplus 8 extern "C" { 9 #endif 10 /* 11 * Class: com_example_ocl_MainActivity 12 * Method: testopencl 13 * Signature: ()Ljava/lang/String; 14 */ 15 JNIEXPORT jstring JNICALL Java_com_example_hellojni_HelloJni_testOpenCL( 16 JNIEnv *, jobject); 17 18 /* 19 * Class: com_example_ocl_MainActivity 20 * Method: getPlatformName 21 * Signature: ()Ljava/lang/String; 22 */ 23 JNIEXPORT jstring JNICALL Java_com_example_hellojni_HelloJni_getPlatformName( 24 JNIEnv *, jobject); 25 26 /* 27 * Class: com_example_ocl_MainActivity 28 * Method: getDeviceName 29 * Signature: ()Ljava/lang/String; 30 */ 31 JNIEXPORT jstring JNICALL Java_com_example_hellojni_HelloJni_getDeviceName( 32 JNIEnv *, jobject); 33 34 JNIEXPORT jstring JNICALL Java_com_example_hellojni_HelloJni_initOpenCL( 35 JNIEnv *, jobject, jstring openCLProgramText); 36 37 #ifdef __cplusplus 38 } 39 #endif 40 #endif 41 void Init_OpenCL(); 42 void Context_cmd(); 43 void Create_Buffer(int *data); 44 void Create_program(); 45 void Set_arg(); 46 void Execution(); 47 void CopyOutResult(int*out);
修改HelloJni.cpp的内容如下。
1 #include2 #include <string.h> 3 #include 4 #include 5 #include <malloc.h> 6 #include 7 #include "HelloJni.h" 8 9 #define LEN(arr) sizeof(arr) / sizeof(arr[0]) 10 #define N 1024 11 #define NUM_THREAD 128 12 13 cl_uint num_device; 14 cl_uint num_platform; 15 cl_platform_id *platform; 16 cl_device_id *devices; 17 cl_int err; 18 cl_context context; 19 cl_command_queue cmdQueue; 20 cl_mem buffer, sum_buffer; 21 cl_program program; 22 cl_kernel kernel; 23 char src[10240]; 24 int num_block; 25 26 int test() 27 { 28 int* in, *out; 29 num_block = N / NUM_THREAD; 30 in = (int*)malloc(sizeof(int) * N); 31 out = (int*)malloc(sizeof(int) * num_block); 32 for (int i = 0; i < N; i++) 33 { 34 in[i] = 1; 35 } 36 Init_OpenCL(); 37 Context_cmd(); 38 Create_Buffer(in); 39 Create_program(); 40 Set_arg(); 41 Execution(); 42 CopyOutResult(out); 43 int sum = 0; 44 for (int i = 0; i < num_block; i++) 45 { 46 sum += out[i]; 47 } 48 return sum; 49 } 50 /* This is a trivial JNI example where we use a native method 51 * to return a new VM String. See the corresponding Java source 52 */ 53 extern "C" 54 JNIEXPORT jstring JNICALL 55 Java_com_example_hellojni_HelloJni_testOpenCL(JNIEnv* env, jobject thiz) 56 { 57 char result[10]; 58 sprintf(result, "%d\n", test()); 59 return env->NewStringUTF(result); 60 } 61 62 extern "C" 63 JNIEXPORT jstring JNICALL 64 Java_com_example_hellojni_HelloJni_getPlatformName(JNIEnv* env, jobject thiz) 65 { 66 char buffer[1024]; 67 clGetPlatformInfo(platform[0], CL_PLATFORM_NAME, sizeof(buffer), buffer, 68 NULL); 69 return env->NewStringUTF(buffer); 70 } 71 72 extern "C" 73 JNIEXPORT jstring JNICALL 74 Java_com_example_hellojni_HelloJni_getDeviceName(JNIEnv* env, jobject thiz) 75 { 76 char buffer[1024]; 77 clGetDeviceInfo(devices[0], CL_DEVICE_NAME, sizeof(buffer), buffer, NULL); 78 return env->NewStringUTF(buffer); 79 } 80 81 extern "C" 82 JNIEXPORT jstring JNICALL 83 Java_com_example_hellojni_HelloJni_initOpenCL(JNIEnv* env, jobject thiz, 84 jstring openCLProgramText) 85 { 86 const char* openCLProgramTextNative = env->GetStringUTFChars( 87 openCLProgramText, 0); 88 strcpy(src, openCLProgramTextNative); 89 char result[10]; 90 sprintf(result, "%d\n", test()); 91 return env->NewStringUTF(result); 92 } 93 94 void Init_OpenCL() 95 { 96 size_t nameLen1; 97 char platformName[1024]; 98 99 err = clGetPlatformIDs(0, 0, &num_platform); 100 platform = (cl_platform_id*)malloc(sizeof(cl_platform_id) * num_platform); 101 err = clGetPlatformIDs(num_platform, platform, NULL); 102 103 err = clGetDeviceIDs(platform[0], CL_DEVICE_TYPE_GPU, 0, NULL, &num_device); 104 devices = (cl_device_id*)malloc(sizeof(cl_device_id) * num_device); 105 err = clGetDeviceIDs(platform[0], CL_DEVICE_TYPE_GPU, num_device, devices, 106 NULL); 107 108 } 109 110 void Context_cmd() 111 { 112 context = clCreateContext(NULL, num_device, devices, NULL, NULL, &err); 113 cmdQueue = clCreateCommandQueue(context, devices[0], 0, &err); 114 } 115 116 void Create_Buffer(int *data) 117 { 118 119 buffer = clCreateBuffer(context, CL_MEM_READ_ONLY | CL_MEM_COPY_HOST_PTR, 120 sizeof(int) * N, data, &err); 121 sum_buffer = clCreateBuffer(context, CL_MEM_WRITE_ONLY, 122 sizeof(int) * num_block, 0, &err); 123 } 124 125 void Create_program() 126 { 127 const char * src0 = src; 128 program = clCreateProgramWithSource(context, LEN(&src0), &src0, NULL, NULL); 129 err = clBuildProgram(program, num_device, devices, NULL, NULL, NULL); 130 kernel = clCreateKernel(program, "redution", NULL); 131 } 132 133 void Set_arg() 134 { 135 err = clSetKernelArg(kernel, 0, sizeof(cl_mem), &buffer); 136 err = clSetKernelArg(kernel, 1, sizeof(cl_mem), &sum_buffer); 137 err = clSetKernelArg(kernel, 2, sizeof(int) * NUM_THREAD, NULL); 138 } 139 140 void Execution() 141 { 142 const size_t globalWorkSize[1] = { N }; 143 const size_t localWorkSize[1] = { NUM_THREAD }; 144 err = clEnqueueNDRangeKernel(cmdQueue, kernel, 1, NULL, globalWorkSize, 145 localWorkSize, 0, NULL, NULL); 146 clFinish(cmdQueue); 147 } 148 149 void CopyOutResult(int*out) 150 { 151 err = clEnqueueReadBuffer(cmdQueue, sum_buffer, CL_TRUE, 0, 152 sizeof(int) * num_block, out, 0, NULL, NULL); 153 }
在jni文件夹下面添加Application.mk,内容如下。
APP_ABI := armeabi-v7a
在jni文件夹下面添加Android.mk,内容如下。
LOCAL_PATH := $(call my-dir)

include $(CLEAR_VARS)
LOCAL_MODULE    := AndroidOpenCL
LOCAL_SRC_FILES := HelloJni.cpp
LOCAL_LDFLAGS += -llog  -lOpenCL
include $(BUILD_SHARED_LIBRARY)
在项目中添加assets文件夹,在此文件夹内新建step.cl文件,内容如下。
 1 __kernel void redution(
 2     __global int *data,
 3     __global int *output,
 4     __local int *data_local
 5     )
 6 {
 7     int gid = get_group_id(0);
 8     int tid = get_global_id(0);
 9     int size = get_local_size(0);
10     int id = get_local_id(0);
11     data_local[id] = data[tid];
12     barrier(CLK_LOCAL_MEM_FENCE);
13     for (int i = size / 2; i>0; i >>= 1)
14     {
15         if (id<i)
16         {
17             data_local[id] += data_local[id + i];
18         }
19         barrier(CLK_LOCAL_MEM_FENCE);
20     }
21     if (id == 0)
22     {
23         output[gid] = data_local[0];
24     }
25 }
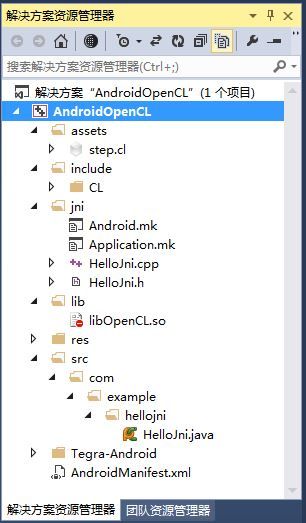
最终解决方案资源管理器里看起来是这个样子的(显示所有文件状态)。
这样就可以重新生成再运行了。需要调试的话,直接在cpp文件中打断点就行了,很方便。
3.资源下载
整个工程的打包文件,其中包含了CL文件夹和libOpenCL.so文件,注意,这里的libOpenCL.so文件是从Nexus 7 2013 WiFi版中提取的,可能不适合你的设备。
链接: http://pan.baidu.com/s/1sjl04JN 密码: 6xtt
4.参考资料
[1]wcj0626,高通平台下安卓opencl小例子,2014.05.19,http://blog.csdn.net/wcj0626/article/details/26272019
[2]Vadim Kartoshkin (Intel),基于 Android* 操作系统的 OpenCL™ 入门,2014.05.12,https://software.intel.com/zh-cn/android/articles/opencl-basic-sample-for-android-os?utm_campaign=eoe&utm_source=eoe.cn&utm_medium=Link&utm_content=intel-optimization
PS:
第一次写技术blog,各位见谅,如有问题,欢迎讨论~