利用第三方Nginx插件监控代理后端节点的服务器
淘宝技术团队开发了一个Tengine(Nginx的分支)模块nginx_upstream_check_module,用于提供主动式后端服务器健康检查。通过它可以检测后端realserver的健康状态,如果后端realserver不可用,则所有的请求就不会转发到该节点上。
Tengine原生支持这个模块,而Nginx则需要通过打补丁的方式将该模块添加到Nginx中。补丁下载地址:https://github.com/yaoweibin/nginx_upstream_check_module。下面介绍一下如何使用这个模块。
1)安装nginx_upstream_check_module模块。
# 系统已经安装了nginx-1.6.3软件
[root@lb01 ~]# /application/nginx/sbin/nginx -V
nginx version: nginx/1.6.3
[root@lb01 ~]# cd /home/oldboy/tools/
# 下载补丁包
[root@lb01 tools]# wget https://codeload.github.com/yaoweibin/nginx_upstream_check_module/zip/master
[root@lb01 tools]# unzip master
# 因为是对源程序打补丁,所以还需要nginx软件包
[root@lb01 tools]# cd nginx-1.6.3
[root@lb01 nginx-1.6.3]# patch -p1 <../nginx_upstream_check_module-master/check_1.5.12+.patch
# 编译参数要和以前一致,最后加上--add-module=../nginx_upstream_check_module-master/
[root@lb01 nginx-1.6.3]# ./configure --prefix=/application/nginx-1.6.3--user=nginx --group=nginx --with-http_ssl_module--with-http_stub_status_module --add-module=../nginx_upstream_check_module-master/
[root@lb01 nginx-1.6.3]# make
# 如果是新装的nginx则继续执行下面make install一步,如果给已经安装的nginx系统打监控补丁就不用执行make install了,本文忽略执行make install。
# make的作用就是重新生成Nginx二进制启动命令而已。
# 操作前备份
[root@lb01 nginx-1.6.3]# mv/application/nginx/sbin/nginx{,.ori}
# 将打过补丁的nginx二进制程序复制到/application/nginx/sbin/目录下
[root@lb01 nginx-1.6.3]# cp ./objs/nginx /application/nginx/sbin/
# 检查是否正常
[root@lb01 nginx-1.6.3]# /application/nginx/sbin/nginx -t
nginx: the configuration file /application/nginx-1.6.3/conf/nginx.confsyntax is ok
nginx: configuration file /application/nginx-1.6.3/conf/nginx.conftest is successful
[root@lb01 nginx-1.6.3]# /application/nginx/sbin/nginx -V
nginx version: nginx/1.6.3
built by gcc 4.4.7 20120313 (Red Hat 4.4.7-11) (GCC)
TLS SNI support enabled
configure arguments: --prefix=/application/nginx-1.6.3 --user=nginx--group=nginx --with-http_ssl_module --with-http_stub_status_module --add-module=../nginx_upstream_check_module-master/
2)配置Nginx健康检查,如下:
[root@lb01 nginx-1.6.3]# vi /application/nginx/conf/nginx.conf
worker_processes 1;
events {
worker_connections 1024;
}
http {
include mime.types;
default_type application/octet-stream;
sendfile on;
keepalive_timeout 65;
upstream static_pools {
server 10.0.0.9:80weight=1;
server 10.0.0.10:80weight=1;
check interval=3000 rise=2 fall=5 timeout=1000 type=http;
#<== interval=3000表示检查节点间隔3秒,fall=5表示当检测节点连续5次宕机后,摘除节点,rise=2表示节点恢复后检测两次成功(rise)方加入集群,超时时间为1秒,检查的协议是http。,这点有点模仿haproxy健康检查的意味。
}
upstream default_pools {
server 10.0.0.11:80weight=1;
}
server {
listen 80;
server_name www.etiantian.org;
location / {
root html;
index index.html index.htm;
proxy_pass http://default_pools;
includeproxy.conf;
}
location ~.*.(gif|jpg|jpeg|png|bmp|swf|css|js)$ {
proxy_pass http://static_pools;
includeproxy.conf;
}
location /status {
check_status;
access_log off;
}
}
}
3)重启Nginx负载
[root@lb01 nginx-1.6.3]# /application/nginx/sbin/nginx -s stop
[root@lb01 nginx-1.6.3]# /application/nginx/sbin/nginx
#注意此处必须重启Nginx,不能重新加载。
4)健康检查参数说明
# check interval=3000 rise=2 fall=5 timeout=1000 type=http;
上面配置的意思是,对static_pools这个负载均衡条目中的所有节点,每隔3秒检测一次,请求2次正常则标记realserver状态为up,如果检测5次都失败,则标记realserver的状态为down,超时时间为1秒,检查的协议是http。更详细用法见官网http://tengine.taobao.org。
4)访问http://10.0.0.7/status页面时,显示如图11-13所示。
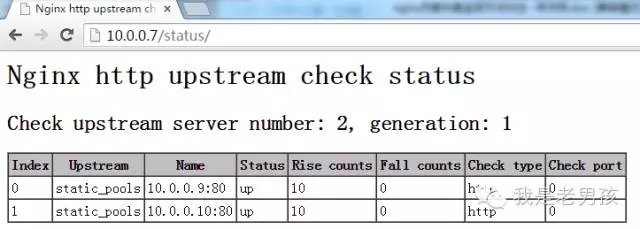
图11-13正常状态下Nginx节点健康检查状态
5)测试节点故障的命令如下:
[root@web01 ~]# /application/nginx/sbin/nginx -s stop
访问http://10.0.0.7/status页面时,显示如图11-14所示。

图11-14非正常状态下Nginx节点健康检查状态
特别说明:
除了此种插件的方法外,我们也可以自己开发简单的SHELL脚本监控达到上述效果,具体代码可见:http://oldboy.blog.51cto.com/2561410/1656844。相关免费视频讲解见http://edu.51cto.com/index.php?do=lesson&id=70879
本文转自老男孩作者的新书《跟老男孩学习linux运维:Web集群实战》