SSM整合
目录
- 一、概述
- 二、创建maven工程
- 三、引入坐标依赖
- 四、代码准备
- 1.准备实体类
- 2.编写dao接口
- 3.编写service
- 4.编写service实现类
- 五、搭建Spring框架
- 1.编写spring的配置文件
- 2.将service交给Spring的ioc管理
- 3.测试Spring
- 六、搭建SpringMVC
- 1.编写index.jsp
- 2.配置前端控制器
- 3.配置一个过滤器,解决中文乱码
- 4.创建springmvc.xml配置文件
- 5.编写Controller
- 6.启动服务器测试SpringMVC
- 七、Spring整合SpringMVC
- 1.在web.xml中配置监听器
- 2.测试结果
- 八、搭建Mybatis环境
- 1.编写SqlMapConfig.xml
- 2.编写sql语句
- 3.编写测试方法
- 4.查看结果
- 九、Spring整合Mybatis
- 1.将SqlMapConfig.xml整合到applicationContext.xml中
- 2.将accountDao交给spring来管理
- 3.测试代码
- 4.查看结果
- 十、ssm整合
- 十一、页面显示
- 十二、回顾
一、概述
整合ssm之前,在回顾一下ssm作用:
- SpringMVC:web层,用来处理用户请求
- Spring:处于中间的位置,其中最出名的ioc控制反转和aop面向切面编程
- Mybatis:用于dao层,和数据库交互
ssm整合首先要先搭建好Spring环境,通过Spring去整合Mybatis和SpringMVC,还是要拿出之前的那张图

在ssm整合这个案例中,主要的需求是,在index.jsp中点击”查询account“,然后将请求传递到Controller,调用service层,然后service调用dao层,最后将结果返回到显示页面list.jsp

创建ssm项目的整合,应该做到对每个框架进行单独的测试,当配置完一个框架,就要进行测试
二、创建maven工程
因为要创建web项目,所以可以选择一个骨架,

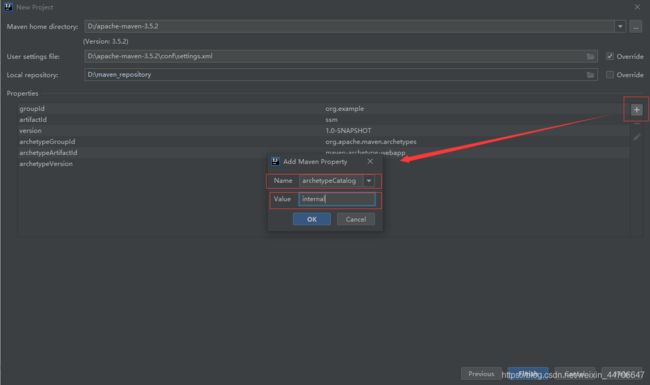
在创建项目的时候可以添加一个键值对,这样在创建maven工程的时候会加快速度,同时也可以选择阿里云的镜像,这样创建工程就更快
[外链图片转存失败,源站可能有防盗链机制,建议将图片保
看到success则工程创建完毕!
三、引入坐标依赖
 <properties>
    <project.build.sourceEncoding>UTF-8project.build.sourceEncoding>
    <maven.compiler.source>1.8maven.compiler.source>
    <maven.compiler.target>1.8maven.compiler.target>

    <spring.version>5.0.2.RELEASEspring.version>
    <slf4j.version>1.6.6slf4j.version>
    <log4j.version>1.2.12log4j.version>
    <mysql.version>5.1.6mysql.version>
    <mybatis.version>3.4.5mybatis.version>
  properties>
 <dependencies>


    <dependency>
      <groupId>org.aspectjgroupId>
      <artifactId>aspectjweaverartifactId>
      <version>1.6.8version>
    dependency>

    <dependency>
      <groupId>org.springframeworkgroupId>
      <artifactId>spring-aopartifactId>
      <version>${spring.version}version>
    dependency>

    <dependency>
      <groupId>org.springframeworkgroupId>
      <artifactId>spring-contextartifactId>
      <version>${spring.version}version>
    dependency>

    <dependency>
      <groupId>org.springframeworkgroupId>
      <artifactId>spring-webartifactId>
      <version>${spring.version}version>
    dependency>

    <dependency>
      <groupId>org.springframeworkgroupId>
      <artifactId>spring-webmvcartifactId>
      <version>${spring.version}version>
    dependency>

    <dependency>
      <groupId>org.springframeworkgroupId>
      <artifactId>spring-testartifactId>
      <version>${spring.version}version>
    dependency>

    <dependency>
      <groupId>org.springframeworkgroupId>
      <artifactId>spring-txartifactId>
      <version>${spring.version}version>
    dependency>

    <dependency>
      <groupId>org.springframeworkgroupId>
      <artifactId>spring-jdbcartifactId>
      <version>${spring.version}version>
    dependency>

    <dependency>
      <groupId>junitgroupId>
      <artifactId>junitartifactId>
      <version>4.12version>
      <scope>compilescope>
    dependency>

    <dependency>
      <groupId>mysqlgroupId>
      <artifactId>mysql-connector-javaartifactId>
      <version>${mysql.version}version>
    dependency>

    <dependency>
      <groupId>javax.servletgroupId>
      <artifactId>servlet-apiartifactId>
      <version>2.5version>
      <scope>providedscope>
    dependency>

    <dependency>
      <groupId>javax.servlet.jspgroupId>
      <artifactId>jsp-apiartifactId>
      <version>2.0version>
      <scope>providedscope>
    dependency>

    <dependency>
      <groupId>jstlgroupId>
      <artifactId>jstlartifactId>
      <version>1.2version>
    dependency>


    <dependency>
      <groupId>log4jgroupId>
      <artifactId>log4jartifactId>
      <version>${log4j.version}version>
    dependency>

    <dependency>
      <groupId>org.slf4jgroupId>
      <artifactId>slf4j-apiartifactId>
      <version>${slf4j.version}version>
    dependency>

    <dependency>
      <groupId>org.slf4jgroupId>
      <artifactId>slf4j-log4j12artifactId>
      <version>${slf4j.version}version>
    dependency>


    <dependency>
      <groupId>org.mybatisgroupId>
      <artifactId>mybatisartifactId>
      <version>${mybatis.version}version>
    dependency>

    <dependency>
      <groupId>org.mybatisgroupId>
      <artifactId>mybatis-springartifactId>
      <version>1.3.0version>
    dependency>

    <dependency>
      <groupId>c3p0groupId>
      <artifactId>c3p0artifactId>
      <version>0.9.1.2version>
      <type>jartype>
      <scope>compilescope>
    dependency>

    <dependency>
      <groupId>junitgroupId>
      <artifactId>junitartifactId>
      <version>4.11version>
      <scope>testscope>
    dependency>
  dependencies>
四、代码准备
因为webapp骨架,不会给我们自动创建java和resource目录,所以我们需要手动创建,并且make directory as 一下,在idea的2019.3的版本中,创建文件夹时,idea可以让我们选择java或者resource,这样就可以不用make directory as
1.准备实体类
com.ssm.domain.Account
/**
 * author by four and ten
 * create by 2020/4/7 20:24
 */
public class Account implements Serializable {
    private Integer id;
    private String name;
	private Double money;

    public Integer getId() {
        return id;
    }

    public void setId(Integer id) {
        this.id = id;
    }

    public String getName() {
        return name;
    }

    public void setName(String name) {
        this.name = name;
    }

    public Double getMoney() {
        return money;
    }

    public void setMoney(Double money) {
        this.money = money;
    }
}
2.编写dao接口
com.ssm.dao.AccountDao
/**
 * author by four and ten
 * create by 2020/4/7 20:26
 */
public interface AccountDao {
    /**
     * 保存账户
     * @param account
     */
    public void saveAccount(Account account);

    /**
     * 查询账户
     * @return
     */
    public List<Account> findAll();
}
3.编写service
com.ssm.service.AccountService
/**
 * author by four and ten
 * create by 2020/4/7 20:29
 */
public interface AccountService {
    /**
     * 保存账户
     * @param account
     */
    public void saveAccount(Account account);

    /**
     * 查询账户
     * @return
     */
    public List<Account> findAll();
}
4.编写service实现类
com.ssm.service.Impl.AccountServiceImpl
/**
 * author by four and ten
 * create by 2020/4/7 20:30
 */
public class AccountServiceImpl implements AccountService {

    private AccountDao accountDao;

    @Override
    public void saveAccount(Account account) {
        accountDao.saveAccount(account);
    }

    @Override
    public List<Account> findAll() {
        List<Account> accounts = accountDao.findAll();
        System.out.println("service层");
        return accounts;
    }
}
五、搭建Spring框架
1.编写spring的配置文件
配置文件很显然需要写在resources目录下applicationContext.xml
<beans xmlns="http://www.springframework.org/schema/beans"
       xmlns:xsi="http://www.w3.org/2001/XMLSchema-instance"
       xmlns:context="http://www.springframework.org/schema/context"
       xmlns:aop="http://www.springframework.org/schema/aop"
       xmlns:tx="http://www.springframework.org/schema/tx"
       xsi:schemaLocation="http://www.springframework.org/schema/beans
	http://www.springframework.org/schema/beans/spring-beans.xsd
	http://www.springframework.org/schema/context
	http://www.springframework.org/schema/context/spring-context.xsd
	http://www.springframework.org/schema/aop
	http://www.springframework.org/schema/aop/spring-aop.xsd
	http://www.springframework.org/schema/tx
	http://www.springframework.org/schema/tx/spring-tx.xsd">


    <context:component-scan base-package="com.ssm">context:component-scan>

beans>
2.将service交给Spring的ioc管理
这个简单,就在AccountServiceImpl加上注解@Service(“accountService”)
3.测试Spring
src/test/java/com/ssm/test
/**
 * author by four and ten
 * create by 2020/4/7 20:43
 */
public class test {
    @Test
    public void testSpring(){
        //读入配置文件
        ApplicationContext ac = new ClassPathXmlApplicationContext("applicationContext.xml");
        AccountService accountService = ac.getBean("accountService", AccountService.class);
        System.out.println(accountService);
    }
}
控制台打印结果

那么,Spring的环境搭建完毕!
六、搭建SpringMVC
1.编写index.jsp
index.jsp
<html>
<head>
    <title>Title</title>
</head>
<body>
    <a href="account/findAll">查询所有</a>
</body>
</html>
2.配置前端控制器
前端控制器是SpringMVC的核心控制器,是一个转发中心。这里需要注意的是前端控制器的名字是不能随便更改的。我们知道,前端控制器是在web.xml中配置
3.配置一个过滤器,解决中文乱码
<web-app>
  <display-name>Archetype Created Web Applicationdisplay-name>


  <filter>
    <filter-name>characterEncodingFilterfilter-name>
    <filter-class>org.springframework.web.filter.CharacterEncodingFilterfilter-class>

    <init-param>
      <param-name>encodingparam-name>
      <param-value>UTF-8param-value>
    init-param>

  filter>

  <filter-mapping>
    <filter-name>characterEncodingFilterfilter-name>
    <url-pattern>/*url-pattern>
  filter-mapping>


  <servlet>
    <servlet-name>dispatcherServletservlet-name>
    <servlet-class>org.springframework.web.servlet.DispatcherServletservlet-class>

    <init-param>
      <param-name>contextConfigLocationparam-name>
      <param-value>classpath:springmvc.xmlparam-value>
    init-param>

    <load-on-startup>1load-on-startup>
  servlet>

  <servlet-mapping>
    <servlet-name>dispatcherServletservlet-name>
    <url-pattern>/url-pattern>
  servlet-mapping>

web-app>
4.创建springmvc.xml配置文件
在springmvc的配置文件中,需要配置扫描Controller包的注解以便将Controller交给Spring的ioc来管理,需要配置视图解析器,还需要设置静态资源不加载,开启SpringMVC的注解支持,这里还需要注意,springmvc里的配置只需要扫描Contrallor的注解,别的注解不扫描,这个时候还需要一个子标签
springmvc.xml
<beans xmlns="http://www.springframework.org/schema/beans"
       xmlns:mvc="http://www.springframework.org/schema/mvc" xmlns:context="http://www.springframework.org/schema/context"
       xmlns:xsi="http://www.w3.org/2001/XMLSchema-instance"
       xsi:schemaLocation="
        http://www.springframework.org/schema/beans
        http://www.springframework.org/schema/beans/spring-beans.xsd
        http://www.springframework.org/schema/mvc
        http://www.springframework.org/schema/mvc/spring-mvc.xsd
        http://www.springframework.org/schema/context
        http://www.springframework.org/schema/context/spring-context.xsd">


    <context:component-scan base-package="com.ssm">
        <context:include-filter type="annotation" expression="org.springframework.stereotype.Controller"/>
    context:component-scan>


    <bean id="viewResolver" class="org.springframework.web.servlet.view.InternalResourceViewResolver">
        <property name="prefix" value="/WEB-INF/pages/">property>
        <property name="suffix" value=".jsp">property>
    bean>


    <mvc:resources mapping="/css/" location="/css/**">mvc:resources>
    <mvc:resources mapping="/images/" location="/images/**">mvc:resources>
    <mvc:resources mapping="/js/" location="/js/**">mvc:resources>


    <mvc:annotation-driven>mvc:annotation-driven>
beans>
5.编写Controller
/**
* author by four and ten
* create by 2020/4/8 13:55
*/
@Controller("accountController")
@RequestMapping("/account")
public class AccountControllor {
@RequestMapping("/findAll")
public String findAll(){
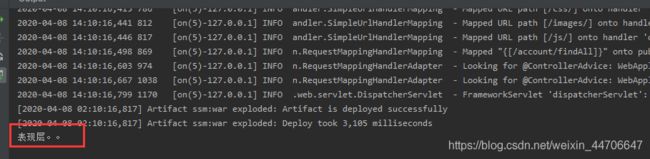
System.out.println("表现层。。");
return "list";
}
}
6.启动服务器测试SpringMVC

七、Spring整合SpringMVC
Spring整合SpringMVC的目的是,在Controllor中能够调用Service的方法。要能够调用这个方法,其中要解决的最大的问题就是,Spring的配置文件怎么加载,如何加载,在上面中spring的配置文件是applicationContext.xml,单独的去使用Spring时,要使用ClassPathXmlApplicationContext对象去加载配置文件,整合SpringMVC的时候该如何让加载呢?
有一种方法很容易想到,我在Controller里面new一个ClassPathXmlApplication-Context去加载配置文件,也就是说
/**
 * author by four and ten
 * create by 2020/4/8 13:55
 */
@Controller("accountController")
@RequestMapping("/account")
public class AccountControllor {
    @Autowired
    private AccountService accountService;

    @RequestMapping("/findAll")
    public String findAll(){
        ApplicationContext ac = new ClassPathXmlApplicationContext("applicationContext.xml");
        System.out.println("表现层。。");
        //调用service层
        List<Account> accounts = accountService.findAll();
        return "list";
    }
}
当点击“查询所有时”,控制台打印

很显然这样写,是能够出结果的,但是弊端也很显然,我只能在页面要发出请求到我们的Controller时才被加载,还有一个更要不得的问题,这样编写,是不是加大了程序之间的耦合,使用spring的好处之一就是为了减少程序之间的耦合。显然这种方法是不可取的,这种方法是我在思考ssm该如何让整合时想到的愚蠢的想法。
在web基础阶段,有web三大组件:servlet,Filter,Listener。可以让Listener在服务器一启动的时候,就去加载配置文件,既然SpringMVC也属于Spring的一部分,那么Spring中就有整和SpringMVC的方式
1.在web.xml中配置监听器
  <listener>
    <listener-class>org.springframework.web.context.ContextLoaderListenerlistener-class>
  listener>
  <context-param>
    <param-name>contextConfigLocationparam-name>
    <param-value>classpath:applicationContext.xmlparam-value>
  context-param>
2.测试结果
八、搭建Mybatis环境
1.编写SqlMapConfig.xml
SqlMapConfig.xml是Mybatis的主配置文件,在这个配置文件里,需要配置数据源,和需要被动态代理创建的dao类的全限定类名
<configuration>
    <environments default="mysql">
        <environment id="mysql">
            <transactionManager type="JDBC">transactionManager>
            <dataSource type="POOLED">
                <property name="driver" value="com.mysql.jdbc.Driver"/>
                <property name="url" value="jdbc:mysql:///ssm"/>
                <property name="username" value="root"/>
                <property name="password" value="213213"/>
            dataSource>
        environment>
    environments>

    <mappers>
        <package name="com.ssm.dao"/>
    mappers>
configuration>
2.编写sql语句
可以使用注解和配置文件的方式来,这根据个人习惯,单表操作我更喜欢直接用注解的的方式,涉及到多表的操作则使用xml配置文件,所以这里使用注解
com.ssm.dao.AccountDao
/**
 * author by four and ten
 * create by 2020/4/7 20:26
 */
public interface AccountDao {
    /**
     * 保存账户
     * @param account
     */
    public void saveAccount(Account account);

    /**
     * 查询账户
     * @return
     */
    @Select("select * from account")
    public List<Account> findAll();
}
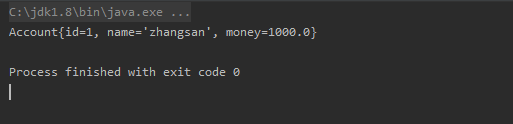
3.编写测试方法
 	@Test
    public void testMybatis() throws IOException {
        InputStream rs = Resources.getResourceAsStream("SqlMapConfig.xml");
        SqlSessionFactory build = new SqlSessionFactoryBuilder().build(rs);
        SqlSession session = build.openSession();
        AccountDao accountDao = session.getMapper(AccountDao.class);
        List<Account> accounts = accountDao.findAll();
        for (Account account : accounts) {
            System.out.println(account);
        }

    }
4.查看结果
九、Spring整合Mybatis
Spring整合Mybatis同样有相同的问题,mybatis的配置文件怎么放,怎么去读取,啥时候去读取,我们在导入jar包的时候,会发现导入了一个mybatis-spring这样的坐标,那么很显然,这就是spring整合Mybatis的jar包。
回顾一下Mybatis的测试代码,首先是使用构建者模式(通过new一个SqlSession-FactoryBuilder)获取SqlSessionFactory对象,然后使用工厂模式来获取SqlSession对象,最后使用代理模式获取dao对象。会发现这里涉及到了很多对象,而我们最终需要的只是dao对象,刚好,spring的最强大的能力之一便是管理对象,所以我们将这些对象全部交给Spring来管理,我们只需要拿到dao对象即可!
1.将SqlMapConfig.xml整合到applicationContext.xml中
在整合的过程中,需要配置数据源,这是很显然的,还需要将sqlsession对象装进ioc容器
<beans xmlns="http://www.springframework.org/schema/beans"
       xmlns:xsi="http://www.w3.org/2001/XMLSchema-instance"
       xmlns:context="http://www.springframework.org/schema/context"
       xmlns:aop="http://www.springframework.org/schema/aop"
       xmlns:tx="http://www.springframework.org/schema/tx"
       xsi:schemaLocation="http://www.springframework.org/schema/beans
	http://www.springframework.org/schema/beans/spring-beans.xsd
	http://www.springframework.org/schema/context
	http://www.springframework.org/schema/context/spring-context.xsd
	http://www.springframework.org/schema/aop
	http://www.springframework.org/schema/aop/spring-aop.xsd
	http://www.springframework.org/schema/tx
	http://www.springframework.org/schema/tx/spring-tx.xsd">


    <context:component-scan base-package="com.ssm">context:component-scan>


    <bean id="dataSource" class="org.springframework.jdbc.datasource.DriverManagerDataSource">
        <property name="driverClassName" value="com.mysql.jdbc.Driver">property>
        <property name="url" value="jdbc:mysql:///ssm">property>
        <property name="username" value="root">property>
        <property name="password" value="213213">property>
    bean>


    <bean id="sqlSessionFactoryBean" class="org.mybatis.spring.SqlSessionFactoryBean">
        <property name="dataSource" ref="dataSource">property>
    bean>


    <bean id="mapperScanner" class="org.mybatis.spring.mapper.MapperScannerConfigurer">
        <property name="basePackage" value="com.ssm.dao">property>
    bean>
beans>
2.将accountDao交给spring来管理
直接添加一个注解Repository
@Repository("accountDao")
public interface AccountDao {
    /**
     * 保存账户
     * @param account
     */

    public void saveAccount(Account account);

    /**
     * 查询账户
     * @return
     */
    @Select("select * from account")
    public List<Account> findAll();
}
3.测试代码
    @Test
    public void testSpring_Mybatis(){
        ApplicationContext ac = new ClassPathXmlApplicationContext("applicationContext.xml");
        AccountDao dao = ac.getBean(AccountDao.class);
        System.out.println(dao);
    }
4.查看结果

说明我们的dao已经交给了spring的ioc容器来管理,Spring整合Mybatis成功!
十、ssm整合
Spring已经将Mybatis和SpringMVC整合完成,最后只需要在Service中注入dao对象,那么就完成了Controllor调用Service,Service调用Dao
com.ssm.service.Impl.AccountServiceImpl
@Service("accountService")
public class AccountServiceImpl implements AccountService {


    @Autowired
    private AccountDao accountDao;

    @Override
    public void saveAccount(Account account) {
        accountDao.saveAccount(account);
    }

    @Override
    public List<Account> findAll() {
        List<Account> accounts = accountDao.findAll();
        System.out.println("service层");
        return accounts;
    }
}
十一、页面显示
再来回顾一下整个逻辑:启动服务器跳转到页面index.jsp点击“查询所有”,将请求发送到Controllor中,Controllor调用Service,Service调用Dao,Dao将结果封装成list集合返回到Controllor,Controllor在将页面跳转到list.jsp页面,所以最后需要编写list.jsp,当然要注意list.jsp是要在WEB-INF/pages/目录下,因为在web.xml中配置的视图解析器就是这个路径
list.jsp
<%@ page contentType="text/html;charset=UTF-8" language="java" isELIgnored="false" %>
<%@ taglib prefix="c" uri="http://java.sun.com/jsp/jstl/core" %>
<html>
<head>
    <title>Titletitle>
head>
<body>

<h3>查询所有的帐户h3>

<c:forEach items="${list}" var="account">
    ${account}
c:forEach>
body>
html>
运行结果:

那么,ssm整合完毕!
十二、回顾
ssm整合的要点是要先搭建好各个环境,一一测试成功之后在进行整合,整合的中心是Spring,Spring整合SpringMVC的要点是需要在web.xml中配置监听器,让服务器一启动就加载Spring的配置文件,Spring整合Mybatis的要点是,将原有的SqlMap-Config.xml文件整合到Spring的配置文件之中,这里只需要将SqlSessionFactoryBean对象加入ioc容器中,那么Mybatis中的SqlSession对象就被创建到Spring的ioc容器中,SqlSession对象有了,那么再将dao加入ioc容器,我们需要的dao对象就有了,整个过程大致就是这样。
下面是整个项目的结构:
