[email protected] + Redux 配置使用
一直非常喜欢 vue-cli 搭建的项目环境,自己实现也比较麻烦,于是最近学习 React 时想着用 vue-cli 改造一个 React 的项目环境。
基础的版本在这里 => Module_React
然后又想着给项目加一些常用的插件,例如 router 和 redux 管理等。
本篇博客的 Demo 模板在 relase@redux 分支下
react-router
多出了一个 react-router-dom 的包,他比 react-router 多了一些新的插件,可以不需要引用 react-router。
// 安装插件
cnpm i -S react-router react-router-dom
4.0 版本需要注意的是,Link 必须要包在Router 标签内,否则会报错。
// router.js
import React from 'react'
import { BrowserRouter as Router, Link, Route } from 'react-router-dom'

import Home from '../containers/home'
import View from '../containers/view'

// router 下如果有多个元素必须用一个盒子包起来,exact 字段表示完全匹配,即 /view 不会渲染 / ,如果没有的话 /view 会渲染 Home 组件 + View 组件
export default () => {
  return (<Router>
    <div>
      <Route path="/" exact component={Home}/>
      <Route path="/view" component={View}/>

      <p><Link to="/">home</Link></p>
      <p><Link to="/view">view</Link></p>
    </div>
  </Router>)
}
// main.js
...
import CreateRouter from './router'
class App extends Component {
render() {
return (
"App">
{/* 渲染路由 */}
{CreateRouter()}
"App-header">
hello world !
)
}
}
...如果需要代码跳转地址,可以这样。更多的 api 可以自行搜索。
goUrl() {
    const { history } = this.props
    history.push('/')
  }
redux
redux 的概念比较繁琐,去网上看各种教程后感觉似懂非懂,果然还是要去认真了解一下相关概念自己动手。
// 安装
cnpm i -S redux-thunk redux react-redux- Store
Store 用来保存数据,一个应用只能有一个 Store。
Redux 提供 createStore 来生成一个 Store。
getState() // 获取 state
dispatch(action) // 更新 state,View 发出 Action 的唯一方式
subscribe(listener) // 注册监听器
subscribe(listener) // 返回的函数注销监听器

// 使用
import { createStore } from 'redux'
let store = createStore()
State
State 是包含当前时点的所有数据的集合。
State 可以通过 store.getState() 获得。每一个时点的 State 都对应一个视图(View)Action
State 的更改会触发 View 的变化,同样 View 的更改需要对应到 State,Action 的作用就是当 View 更改时去通知 State 更改。
Action 是一个简单的 JS 对象,必须要包含 type 属性,用来标识 Action 的名称,其他属性自由设置。{ type: 'ADD_LIST', content: 'LIST-one' }改变 State 的唯一方法就是使用 Action。
Reducer
Store 接收到 Action 后,会计算生成一个新的 State,Reducer 指定了状态的变化如何响应 Action 并反馈给 Store。Reducer 是一个纯函数,即相同的输入输出结果相同。返回一个新的 State。
store.dispatch方法会触发 Reducer 的自动执行,把 reducer 传入 creatStore 即可
import { createStore } from ‘redux’;
const store = createStore(reducer);Redux 基本上包含这几个概念。
// 先改造一下 main.js
// 这里创建全局的一个 store
import React, { Component } from 'react'
import ReactDOM from 'react-dom'
import { Provider } from 'react-redux'

import getStore from './store'
import CreateRouter from './router'

class App extends Component {
  render() {
    return (
      "App">
        {CreateRouter()}
        "App-header">
          hello world !


    )
  }
}

const store = getStore()
ReactDOM.render(


  ,
  document.body.appendChild(document.createElement('div'))
)
// store/index.js
// 创建 store 的函数

import { createStore, compose, applyMiddleware } from 'redux'
import thunkMiddleware from 'redux-thunk'

import Reducer from '../reducer'

const createStoreWithMiddleware = compose(
  applyMiddleware(thunkMiddleware)
)(createStore)

export default () => createStoreWithMiddleware(Reducer)
// reducer/index.js
// 绑定多个 reducer

import { combineReducers } from 'redux'

import home from './home'

const rootReducer = combineReducers({
  home
})

export default rootReducer
// reducer/home/index.js
// 这里是单个的 reducer,在reducer/index.js 中绑定
export default (state = {}, action) => {
switch (action.type) {
case 'ADD':
return {
...state,
log: 'yes',
list: action.list || 0
}
default:
return { list: 0 }
}
}然后在组件中使用
// View

import React, { Component } from 'react'
import { PropTypes } from 'prop-types'
import { connect } from 'react-redux'

class View extends Component {
  constructor(props) {
    super(props)
    this.state = {
      msg: 'view'
    }
  }


  goUrl() {
    const { history } = this.props
    history.push('/')
  }
  addNum() {
    const { dispatch, home } = this.props
    dispatch({
      type: 'ADD',
      list: home.list + 1
    })
  }

  btnSty() {
    return {
      width: '100px',
      height: '40px',
      border: '1px solid rgba(0,0,0,0.1)',
      background: 'rgba(0,0,0,0.1)',
      borderRadius: '3px',
      cursor: 'pointer',
      textAlign: 'center',
      lineHeight: '40px',
      userSelect: 'none'
    }
  }

  render () {
    return (

        "view">list:{this.props.home.list}
        {this.props.examinationId}
        this.btnSty()}} onClick={() => { this.goUrl() }}>to home
        this.btnSty()}} onClick={ this.addNum.bind(this) }>Add Num

    )
  }
}

export default connect(state => ({
  home: state.home,
  examinationId: 1
}))(View)
// Home

import React, { Component } from 'react'
import { PropTypes } from 'prop-types'
import { connect } from 'react-redux'

class Home extends Component {
  constructor(props) {
    super(props)
    this.state = {
      msg: 'home'
    }
  }

  render () {
    return (

        "home">{this.state.msg}
        {this.props.home.list}

    )
  }
}

export default connect(state => ({
  home: state.home
}))(Home)
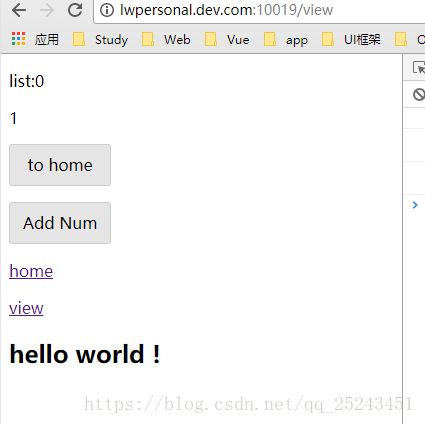
然后在 /view 路由下会看到一个 low 到爆的页面,点击 Add Num 可以看到已经触发了视图的更新。
切换到 / 路由下 list 的状态保持不变,好了一个简单的 redux Demo 已经实现了。

