SpringBoot--多模块开发
目录结构:

实现步骤:
1.创建springboot项目--spring-boot-demo。
pom.xml文件:
   4.0.0

   com.cxb
   spring-boot-demo
   0.0.1-SNAPSHOT


      web
      persistence
      model


   pom

   spring-boot-demo
   Demo project for Spring Boot


      org.springframework.boot
      spring-boot-starter-parent
      2.0.3.RELEASE


      UTF-8
      UTF-8
      1.8


         org.springframework.boot
         spring-boot-starter-webflux


         org.springframework.boot
         spring-boot-starter-test
         test


         io.projectreactor
         reactor-test
         test
创建模块web:

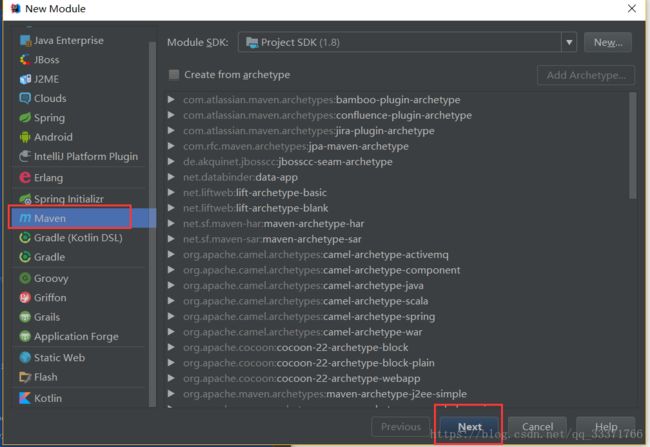
一直next,填好模块名称即可。
web模块的目录结构:

这里的web.xml文件是为了打成war时候添加的。
pom.xml文件:
        spring-boot-demo
        com.cxb
        0.0.1-SNAPSHOT

    4.0.0

    web


    war


            com.cxb
            0.0.1-SNAPSHOT
            persistence


        compile


                org.springframework.boot
                spring-boot-maven-plugin


                    springbootdemo.SpringBootDemoApplication
package springbootdemo.config;

import org.springframework.context.annotation.Bean;
import org.springframework.context.annotation.Configuration;
import org.springframework.web.reactive.function.server.RequestPredicates;
import org.springframework.web.reactive.function.server.RouterFunction;
import org.springframework.web.reactive.function.server.RouterFunctions;
import org.springframework.web.reactive.function.server.ServerResponse;
import reactor.core.publisher.Flux;
import springbootdemo.model.User;
import springbootdemo.repository.UserRepository;

import java.util.Collection;

/**
 *  路由器函数配置
 * Created by 81046 on 2018-06-16
 */
@Configuration
public class RouterFunctionConfiguration {

    /**
     * Servlet
     *      请求接口:ServletRequest或者HttpServletRequest
     *      响应接口:ServletResponse或者HttpServletResponse
     *  Spring 5.0 重新定义了服务请求和响应接口
     *      请求接口:ServletRequest
     *      响应接口:ServletResponse
     *  即可支持Servlet 规范,也可以支持自定义,比如 Netty (Web Server)
     *
     *  以本例:
     *      定义GET请求,并且返回所有的用户对象 URI:/user/findAll
     *      Flux 是0-N个对象集合
     *      Mono 是0-1个对象集合
     *      Reactive 中的Flux 或者 Mono 它是异步处理 (非阻塞)
     *      集合对象基本上是同步处理 (阻塞)
     *      Flux 或者 Mono 都是 Publisher
     */
    @Bean
    public RouterFunction userFindAll(UserRepository userRepository){
        return RouterFunctions.route(RequestPredicates.GET("/user/list"),
                request -> {
                    //返回所有的用户
                    Collection users = userRepository.findAll();
                    Flux userFlux = Flux.fromIterable(users);
                    return ServerResponse.ok().body(userFlux,User.class);
                });
    }
}
package springbootdemo.controller;

import org.springframework.beans.factory.annotation.Autowired;
import org.springframework.web.bind.annotation.*;
import springbootdemo.model.User;
import springbootdemo.repository.UserRepository;

import java.util.Collection;

/**
 * Created by 81046 on 2018-06-16
 */
@RestController
@RequestMapping("/user")
//RestController 等价于controller和responseBody
public class UserController {

    private final UserRepository userRepository;

    /**
     *  这里是采用构造器的注入方式注入userRepository
     *  好处是提前初始化,不能修改
     *  @Autowired 可写可不写
     */
    @Autowired
    public UserController(UserRepository userRepository){
        this.userRepository=userRepository;
    }

    /**
     *  http://localhost:8080/user/save?name=小石潭记
     * @param name
     * @return
     */
    @PostMapping("/save")
    public User save(@RequestParam String name){
        User user = new User();
        user.setName(name);
        if (userRepository.save(user)){
            System.out.println("保存对象成功:" + user);
        }
        return user;
    }

    @GetMapping("/list")
    public Collection list(){
        return userRepository.findAll();
    }

}
package springbootdemo;

import org.springframework.boot.SpringApplication;
import org.springframework.boot.autoconfigure.SpringBootApplication;

@SpringBootApplication
public class SpringBootDemoApplication {

   public static void main(String[] args) {
      SpringApplication.run(SpringBootDemoApplication.class, args);
   }
}
这里web模块就完成了,注意该模块需要依赖其他模块的文件,依赖在该模块pom.xml文件中。
多模块就是为了职责分明,web模块只做web端的访问,model模块就是用来管理实体类的,persistence模块就是管理数据库打交道的。
接下来介绍model模块和persistence模块。
创建模板的方式和前面的web模块一样。
model模块目录结构:

pom.xml文件:
        spring-boot-demo
        com.cxb
        0.0.1-SNAPSHOT

    4.0.0

    model
package springbootdemo.model;

/**
 * Created by 81046 on 2018-06-16
 */
public class User {
    private int id;
    private String name;

    public int getId() {
        return id;
    }

    public void setId(int id) {
        this.id = id;
    }

    public String getName() {
        return name;
    }

    public void setName(String name) {
        this.name = name;
    }

    public User() {
    }

    @Override
    public String toString() {
        return "User{" +
                "id=" + id +
                ", name='" + name + '\'' +
                '}';
    }
}
persistence模块目录结构:

pom.xml文件:
        spring-boot-demo
        com.cxb
        0.0.1-SNAPSHOT

    4.0.0

    persistence


            com.cxb
            0.0.1-SNAPSHOT
            model
package springbootdemo.repository;

import org.springframework.stereotype.Repository;
import springbootdemo.model.User;

import java.util.Collection;
import java.util.concurrent.ConcurrentHashMap;
import java.util.concurrent.ConcurrentMap;
import java.util.concurrent.atomic.AtomicInteger;

/**
 * Created by 81046 on 2018-06-16
 */
@Repository
public class UserRepository {

    /**
     * 采用内存型的存储方式-->Map
     */
    private final ConcurrentMap repository = new ConcurrentHashMap<>();

    /**
     * id生成器
     */
    private final static AtomicInteger idGennerator = new AtomicInteger();

    /**
     * 保存用户对象
     */
    public boolean save(User user){
        int id = idGennerator.incrementAndGet();
        user.setId(id);
        return repository.put(id,user) == null ;
    }

    /**
     * 查询所有的用户
     * @return
     */
    public Collection findAll(){
        return repository.values();
    }
}
这里就完成了三个模块的实现,注意每个模块的包名保持一致,这里包名全是springbootdemo,然后在下面创建具体的包即可。
再介绍一下打包的方式:
1.jar 在该文件的位置执行cmd 执行mvn -Dmaven.test.skip -U clean package


这里jar的方式介绍完了,war只是将pom文件中的jar改成war

