用Python搭建2层神经网络实现mnist手写数字分类
这是一个用python搭建2层NN(一个隐藏层)识别mnist手写数据集的示例
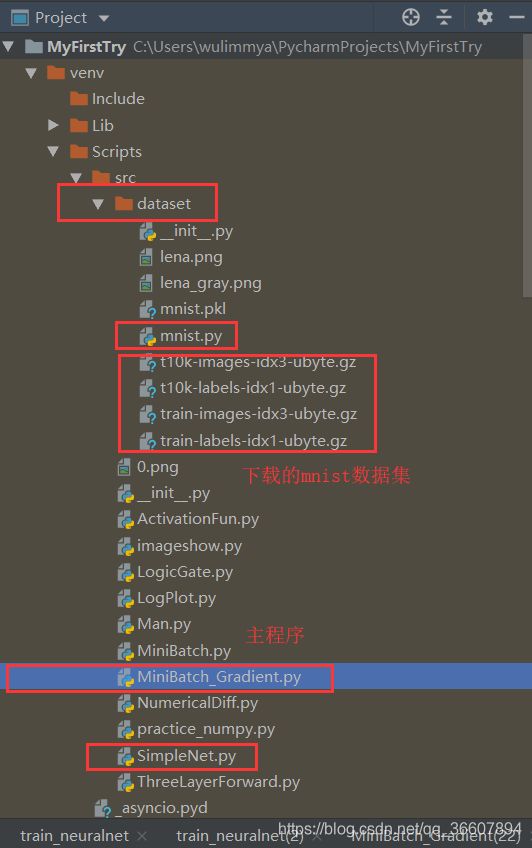
mnist.py文件提供了mnist数据集(6万张训练图,1万张测试图)的在线下载,每张图片是 28 ∗ 28 28*28 28∗28的尺寸,拉长为 1 ∗ 784 1*784 1∗784的向量作为NN的输入,隐藏层设置了50个神经元,输出层由于是十分类(数字0-9)所以设置了10个神经元,所以网络的架构是784-50-10;
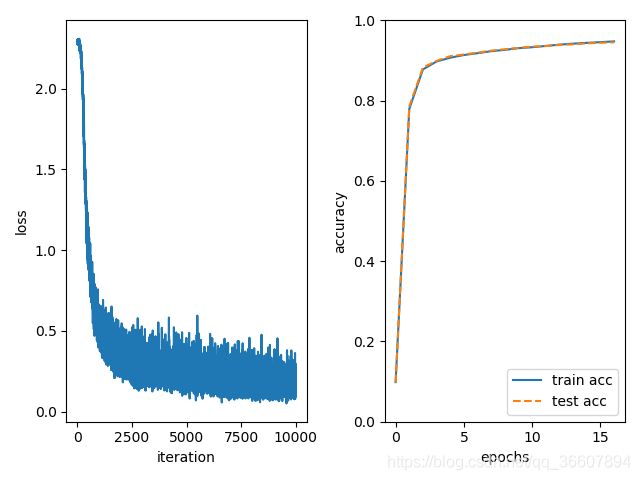
设置的迭代学习次数是10000次,学习率0.1,mini-batch的大小为100个,程序中计算了训练精度,测试精度,训练的损失,并通过打印和画图呈现出来,还计算了程序运行时间,可以看出损失函数确实在不断减小,训练精度和测试精度都在上升且差距很小,说明NN正在正确地学习。
源码:
import time
import numpy as np
from dataset.mnist import load_mnist
from SimpleNet import simpleNet
import matplotlib.pyplot as plt

start = time.clock() # 程序计时

(x_train, t_train), (x_test, t_test) = load_mnist(normalize=True, one_hot_label=True)

train_loss_list = []
train_acc_list = []
test_acc_list = []


# 超参数
iters_num = 10000
train_size = x_train.shape[0]
batch_size = 100
learning_rate = 0.1

iter_per_epoch = max(train_size / batch_size, 1)

network = simpleNet(input_size=784, hidden_size=50, output_size=10)

for i in range(iters_num):
    # 获取mini-batch
    batch_mask = np.random.choice(train_size, batch_size)
    x_batch = x_train[batch_mask]
    t_batch = t_train[batch_mask]

    # 计算梯度
    # grad = network.numerical_gradient(x_batch, t_batch)
    grad = network.gradient(x_batch, t_batch)

    # 更新参数
    for key in ('W1', 'b1', 'W2', 'b2'):
        network.params[key] -= learning_rate * grad[key]

    # 记录学习过程的损失变化
    loss = network.loss(x_batch, t_batch)
    train_loss_list.append(loss)

    if i % iter_per_epoch == 0:
        train_acc = network.accuracy(x_train, t_train)
        test_acc = network.accuracy(x_test, t_test)
        train_acc_list.append(train_acc)
        test_acc_list.append(test_acc)
        print("train acc, test acc | " + str(train_acc) + ", " + str(test_acc))

# 画损失函数的变化
x1 = np.arange(len(train_loss_list))
ax1 = plt.subplot(121)
plt.plot(x1, train_loss_list)
plt.xlabel("iteration")
plt.ylabel("loss")


# 画训练精度,测试精度随着epoch的变化
markers = {'train': 'o', 'test': 's'}
x2 = np.arange(len(train_acc_list))
ax2 = plt.subplot(122)
plt.plot(x2, train_acc_list, label='train acc')
plt.plot(x2, test_acc_list, label='test acc', linestyle='--')
plt.xlabel("epochs")
plt.ylabel("accuracy")
plt.ylim(0, 1.0)
plt.legend(loc='lower right')
plt.show()

end = time.clock()
print('Running Time: %s Seconds' %(end-start))
打印学习过程中训练和测试精度随着epoch的迭代的变化和程序运行时间:
train acc, test acc | 0.09871666666666666, 0.098
train acc, test acc | 0.7794833333333333, 0.7855
train acc, test acc | 0.8781166666666667, 0.8828
train acc, test acc | 0.8979166666666667, 0.8994
train acc, test acc | 0.90735, 0.9111
train acc, test acc | 0.9139166666666667, 0.9153
train acc, test acc | 0.9185666666666666, 0.9197
train acc, test acc | 0.9235333333333333, 0.9248
train acc, test acc | 0.9269, 0.9283
train acc, test acc | 0.9310666666666667, 0.9317
train acc, test acc | 0.9333666666666667, 0.935
train acc, test acc | 0.93655, 0.9363
train acc, test acc | 0.9398666666666666, 0.9391
train acc, test acc | 0.9423, 0.9406
train acc, test acc | 0.9442833333333334, 0.9432
train acc, test acc | 0.9460333333333333, 0.9444
train acc, test acc | 0.9479333333333333, 0.9457
Running Time: 82.45328003986769 Seconds
用到的simpleNet类(这个类定义了2层的NN,包括前向预测和反向计算梯度的学习的所有函数)定义在SimpleNet.py中,和上面的主程序放在同一个文件夹下,所以用from SimpleNet import simpleNet命令导入:
# 这是一个2层网络,即输入-隐藏层-输出

import numpy as np

def sigmoid(x):
    return 1 / (1 + np.exp(-x))

def softmax(x):
    if x.ndim == 2:
        x = x.T
        x = x - np.max(x, axis=0)
        y = np.exp(x) / np.sum(np.exp(x), axis=0)
        return y.T

    x = x - np.max(x) # 溢出对策
    return np.exp(x) / np.sum(np.exp(x))

# 计算sigmoid层的反向传播导数(根据数学推导知道是y(1-y))
def sigmoid_grad(x):
        return (1.0 - sigmoid(x)) * sigmoid(x)

def numerical_gradient(f, x):
    h = 1e-4  # 0.0001
    grad = np.zeros_like(x)

    it = np.nditer(x, flags=['multi_index'], op_flags=['readwrite'])
    while not it.finished:
        idx = it.multi_index
        tmp_val = x[idx]
        x[idx] = float(tmp_val) + h
        fxh1 = f(x)  # f(x+h)

        x[idx] = tmp_val - h
        fxh2 = f(x)  # f(x-h)
        grad[idx] = (fxh1 - fxh2) / (2 * h)

        x[idx] = tmp_val  # 还原值
        it.iternext()

        return grad


def cross_entropy_error(y, t):
    if y.ndim == 1:
        t = t.reshape(1, t.size)
        y = y.reshape(1, y.size)

    # 监督数据是one-hot-vector的情况下,转换为正确解标签的索引
    if t.size == y.size:
        t = t.argmax(axis=1)

    batch_size = y.shape[0]
    return -np.sum(np.log(y[np.arange(batch_size), t] + 1e-7)) / batch_size


class simpleNet:
    def __init__(self, input_size, hidden_size, output_size, weight_init_std = 0.01):
        # 初始化网络
        self.params = {}
        # weight_init_std:权重初始化标准差
        self.params['W1'] = weight_init_std * \
                            np.random.randn(input_size, hidden_size)
                            # 用高斯分布随机初始化一个权重参数矩阵
        self.params['b1'] = np.zeros(hidden_size)
        self.params['W2'] = weight_init_std * \
                            np.random.randn(hidden_size, output_size)
        self.params['b2'] = np.zeros(output_size)


    def predict(self, x):
        # 前向传播,用点乘实现
        W1, W2 = self.params['W1'], self.params['W2']
        b1, b2 = self.params['b1'], self.params['b2']

        a1 = np.dot(x, W1) + b1
        z1 = sigmoid(a1)
        a2 = np.dot(z1, W2) + b2
        y = softmax(a2)

        return y


    def loss(self, x, t):
        y = self.predict(x)
        loss = cross_entropy_error(y, t)

        return loss

    def accuracy(self, x, t):
        y = self.predict(x)
        y = np.argmax(y, axis=1)
        t = np.argmax(t, axis=1)

        accuracy = np.sum( y==t ) / float(x.shape[0])
        return accuracy

    def numerical_gradient(self, x, t):
        loss_W = lambda W: self.loss(x, t)

        grads = {}
        grads['W1'] = numerical_gradient(loss_W, self.params['W1'])
        grads['b1'] = numerical_gradient(loss_W, self.params['b1'])
        grads['W2'] = numerical_gradient(loss_W, self.params['W2'])
        grads['b2'] = numerical_gradient(loss_W, self.params['b2'])

        return grads

  # 高速版计算梯度,利用批版本的反向传播实现计算高速
    def gradient(self, x, t):
        W1, W2 = self.params['W1'], self.params['W2']
        b1, b2 = self.params['b1'], self.params['b2']
        grads = {}

        batch_num = x.shape[0]  # 把输入的所有列一起计算,因此可以快速

        # forward
        a1 = np.dot(x, W1) + b1
        z1 = sigmoid(a1)
        a2 = np.dot(z1, W2) + b2
        y = softmax(a2)

        # backward
        dy = (y - t) / batch_num  # 输出和标签的平均距离,作为损失值
        grads['W2'] = np.dot(z1.T, dy)
        # numpy数组.T就是转置
        grads['b2'] = np.sum(dy, axis=0)
        # 这里和批版本的Affine层的反向传播导数计算一样


        dz1 = np.dot(dy, W2.T)
        da1 = sigmoid_grad(a1) * dz1
        grads['W1'] = np.dot(x.T, da1)
        grads['b1'] = np.sum(da1, axis=0)

        return grads
定义load_mnist()方法的mnist.py文件,放在dataset文件夹中,dataset文件夹放在和主程序相同的路径,所以用from dataset.mnist import load_mnist命令导入:
# coding: utf-8

try:
    import urllib.request # 用于打开URL(主要是针对HTTP)
except ImportError:
    raise ImportError('You should use Python 3.x')
import os.path  # os模块提供操作系统相关的操作
import gzip # 这个模块提供接口解压和压缩文件
import pickle # 把Python对象的结构序列化
import os
import numpy as np


url_base = 'http://yann.lecun.com/exdb/mnist/' # url字符串
key_file = {
    'train_img':'train-images-idx3-ubyte.gz',
    'train_label':'train-labels-idx1-ubyte.gz',
    'test_img':'t10k-images-idx3-ubyte.gz',
    'test_label':'t10k-labels-idx1-ubyte.gz'
}  # 字典变量


dataset_dir = os.path.dirname(os.path.abspath(__file__))
save_file = dataset_dir + "/mnist.pkl"

train_num = 60000
test_num = 10000
img_dim = (1, 28, 28)
img_size = 784

# 下载一个文件
def _download(file_name):
    file_path = dataset_dir + "/" + file_name
    # 已经有了就不再下载了
    if os.path.exists(file_path):
        return

    print("Downloading " + file_name + " ... ")
    urllib.request.urlretrieve(url_base + file_name, file_path)
    print("Done")

# 下载 mnist 数据集,四个文件
def download_mnist():
    for v in key_file.values():
       _download(v)

def _load_label(file_name):
    file_path = dataset_dir + "/" + file_name

    print("Converting " + file_name + " to NumPy Array ...")
    with gzip.open(file_path, 'rb') as f:
        # gzip.open()打开gzip文件,转换为二进制文件,返回文件对象
            labels = np.frombuffer(f.read(), np.uint8, offset=8)
    print("Done")

    return labels

def _load_img(file_name):
    file_path = dataset_dir + "/" + file_name

    print("Converting " + file_name + " to NumPy Array ...")
    with gzip.open(file_path, 'rb') as f:
            data = np.frombuffer(f.read(), np.uint8, offset=16)
    data = data.reshape(-1, img_size)
    print("Done")

    return data

def _convert_numpy():
    dataset = {}
    dataset['train_img'] = _load_img(key_file['train_img'])
    dataset['train_label'] = _load_label(key_file['train_label'])
    dataset['test_img'] = _load_img(key_file['test_img'])
    dataset['test_label'] = _load_label(key_file['test_label'])

    return dataset

def init_mnist():
    download_mnist()
    dataset = _convert_numpy()
    print("Creating pickle file ...")
    with open(save_file, 'wb') as f:
        pickle.dump(dataset, f, -1)
    print("Done!")

def _change_one_hot_label(X):
    T = np.zeros((X.size, 10))
    for idx, row in enumerate(T):
        row[X[idx]] = 1

    return T


def load_mnist(normalize=True, flatten=True, one_hot_label=False):
    """读入MNIST数据集

    Parameters
    ----------
    normalize : 将图像的像素值正规化为0.0~1.0
    one_hot_label :
        one_hot_label为True的情况下,标签作为one-hot数组返回
        one-hot数组是指[0,0,1,0,0,0,0,0,0,0]这样的数组
    flatten : 是否将图像展开为一维数组

    Returns
    -------
    (训练图像, 训练标签), (测试图像, 测试标签)
    """
    if not os.path.exists(save_file):
        init_mnist()

    with open(save_file, 'rb') as f:
        dataset = pickle.load(f)

    if normalize:
        for key in ('train_img', 'test_img'):
            dataset[key] = dataset[key].astype(np.float32)
            dataset[key] /= 255.0

    if one_hot_label:
        dataset['train_label'] = _change_one_hot_label(dataset['train_label'])
        dataset['test_label'] = _change_one_hot_label(dataset['test_label'])

    if not flatten:
         for key in ('train_img', 'test_img'):
            dataset[key] = dataset[key].reshape(-1, 1, 28, 28)

    return (dataset['train_img'], dataset['train_label']), (dataset['test_img'], dataset['test_label'])


if __name__ == '__main__':
    init_mnist()

