springBoot整合activeMQ,并绑定生产者ip
springBoot整合activeMQ,并绑定生产者ip
- 前言
- springBoot整合
- 1.依赖
- 2.配置参数
- 3.配置转化器
- 4.生产消息
- 5.通配符订阅消息
- 绑定生产者ip
- 插件工程依赖
- activemq.xml
前言
因为物联网项目的毕业设计需要,最好使用mqtt协议通信。
有两个需求:
1.获得物联网设备的ip(生产者ip)
2.使用通配符订阅Queue(因为设备很多,而且是动态新增,主题是不确定的)
springBoot整合
1.依赖
     org.messaginghub
     pooled-jms


     org.springframework.boot
     spring-boot-starter-activemq


     org.apache.activemq
     activemq-pool
2.配置参数
#activeMQ
spring.activemq.broker-url=tcp://localhost:61616
#true 表示使用内置的MQ,false则连接服务器
spring.activemq.in-memory=false
#true表示使用连接池;false时,每发送一条数据创建一个连接,内存销毁巨大
spring.activemq.pool.enabled=true
#连接池最大连接数
spring.activemq.pool.max-connections=10
3.配置转化器
springBoot的自动配置默认使用的转化器是在监听到消息时转化为字符串,为了拿到更多信息,我们可以自己定义转化器,转化器需要实现MessageConverter 接口,toMessage方法在发送前会执行,fromMessage方法在监听回调前会执行
@Component
public class IOTMQConverter implements MessageConverter {
    @Autowired
    private ObjectMapper objectMapper;
    @Override
    public Message toMessage(Object o, Session session) throws JMSException, MessageConversionException {
        try {
            String ret = objectMapper.writeValueAsString(o);
            return session.createTextMessage(ret);
        }catch (Exception e){
            return null;
        }
    }

    @Override
    public Object fromMessage(Message message) throws JMSException, MessageConversionException {
        ActiveMQTextMessage textMessage = (ActiveMQTextMessage) message;
        return textMessage;
    }
}
然后使用自己定义的convert创建一个DefaultJmsListenerContainerFactory的bean对象就可以了
@Configuration
@AutoConfigureAfter(ActiveMQAutoConfiguration.class)
public class MQTTConfig{
    @Bean
    public JmsListenerContainerFactory queueContainer(ConnectionFactory connectionFactory, IOTMQConverter iotmqConverter){
        DefaultJmsListenerContainerFactory factory = new DefaultJmsListenerContainerFactory();
        factory.setConnectionFactory(connectionFactory);
        factory.setPubSubDomain(Boolean.FALSE);//支持queue
        factory.setMessageConverter(iotmqConverter);
        return  factory;
    }
}
4.生产消息
    @Autowired
    private JmsMessagingTemplate jmsMessagingTemplate;

    public void solve(String queueName, String message){
        jmsMessagingTemplate.convertAndSend(queueName,message);
    }
只需要注入自动生成的jmsMessagingTemplate,使用convertAndSend方法即可完成生产
5.通配符订阅消息
activemq支持使用相同前缀,以.结束加上通配符的名称作为主题名来批量订阅(实现原理是他的虚拟主题)。如下订阅 A.*的所有主题(A.1,A.b,A.2,A.ss,A.xxx…)。此处的方法的参数,就是convert的fromMessage最终返回的对象,方法的参数类型需要兼容该对象(是其类型或父类),否则此条消息不会被消费
@Component
public class JmsListener{
    @JmsListener(destination = "A.*")
    public void solve(ActiveMQTextMessage message){
        //todo
    }
}
绑定生产者ip
activeMQ提供通过plugin扩展开发的方式,来在mq服务端做一些开发扩展。其使用的是责任链的设计模式,需要先定义一个实现BrokerPlugin的类,其只有一个 installPlugin方法等待重写,在里面使用自己定义的broker过滤器包装当前broker。
自己定义的broker过滤器需要继承BrokerFilter,然后可以重写其中的方法,在消息的不同阶段进行回调处理。创建一个新的maven工程,添加activemq的依赖(可以直接使用all),我这里因为自己要用序列化还用了阿里巴巴的fastjson
插件工程依赖
     org.apache.activemq
     activemq-all
     5.15.12


     com.alibaba
     fastjson
     1.2.61
public interface BrokerPlugin {
    Broker installPlugin(Broker broker) throws Exception;
}
public interface Broker extends Region, Service {

    Broker getAdaptor(Class<?> type);

    BrokerId getBrokerId();

    String getBrokerName();

    void addBroker(Connection connection, BrokerInfo info);

    void removeBroker(Connection connection, BrokerInfo info);

    void addConnection(ConnectionContext context, ConnectionInfo info) throws Exception;

    void removeConnection(ConnectionContext context, ConnectionInfo info, Throwable error) throws Exception;

    void addSession(ConnectionContext context, SessionInfo info) throws Exception;

    void removeSession(ConnectionContext context, SessionInfo info) throws Exception;

    @Override
    void addProducer(ConnectionContext context, ProducerInfo info) throws Exception;

    @Override
    void removeProducer(ConnectionContext context, ProducerInfo info) throws Exception;
   	.....
}
public class BrokerFilter implements Broker {

    protected final Broker next;

    public BrokerFilter(Broker next) {
        this.next = next;
    }

    public Broker getNext() {
        return next;
    }
    .....
}
因为我们要完成对ip的绑定,主要在生产的时候,所以重写他的send方法
public class IpPlugin implements BrokerPlugin {
    static class IpBindFilter extends BrokerFilter {

        public IpBindFilter(Broker next) {
            super(next);
        }

        @Override
        public void send(ProducerBrokerExchange producerExchange, Message messageSend) throws Exception {
            if(!(messageSend instanceof ActiveMQTextMessage)){
                throw new RuntimeException("not allow,must be json string message");
            }
            String remoteAddr = producerExchange.getConnectionContext().getConnection().getRemoteAddress();//tcp://127.0.0.1:61468
            String ip = remoteAddr.substring(6,remoteAddr.lastIndexOf(':'));
            ActiveMQTextMessage textMessage = (ActiveMQTextMessage) messageSend;
            String content = textMessage.getText();
            JSONObject jsonObj = JSON.parseObject(content);
            jsonObj.put("producerIp",ip);
            textMessage.setText(jsonObj.toJSONString());
            super.send(producerExchange, textMessage);
        }
    }
    public Broker installPlugin(Broker broker) throws Exception {
        return new IpBindFilter(broker);
    }
}
这样就完成了插件的开发,接下来需要通过maven打包,将jar包,以及插件除了activeMQ的其他依赖的jar包,都放到activemq的lib目录下(比如:本工程用到fastjson),然后修改activemq的conf目录中的activemq.xml,在broker标签中的plugins标签中,加入以下内容(plugins标签不存在就手动创建),bean的id随便写,class包名不要错就行
activemq.xml
至此就完成了插件的安装和配置,重启activemq就可以了。
附生产测试代码:
public class Main {
    public static void main(String[] args) throws JMSException {
        ConnectionFactory connectionFactory = new ActiveMQConnectionFactory("tcp://127.0.0.1:61616");
        //2、使用连接工厂创建一个连接对象
        Connection connection = connectionFactory.createConnection();
        //3、开启连接
        connection.start();
        //4、使用连接对象创建会话(session)对象
        Session session = connection.createSession(false, Session.AUTO_ACKNOWLEDGE);

        //5、使用会话对象创建目标对象,包含queue和topic(一对一和一对多)
        Queue queue = session.createQueue("myQueue");
        //6、使用会话对象创建生产者对象
        MessageProducer producer = session.createProducer(queue);
        //7、使用会话对象创建一个消息对象
        TextMessage textMessage = session.createTextMessage("{author:\"eetal\"}");
        //8、发送消息
        producer.send(textMessage);
        //9、关闭资源
        producer.close();
        session.close();
        connection.close();
    }
}
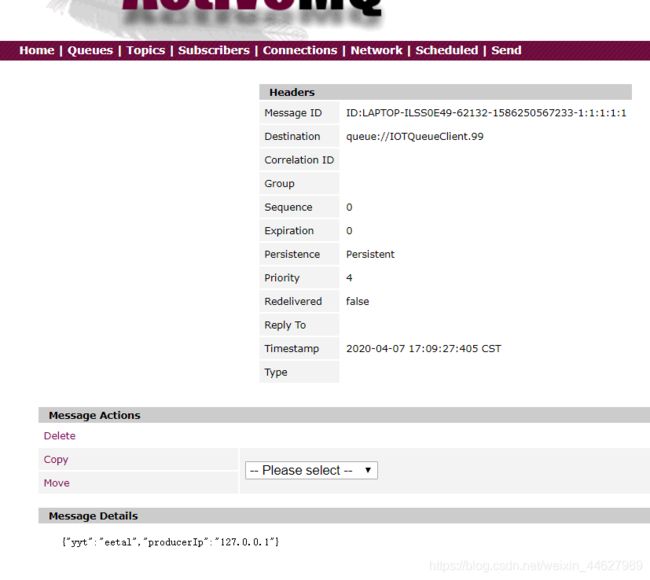
测试结果,把ip带过来了

这里我上传了一份到gitee上——gitee上的demo仓库
更多文章,请搜索公众号歪歪梯Club
![]()