Elastic Search 安装
安装环境
cat /etc/redhat-release
CentOS release 6.8 (Final)
uname -r
2.6.32-642.el6.x86_64
主机IP:192.168.56.7
安装前需要先部署JAVA环境
yum -y install java
java –version 验证java是否安装成功
vim /etc/hosts 配置hosts解析主机名
做好时间同步
/usr/sbin/ntpdate ntp.api.bz
ES默认端口
9200
安装ES
1、下载并安装ES的yum公钥
rpm --import https://packages.elastic.co/GPG-KEY-elasticsearch
2、配置ES的yum源
vim /etc/yum.repos.d/elasticsearch.repo
输入下面的内容:
[elasticsearch-2.x]
name=Elasticsearch repository for 2.x packages
baseurl=http://packages.elastic.co/elasticsearch/2.x/centos
gpgcheck=1
gpgkey=http://packages.elastic.co/GPG-KEY-elasticsearch
enabled=1
更新yum的缓存
yum makecache
安装ES
yum -y install elasticsearch
配置ES
mkdir -p /data/es-data
chown -R elasticsearch:elasticsearch /data/es-data/
vim /etc/elasticsearch/elasticsearch.yml
17 cluster.name: myes集群名称,非常重要,所有集群需要一个名称
23 node.name: tom01.linux.com 节点名称
33 path.data: /data/es-data
37 path.logs: /var/log/elasticsearch/
43 bootstrap.memory_lock: true 打开,内存使用不会使用swap分区
54 network.host: 0.0.0.0
58 http.port: 9200
67 discovery.zen.ping.multicast.enabled: false #关闭多播
68 discovery.zen.ping.unicast.hosts: [“192.168.56.8”,“192.168.56.9”] 添加节点 并不用全部添加进去,只要让所有集群中的成员能相互认识就可以
vim /etc/security/limits.conf 添加下面内容锁住内存不使用swap
#allow user ‘elasticsearch’ mlockall
elasticsearch soft memlock unlimited
elasticsearch hard memlock unlimited
[root@tom01 ~]# ulimit
启动ES
[root@tom01 ~]# /etc/init.d/elasticsearch start
启动后检查
[root@tom01 ~]# lsof -i :9200
COMMAND PID USER FD TYPE DEVICE SIZE/OFF NODE NAME
java 1734 elasticsearch 91u IPv4 15466 0t0 TCP *:wap-wsp (LISTEN)
查看安装ES版本
[root@tom01 ~]# curl -XGET 192.168.56.7:9200
{
“name” : “tom01.linux.com”,
“cluster_name” : “myes”,
“cluster_uuid” : “YJvxLL3uQf2Gm7sdZRVDIg”,
“version” : {
“number” : “2.4.6”,
“build_hash” : “5376dca9f70f3abef96a77f4bb22720ace8240fd”,
“build_timestamp” : “2017-07-18T12:17:44Z”,
“build_snapshot” : false,
“lucene_version” : “5.5.4”
},
“tagline” : “You Know, for Search”
}
检查
[root@bj01 elasticsearch]# curl -i -XGET ‘http://192.168.56.7:9200/_count?pretty’ -d ’ {
“query”: {
“match_all”: {}
}
}’
HTTP/1.1 200 OK
Content-Type: application/json; charset=UTF-8 类型jeson
Content-Length: 95
{
“count” : 0, 总共0个索引
“_shards” : {
“total” : 0, 分片0个
“successful” : 0, 成功0个
“failed” : 0 失败0个
}
}
安装head插件
[root@tom01 ~]# /usr/share/elasticsearch/bin/plugin install mobz/elasticsearch-head
-> Installing mobz/elasticsearch-head…
Trying https://github.com/mobz/elasticsearch-head/archive/master.zip …
Downloading …
…DONEVerifying https://github.com/mobz/elasticsearch-head/archive/master.zip checksums if available …
NOTE: Unable to verify checksum for downloaded plugin (unable to find .sha1 or .md5 file to verify)
Installed head into /usr/share/elasticsearch/plugins/head
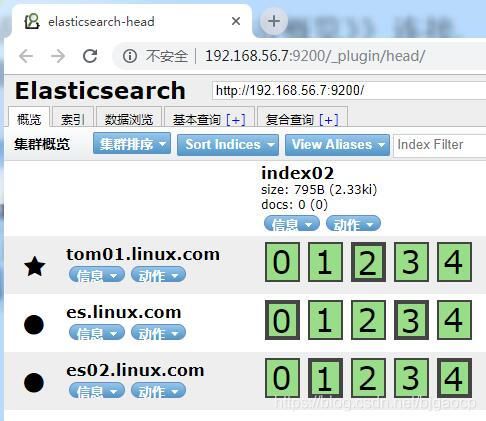
浏览器访问
http://192.168.56.7:9200/_plugin/head/

创建ES集群
集群规划
192.168.56.7 tom01.linux.com
192.168.56.8 es.linux.com
192.168.56.9 es2.linux.com
写入本地hosts
[root@es02 ~]# vim /etc/hosts
在所有的集群节点上安装java和elasticsearch
所有操作按照单机安装一样
vim /etc/elasticsearch/elasticsearch.yml
17 cluster.name: chunpeng 集群名称,非常重要,所有集群内机器需要一个名称
23 node.name: es.linux.com 节点名称
33 path.data: /data/es-data
37 path.logs: /var/log/elasticsearch/
43 bootstrap.memory_lock: true 打开,内存使用不会是用swap分区
54 network.host: 0.0.0.0
58 http.port: 9200
67 discovery.zen.ping.multicast.enabled: false
68 discovery.zen.ping.unicast.hosts: [“192.168.56.7”, “192.168.56.8”, “192.168.56.9”]
注:所有配置都一样 只是节点名称改成各自的
vim /etc/security/limits.conf
#allow user ‘elasticsearch’ mlockall
elasticsearch soft memlock unlimited
elasticsearch hard memlock unlimited
浏览器测试是否成功http://192.168.56.8:9200/
成功之后加入节点
进入刚刚装head插件的web界面点击概览>>连接

关于解决裂脑的几个参数
1.discovery.zen.ping_timeout
2.node.master
3.discovery.zen.minimum_master_nodes
安装监控ES插件
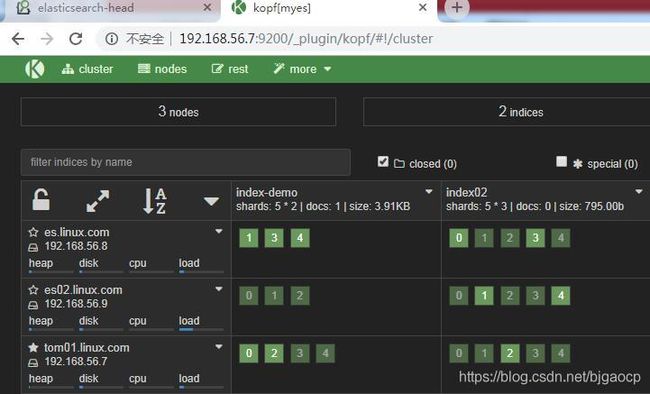
KOPF插件
/usr/share/elasticsearch/bin/plugin install lmenezes/elasticsearch-kopf
http://192.168.56.7:9200/_plugin/kopf/
