EFK 日志系统收集K8s日志 (一)
一、日志收集的需求背景:
• 业务发展越来越庞大,服务器越来越多
• 各种访问日志、应用日志、错误日志量越来越多
• 开发人员排查问题,需要到服务器上查日志,效率低、权限不好控制
• 运维需实时关注业务访问情况
二、容器特性给日志采集带来的难度:
• K8s弹性伸缩性:导致不能预先确定采集的目标
• 容器隔离性:容器的文件系统与宿主机是隔离,导致日志采集器读取日志文件受阻
三、应用程序日志记录分为两类:
• 标准输出:输出到控制台,使用kubectl logs可以看到 (比如nginx 的日志就是输出到控制台)
• 日志文件:写到容器的文件系统的文件(比如tomcat的日志就是写入到容器中的文件系统的文件)
四、Kubernetes应用日志收集
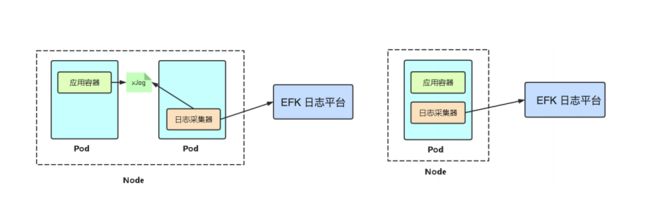
针对标准输出:以DaemonSet方式在每个Node上部署一个日志收集程序,采集/var/lib/docker/containers/目录下所有容器日志
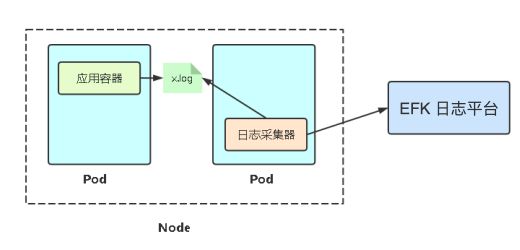
针对容器中日志文件:在Pod中增加一个容器运行日志采集器,使用emtyDir共享日志目录让日志采集器读取到日志文件
五、EFK Stack日志系统
[外链图片转存失败,源站可能有防盗链机制,建议将图片保存下来直接上传(img-47FnrAqR-1614917359807)(http://jpg.fxkjnj.com/soft/kubernetes/ELK-2.png)]
EFK 是三个开源软件的缩写,提供一套完整的企业级日 志平台解决方案。
分别是:
• Elasticsearch:搜索、分析和存储数据

• Filebeat :是本地文件的日志数据采集器,可监控日志目录或特定日志文件,并将它们转发给Elasticsearch或Logstatsh进行索引、kafka等

• Kibana:数据可视化
六、部署ES 单点+ filebeat + kibana 实现Kubernetes应用日志收集
1、集群信息
| 主机名 | IP地址 | 节点信息 |
|---|---|---|
| Master | 192.168.31.61 | master 节点 8核8G |
| Node-1 | 192.168.31.63 | node 节点 8核12G |
| Node-2 | 192.168.31.66 | node 节点 8核12G |
| Node-3 | 192.168.31.67 | node 节点 8核12G |
| NFS | 192.168.31.100 | nfs 存储节点 8核12G |
2、软件版本
| 软件名 | 版本 | 备注 |
|---|---|---|
| kubernetes | v1.18.6 | |
| Elasticsearch | v7.9.2 | 单点 |
| Filebeat | v7.9.2 | |
| Kibana | v7.9.2 | |
| Nfs-client-provisioner | v1.2.8 | 动态PV |
3、部署NFS 服务
#   创建 NFS 存储目录
mkdir -p /home/elk
#   安装nfs服务
yum -y install nfs-utils rpcbind
#   修改配置文件
echo "/home/elk *(rw,sync,no_root_squash,no_subtree_check)" >> /etc/exports
#   启动服务
systemctl start nfs && systemctl start rpcbind
#   设置开机启动
systemctl enable nfs-server && systemctl enable rpcbind
4、集群所有节点都要安装nfs-utils
yum -y install nfs-utils

#记住,所有节点都要安装nfs-utils,否则无法使用pv
5、部署动态PV
5.1、创建NFS 动态PV专属命名空间
[root@master-1 ~]# kubectl create ns nfs
namespace/nfs created
5.2、使用Helm 部署nfs-client-provisioner
注意事项:
		(1)、nfs-client-provisioner部署到刚刚创建的nfs命名空间下
		(2)、storageClass.name #指定storageClassName名称,用于 PVC 自动绑定专属动态 PV 上
		(3)、需要指定NFS服务器的IP 地址(192.168.31.100),以及共享名称路径(/home/elk)
#添加helm charts repo
[root@master-1 es-single-node]# helm repo add helm-stable https://charts.helm.sh/stable
[root@master-1 es-single-node]# helm repo update

cat >  elastic-client-nfs.yaml << EOF
# NFS 设置
nfs:
  server: 192.168.31.100
  path: /home/elk
storageClass:
  # 此配置用于绑定 PVC 和 PV
  name: elastic-nfs-client

  # 资源回收策略
#主要用于绑定的PVC删除后,资源释放后如何处理该PVC在存储设备上写入的数据。
#Retain:保留,删除PVC后,PV保留数据;
#Recycle:回收空间,删除PVC后,简单的清除文件;(NFS和HostPath存储支持)
#Delete:删除,删除PVC后,与PV相连接的后端存储会删除数据;(AWS EBS、Azure Disk、Cinder volumes、GCE PD支持)
  reclaimPolicy: Retain
# 使用镜像
image:
  repository: kubesphere/nfs-client-provisioner
# 副本数量
replicaCount: 3
EOF

#helm 部署 nfs-client-provisioner
[root@master-1 es-single-node]# helm install elastic-nfs-storage -n nfs --values elastic-client.yaml helm-stable/nfs-client-provisioner --version 1.2.8
5.3、查看 nfs-client-provisioner Pod 运行状态
[root@master-1 es-single-node]# kubectl get pods -n nfs
NAME                                                          READY   STATUS    RESTARTS   AGE
elastic-nfs-storage-nfs-client-provisioner-78c7754777-8kvlg   1/1     Running   0          28m
elastic-nfs-storage-nfs-client-provisioner-78c7754777-vtpn8   1/1     Running   0          28m
elastic-nfs-storage-nfs-client-provisioner-78c7754777-zbx8s   1/1     Running   0          28m
6、部署单节点Elasticsearch数据库
6.1、创建EFK 专属命名空间
[root@master-1 es-single-node]# kubectl create ns ops
namespace/ops created
6.2、创建elasticsearch.yaml
cat >  elasticsearch.yaml  << EOF
apiVersion: apps/v1
kind: Deployment
metadata:
  name: elasticsearch
  namespace: ops
  labels:
    k8s-app: elasticsearch
spec:
  replicas: 1
  selector:
    matchLabels:
      k8s-app: elasticsearch
  template:
    metadata:
      labels:
        k8s-app: elasticsearch
    spec:
      containers:
      - image: elasticsearch:7.9.2
        name: elasticsearch
        resources:
          limits:
            cpu: 2
            memory: 3Gi
          requests:
            cpu: 0.5
            memory: 500Mi
        env:
          - name: "discovery.type"
            value: "single-node"
          - name: ES_JAVA_OPTS
            value: "-Xms512m -Xmx2g"
        ports:
        - containerPort: 9200
          name: db
          protocol: TCP
        volumeMounts:
        - name: elasticsearch-data
          mountPath: /usr/share/elasticsearch/data
      volumes:
      - name: elasticsearch-data
        persistentVolumeClaim:
          claimName: es-pvc

---

apiVersion: v1
kind: PersistentVolumeClaim
metadata:
  name: es-pvc
  namespace: ops
spec:
#指定动态PV 名称
  storageClassName: "elastic-nfs-client"
  accessModes:
    - ReadWriteMany
  resources:
    requests:
      storage: 10Gi

---

apiVersion: v1
kind: Service
metadata:
  name: elasticsearch
  namespace: ops
spec:
  ports:
  - port: 9200
    protocol: TCP
    targetPort: 9200
  selector:
    k8s-app: elasticsearch
EOF

[root@master-1 es-single-node]# kubectl apply -f elasticsearch.yaml
deployment.apps/elasticsearch create
persistentvolumeclaim/es-pvc create
service/elasticsearch create
6.3、查看elasticsearch pod,service 运行状态
[root@master-1 es-single-node]# kubectl get pod -n ops -l k8s-app=elasticsearch
NAME                            READY   STATUS    RESTARTS   AGE
elasticsearch-97f7d74f5-qr6d4   1/1     Running   0          2m41s


[root@master-1 es-single-node]# kubectl get service -n ops
NAME                 TYPE        CLUSTER-IP   EXTERNAL-IP   PORT(S)             AGE
elasticsearch        ClusterIP   10.0.0.126           9200/TCP            2m41s
7、部署kibana 可视化展示
7.1、创建kibana.yaml
cat >  kibana.yaml  << EOF
apiVersion: apps/v1
kind: Deployment
metadata:
  name: kibana
  namespace: ops
  labels:
    k8s-app: kibana
spec:
  replicas: 1
  selector:
    matchLabels:
      k8s-app: kibana
  template:
    metadata:
      labels:
        k8s-app: kibana
    spec:
      containers:
      - name: kibana
        image: kibana:7.9.2
        resources:
          limits:
            cpu: 2
            memory: 4Gi
          requests:
            cpu: 0.5
            memory: 500Mi
        env:
          - name: ELASTICSEARCH_HOSTS
#指定elasticsearch的servicesname,记得加上命名空间.ops
            value: http://elasticsearch.ops:9200
          - name: I18N_LOCALE
            value: zh-CN
        ports:
        - containerPort: 5601
          name: ui
          protocol: TCP

---
apiVersion: v1
kind: Service
metadata:
  name: kibana
  namespace: ops
spec:
  type: NodePort
  ports:
  - port: 5601
    protocol: TCP
    targetPort: ui
    nodePort: 30601
  selector:
    k8s-app: kibana
EOF


[root@master-1 es-single-node]# kubectl apply -f kibana.yaml
deployment.apps/kibana create
service/kibana create
7.2、查看kibana pod,service 运行状态
[root@master-1 es-single-node]# kubectl get pod -n ops -l k8s-app=kibana
NAME                      READY   STATUS    RESTARTS   AGE
kibana-5c96d89b65-zgphp   1/1     Running   0          7m

[root@master-1 es-single-node]# kubectl get service -n ops
NAME                 TYPE        CLUSTER-IP   EXTERNAL-IP   PORT(S)             AGE
kibana               NodePort    10.0.0.164           5601:30601/TCP      7m
7.3、查看kibana dashboard
输入kibana 地址: http://nodeIP:30601
[外链图片转存失败,源站可能有防盗链机制,建议将图片保存下来直接上传(img-UHVvqpXP-1614917359809)(http://jpg.fxkjnj.com/soft/kubernetes/ELK-4.png)]
8、日志收集
8.1、收集容器标准输出日志
大致思路:
以DaemonSet方式在每个Node上部署一个Filebeat 的日志收集程序的Pod,采用hostPath 方式把 /var/lib/docker/containers 挂载到Filebeat 容器中,/var/lib/docker/containers 目录下的就是每个容器标准输出的日志
8.1.1 创建 filebeat-kubernetes.yaml
cat >  filebeat-kubernetes.yaml << EOF
---
apiVersion: v1
kind: ConfigMap
metadata:
  name: filebeat-config
  namespace: ops
  labels:
    k8s-app: filebeat
data:
  filebeat.yml: |-
    filebeat.config:
      inputs:
        # Mounted `filebeat-inputs` configmap:
        path: ${path.config}/inputs.d/*.yml
        # Reload inputs configs as they change:
        reload.enabled: false
      modules:
        path: ${path.config}/modules.d/*.yml
        # Reload module configs as they change:
        reload.enabled: false

    output.elasticsearch:
      hosts: ['elasticsearch.ops:9200']
---
apiVersion: v1
kind: ConfigMap
metadata:
  name: filebeat-inputs
  namespace: ops
  labels:
    k8s-app: filebeat
data:
  kubernetes.yml: |-
    - type: docker
      containers.ids:
      - "*"
      processors:
        - add_kubernetes_metadata:
            in_cluster: true
---
apiVersion: apps/v1
kind: DaemonSet
metadata:
  name: filebeat
  namespace: ops
  labels:
    k8s-app: filebeat
spec:
  selector:
    matchLabels:
      k8s-app: filebeat
  template:
    metadata:
      labels:
        k8s-app: filebeat
    spec:
      serviceAccountName: filebeat
      terminationGracePeriodSeconds: 30
      containers:
      - name: filebeat
        image: elastic/filebeat:7.9.2
        args: [
          "-c", "/etc/filebeat.yml",
          "-e",
        ]
        securityContext:
          runAsUser: 0
          # If using Red Hat OpenShift uncomment this:
          #privileged: true
        resources:
          limits:
            memory: 200Mi
          requests:
            cpu: 100m
            memory: 100Mi
        volumeMounts:
        - name: config
          mountPath: /etc/filebeat.yml
          readOnly: true
          subPath: filebeat.yml
        - name: inputs
          mountPath: /usr/share/filebeat/inputs.d
          readOnly: true
        - name: data
          mountPath: /usr/share/filebeat/data
        - name: varlibdockercontainers
          mountPath: /var/lib/docker/containers
          readOnly: true
      volumes:
      - name: config
        configMap:
          defaultMode: 0600
          name: filebeat-config
      - name: varlibdockercontainers
        hostPath:
          path: /var/lib/docker/containers
      - name: inputs
        configMap:
          defaultMode: 0600
          name: filebeat-inputs
      # data folder stores a registry of read status for all files, so we don't send everything again on a Filebeat pod restart
      - name: data
        hostPath:
          path: /var/lib/filebeat-data
          type: DirectoryOrCreate
---
apiVersion: rbac.authorization.k8s.io/v1
kind: ClusterRoleBinding
metadata:
  name: filebeat
subjects:
- kind: ServiceAccount
  name: filebeat
  namespace: ops
roleRef:
  kind: ClusterRole
  name: filebeat
  apiGroup: rbac.authorization.k8s.io
---
apiVersion: rbac.authorization.k8s.io/v1
kind: ClusterRole
metadata:
  name: filebeat
  labels:
    k8s-app: filebeat
rules:
- apiGroups: [""] # "" indicates the core API group
  resources:
  - namespaces
  - pods
  verbs:
  - get
  - watch
  - list
---
apiVersion: v1
kind: ServiceAccount
metadata:
  name: filebeat
  namespace: ops
  labels:
    k8s-app: filebeat
EOF

[root@master-1 es-single-node]# kubectl apply -f filebeat-kubernetes.yaml
configmap/filebeat-config create
configmap/filebeat-inputs create
daemonset.apps/filebeat create
clusterrolebinding.rbac.authorization.k8s.io/filebeat create
clusterrole.rbac.authorization.k8s.io/filebeat create
serviceaccount/filebeat create
8.1.2 查看Filebeat pod 运行状态
[root@master-1 es-single-node]# kubectl get pods -n ops -l k8s-app=node-exporter
NAME                  READY   STATUS    RESTARTS   AGE
node-exporter-j72cb   1/1     Running   10         13d
node-exporter-k6d7v   1/1     Running   10         13d
node-exporter-vhgns   1/1     Running   10         13d
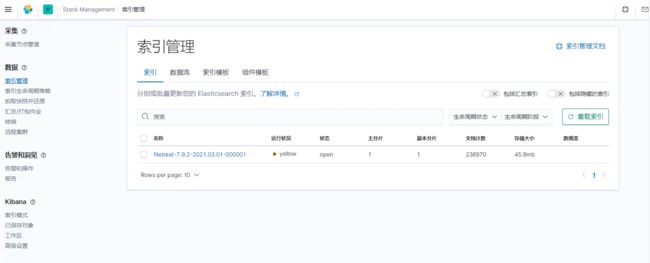
8.1.3 登陆kibana 管理索引, 添加索引模式
索引管理:
(一般只要有数据入到ES中就会有索引出现 ,如果没有出现可以试着访问下业务使其产生日志输出到ES中)
点击左边的 Stack Management 中的 索引管理 可以看到一个名词为filebeat-7.9.2-2021.03.01-000001的索引,状态为open
添加索引模式:
点击左边的 Stack Management 中的索引模式,创建索引模式
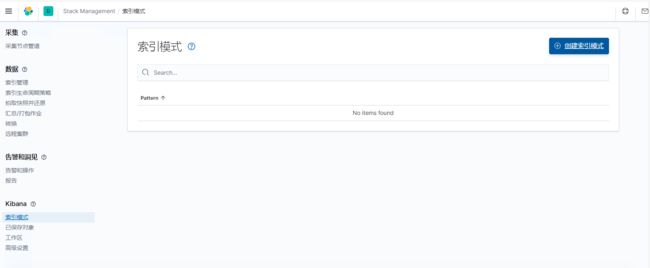
输入索引模式名称: filebeat-7.9.2-*
表示可以匹配到上面的索引 filebeat-7.9.2-2021.03.01-000001
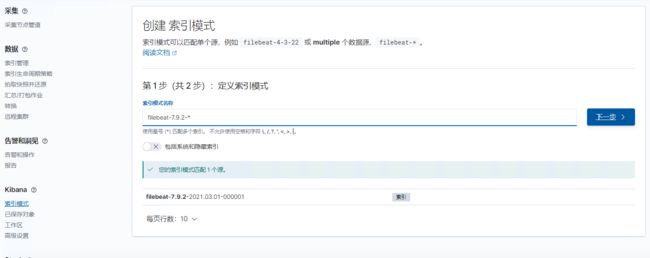
选择@timestamp 时间字段

[外链图片转存失败,源站可能有防盗链机制,建议将图片保存下来直接上传(img-KBR3baQm-1614917359818)(http://jpg.fxkjnj.com/soft/kubernetes/ELK-11-1.png)]
8.1.4 启动一个nginx 的Pod,验证日志数据
cat >  app-log-stdout.yaml  << EOF
apiVersion: apps/v1
kind: Deployment
metadata:
  name: app-log-stdout
spec:
  replicas: 3
  selector:
    matchLabels:
      project: stdout-test
      app: nginx-stdout
  template:
    metadata:
      labels:
        project: stdout-test
        app: nginx-stdout
    spec:
      containers:
      - name: nginx
        image: nginx
---
apiVersion: v1
kind: Service
metadata:
  name: app-log-stdout
spec:
  ports:
  - port: 80
    protocol: TCP
    targetPort: 80
  selector:
    project: stdout-test
    app: nginx-stdout
EOF


[root@master-1 es-single-node]# kubectl apply -f app-log-stdout.yaml
deployment.apps/app-log-stdout created
service/app-log-stdout created
8.1.5 查看nginx pod,service 状态
[root@master-1 es-single-node]# kubectl get pods -l app=nginx-stdout
NAME                              READY   STATUS    RESTARTS   AGE
app-log-stdout-76fb86fcf6-cjch4   1/1     Running   0          2m34s
app-log-stdout-76fb86fcf6-wcfqm   1/1     Running   0          2m34s
app-log-stdout-76fb86fcf6-zgzcc   1/1     Running   0          2m34s

[root@master-1 es-single-node]# kubectl get service
NAME             TYPE        CLUSTER-IP   EXTERNAL-IP   PORT(S)   AGE
app-log-stdout   ClusterIP   10.0.0.167           80/TCP    2m41s
kubernetes       ClusterIP   10.0.0.1             443/TCP   63d
8.1.6 访问nginx 的Pod 使其产生nginx 日志
[root@node-1 ~]# curl 10.0.0.167
Welcome to nginx!
Welcome to nginx!
If you see this page, the nginx web server is successfully installed and
working. Further configuration is required.
For online documentation and support please refer to
nginx.org.
Commercial support is available at
nginx.com.
Thank you for using nginx.
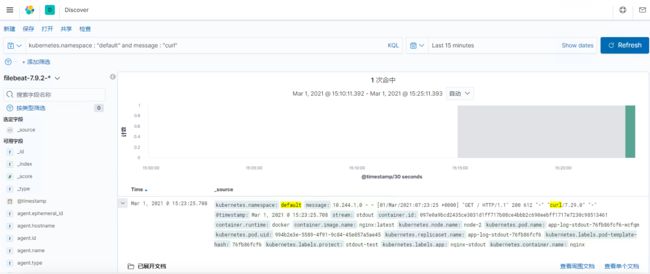
8.1.7 登陆kibana dashboard 检索nginx 日志
检索的语句: kubernetes.namespace : “default” and message : “curl”
可以看到有1个 日志被命中了
本文版权归 飞翔沫沫情 作者所有,欢迎转载,但未经作者同意必须保留此段声明,且在文章页面明显位置给出 原文链接 如有问题, 可发送邮件咨询,转贴请注明出处:https://www.fxkjnj.com/?p=2705
本人博客: https://fxkjnj.com