spring源码一次成功的编译及错误记录
spring官方github上的源码是gradle编译的。记录一下成功编译的路程并且记录一些坑。
版本工具:spring5.1.3x ,gradle4.9,jdk1.8.0_201,Intellij IDEA
1,首先需要安装gradle,安装的版本如果是5*以上的版本,后面编译会出现“Could not find property ‘classesDir’ on source set main”的提示,这是由于这个参数在5.0以后的版本已经被remove,变成了“classesDirs”,因此不建议用太高的版本。
在官网下载https://gradle.org/releases/,解压到本地文件夹后,配置环境变量:添加GRADLE_HOME变量-D:\WORKTOOL\gradle-4.9,path中增加%GRADLE_HOME%/bin;即可。添加完成后进入解压目录,输出cmd进入命令行 gradle -v查看是否配置成功。gradlew.bat可以实行编译,也可以在idea里面导入项目后进行编译。
2,spring源码可以去github上下载自己需要的版本,然后解压到指定文件夹
![]()
上图用红框圈出来的几个文件要重点关注下:-
- build.gradle 放了一些依赖配置,有点像maven的pom文件
- gradle.properties 存放当前Spring的版本,可以对比下看看是不是5.0.8版本
- gradlew.bat 放的是项目的构建脚本,不过在本章用不上,本章是使用IDEA去构建
- import-into-idea.md 这个是Spring导入IDEA的说明文件,可以根据里面的步骤去导入
import-into-idea.md 文件打开以后,需要注意几点:
a,因为其他项目需要依赖spring-core和spring-oxm,所以我们导入后需要先编译这两个包
b,spring-aspects需要依赖三方jar(精通aop的应该知道spring-aop和aspectj的关系,在使用注解方式实现spring-aop的时候,需要导入aspectj的jar,有兴趣的可以去查阅下官方文档aop相关文档),这里编译可能会报错,不影响我们编译使用,我们先不处理
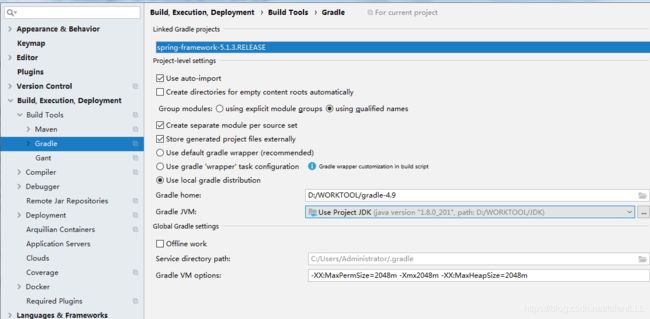
c,使用工具编译时,可能会出现内存溢出情况,这里我们编译时需要增加相关参数
-XX:MaxPermSize=2048m -Xmx2048m -XX:MaxHeapSize=2048m
3,idea导入该项目,选择gradle项目导入,并做一些配置
配置完成后,打开打开docs.gradle文件,注释掉dokka和asciidoctor两个配置项,因为这个版本的源代码在我本地构建过程中执行这两个任务时会导致构建失败,这两个任务主要是用来生成文档使用,对主流程并没有任何影响,可以直接忽略,当然如果大家本地没有这个问题,也可以不注释。
然后在gradle的构建脚本,只针对Linux系统做了适配,需要把task schemaZip替换成下面代码,因为原有代码的路径符号“/”是针对Linux的,windows使用会有问题,在windows环境需要替换成"\\",否则会出现如下异常:
* What went wrong:
Failed to capture snapshot of input files for task ':distZip' property 'rootSpec$1$3' during up-to-date check.
> Failed to create MD5 hash for file 'D:\repository\spring-framework-5.0.8.RELEASE\build\distributions\spring-framework-5.0.8.RELEASE-schema.zip'
替换代码
task schemaZip(type: Zip) {
group = "Distribution"
baseName = "spring-framework"
classifier = "schema"
description = "Builds -${classifier} archive containing all " +
"XSDs for deployment at http://springframework.org/schema."
duplicatesStrategy 'exclude'
moduleProjects.each { subproject ->
def Properties schemas = new Properties();
subproject.sourceSets.main.resources.find {
it.path.endsWith("META-INF\\spring.schemas")
}?.withInputStream { schemas.load(it) }
for (def key : schemas.keySet()) {
def shortName = key.replaceAll(/http.*schema.(.*).spring-.*/, '$1')
assert shortName != key
File xsdFile = subproject.sourceSets.main.resources.find {
it.path.endsWith(schemas.get(key).replaceAll('\\/','\\\\'))
}
assert xsdFile != null
into (shortName) {
from xsdFile.path
}
}
}
}
4.根据import-into-idea.md文档步骤去构建
根据import-into-idea.md文档里面介绍,我们需要对spring-core和spring-oxm做预编译,可以通过以下命令./gradlew :spring-oxm:compileTestJava,在IDEA比较简单,对这两个包分别按下图操作即可:![]()
5.终极构建Spring项目
最后一步,对整个Spring项目构建,这个时候它会自动下载依赖包,如果有异常,会在控制台抛出并停止操作。
![]()
